How to Remove Chipped Paint and Restore Smooth Surfaces
You can remove chipped paint and restore a smooth surface by scraping loose flakes, sanding edges smooth, and cleaning dust for good adhesion. Test the paint type and substrate, treat rust or stains, then apply the right primer and sealers. Fill holes, sand between filler coats, feather new paint into the old, and use thin topcoats for a seamless finish. Follow safety steps and prep tips, and if you keep going you’ll learn troubleshooting and pro-level techniques.
Quick Fix: Remove Chipped Paint in 5 Steps
1 quick, careful pass can make a chipped paint patch look whole again. You’ll scrape loose flakes, sand edges smooth, clean dust, apply primer where needed, and feather new paint to blend.
Tackle each step deliberately so chipped paint won’t reappear, and the surface restoration looks seamless.
Finish by checking for texture differences and touch up tiny imperfections.
Tool & Safety Checklist for Paint Repair
Before you start, gather the right personal protective equipment—gloves, goggles, and a respirator—so you won’t breathe dust or get chemicals on your skin.
You’ll also need essential tools like scrapers, sandpaper, a wire brush, and quality touch-up paint.
Finally, prep the workspace by clearing the area, laying drop cloths, and ensuring good ventilation.
Personal Protective Equipment
Personal protective equipment (PPE) keeps you safe while you remove chipped paint, so gather gloves, eye protection, a respirator rated for paint and lead dust, and disposable coveralls before you start.
Follow safety guidelines and use protective gear properly: check fit, replace contaminated items, and keep work areas ventilated.
- snug nitrile gloves
- sealed goggles
- NIOSH-rated respirator
Essential Repair Tools
Gather a compact set of tools and safety items you’ll use throughout the repair to work efficiently and stay protected. You’ll need scrapers, sandpaper, filler, brushes, and PPE; follow repair techniques and tool maintenance to guarantee consistent results.
| Item | Purpose | Safety |
|---|---|---|
| Scraper | Remove loose paint | Gloves |
| Sandpaper | Smooth edges | Mask |
| Filler | Patch chips | Ventilation |
| Brushes | Finish coats | Eye protection |
| Cloth | Clean surfaces | Disposal bags |
Workspace Preparation Steps
Start by clearing and lighting a dedicated work area so you can move freely and see fine details; lay down drop cloths, set up a stable work surface, and position a bright, adjustable lamp to eliminate shadows.
You’ll organize tools, check safety gear, and gather cleaning supplies. Keep workspace organization tight to prevent contamination and accidents.
- Gloves, mask, goggles
- Sandpaper, scraper, putty knife
- Rags, solvent, bucket
Is This Repair DIY-Friendly or Pro-Level?
Wondering if you can tackle chipped paint yourself or if you should call a pro?
You’ll weigh DIY Challenges like tool skill, time, and surface complexity against cost.
If layers, rust, or structural damage appear, seek Professional Insights for lasting results.
Choose DIY for small, straightforward chips with patience; hire pros for extensive, risky, or time-sensitive restorations.
Test the Surface and Paint Type First
Before you scrape or sand, test the surface and identify the paint type so you know what prep and products will work best.
You’ll perform surface testing to see adhesion, porosity, and existing finish. Confirm paint compatibility before choosing stripper, primer, or new paint.
- Rub a hidden spot with solvent
- Scratch a tiny area for adhesion
- Note sheen and texture for matching
Contain and Protect Nearby Surfaces
While you remove loose paint, contain the work area so dust, chips, and chemicals don’t spread to floors, furniture, or landscaping.
Use drop cloths, plastic sheeting, and painter’s tape for surface protection. Seal vents and cover nearby plants.
Employ masking techniques around trim, fixtures, and hardware to keep edges clean. Secure coverings with weights or tape and check seals periodically to prevent contamination.
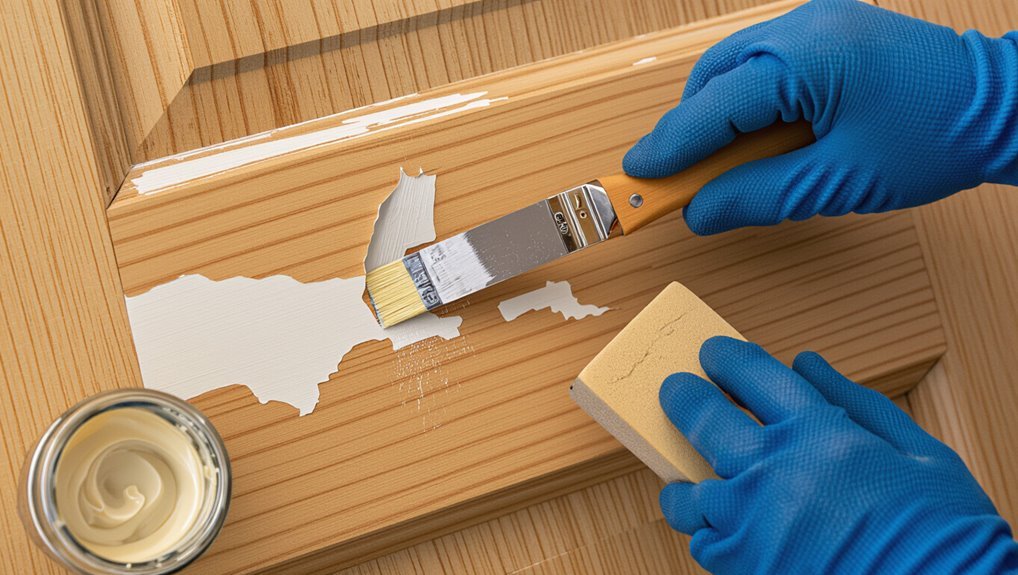
Remove Loose Paint With a Scraper
Pick a scraper that matches your surface—use a flexible blade for trim and a stiff one for flat boards—to avoid gouging.
Hold the scraper at a low angle and push with steady, controlled strokes so you remove loose paint without damaging the substrate.
Wear gloves and eye protection, and keep the removed chips contained for easy cleanup.
Proper Scraper Selection
Choose a scraper that matches the paint type and surface—metal or heavy-duty plastic blades for exterior or thick layers, and a flexible plastic or putty knife for delicate trim—so you remove loose paint efficiently without gouging the substrate.
Pick by scraper materials and blade shapes to match contours, avoid damage, and speed work.
- Jagged rusted metal blade scraping old flake
- Thin flexible blade hugging trim seams
- Wide stiff blade clearing flat siding
Safe Scraping Technique
Now that you’ve matched your scraper to the job, you can start removing loose paint with control and care.
Hold the scraper at a low angle, push smoothly along the grain, and avoid gouging. Use short strokes, pause to inspect the substrate, and switch blades when dull.
These scraping techniques are essential for effective surface preparation and for creating a clean, paint-ready base.
When (And How) to Use Heat or Chemical Strippers
1 reliable rule: use heat or chemical strippers when paint is thick, multiple layers are present, or scraping alone risks damaging the substrate.
You’ll pick based on substrate, ventilation, and chemical safety; control heat application to avoid burns or warping. Use respirators, gloves, and test a small area first.
- bubbling paint peeling away
- fumes lifting layers
- softened film scraping clean
Sand for a Smooth, Feathered Edge
Pick a sandpaper grit that matches how much paint and damage you need to remove so you won’t gouge the surface.
Sand with the grain to keep the wood or metal looking consistent and to avoid visible scratches.
Blend the old paint edge into the surrounding finish until it’s smooth and feathered for a seamless repaint.
Choose The Right Grit
Choosing the right sandpaper grit matters because it determines how smoothly you’ll blend the chipped area into surrounding paint. You’ll focus on grit selection and surface compatibility to avoid gouges.
Pick coarser grits for heavy edges, medium for feathering, fine for finishing.
Visualize the result:
- A softened chip edge fading into intact paint
- Gentle, even curves across the repair
- Smooth, paint-ready surface
Sand With The Grain
While you sand, move the paper with the wood or surface grain so the repair blends smoothly into the surrounding finish; this prevents visible cross-grain scratches and gives you a feathered edge that’s easy to repaint.
Use appropriate sanding techniques for the material, adjust pressure for different wood types, and check frequently.
Work evenly, keep grit progression consistent, and stop when the surface looks uniform.
Blend Edges Smoothly
Once the loose paint’s removed, sand out from the repair toward the intact finish so the damaged area tapers into a smooth, feathered edge; this makes the new coat sit evenly and hides the shift.
You’ll use fine grit, check contours, and prep for color blending and precise edge finishing.
- Soft, sloping shift
- Light, even strokes
- Invisible seam ready for paint
Repair Holes and Gouges With the Right Filler
If you’ve got holes or deep gouges in your drywall or wood, pick a filler that matches the material and the size of the damage so the repair holds and sands smoothly.
Choose among filler types—spackle, joint compound, wood filler, or epoxy—then follow proper application techniques: clean, layer, compress, and feather edges.
Sand between coats and prime before painting.
Match and Recreate Surface Texture
Before you repaint, match the existing texture so the repair disappears into the surrounding surface.
If the wall has a clear pattern, you can create a custom texture with patching compound and tools like knives, brushes, or spray cans.
Finish by feathering and blending the edges so the repaired area merges smoothly into the original finish.
Match Existing Texture
When you’re repairing chipped paint, matching the existing texture is just as important as matching color to keep the patch invisible; take time to study the surrounding surface so you can recreate its pattern and scale accurately.
Use texture matching techniques and surface blending methods to feather edges, mimic grain, and adjust relief.
- stippled popcorn-like bumps
- subtle brushstroke ridges
- fine orange-peel finish
Create Custom Texture
Start by studying the surrounding finish closely so you can recreate the texture’s scale, rhythm, and depth—this guides your choice of tools and materials (spray gun, brush, roller, or trowel) and the technique you’ll use to apply the patch.
Use custom design techniques: test on scrap, match paint sheens, adjust compound consistency, and layer small passes to mimic textured finishes until the surface reads uniform.
Feather And Blend
With the texture matched and your patch built up, you’ll now feather and blend the edges so the repair disappears into the surrounding finish.
You’ll use feathering techniques and subtle blending methods to soften shifts, sanding lightly and stippling or brushing to mimic grain.
Work gradually, viewing from different angles to judge texture and sheen until the repair reads as original.
- light sanding strokes
- gentle stipple brush
- soft directional blending
Primer Selection by Substrate: Wood, Metal, Drywall, Masonry
Because each surface soaks up and bonds with paint differently, you’ll need to match your primer to the substrate—wood, metal, drywall, or masonry—to guarantee adhesion, durability, and a uniform finish. Choose wood primer for tannin control, metal primer for rust inhibition, drywall primer for sealing, masonry primer for porosity. Compare adhesion qualities and surface compatibility:
| Substrate | Primer Type | Benefit |
|---|---|---|
| Wood | wood primer | Seal/tannin control |
| Metal | metal primer | Rust protection |
| Drywall/Masonry | drywall primer / masonry primer | Seal/porosity control |
How to Apply Primer for Adhesion and Stain Blocking
Now that you’ve matched the primer to your substrate, focus on how you apply it to guarantee strong adhesion and effective stain blocking.
Use correct primer types and crisp application techniques: clean surface, thin coats, sanding between. Apply evenly, seal stains with a blocking primer, and let dry fully before topcoat.
- Smooth brush strokes across grain
- Thin roller passes for even lay
- Feathered edges to avoid lap marks
Choose Paint Finish and Color-Match Tips
When you pick a finish, think about durability and how much it will highlight surface flaws; flat hides imperfections, satin and eggshell resist scrubbing, and semi-gloss or gloss stand up best in high-traffic or wet areas.
Test paint finish samples on the repaired spot, view in different light, and use small chips for accurate color matching.
Keep notes of brand and formula for future touch-ups.
Repaint for Seamless Touch-Ups and Full Coverage
If you want touch-ups that disappear, repaint carefully so new paint blends with old in texture, sheen, and color.
Sand, prime, and feather edges so repairs sit flat; use color matching tools and compatible paint finishes for uniform look.
Apply thin coats, overlapping slightly, and inspect under good light to catch differences early.
- feathered edges
- subtle overlap
- matched sheen
Cure Time, Recoat Windows, and Touch-Up Timing
After you’ve blended and feathered your repair, let the paint cure fully before attempting any recoat or handling; curing affects adhesion, sheen, and how well touch-ups disappear.
Check manufacturer curing times and monitor paint drying by touch and appearance.
Follow recoat schedules to avoid lifting. Space touch up intervals so underlying layers harden; rushed recoats cause visible seams and poor durability.
Stop Rust and Moisture to Prevent Future Peeling
Because rust and trapped moisture keep breaking paint’s bond, you need to eliminate both before you seal and repaint.
Remove corrosion, dry surfaces thoroughly, and apply rust inhibitors. Install moisture barriers where water collects and guarantee ventilation.
Eliminate corrosion, dry surfaces completely, apply rust inhibitors, add moisture barriers, and ensure proper ventilation.
Visualize prevention:
- A dry, warm crawlspace with sealed seams
- Scraped metal treated with primer and rust inhibitor
- A painted window sill with a clear moisture barrier
Troubleshooting: Blisters, Cracks, and Re-Peeling Fixes
If you’re seeing blisters, cracks, or areas that’re peeling again, start by identifying any moisture sources that may be undermining the paint.
Make sure you prepare the surface correctly—strip loose material, sand smooth, and clean thoroughly before you touch up.
Finally, recoat and seal with the right primer and topcoat to lock out moisture and prevent the problem from returning.
Identify Moisture Sources
When you’re tracking down recurring blisters, cracks, or re-peeling paint, start by locating moisture sources—plumbing leaks, roof failures, poor ventilation, or ground-level water intrusion are the usual suspects.
You’ll use moisture detection and set humidity control targets; inspect hidden cavities, exterior grading, and vents. Check visual clues and feel for dampness.
- Dripping pipe behind drywall
- Condensation on window frames
- Saturated soil at foundation
Proper Surface Preparation
Start by removing all loose paint and damaged substrate so new coatings can bond to a stable surface.
Scrape, sand, and dust thoroughly, using appropriate surface cleaning techniques to remove grease, mildew, and salts.
Repair cracks and blisters with compatible fillers, sand smooth, then prime.
Follow recommended paint application methods to guarantee even coverage and prevent future peeling.
Recoat And Seal Techniques
Address blistering, cracks, and re-peeling by removing loose material, feathering edges, and applying compatible primers and sealers so the new coat bonds uniformly to the substrate.
You’ll use recoat techniques that guarantee adhesion, inspect for moisture, and choose proper seal application to prevent future failure.
- Scrape and sand to smooth shifts.
- Spot-prime exposed areas.
- Apply even sealer coats, drying fully.
Cost-Saving DIY Tips and When to Hire a Pro
1 smart approach to fixing chipped paint yourself is to prioritize prep and small repairs that save the most money: scrape loose flakes, sand edges smooth, spot-prime bare areas, and use matching touch-up paint in thin layers.
Choose cost effective materials, buy quality tools, and work methodically.
Get professional estimates when damage is extensive, lead is suspected, or uneven surfaces persist beyond your skills.
Maintenance Checklist to Keep Restored Surfaces New
Keep a simple, regular routine to protect your repaired paint and prevent chips from reappearing. You’ll do surface upkeep with light cleaning, quick touch-ups, and routine inspections to catch problems early.
Visualize caring for the finish:
- Wipe dust and grime with a soft cloth and mild soap.
- Spot-prime and repaint tiny nicks within days.
- Inspect seams and edges monthly for moisture or cracking.
Frequently Asked Questions
Can I Use Leftover Interior Paint on Exterior Surfaces?
You can, but you shouldn’t: interior paint has lower paint durability and isn’t formulated for weather. If you must, do rigorous surface preparation, prime with an exterior primer, and expect reduced longevity compared to proper exterior paint.
How Long Should I Wait Before Placing Objects on a Freshly Painted Surface?
You’ll usually wait 24–48 hours for full drying time before object placement, though paint can be touch-dry in a few hours; test a hidden spot first, and longer in cool, humid conditions to avoid sticking.
Will Painting Over Lead-Based Paint Disturb Hazardous Dust?
Yes — you’ll disturb hazardous dust if you paint over lead-based paint without precautions. Use lead safety practices, contain dust with plastic sheeting and negative pressure, wet-clean surfaces first, and follow regulatory guidance to minimize exposure.
Can I Use a Power Washer to Remove Loose Paint?
You can use a power washer to remove loose paint, but you should weigh paint removal techniques and follow power washer safety—use low pressure, test a small area, wear respirator and containment, and avoid disturbing lead paint dust.
What Temperature and Humidity Are Best for Painting Outdoors?
You’ll want ideal weather: moderate temperature, not too hot or cold—around 50–85°F—and humidity under 70% for outdoor painting. You’ll avoid rapid drying, condensation, and guarantee paint cures evenly for lasting results.
Conclusion
You’ve got the basics to remove chipped paint and restore smooth surfaces, but test first: sanding will never fix paint that’s failing from trapped moisture or incompatible layers. Try a small patch—if new paint still peels, the problem’s deeper (rust, moisture, or wrong primer). That’s good to know: a quick scrub isn’t always enough. If the test sticks, proceed; if it fails, stop and address the root cause or call a pro to avoid repeating the work.