How to Remove Oil Based Paint: Effective Removal Methods
You’ll start by identifying why you’re removing oil‑based paint—small repairs, full strip, or prep for new coatings—then pick safety, prep, and a method. Ventilate, wear gloves, goggles and a respirator, and test paint type and adhesion. Use chemical strippers for detailed work, mechanical abrasion for heavy layers, then sand progressively and dispose of waste safely. Watch for lead, avoid shortcuts, and plan time; keep going to learn step‑by‑step techniques and product choices.
Identify Why You Need to Remove Oil‑Based Paint
Before you start, figure out exactly why you’re removing the oil‑based paint—are you fixing peeling or blistering, updating the color, correcting a bad finish, or preparing the surface for a different coating like latex?
Once you know the paint removal necessity, assess substrates, hazards, and time.
Acknowledge oil paint challenges like adhesion, solvents needed, and potential fumes so you can choose an appropriate, safe removal method.
Quick Decision: Repair, Restore, or Fully Strip
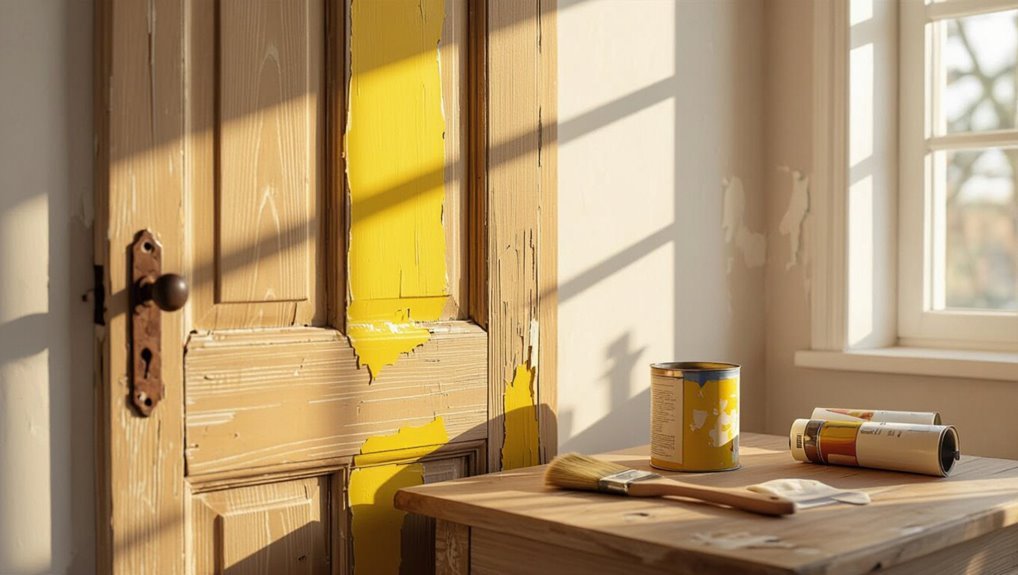
Look at the surface closely to assess the extent of damage—small chips or surface yellowing can often be repaired, while peeling or multiple layers usually need more work.
Weigh how much time you can spend versus the outcome you want, since full stripping takes far longer than spot repairs or light restoration.
That quick assessment will steer you to repair, restore, or fully strip.
Assess Damage Extent
If you’ve got flaking, peeling, or thick uneven layers of oil-based paint, you need to quickly decide whether to spot-repair, restore the surface, or fully strip it—each option saves different amounts of time and effort.
Inspect paint finishes and surface textures closely: note adhesion, substrate damage, and contamination. Measure affected area and depth.
Choose repair for small spots, restoration for moderate wear, stripping for severe failure.
Evaluate Time Cost
Start by estimating how many hours each option will take—repairing small spots, restoring worn areas, or fully stripping back to bare substrate—and factor in cure and cleanup time so you don’t get surprised.
You’ll weigh time investment against results: quick repairs save hours but may need repeats; full stripping demands more labor now.
Do a clear cost analysis to decide which path fits your schedule and budget.
Safety First: Ventilation, PPE, and Fire Hazards
Because oil-based paint removers and solvents release strong fumes and are often flammable, you’ll want to prioritize ventilation, proper personal protective equipment (PPE), and careful handling to prevent inhalation, skin exposure, and accidental fires.
Use ventilation techniques like cross-breezes and exhaust fans, wear gloves, goggles, and respirators, store solvents in sealed metal containers, and keep ignition sources and open flames well away.
Tools and Supplies Checklist for Oil‑Based Paint Removal
Now that you’ve addressed ventilation, PPE, and fire risks, gather the right tools and supplies so the job goes smoothly and safely.
You’ll need scrapers, wire brushes, sanding blocks, respirator, chemical-resistant gloves, drop cloths, and containers.
Include solvents or removers for paint removal techniques, brushes, and rags.
Consider eco friendly options like citrus-based strippers and biodegradable cleanup products to reduce hazards.
How to Test Paint Type and Adhesion Before You Start
Before you start stripping, you’ll want to identify whether the coating is oil‑based or latex so you choose the right remover.
Test a small area with mineral spirits or denatured alcohol—if the finish softens or comes off, it’s likely oil‑based.
Also press a fingernail or a putty knife edge at the seam to check adhesion; flaky or easily lifted paint needs more aggressive prep.
Identify Paint Type
Want to know whether the paint on your surface is oil-based or water-based and if it’ll come off cleanly? Use simple paint identification methods: inspect sheen, tack, and smell; oil paint characteristics include strong gloss, solvent scent, and slow drying.
Check adhesion by scoring a small hidden area and trying gentle pressure; note flakes or firm bonding before proceeding.
Perform Solvent Test
Having identified likely oil-based paint and checked adhesion, you should confirm both with a simple solvent test. Dampen a cloth with mineral spirits; rub discreet area. If paint softens, it’s oil-based.
Note solvent effectiveness and test different solvents for paint compatibility.
Steps:
- Choose solvent.
- Wear gloves.
- Rub small area.
- Observe reaction and dry time.
Check Paint Adhesion
Once you’ve identified the paint type, check adhesion to make sure the coating’s still firmly bonded to the surface before you start removal; loosely adhered paint will need scraping or stripping while well-adhered paint may only require spot treatment. Use simple paint adhesion techniques and adhesion testing methods like tape, score, and peel to decide your approach.
| Method | Tool | Result |
|---|---|---|
| Tape test | Tape | Peel |
| Cross-cut | Knife | Flakes |
| Scrape | Putty knife | Hold |
Immediate Options: Fast Fixes for Small Oil‑Paint Spills
If you catch a small oil‑paint spill right away, you can usually stop it from staining with a few quick steps:
- Blot excess with paper towels — don’t rub.
- Sprinkle absorbent (cat litter) to lift fresh paint; wait, then sweep.
- Apply mild dish soap and warm water, blotting gently.
- Use solvent sparingly on a hidden spot.
Focus on spill management and cleanup techniques.
Choose Chemical Solvents or Mechanical Removal: A Decision Guide
You’ll weigh chemical solvents’ speed and effectiveness against their fumes, toxicity, and surface compatibility.
For tougher or large-area jobs, mechanical removal like sanding or scraping can avoid harsh chemicals but needs more labor and may damage substrates.
Consider paint thickness, surface type, safety gear, and disposal rules to pick the best method.
Chemical Solvent Pros/Cons
While mechanical methods like sanding can work, chemical solvents often offer a faster, less labor-intensive way to dissolve oil-based paint — but they come with trade-offs you should weigh carefully.
You’ll consider solvent effectiveness, solvent safety, environmental impact, application technique, odor control, residue management, compatibility issues, and cost comparison.
- Effectiveness vs risk
- Safety precautions
- Disposal/environment
- Proper application
Mechanical Removal Considerations
Assess your project’s scope and constraints before choosing mechanical removal over solvents: consider surface type, paint thickness, access, dust control, noise limits, and available tools.
You’ll weigh sanding techniques versus scraping methods, matching grit and blade choice to substrate.
Plan containment, PPE, and waste disposal.
For delicate or detailed work, opt for gentler abrasion; for robust surfaces, use power tools with proper dust extraction.
Mineral Spirits: What It Removes and When to Use It
Because mineral spirits dissolve the binders in oil-based paints, they’re one of the first solvents you’ll reach for when removing wet or tacky paint, thinning oil-based primers, or cleaning brushes and rollers after a job.
Mineral spirits cut through oil-based binders, perfect for removing wet paint, thinning primers, or cleaning brushes and rollers.
You’ll appreciate mineral spirits benefits for light cleanup; consider mineral spirits alternatives for stronger or low-odor needs.
- Wet paint
- Tacky spots
- Brushes/rollers
- Thin primers
Turpentine vs Mineral Spirits: Pick the Right Solvent
If you’re deciding between turpentine and mineral spirits, focus on what matters most: performance, smell, and safety. You’ll weigh turpentine benefits (stronger odor, plant-derived) against mineral spirits’ milder scent and predictable solvent effectiveness. Use appropriate cleaning techniques, test surfaces, and ventilate.
| Feature | Notes |
|---|---|
| Odor | Turpentine strong |
| Effectiveness | Both effective |
| Safety | Spirits milder |
| Use | Test first |
Paint Thinner Blends: Pros, Cons, and Common Uses
When you’re choosing a paint thinner blend, weigh the trade-offs between strength, odor, and safety to match the job and workspace conditions.
You’ll consider paint thinner advantages and paint thinner disadvantages; choose blends for specific paint thinner applications or opt for paint thinner alternatives if ventilation or sensitivity’s an issue.
- Strength
- Odor
- Safety
- Use case
Commercial Paint Strippers: Types and Active Ingredients
Although commercial paint strippers vary widely in form and strength, they all rely on a few core active ingredients to break down coatings so you can remove them quickly. You’ll weigh commercial strippers by active ingredients, safety considerations, application techniques, environmental impact, cost comparison, effectiveness ratings, and user reviews to pick what fits your project.
| Type | Ingredient | Emotion |
|---|---|---|
| Gel | NMP | Relief |
| Paste | Methanol | Caution |
| Citrus | d-Limonene | Hope |
| Solvent | Methylene chloride | Fear |
Apply Liquid Paint Stripper Safely and Effectively
Pick a stripper formulated for the surface and paint type so you get effective results without damaging the substrate.
Wear gloves, eye protection, and a respirator if the product label recommends it, and work in a well-ventilated area.
Apply the remover in controlled sections, follow dwell times exactly, and neutralize or clean the surface as instructed.
Choose Appropriate Stripper
Because different oil-based paints and surfaces demand different chemistry, you’ll want to match the stripper to the job before you buy anything.
Choose stripper types based on substrate and finish, and plan application techniques for coverage and dwell time.
Consider:
- Solvent-based for stubborn coatings
- Caustic for thick layers
- Bio-based for delicate surfaces
- Gel for vertical work
Follow Safety Precautions
Now that you’ve matched the stripper to the surface and coating, focus on safety before you apply any liquid paint remover.
Wear chemical-resistant gloves, eye protection, and a respirator rated for solvents. Work outdoors or ventilate well, contain spills, and keep ignition sources away.
Read labels and follow disposal rules to minimize paint safety risks and prevent removal hazards for you and the environment.
Use Gel and Paste Strippers on Vertical Surfaces
Apply gel or paste strippers when you’re working on vertical surfaces where liquid strippers would just run off; these thicker products cling to walls, doors, and furniture so the active chemicals can penetrate multiple paint layers without dripping.
For vertical surfaces, choose gel or paste strippers—they cling and penetrate multiple paint layers without running off.
Use gel application for controlled coverage and rely on paste effectiveness for stubborn coatings.
Steps:
- Test small area
- Apply evenly
- Wait recommended time
- Scrape gently
Caustic (Alkaline) Strippers: When to Use and Precautions
When you need to strip multiple thick oil-based layers or work on bare wood that can tolerate strong chemicals, caustic (alkaline) strippers are often the fastest option.
You’ll need full PPE—gloves, eye protection, and good ventilation—and be careful to avoid skin or respiratory contact.
After use, neutralize residues per the product instructions and follow local disposal rules to protect surfaces and the environment.
When To Choose
If you’re stripping multiple coats of oil-based paint from bare wood or heavily built-up finishes, caustic (alkaline) strippers can be the most effective option because they break down and swell old paint quickly; however, you’ll need to follow safety precautions and test a small area first to avoid surface damage.
Use them when:
- You face thick, aged coatings.
- You need fast penetration.
- Mechanical methods fail.
- You understand best practices and common challenges.
Safety Precautions
Having decided that a caustic stripper is the right tool for thick, stubborn oil-based coats, you’ll need to follow strict safety precautions because these alkaline products can harm skin, eyes, and finishes if mishandled.
Wear full safety gear—chemical-resistant gloves, goggles, respirator, and apron. Work in ventilation, keep neutralizers and clear emergency procedures handy, and never leave the product unattended near children or pets.
Neutralizing And Disposal
Because caustic strippers keep reacting until they’re neutralized, you need to stop them immediately after they’ve lifted the paint.
Use proper neutralizing agents, rinse thoroughly, and follow safe disposal methods.
Steps:
- Wear PPE.
- Apply neutralizer per label.
- Collect rinsate in sealed containers.
- Contact local hazardous-waste facility for approved disposal methods and documentation.
Using Citrus, Soy, and Bio‑Based Solvent Alternatives
When you want a less toxic way to strip oil‑based paint, citrus, soy, and other bio‑based solvents offer effective, lower‑odor alternatives to traditional mineral spirits and methylene chloride.
You’ll appreciate citrus solvents benefits like reduced fumes and easier cleanup; soy based alternatives dissolve alkyds gently.
Test a small area, follow label directions, wear gloves, and ventilate to guarantee safe, effective stripping.
When Eco‑Friendly Removers Work: And When They Don’t
If you’re dealing with light to moderate oil‑based paint on trim, furniture, or other small projects, eco‑friendly removers can do a great job with less odor and toxicity than traditional strippers.
You’ll see eco friendly effectiveness with patience; try natural alternatives on thin layers.
Consider:
- Test a small area
- Allow extra dwell time
- Use scraping gently
- Repeat as needed
Remove Oil Paint From Brushes Without Ruining Bristles
You’ll want to start by picking the right solvent — mineral spirits or a commercial brush cleaner that’s recommended for oil paint — so you don’t damage the bristles.
Work the solvent through the hairs gently, then wash with warm soapy water to remove residue.
Finally, reshape and condition the bristles while they dry to restore their tip and spring.
Choose The Right Solvent
Because solvent choice determines how well your brushes clean and how long the bristles last, pick one that matches the paint and bristle type.
Know common solvent types and proper application techniques to avoid damage. Consider:
- Mineral spirits — gentle, versatile
- Turpentine — strong, fast
- Brush cleaner — formulated, safe
- Citrus solvent — milder, eco-friendly
Use gloves and ventilate.
Clean And Restore Bristles
Start by removing excess paint with a cloth or paper towel, then work from the ferrule outward so you don’t splay the bristles.
Rinse in mineral spirits, then wash with warm soapy water and a brush comb to realign fibers.
Repeat cleaning techniques until solvent runs clear.
Squeeze out water, reshape bristles, and hang or lay flat to dry for proper bristle care.
Remove Oil Paint From Clothing and Fabrics: Step‑by‑Step
If fresh oil paint lands on your clothes, act fast: blot off excess with a clean cloth, then gently scrape away any dried crust with a spoon or dull knife so you don’t push pigment deeper into the fibers.
Choose methods by fabric types, prioritize stain prevention, then follow steps:
- Pretreat with solvent.
- Blot, don’t rub.
- Launder hot if safe.
- Repeat as needed.
Remove Oil Paint From Wood Without Harming the Finish
Wood surfaces can usually be cleaned of oil paint without damaging the finish if you use the right solvents and gentle techniques; work slowly, test in an inconspicuous spot, and proceed from least to more aggressive methods to protect the wood’s sheen.
You should try mild solvents, citrus-based or gel alternative paint removers, soft scrapers and fine steel wool, then restore with approved wood preservation techniques and a gentle polish.
Strip Oil Paint From Metal Safely
When you strip oil paint from metal, start by prepping the surface—clean, degrease, and protect nearby areas.
Choose a chemical stripper suited for metal and ventilation, or plan mechanical methods like sanding, scraping, or media blasting for tougher layers.
We’ll compare safety, effectiveness, and cleanup so you can pick the right approach.
Surface Preparation Steps
Start by clearing the work area and putting on proper PPE—gloves, goggles, and a respirator rated for solvents—so you can strip oil paint from metal safely and without unnecessary exposure.
Prepare the metal surface with these steps:
- Remove loose paint and rust.
- Degrease for surface cleaning.
- Sand to promote paint adhesion.
- Wipe with solvent and dry thoroughly.
Chemical Stripper Options
Now that the metal is clean, degreased, and sanded, it’s time to choose a chemical stripper to remove the oil-based paint. You’ll pick based on paint age, metal type, and ventilation.
Prioritize chemical stripper safety: wear gloves, eye protection, and respirator.
Consider eco friendly alternatives like soy or citrus-based strippers for less toxic fumes, then test a small area before full application.
Mechanical Removal Techniques
Tackle the paint mechanically by choosing the right tool and technique for your metal and the paint’s condition; hand-sanding, wire brushing, and power tools each have roles depending on reach, rust, and thickness.
Use sanding techniques and scraping methods safely, wear PPE, and protect surrounding finishes.
- Manual sanding
- Wire brushing
- Orbital sander
- Needle scaler
Remove Oil Paint From Drywall and Plaster Without Damage
Removing oil-based paint from drywall or plaster requires patience and a gentle touch so you don’t gouge the surface or loosen paper and skim coat layers.
You’ll test solvents on an inconspicuous spot, use minimal solvent with soft cloths, and scrape gently with a plastic blade.
Follow drywall techniques and plaster care: slow, small-area work, light sanding, spot priming, and repainting as needed.
Remove Oil Paint From Concrete, Stone, and Masonry
Start by evaluating the surface and the paint: concrete, stone, and masonry absorb oil-based paint differently, so you’ll choose methods based on porosity, paint thickness, and nearby finishes.
For effective oil paint removal and concrete preparation, follow steps:
- Dry scrape and test solvent.
- Apply commercial stripper.
- Use pressure wash or rotary brush.
- Rinse, neutralize, and seal pores.
Remove Oil Paint From Glass and Glazed Ceramics
Start by softening the oil paint on glass or glazed ceramics with a suitable solvent you trust, like mineral spirits or a commercial paint remover rated for glass.
Once the paint loosens, gently scrape with a plastic razor blade or putty knife to avoid scratching the surface.
Wipe the area clean with a lint-free cloth and a little solvent, then rinse with soapy water to remove residue.
Soften Paint With Solvent
Loosen stubborn oil paint on glass or glazed ceramics by applying a suitable solvent—like mineral spirits, turpentine, or a commercial paint remover—so it softens for easier removal; always test a small, inconspicuous area first and work in a well‑ventilated space while wearing gloves and eye protection.
- Choose solvent types by compatibility.
- Apply sparingly with a cloth.
- Wait for softening time.
- Blot residue, repeat if needed.
Scrape And Clean Gently
Work carefully with a thin razor blade or plastic scraper to lift softened oil paint from glass or glazed ceramics, holding the blade at a low angle to avoid scratching the surface; keep the tool sharp and replace it if it drags.
Use precise scraping techniques, working small areas, then wipe residue with a soft cloth and mild solvent, practicing gentle cleaning until the surface is spotless.
Use a Heat Gun to Soften Oil Paint: Technique and Safety
Aim the heat gun at the painted surface to soften the oil paint so you can scrape it away more easily, but keep the nozzle moving to avoid scorching the substrate or igniting fumes.
Use controlled heat application and strict safety measures.
Follow steps:
- Wear gloves and eye protection.
- Ventilate the area.
- Test a small spot.
- Keep a fire extinguisher nearby.
Sanding Strategies After Paint Removal: Grit, Technique, Timing
Once you’ve removed the bulk of the oil paint, you’ll choose sandpaper grit based on how aggressive the finish still is—start coarse for thick residues, then move finer to smooth.
Use controlled, even strokes and keep the sander flat to avoid gouging, switching to hand sanding for edges and detail.
Wait between sanding steps to wipe away dust and inspect the surface so you don’t seal in imperfections or skip a necessary grit.
Grit Selection Guide
Although you can skip straight to a finer grit for light scuffing, choosing the right sandpaper grit after removing oil-based paint makes the difference between a smooth prep and visible scratches.
You’ll balance grit types with sanding methods and timing. Choose based on surface condition:
- 80–100 for heavy removal
- 120–150 for smoothing
- 180–220 for final prep
- 320+ for ultra-fine finishes
Sanding Technique Tips
Start by matching your sanding approach to the job: pick the coarsest grit that removes remaining paint without gouging the substrate, then work progressively finer to erase scratches and feather edges.
Use proper sanding techniques: keep the pad flat, sand with the grain, apply even pressure, and check progress frequently.
For grit selection, step up numbers to smooth changes and prevent visible swirl marks.
Timing Between Steps
If you want smooth, consistent results, plan the timing between sanding steps so each grit has time to clear dust and settle before you move finer.
You’ll use timing strategies and set application intervals to avoid clogging and overworking the surface.
- Start coarse, wait for dust to settle.
- Vacuum and tack wipe.
- Move to medium, pause again.
- Finish fine, inspect.
Neutralize Chemicals and Clean Residue After Stripping
After stripping oil-based paint, neutralize any leftover chemicals right away to prevent surface damage and make cleanup safer.
You’ll want to follow the stripper’s instructions for neutralizers or use a mild acid or alkaline rinse as recommended for the product you used.
Use neutralization techniques like buffered solutions, rinse thoroughly, and scrub with nonabrasive pads.
Finish with residue cleaning using clean water and lint-free cloths.
Dispose of Solvents, Rags, and Waste Legally and Safely
Check your local hazardous waste guidelines before tossing solvents or paint chips, since many communities require drop-off or special handling.
Store used rags in a metal container with a tight lid to prevent unexpected combustion until you can dispose of them properly.
If you’re unsure where to go, contact your local waste authority for approved disposal options and schedules.
Local Hazardous Waste
Because solvents, oily rags, and paint waste can pose serious fire and environmental risks, you need to treat them as hazardous and dispose of them through approved local channels.
Follow local hazardous waste disposal guidelines and don’t guess. Check municipal programs, scheduled drop-offs, or household hazardous waste events.
- Confirm accepted items
- Use sealed containers
- Label contents
- Transport per rules
Proper Rag Storage
Rags soaked with solvents or oil can unexpectedly ignite if you don’t store them correctly, so collect them in a metal container with a tight-fitting lid, never in a plastic bag or open can. You’ll label containers, ventilate storage, and follow local disposal rules for rag organization and storage solutions.
| Item | Action | Frequency |
|---|---|---|
| Wet rags | Seal | After use |
| Drying | Air out | Daily |
| Disposal | Hazard facility | As needed |
| Records | Log | Weekly |
| Inspection | Check | Monthly |
Prevent Surface Damage: Tests and Patch Removals
Before you plunge into full-scale paint removal, do a small test and a patch removal to see how the surface reacts; this tells you whether the cleaner, solvent, or scraper will harm the substrate and lets you adjust technique accordingly.
Use test methods and patch techniques, then:
- Start in an inconspicuous spot.
- Try mild solvent first.
- Check for discoloration.
- Note tool pressure and timing.
Multiple Layers and Lead Paint: Testing and Legal Rules
If your paint job has multiple layers, you’ll need to identify each layer’s age and composition before proceeding—older layers may hide lead or other hazards that change how you remove them. Test for lead, follow lead paint regulations, and plan for multi layer challenges. DIY-safe methods vary; document results and comply with disposal rules.
| Test | Result | Action |
|---|---|---|
| Kit | +/− | Contain |
| Lab | Confirm | Notify |
| Visual | Age | Seal |
| Risk | High | Abate |
When to Hire a Pro for Paint Removal
When the job involves lead, extensive surface damage, complex architectural details, or areas you can’t safely isolate, hire a pro—you’ll save time, reduce health risks, and meet legal requirements.
If lead, major damage, intricate trim, or poor isolation are involved, hire a pro to save time and stay safe.
You should weigh pros and cons and watch for signs of urgency.
Consider hiring when:
- Lead testing confirms contamination
- Structural damage exists
- Intricate trim or moldings present
- Ventilation/isolation is impossible
DIY vs Pro: Cost Factors and Budgeting
Although tackling paint removal yourself can save money upfront, you’ll want to compare true costs—materials, tools, disposal fees, time, and the risk of mistakes—against professional estimates to decide what’s really cheaper.
Tally DIY Cost for supplies, rental equipment, and cleanup.
Then request itemized Professional Pricing.
Decide based on scale, safety, warranty, and whether you value speed over saving.
Time Estimates: How Long Common Removal Methods Take
How long will it take to remove oil-based paint from a surface? You’ll want clear time estimates to plan work and compare method comparisons quickly.
How long to strip oil-based paint? Quick time estimates help you plan and compare removal methods efficiently.
- Heat gun: 30–90 minutes per small area.
- Chemical stripper: 1–4 hours with dwell time.
- Sanding: 2–6 hours for moderate surfaces.
- Infrared: 45–120 minutes, faster on thick layers.
Adjust for size and condition.
Repair Steps After Removal: Fill, Sand, and Finish
With the paint stripped, you’ll need to repair the substrate before refinishing: fill remaining gouges or nail holes, sand smooth, and prepare a clean surface for primer and topcoat. You’ll use appropriate filling techniques, let compound cure, then apply progressive sanding methods. Finish with tack cloths and inspection; touch up low spots before priming.
| Tool | Purpose | Grit |
|---|---|---|
| Putty knife | Apply filler | 80–120 |
| Sandblock | Level surface | 120–220 |
| Cloth | Clean dust | — |
Prepare Surfaces for New Paint After Oil Removal
Start by wiping the repaired surface with a solvent appropriate for oil-based paint—mineral spirits or a dedicated cleaner—to remove any lingering oils, dust, or compound residue so your primer bonds properly.
You’ll focus on surface preparation and priming techniques:
- Degrease thoroughly.
- Sand for tooth.
- Clean dust away.
- Inspect for defects before priming.
Choose Primers and Paints After Oil‑Based Removal
Once you’ve removed the oil-based paint and prepped the surface, pick a primer formulated to block remaining oils and promote adhesion—shellac- or oil-based primers are your safest bets, while high-quality latex bonding primers can work on well-cleaned surfaces; then choose a topcoat compatible with that primer (oil or latex) to guarantee a durable finish.
| Primer types | Paint finishes |
|---|---|
| Shellac | Gloss |
| Latex bond | Satin |
Common Mistakes That Ruin Removal Jobs: And How to Avoid Them
Although removing oil-based paint can feel straightforward, several common mistakes can turn a quick job into a costly redo.
You’ll avoid damage by spotting common pitfalls and using clear prevention strategies. Follow these steps:
- Rushing prep
- Skipping ventilation
- Using wrong solvents
- Neglecting protective gear
Address each item methodically, and you’ll keep projects tidy and safe.
Troubleshooting Stuck Paint and Stubborn Residues
Even with careful prep and the right solvents, you’ll still hit areas where oil-based paint clings or leaves tacky residue.
Inspect surface for strong paint adhesion, then soften with heat or repeated solvent applications. Scrape gently along the grain, wipe away loosened bits, and use a nylon scrub pad for residue removal.
Rinse and recheck; repeat targeted treatment until surface is clean.
Recommended Tools, Strippers, and Solvents (Product Picks)
You’ll want a compact kit of reliable tools and proven solvents to tackle oil-based paint efficiently: a quality chemical stripper (low-VOC where possible), mineral spirits or paint thinner, a citrus-based remover for sensitive substrates, assorted scrapers (metal and plastic), coarse and fine steel wool or nylon scrubbing pads, disposable rags, a heat gun for stubborn spots, and nitrile gloves plus eye protection.
- Pick recommended products tested for safety.
- Prioritize low-VOC strippers.
- Match solvent to substrate.
- Use scrapers, pads, and heat in effective techniques.
Quick Reference: Best Oil‑Based Paint Removal by Surface and Scenario
Wood, metal, glass, and masonry each demand a different approach, so match method to surface and situation before you start.
For wood, use chemical stripper or heat gun, minding paint compatibility and finish.
For wood, match method to finish — chemical stripper or heat gun, and check paint compatibility first.
For metal, abrasive blasting or solvent wipe works.
For glass, razor blades and solvent.
For masonry, pressure washing and eco-friendly stripper to reduce environmental impact.
Choose PPE.
Frequently Asked Questions
Can Oil‑Based Paint Removal Methods Harm Nearby Plants or Landscaping?
Yes — the solvents and strippers you use can harm plant safety and increase environmental impact; you should cover plants, divert runoff, use less toxic products, and clean up promptly to protect landscaping and local ecosystems.
Can I Compost Rags or Materials Contaminated With Oil‑Based Paint?
A gardener once tossed solvent‑soaked rags into a compost bin and ruined the pile. You shouldn’t compost rags contaminated with oil‑based paint; follow paint disposal methods and choose eco friendly alternatives like hazardous‑waste collection.
How Do I Store Leftover Paint Stripper Safely Long‑Term?
Store paint stripper in its original, tightly sealed container, label it clearly, and keep it upright in a cool, ventilated area away from heat and ignition sources. Follow local disposal rules for long term safety.
Will Insurance Cover Damage From DIY Paint Removal Accidents?
A neighbor’s DIY stripping fire cost them money; you’ll often find damage covered if your homeowner policy includes liability coverage and accidental damage extensions, but check limits, exclusions, and practice strict accident prevention to avoid denial.
Can Oil‑Based Paint Fumes Affect Pets Differently Than Humans?
Yes — you’ll notice pets often react faster because pet sensitivity and smaller size increase fume toxicity effects; you’ll see coughing, drooling, lethargy, or seizures sooner, so ventilate, evacuate animals, and get veterinary help promptly.
Conclusion
You’ve got the plan—pick the right method, suit up, and work smart—so removing oil‑based paint won’t feel like wrestling a stubborn stain into submission. Start with small tests, choose the gentlest effective approach, and only escalate to harsher strippers or sanding when needed. Keep ventilation and fire safety front‑of‑mind, dispose of waste properly, and take your time. With patience and the right tools, you’ll reveal the surface beneath like uncovering hidden treasure.