
What Does Peeling Lead Paint Look Like and When Should You Worry?
If your home was built before 1978, assume peeling, chipping, or powdery paint on windows, doors, trim, or baseboards could be lead and get it tested. Look for broad flakes, small fragments, concentric or island-like peeling, dusty/gritty residue on sills, and bright reds or yellows that often held lead. Worry when paint is deteriorating where kids touch or where friction makes dust; act quickly with testing, containment, or certified abatement to protect health — more practical steps follow.
Is This Old Paint Likely to Contain Lead?

How old is the paint and where’s it used? You’ll check lead paint history to assess risk: pre-1978 homes are likeliest, especially on trim, windows, and doors.
Use reliable detection methods—EPA test kits, XRF, or lab analysis—to confirm. Don’t assume age alone; sampling gives definitive answers so you can plan safe remediation or occupancy decisions without guesswork.
Visual Signs: Peeling, Chipping, and Dust to Watch For
Look for flaking paint that peels in broad, layered sheets or that chips into small, powdery fragments, since those patterns can signal older, lead-based coatings.
Check windowsills, door frames, and high-traffic floors for fine dust or gritty residue, which may be lead dust from deteriorating paint.
If you spot these signs, you’ll want to test or get a professional inspection before disturbing the surface.
Flaking Paint Patterns
Flaking paint often gives the clearest early clue that a surface may contain lead — you’ll see small chips, curling edges, or powdery dust where layers separate from wood, metal, or plaster.
Pay attention to flaking patterns and peeling textures: concentric rings, patchy islands, or thin, brittle scales.
If you notice recurring areas or paint coming away easily, don’t ignore it — assess risk and avoid disturbance.
Lead Dust Indicators
Wondering whether that dusty windowsill or chipping stair tread is more than ordinary wear? You should watch for fine powder, smudgy handprints, and stale paint crumbs—signs that increase risk of lead exposure and need dust detection.
- Powder under trim
- Dark streaks on sills
- Crumbs near play areas
Act fast: test, clean with HEPA methods, and limit access.
Where Peeling Lead Paint Shows Up Most (Rooms and Surfaces)
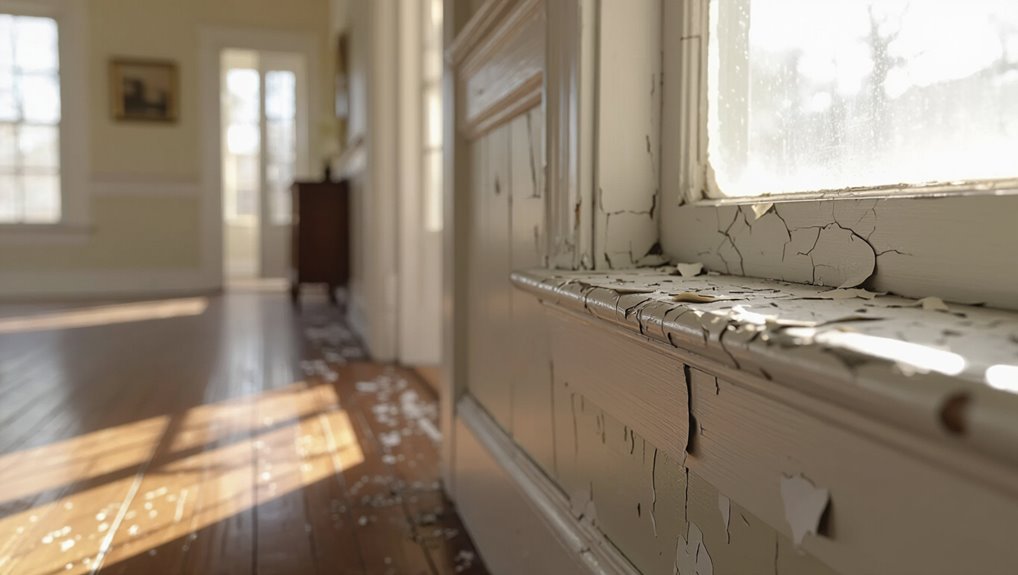
When peeling lead paint appears, it’s most often in high-use rooms and on surfaces that get bumped, rubbed, or opened and closed a lot; you’ll commonly find it on window sills and frames, door and cabinet edges, stair railings, and baseboards where friction and moisture wear the finish away.
Check kitchen walls, children’s rooms and playrooms, exterior surfaces, high traffic areas, window frames, doorways, and basement ceilings.
Paint Colors and Textures That Signal Lead Risk
Watch for cracking or blistering paint and a chalky, powdery residue on surfaces—you’ll often see these textures where old lead-based paint is failing.
Bright, unusual “legacy” colors like vivid reds, yellows, and greens are also a warning sign, since they were commonly made with lead pigments.
If you spot any of these clues, don’t sand or scrape without proper testing and precautions.
Cracking, Blistering Paint
Although peeling paint can look like normal wear, certain colors and textured patterns—like chalky white flaking, powdery yellowing, or bubbling blisters—often signal a higher chance the layers contain lead.
You should watch for cracking paint and blistering surfaces; they indicate moisture or old lead primers.
Act if you see:
- Hairline cracks
- Raised blisters
- Flaking chips
Chalky, Powdery Residue
Chalky, powdery residue on painted surfaces often means the finish is breaking down and could contain lead, so you should take it seriously. You’ll notice a chalky texture and powdery appearance where paint flakes; avoid scraping. Get testing, limit dust spread, and protect kids.
| Fear | Fragile | Fix |
|---|---|---|
| Dust | Tears | Test |
| Worry | Crumb | Seal |
| Kids | Air | Remove |
| Home | Loss | Safe |
Bright, Legacy Colors
Many older homes used bold, high-contrast pigments—think glossy reds, yellows, and turquoise—that often contained lead to help them hold color and sheen.
You should watch for vibrant hues peeling in layers; they signal both aesthetic charm and historical significance.
Check these warning signs:
- Flaking bright topcoats
- Multiple colored layers
- Powdery residue beneath glossy finishes
When Peeling Paint Creates Dangerous Dust and Chips
When old paint peels, it can shed fine dust and chips that carry lead into the air and onto surfaces where you breathe, eat, or touch.
If you see peeling paint or scattered flakes, assume risk and limit access.
Don’t dry-sweep; wet-clean and contain debris.
Avoid dry-sweeping—use wet cleaning and contain debris to prevent spreading lead dust and chips.
Test suspect areas, use protective gear, and hire certified abatement if lead exposure is likely or cleanup is extensive.
Health Risks From Breathing or Swallowing Lead Dust
If you breathe or swallow lead-contaminated dust, it can quickly enter your bloodstream and harm your nervous system, kidneys, and reproductive organs.
You can develop lead poisoning from even small dust exposure events. Watch for symptoms and get testing.
- Cognitive decline
- Gastrointestinal pain
- Fatigue and headaches
Who’s Most at Risk From Lead Paint
Almost anyone can be exposed to lead paint, but young children, pregnant people, and workers who disturb old paint are at highest risk; their bodies absorb lead more readily and even small amounts can cause serious harm.
You should know that vulnerable populations—infants, toddlers, pregnant people, elderly, and renovation workers—face greater lead exposure.
Protecting them means minimizing contact, testing, and seeking professional help promptly.
Three Safe Home Checks You Can Do Now (Don’t Disturb Paint)

You can do three quick, noninvasive checks that help spot lead paint hazards without disturbing any surfaces:
- Visually inspect window sills, trim, and doors for peeling, chipping, or dust accumulation—note locations for a paint assessment.
- Smell for musty or metallic odors near old painted areas during ventilation.
- Wipe floors and surfaces with a damp cloth; test for lead dust using a home kit as part of safe inspections.
When to Stop DIY and Avoid Disturbing the Paint
Noting peeling paint, dust, or a positive home test is a good start, but some signs mean you should stop DIY work and avoid disturbing painted surfaces.
If paint flakes widely, children or pregnant people are present, or you smell dust, pause.
Prioritize DIY precautions: don’t sand, scrape, or vacuum without HEPA.
Call a certified contractor to prevent hazardous paint disturbance.
How Professionals Test for Lead Paint (Methods and Pros/Cons)
Professionals use a few main testing methods—X-ray fluorescence (XRF), lab analysis of paint or dust samples, and surface or wipe tests—each with clear trade-offs in accuracy, cost, and invasiveness.
You’ll see three common Lead Testing Methods and Lead Detection Techniques:
- XRF: fast, noninvasive, pricier.
- Lab analysis: most accurate, slower.
- Wipes: cheap, surface-limited.
What Lead Paint Test Results Mean and Which Levels Matter
When you get lead paint test numbers, you’ll want to know what they actually mean for health and safety.
Compare results to health-based thresholds—like the EPA and HUD standards—to see if action is required.
If levels are above those cutoffs, you’ll need to prioritize containment or removal.
Understanding Test Numbers
Anyone testing for lead paint needs to know what the numbers mean: test results tell you how much lead was found, whether it exceeds safety thresholds, and what actions are recommended.
You’ll see values from different test methods; compare them to local lead regulations and follow prescribed steps.
- Identify sample level
- Check method accuracy
- Follow required actions
Health-Based Thresholds
Because small amounts of lead can still harm children and pregnant people, you should focus on test results that compare measured lead levels to health-based thresholds set for exposure and cleanup.
You’ll learn which values trigger action, how thresholds relate to health risks, and when remediation is required.
Consider both immediate exposure and long-term environmental impact to decide urgency and cleanup scope.
Immediate Actions to Reduce Lead Paint Exposure Before Work
If you’re planning to remove or disturb lead paint, take quick steps to protect people and pets before any work starts:
- Seal work area and close vents; keep kids and pets out.
- Wear PPE, use wet methods and HEPA-filtered vacuuming to limit dust for exposure prevention.
- Bag debris, wash hands/clothes immediately, and post notices so others avoid the zone.
Safe Short-Term Fixes Versus Permanent Remediation Options
You can use temporary containment measures like plastic sheeting and HEPA vacuums to limit dust while you plan next steps.
For short-term stabilization, quick fixes such as sealing flaking areas with encapsulants or smooth coatings can reduce immediate risk.
When you’re ready for a long-term solution, consider permanent abatement options like professional removal, full enclosure, or component replacement.
Temporary Containment Measures
While temporary containment measures can give you immediate protection from peeling lead paint, they’re not a substitute for permanent remediation; think of them as short-term fixes that reduce exposure until a certified abatement is done.
- Install temporary barriers to block access and limit spread.
- Use plastic sheeting and tape for dust containment during work.
- Clean with HEPA vacuums and wet wiping, then schedule professional abatement.
Interim Surface Stabilization
Because interim surface stabilization buys you time but doesn’t eliminate lead hazards, treat these measures as trusted stopgaps until a certified remediation is done.
You should focus on improving paint adherence by cleaning, lightly abrading loose flakes, and using compatible primers. Proper surface preparation minimizes dust and spread, but don’t assume these short-term fixes replace professional testing, containment, or permanent abatement.
Permanent Abatement Choices
Interim surface stabilization can buy time, but you shouldn’t treat it as a final solution.
Once stabilization is in place, it’s time to weigh safe short-term fixes against permanent remediation options. You should choose between temporary containment and long-term permanent solutions like removal or lead encapsulation.
Consider:
- Monitor and maintain.
- Encapsulate when feasible.
- Remove for permanent abatement.
What Certified Lead Abatement Does and What to Expect
When you hire a certified lead abatement contractor, they’ll assess the site, contain the work area, remove or stabilize lead hazards, and verify the space is safe before they leave.
You’ll see certified contractors follow documented abatement processes: sealing, HEPA cleanup, safe waste disposal, and clearance testing.
Expect timelines, clear communication, and containment signage; follow their prep and post-care instructions for safety.
Costs, Funding, and Resources for Low-Income Homeowners
How much will peeling lead paint cost you, and where can you get help if funds are tight?
You’ll find funding options and financial assistance through local assistance programs and community outreach. Check resource availability for home repair grants, loans, or subsidized abatement.
Prioritize certified contractors and documentation.
- Grants
- Low-interest loans
- Volunteer programs
How to Verify Remediation Worked and Prevent Recurrence
After you secure funding and complete abatement, you’ll want to verify the job actually removed the hazard and stop lead from coming back.
Once abatement is done and funded, confirm the hazard’s gone and prevent lead from returning.
Hire a certified inspector for remediation verification with clearance testing (dust, soil, paint).
Keep maintenance records, fix moisture or friction sources, and use safe painting and caulking.
Regularly test high-risk areas to confirm recurrence prevention and protect occupants.
Frequently Asked Questions
Are Pets at Risk From Peeling Lead Paint and How to Protect Them?
Yes — your pets can be at risk from lead exposure; they’ll suffer health effects. For pet safety, keep peeling paint away, clean dust, prevent chewing, test older homes, and follow prevention tips like sealing or professional abatement.
Can Gardening or Soil Near the House Be Contaminated by Lead Paint?
Yes — gardening soil near older painted houses can be contaminated by lead paint chips and dust. You should test for lead exposure risks and get soil testing, remove or cover contaminated soil, and avoid homegrown produce.
How Long Does Lead Dust Remain Hazardous After Disturbance?
Surprisingly, lead dust can linger for months: you’ll face lead exposure and health risks until thorough cleaning removes it, since tiny particles settle into surfaces and carpets and can remain hazardous without professional or repeated cleaning.
Do Landlords Have Legal Obligations About Peeling Lead Paint?
Yes — you’ve got rights: landlords must follow lead paint regulations, disclose hazards, repair peeling paint, and address lead dust. If they don’t, you can enforce tenant rights, request repairs, or seek legal remedies.
Can Renovation Materials (Sanding, New Paint) Release Hidden Lead?
Like a hidden storm, yes — sanding or repainting can release dust from old layers. You’ll face renovation hazards and must follow lead paint safety rules: contain, wet-clean, and use proper PPE or certified abatement to protect occupants.
