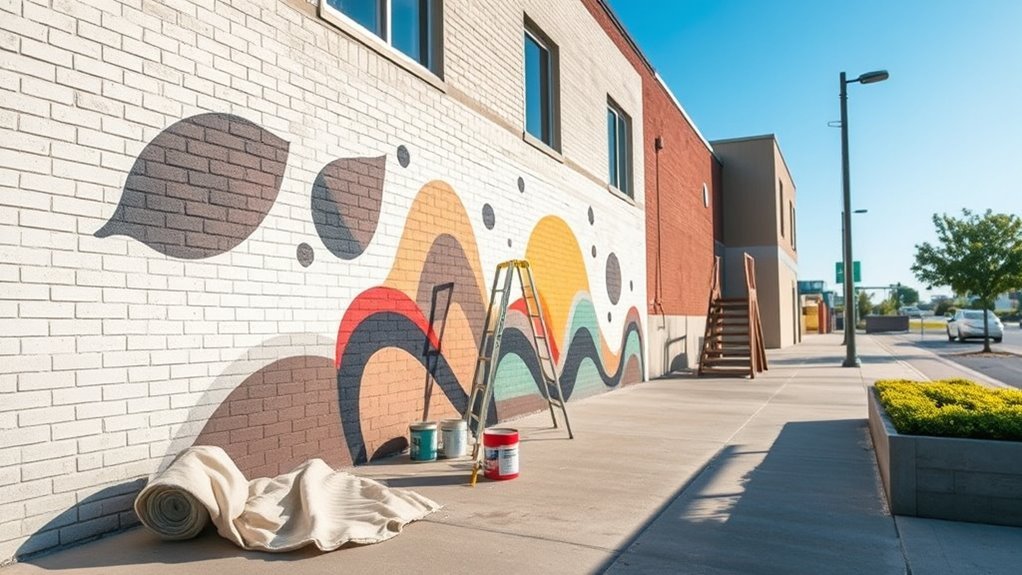
How to Paint Mural on Outside Wall Step-by-Step
You’ll start by evaluating the wall for size, surface condition, and safety, and by getting permission from the owner or city. Develop a clear design that reflects local context, pick durable outdoor paints and tools, and prep the surface by cleaning, repairing, and priming. Transfer the design with guidelines or stencils, paint in layers using brushes, rollers, or spray, then seal and schedule maintenance. Scroll on to get stepwise tips, gear lists, and permit pointers.
Why Paint an Outdoor Mural
You’ll choose colors and forms that guide mood, using mural symbolism to honor history, spark dialogue, or celebrate community identity. You’ll engage passersby, turning ordinary routes into moments of surprise and reflection.
You’ll also increase curb appeal and create landmarks people remember. By planning purposefully, you make art that’s durable, meaningful, and visible—work that serves both aesthetic and communal goals for years.
Who This Mural Guide Is For
Whether you’re a homeowner, business owner, community organizer, or artist—this guide is for you. You’ll get practical steps, safety tips, and creative prompts so you can plan and execute an outdoor mural with confidence.
You’ll learn how color theory informs mood and how mural symbolism can communicate local stories. Use this guide if you want to:
- Develop a design that suits your wall and neighborhood
- Coordinate volunteers or contractors efficiently
- Choose durable paints and prepping methods
- Translate a concept into clear, repeatable steps
You don’t need prior mural experience—just enthusiasm and a willingness to learn.
Mural Process at a Glance: Design to Seal
When you move from concept to finished mural, you’ll follow a clear sequence: site assessment, design development, surface prep, painting, and sealing—each step builds on the last to guarantee durability and visual impact.
You’ll assess light, traffic, and substrate to choose materials that last.
In design development you’ll sketch, test palettes, and apply color theory so tones read correctly at scale.
Surface prep removes dirt and repairs flaws for proper adhesion.
During painting you’ll block shapes, refine details, and respect mural history influences while staying original.
Finally, you’ll seal with a UV and weather-resistant coating to protect your work.
Choose the Right Wall for Your Mural
Before you pick a design, pick the wall: assess its visibility, condition, and context so your mural has the right audience, the right surface, and the right permissions. You’ll want a clean, stable wall that complements your concept; consider light, sightlines, and nearby architecture. Think about color psychology to guarantee your palette reads from a distance and ties into the site.
Study mural history for scale, themes, and techniques that work outdoors. Evaluate texture, moisture, and sun exposure so your paints last. Match your tools and technique to the wall’s demands.
- Visibility and sightlines
- Surface texture and repair needs
- Light and exposure
- Neighborhood character
Get Permission: Permits, Owners, and Neighbors
Because public art changes a space, you’ll need to secure permission from the right people and the proper permits before you roll a single brushstroke.
Start by identifying the property owner and any municipal departments that handle outdoor art; ask about zoning, historic rules, and permit fees. Document the permission process in writing—contracts, insurance, and timelines protect you and the owner.
Talk with nearby residents early to build positive neighbor relations; share sketches, explain maintenance, and note work hours.
Getting formal approval and community buy-in prevents delays, complaints, and legal issues so your mural can proceed smoothly.
Set a Clear Goal and Message for the Mural
If you want your mural to resonate and guide every design choice, define a single clear goal and the core message it’ll communicate. You’ll pick a purpose—celebration, awareness, or identity—and keep message clarity as your north star.
Decide who your audience is, what emotion you want, and which symbols convey that without clutter. Consider color harmony early so hues support tone and readability.
Test a short tagline or sketch with locals to confirm impact. Use feedback to tighten focus; fewer concepts make stronger murals. A disciplined goal prevents mixed signals and guarantees your mural communicates at a glance.
- Identify target audience and emotion
- Pick one central symbol or phrase
- Choose a limited palette for color harmony
- Solicit quick feedback for message clarity
Design for Scale and Context
When you design your mural, pay attention to the building’s lines, materials, and nearby details so the artwork feels like part of the place.
Scale your composition to human sightlines and movement so people can read and relate to it at street level.
Matching architectural rhythm and human scale keeps the mural connected and accessible.
Consider Surrounding Architecture
How will your mural sit within the block? You’ll assess architectural harmony and environmental integration, noting rooflines, materials, and sightlines so the piece guarantees the complement of nearby buildings.
Consider rhythm, color echoes, and vertical or horizontal emphasis that respect façade patterns. Also factor in native plants, pavement, and lighting that shape perception.
- Note window placements and architectural details to avoid conflicts.
- Match mural scale to nearby massing without overpowering structures.
- Use colors and textures that respond to adjacent materials.
- Account for street-level views, approaches, and vistas to ensure cohesion.
Match Human Scale
Because people experience a mural up close and at eye level, design with human scale in mind so your work reads comfortably from typical sightlines. You’ll place focal elements at reachable heights and size figures so faces and gestures resolve without stepping back.
Use color theory to balance contrast and depth at viewer distance; bold hues and simplified forms read better than tiny details.
Consider sightlines from sidewalks and doorways, and align motifs with architectural lines.
Let mural symbolism stay clear: scale affects meaning, so emphasize key icons large enough to register immediately.
Test full-size mockups before committing to paint.
Create a Simple Mural Mockup or Sketch
Although you don’t need perfect artwork, start by sketching a clear, scaled mockup so you can test composition, color balance, and proportions before committing paint to the wall. You’ll draft small thumbnails, then refine a larger sketch on paper or digitally, practicing sketch techniques like contouring and value studies.
Add simple color notes to plan color blending and harmony. Keep shapes bold and readable from distance. Label focal points, scale references, and wall obstacles. Use this mockup to decide materials and timing before transfer.
- Focal point placement
- Value and contrast notes
- Palette swatches and color blending cues
- Scale markers and sightlines
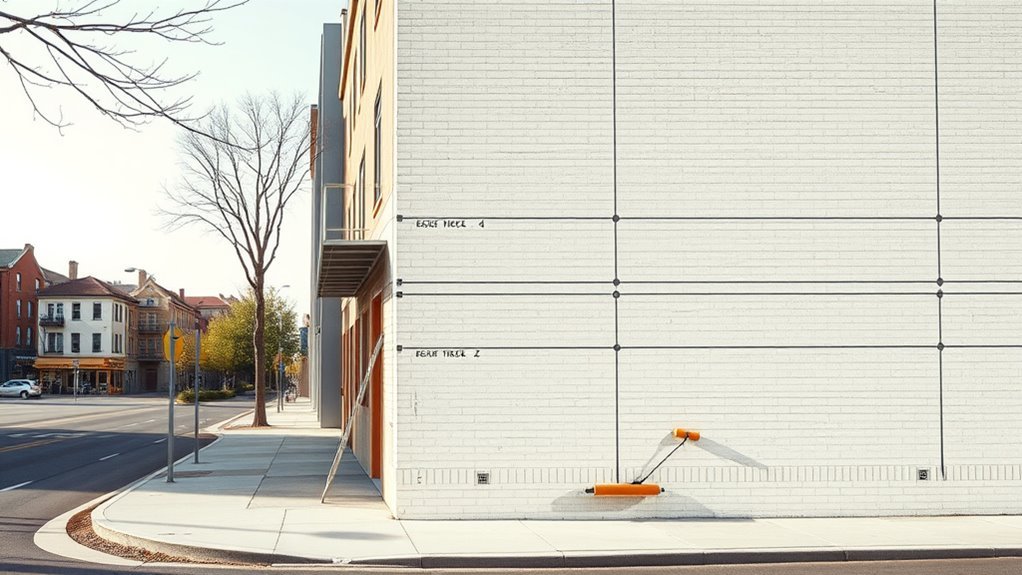
Transfer Art: Projector vs Grid Methods
You’ll choose between a projector, which lets you trace details quickly but can struggle in bright light and needs power, and the grid method, which only needs a tape measure and patience.
With a projector you’ll get fast, accurate outlines but may face shadows, keystone distortion, or equipment limits.
With the grid method you’ll measure and copy each square to scale, giving reliable results without tech.
Projector Pros And Cons
Wondering whether to trace your design with a projector or map it out with a grid? Using a projector speeds placement, preserves fine detail, and helps you check color theory and mural symbolism against the wall at scale.
It’s fast for nighttime work and great for solo artists, but it can struggle in bright daylight, uneven surfaces, or with image distortion.
- Quick setup and precise detail replication
- Works solo; projects full composition instantly
- Sensitive to ambient light and wall texture
- Requires power, careful alignment, and lens adjustments
Weigh speed and fidelity against environmental limits before choosing.
Grid Transfer Steps
How do you break a complex design into manageable squares? You draw a proportional grid on your reference, then scale and mark the same grid on the wall with chalk or washable pencil.
Work square by square, sketching major lines and shapes, checking alignment and proportions as you go. Use light, confident strokes so corrections stay easy.
As you refine, start blocking basic colors informed by color theory to preserve contrast and mood.
Keep mural symbolism clear by placing key symbols on strong grid anchors.
Step back often, adjust scale, and lock in final outlines before painting.
Pick Colors for Outdoor Murals
Before you mix a single shade, think about the wall’s surroundings and the mural’s purpose: natural light, nearby buildings, and the desired mood will all shape your palette. You’ll use color psychology to guide emotional impact and test hue harmony across samples on the wall at different times.
Pick a dominant, two accents, and a neutral to keep contrasts readable from distance. Photograph samples and view them in context.
- Test colors in morning and afternoon light
- Consider local architecture and signage tones
- Confirm contrasts support legibility for text or figures
- Bring small swatches for stakeholder feedback
Choose Weather-Resistant Paint Types
You’ve settled on colors that read well in the light and against nearby architecture; now pick paints that will hold those hues through seasons and storms.
Choose exterior acrylic latex for flexibility and UV resistance, or 100% acrylic for richer pigment permanence tied to your color theory choices.
Opt for exterior acrylic latex for flexibility and UV defense, or 100% acrylic for deeper, longer-lasting pigment.
Use masonry or elastomeric paints on rough or porous walls to prevent moisture damage.
Match finish to detail: satin for easy cleaning, flat for large backgrounds.
Select primers and UV-stable clear coats to protect mural symbolism and contrast.
Test swatches in sun and rain, and follow manufacturer cure times before final sealing.
Estimate Materials, Time, and Budget
Before you start, list the paint, primer, brushes, rollers, tape, and scaffolding you’ll need and estimate quantities based on wall size and coverage rates.
Set a realistic timeframe with buffer days for weather and drying, and schedule work in manageable phases.
Break down costs for materials, labor, permits, and add a contingency (10–20%) for unexpected expenses.
Materials Quantity Estimate
When planning the mural, estimate paint, primer, brushes, rollers, tape, drop cloths, and hardware by measuring wall area and factoring in surface texture and color changes so you can order the right quantities and avoid mid-project runs.
Use your mural mockup and chosen color palette to calculate coverage: note base coats, accent colors, and gradients. Account for porosity, multiple coats, and touch-ups. Buy a little extra—5–10% for waste.
Check hardware sizes for scaffolding and fasteners.
- Calculate square footage and coat counts
- List each color and required liters
- Note primer and sealer needs
- Include replacement brushes and tapes
Timeframe And Scheduling
Estimate the overall schedule by breaking the mural project into clear phases—prep, priming, base coats, detail work, drying times, and sealing—then assign realistic durations and buffer time for each so you can order materials and labor to match. Plan around weather resilience: check forecasts and pick windows with low humidity and mild temps. Allow extra days for color harmony adjustments and unexpected touch-ups. Use this simple timeline:
| Phase | Days | Notes |
|---|---|---|
| Prep/Masking | 1–2 | Clean, repair |
| Priming | 1 | Weather-dependent |
| Base coats | 1–3 | Dry between coats |
| Details/Seal | 2–4 | Final adjustments |
Budget Breakdown And Contingencies
Because unexpected costs and delays happen, build your mural budget around clear line items—materials, labor, equipment rental, permits, and a contingency fund—so you can track spending and adjust quickly. You’ll estimate paint, primers, sealers, brushes, and scaffolding hours, then multiply by vendor rates and add permits.
Use Budget planning to set weekly spending caps and milestones. For Contingency planning, reserve 10–20% for weather, repairs, or design tweaks. Monitor receipts and update forecasts as you go, so surprises don’t derail the project.
- Itemize supplies and quantities
- Calculate hourly labor totals
- Schedule rental durations
- Set a 10–20% contingency fund
Prep Masonry: Clean, Repair, and Prime
Before you lay down any paint, get the masonry clean, sound, and dry so the mural will last—remove dirt, efflorescence, loose mortar, and peeling paint. Repair cracks or spalls, and apply a suitable masonry primer to guarantee adhesion and weather resistance.
Start by washing with a stiff brush and mild detergent or pressure-wash at low setting; let the wall fully dry.
Rake and repoint joints, use a patching mortar for spalls, and seal active cracks.
Test primer compatibility with your chosen mural color on a small area.
Gather appropriate mural tools: wire brush, trowel, masonry primer, and safety gear.
Prep Wood & Siding
Before you start painting a mural on wood or siding, make sure the surface is clean and any loose paint, rot, or damaged boards are repaired or replaced.
You’ll want to sand glossy areas and wash away dirt, mildew, and dust so primer and paint will bond properly.
Finally, apply a suitable exterior primer designed for wood or siding to seal the surface and create a stable base for your mural.
Surface Cleaning And Repair
When you’re prepping wood siding for a mural, start by removing dirt, mildew, peeling paint, and loose caulk so new paint can bond properly.
Inspect for rot, nail pops, and gouges; note wall texture changes and weather impact that caused damage.
Scrub with a mildew cleaner, rinse, and let dry.
Sand rough areas smooth where paint must adhere.
Replace rotten boards, fill gaps with exterior-grade wood filler, and reseat loose trim.
- Check seams and flashing for leaks
- Use a stiff brush for textured surfaces
- Discard soft or crumbling material
- Protect surrounding plants and fixtures
Priming Wood And Siding
If your cleaned siding shows bare wood, patched spots, or fresh caulk lines, prime those areas now so the paint will bond evenly and resist moisture. You’ll do wood preparation by sanding glossy spots, removing dust, and applying a stain-blocking exterior primer to bare or repaired areas. For siding priming, pick a primer compatible with your topcoat and substrate. Work in sections, brush into seams and caulking, then roll for uniform coverage. Let primer dry fully before painting. Use this quick checklist:
| Area | Action |
|---|---|
| Bare wood | Sand + primer |
| Patches/caulk | Prime seams |
Paint on Stucco and Textured Walls
Because stucco and heavily textured walls grab and hide paint differently than smooth surfaces, you’ll need the right prep, tools, and techniques to get crisp lines and full coverage. You’ll clean, patch, and use a high-build primer to fill pores, then choose masonry or acrylic exterior paints.
Use texture techniques like stippling and ragging to work with the surface, and practice color blending for depth without overworking rough areas. Roll with thick-nap rollers, use stiff-bristle brushes for edges, and consider spray for large sections. Test a small area first to confirm adhesion and appearance.
- Clean and patch thoroughly
- Use high-build primer
- Stipple and blend colors
- Roll, brush, or spray as needed
Seasonal & Temperature Painting Rules
Now that you’ve handled texture and priming, you’ll also need to plan around seasons and temperatures to keep your mural looking great. You should follow seasonal considerations: paint in mild, dry months to guarantee adhesion and curing.
Avoid freezing nights, extreme heat, and high humidity; they can ruin finish and drying time. Check forecasts and pick consistent days for base coats and varnish.
Follow temperature guidelines on product labels—most acrylics work best between 50–85°F (10–29°C). If conditions shift, pause work, cover wet areas, or use additives designed for wider temperature ranges to protect your finish.
Select Brushes, Rollers, and Sprayers
When you choose brushes, rollers, and sprayers, match each tool to the scale, texture, and type of paint for the best results. You’ll need purposeful brush selection: use synthetic filaments for acrylics, natural for enamels, and angled brushes for edges.
Pick roller types by nap length—short for smooth, long for rough stucco.
For large areas, a sprayer speeds coverage but practice to control overspray and thinning.
Clean and store tools properly to preserve performance.
- Match brush size to detail level
- Choose roller nap to wall texture
- Test sprayer settings on scrap
- Keep cleaning supplies handy
Safe Ladders & Scaffolding Setups
If you’ll be working above ground level, set up ladders and scaffolding so they’re stable, level, and well-supported before you start painting.
Inspect ladder safety: check feet, locks, and rails; angle ladders at 75 degrees; tie off the top and use a spotter when possible.
For scaffold stability, assemble on firm ground, level each section, and lock braces and planks.
Don’t overload platforms—distribute tools and paint evenly.
Keep access clear and use guardrails on elevated scaffolds.
Move equipment rather than overreaching.
Regularly recheck connections and footing throughout the job to prevent slips or collapses.
Personal Protective Equipment Checklist
You’ve set up your ladder and scaffold correctly, so next make sure you’re protected with the right personal protective equipment (PPE).
For personal safety, choose protective gear that fits, is rated for painting hazards, and stays comfortable during long sessions. Check respirators for filter integrity, wear eye protection against splatter, and use gloves that resist solvents. Keep a high-visibility vest if you’re near traffic.
Choose properly rated, comfortable PPE—check respirator filters, wear splash goggles and solvent-resistant gloves, and use a high-visibility vest when needed.
- NIOSH-rated respirator or mask
- Safety goggles or splash shields
- Chemical-resistant gloves and knee pads
- Non-slip footwear and high-visibility vest
Inspect gear before each use and replace worn items promptly.
Build a Covered Work Area (Weather Shelter)
Pick a shelter spot that keeps you dry, gives good access to the wall, and won’t damage landscaping or nearby structures. Consider temporary roofs like pop-up canopies, poly tarp frames, or scaffold-mounted covers that fit the site and expected weather.
Make sure the option you choose is stable, ventilated, and easy to reposition as you work.
Site Selection Criteria
When weather’s uncertain, build a covered work area so you can paint without worrying about rain, wind, or sun damage to your mural and supplies. Choose a site with good access, stable footing, and room for ladders and scaffolding. Consider sightlines so your color harmony and mural symbolism read correctly from common viewpoints. Check permissions, nearby utilities, and drainage to avoid disruptions. Guarantee power access for tools and lighting.
- flat, stable ground
- clear public sightlines
- legal access and permits
- safe distance from overhead lines
These choices protect your work and streamline painting.
Temporary Roof Options
With a secure site chosen, you’ll want a temporary roof that keeps paint, equipment, and people dry while letting you work comfortably and safely.
Choose a sturdy frame—metal scaffolding, pop-up canopy, or lumber truss—anchored to resist wind. Use durable tarps or corrugated panels for a waterproof cover, sealing overlaps to guarantee rain protection.
Maintain ventilation and light with translucent panels or side openings. Position the shelter to avoid runoff onto your mural and provide gutters or channels for diverted water.
Inspect anchors daily, clear debris, and pack proper tools so your temporary shelter stays safe and functional throughout the job.
Block In Large Shapes and Composition
Before you refine any details, lay in the major shapes and overall composition so you can see how the mural will read from a distance. Start with broad, confident strokes to map focal points, negative space, and movement. Use simple forms to test balance before committing. Consider scale, sightlines, and how elements interact.
- Block large color areas quickly to establish hierarchy and flow.
- Use basic brush techniques for flat fills, feathering edges, and soft progressions.
- Test color blending at edges to suggest volume without detail.
- Step back frequently to assess composition and adjust proportions.
Mix Paints for Consistent Color
After you’ve blocked in shapes and confirmed the composition reads from afar, start mixing paints so the colors stay consistent across the wall. You’ll set a limited palette, mix slightly larger batches than you think you’ll need, and note ratios for each hue.
Use a calibrated tray or labeled jars to store mixes; stir thoroughly before sampling on a scrap. Check mixes under the same light and from distance to verify color consistency.
Keep a small reserve for touch-ups and remix using your recorded ratios. Regularly remix intermediates to avoid drift as you work across different wall sections.
Get Clean Edges and Crisp Lines
When you’re ready to define shapes, use masking and steady brushwork to get clean edges and crisp lines that read from a distance. You’ll prioritize edge definition by prepping surfaces, aligning tape precisely, and removing it at the right tack. Use angled brushes and short, confident strokes for line crispness. Work in sections, keep paint thin near tape, and touch up with a fine liner.
Mask precisely, brush confidently, and remove tape at the right tack for crisp, readable edges.
- Choose high-quality painter’s tape and press down firmly
- Cut curves with a craft knife for precise progression
- Use a sable or synthetic angled brush for borders
- Remove tape at 45° while paint’s tacky
Make Smooth Gradients and Blends
If you want gradients that read smoothly from across the street, plan your color shifts and work while the paint’s still tacky so you can feather edges and blend without harsh lines. Use wide, soft brushes or dry rollers and overlap strokes where colors meet.
Mix transitional tones on a palette and apply with alternating passes to avoid banding. For long runs, keep a wet edge by working in manageable sections.
Practice color blending with small tests to judge opacity and drying times. Clean brushes between hues to prevent muddy results, and step back frequently to check overall balance and progressions.
Use Stencils and Masking for Details
Choose durable stencil materials like Mylar or laser-cut vinyl so your edges stay crisp and reusable.
Use low-tack masking tape and spray adhesive sparingly to secure stencils without lifting paint or damaging the wall.
For sharp lines, burnish tape edges and peel while paint is tacky to prevent bleeding.
Selecting Stencil Materials
Because precise edges make a mural read clearly from a distance and up close, pick stencil materials that hold shape, resist paint bleed, and match the texture of your wall. You’ll choose between durable plastic, mylar, cardstock with sealant, or adhesive vinyl based on detail level and reuse.
Test how each handles outdoor weather, paint layers, and flexing against brick or stucco. Use spray adhesives sparingly on porous surfaces to keep stencils flat without damaging paint.
Clean and store reusable stencils flat. Consider cut thickness: thinner for fine detail, thicker for repeated use and rough textures.
- Durable plastic/mylar
- Adhesive vinyl
- Sealed cardstock
- Spray adhesives (light use)
Masking Techniques For Edges
Now that you’ve picked stencil materials that hold up to weather and texture, you’ll use masking techniques to protect crisp edges and add fine details.
First, secure stencils with low-tack tape techniques so adhesive won’t strip paint or surface. Press edges firmly, then seal gaps with a thin layer of base color to prevent bleed.
For long runs, apply edge masking with painter’s tape, removing in stages to avoid tearing wet paint.
Use flexible masking film for curves and detail knives to trim stencils on-site.
Work from light to dark layers, lift masks slowly, and touch up tiny imperfections immediately.
Layering Techniques for Texture and Depth
When you build texture through thoughtful layering, your mural will feel more alive and three-dimensional; start by planning which areas should read forward and which should recede. You’ll use texture layering to suggest material and weathering, and prioritize depth enhancement with thin glazes, scumbled midtones, and raised impasto where light hits.
Work from general to specific: big shapes, mid details, then highlights. Let each layer dry enough to avoid muddiness. Test washes and scrapes on a board before committing. Vary tools—brushes, rollers, palette knives—to keep surfaces dynamic.
Build layers from broad shapes to highlights; let each dry, test techniques, and vary tools for lively surfaces.
- Thin glazes
- Drybrushing
- Scumbling
- Impasto
Paint Realistic Figures at Large Scale
If you want figures that read correctly at a distance, start by scaling and simplifying forms before adding detail. Block in large values to establish gesture, proportion, and focal points.
Use Color theory to choose harmonious palettes and high-contrast accents so figures pop against the wall and environment. Map light and shadow broadly, then refine gradations with gradated washes.
Select brushes for purpose: large flats for mass, filberts for curves, rounds for accents. Employ steady Brush techniques—controlled strokes, layered glazing, and occasional dry-brush—to maintain cohesion from afar while preserving believable anatomy and presence.
Simplify Details for Wall-Scale Readability
After you’ve settled on large shapes, gesture, and value, pare back small-scale detail so viewers read the image cleanly from a distance. You’ll simplify line work, reduce texture, and emphasize silhouettes to preserve Color harmony and strengthen mural symbolism.
Once large shapes, gesture, and value are set, strip fine detail—favor bold silhouettes and clear contrast for legible murals.
Think of distant viewers first: clarify focal points, use bold contrasts, and remove competing clutter. Test readability from the street; step back or photograph to judge impact. Limit tiny patterns and fine highlights that vanish at scale. Use broad, confident strokes that read like typography across a wall.
- Prioritize contrast and silhouette
- Streamline patterns and textures
- Amplify key symbolic elements
- Consolidate color zones
Fix Mistakes and Touch-Ups Outdoors
Because outdoor conditions and scale increase the chance of small errors, you’ll want a clear, methodical approach to fixing mistakes and doing touch-ups: identify issues from various distances, clean the area, match paint and texture, and layer corrections so they blend into the mural.
Walk back often and view from street level and close up to spot color shifts, drips, or missed edges.
Gently sand or scrape loose bits, wipe residue, and use compatible primers if needed.
Mix paint batches to match fading caused by outdoor weather.
Finish with thin glaze layers to feather gradual transitions and preserve mural durability.
Seal Seams, Cracks, and Wall Junctions
Before you paint, walk the wall and mark any seams, cracks, and junctions so nothing gets missed.
Pick a weatherproof sealant suited to your wall material and temperature range.
Apply, smooth, and blend each joint so the repair hides under your mural paint.
Inspect And Mark Gaps
When you inspect the wall, look closely for gaps where seams, cracks, or junctions could let moisture or paint bleed through, and mark each area clearly with a pencil or chalk so you don’t overlook it during prep.
During your surface inspection, note depth, width, and surrounding material. Use consistent gap marking so repairs stay organized.
Photograph larger areas for reference.
- Note hairline cracks versus voids
- Mark junctions between different materials
- Record seam lengths and locations
- Flag areas needing cleaning before sealing
This precise approach speeds repair and guarantees your mural base stays stable.
Choose Appropriate Sealant
Which sealant will hold up to weather and paint adhesion? You’ll choose based on surface, movement, and paint compatibility.
For masonry, pick a breathable, elastomeric sealant; for metal or trim, use a paintable silicone or polyurethane. Prioritize UV and temperature resistance.
Your sealant selection affects durability and finish—read labels and match to primer and exterior acrylic paints.
Clean and dry joints before you work.
Use proper application techniques: cut nozzle for correct bead size, apply steady pressure, and tool the bead once for contact.
Allow full cure per manufacturer before priming or painting to guarantee adhesion.
Smooth And Blend Joints
After the sealant has cured, smooth and blend joints so the mural surface reads as one continuous plane and paint won’t trap moisture or show seams. You’ll inspect seams, cracks, and junctions, sanding ridges and feathering edges for effective joint smoothing.
Use flexible filler where gaps remain, then sand and prime; this prevents paint from pooling and helps with color blending across panels. Work in small sections, keeping tools clean to avoid drag marks. Final sanding should leave a uniform tooth for paint adhesion.
- Sand high spots and feather edges
- Fill gaps with flexible sealant
- Prime blended areas
- Test color blending before finishing
Apply UV-Protective Clear Coats
Because sunlight breaks down pigments over time, you’ll want to seal your mural with a UV-protective clear coat to preserve color and finish. Choose a satin or gloss finish, apply thin even layers, and allow full cure between coats. For best UV protection, use products labeled for exterior murals and follow manufacturer drying times. Test a small area first and apply with a roller or spray for uniform coverage.
| Product Type | Finish | Notes |
|---|---|---|
| Acrylic Urethane | Satin | Durable, flexible |
| Polyurethane | Gloss | High sheen, strong UV resistance |
| Acrylic Spray | Matte | Easy application, light coats |
Prevent Mold, Mildew, and Moisture Damage
If your wall gets damp, mold and mildew can quickly eat through paint and backing, so address moisture sources before you start painting: fix leaks, improve drainage, and guarantee siding and flashing are intact.
You’ll prep surfaces with a mold-killing wash, sand loose areas, and apply breathable, mildew-resistant primer.
Choose paints formulated for exterior moisture. Consider how Mural symbolism and color psychology interact with damp spots—avoid cool, dark tones that hide moisture but attract mold.
Seal edges and vents to prevent seepage, and assure proper airflow so your mural’s meaning and hues stay vivid.
- Use a fungicidal wash
- Install drainage planes
- Choose breathable primers
- Ventilate behind siding
Long-Term Maintenance Schedule for Murals
You should set an annual inspection routine to check for cracks, fading, and moisture damage so small problems don’t become big ones.
Plan regular cleaning and protective treatments—like gentle washing and reapplying UV-resistant varnish—to keep colors vibrant.
Schedule touch-ups and periodic recoating based on inspection findings to extend the mural’s life.
Annual Inspection Routine
When planning a long-term maintenance schedule, set an annual inspection routine so you catch small issues before they become costly repairs. You’ll walk the wall, note fading, cracks, peeling, graffiti, and any structural shifts.
Pay special attention to how sunlight alters color theory outcomes and whether weathering affects mural symbolism or legibility. Record photos and a checklist, then prioritize repairs.
- Photograph sections under consistent lighting
- Note pigment shifts and substrate cracks
- Log dates, materials used, and recommended fixes
- Schedule follow-up checks or contractor quotes
Keep records concise so future touch-ups stay faithful to the original design.
Cleaning And Protection
Because grime, biological growth, and pollutants keep building up over time, you should set a regular cleaning and protection plan that preserves pigment and substrate without causing damage.
Inspect quarterly for mold, bird droppings, and salt deposits, noting how surface textures affect dirt build-up.
Use soft brushes, low-pressure washer settings, and pH-neutral cleaners to avoid abrading paint or undermining paint adhesion.
Rinse thoroughly and allow full drying before applying any protective coating.
Select breathable, UV-resistant sealants compatible with original materials.
Record dates, products, and observations in a maintenance log so you can adjust frequency and methods as conditions change.
Touch-Ups And Recoating
Although touch-ups and recoating are often postponed, a proactive schedule keeps a mural vivid and prevents small issues from becoming costly repairs. You should inspect biannually for fading, flaking, or graffiti, noting areas where color harmony has shifted or mural symbolism has dulled.
Recoat protective varnish every 3–5 years and spot-paint exposed primer or chalked areas immediately. Use matching pigments and document formulae for consistency. Keep records of dates, products, and weather conditions to refine timing.
- Inspect for UV fade and surface damage
- Match pigments to original color harmony
- Recoat protective sealants routinely
- Preserve mural symbolism with careful retouching
Photograph and Document Your Mural
If you want your mural to be remembered, properly photograph and document it from the start: shoot high-resolution images in even light, capture straight-on and angled views, and record dimensions, location, date, materials, and any collaborators. You’ll also note color palette choices and mural symbolism in captions. Keep organized files, backups, and release forms. Use timestamped notes for touch-up schedules and protective coatings. Share a media kit for promotion and archives.
| Photo Type | Filename | Notes |
|---|---|---|
| Straight-on | mural_front.jpg | full composition |
| Angled | mural_angle1.jpg | context and scale |
| Detail | mural_detail.jpg | texture, signatures |
| Documentation | mural_docs.pdf | permits, credits |
Coordinate Volunteers and Helpers
You’ll assign clear roles so everyone knows who sketches, primes, paints, and cleans up.
Set shift times so volunteers arrive and leave without overlap or gaps. That structure keeps the project moving and prevents confusion.
Assign Clear Roles
Once everyone knows what they’re responsible for, the whole mural project runs smoother and finishes faster. You assign clear roles so volunteers focus on strengths: sketching, color mixing, priming, or detailing.
Emphasize color harmony decisions and which brush techniques each person should use to keep the mural cohesive. Label stations and post brief instructions so folks jump in confidently.
- Lead artist: overall design and corrections
- Colorist: mixing and maintaining color harmony
- Surface prep: priming and patching
- Detail painters: specific brush techniques and finishing touches
Give short demos, confirm understanding, and rotate roles if needed.
Schedule Shift Times
With roles assigned, set clear shift times so everyone knows when to show up, take breaks, and hand off tasks without crowding the wall. You’ll stagger painters, detailers, and prep crew so wet paint and scaffolding aren’t congested. Factor light, weather, and peak energy; match difficult color theory sections to your strongest painters. Reserve a review slot for mural symbolism checks and touch-ups. Communicate shifts via schedule board and messaging. Use short handoffs and overlap for continuity.
| Shift | Role | Focus |
|---|---|---|
| Morning | Prep | Prime, outline |
| Midday | Paint | Base colors |
| Afternoon | Detail | Color theory |
| Evening | Review | Symbolism |
| Night | Clean | Store tools |
Manage Neighbors and Community Input
How will your mural affect the people who live and work nearby? You’ll prioritize neighbor communication and community collaboration early: notify residents, explain hours, and invite feedback so concerns don’t surprise you. Host a short meeting or door-knock to share designs and schedule, and be ready to adjust for accessibility or sightline worries. Document agreements and respect quiet hours.
- Offer clear timelines and contact info.
- Invite locals to suggest imagery or colors.
- Provide a simple feedback form or email.
- Acknowledge and address complaints promptly.
Staying transparent builds trust and reduces conflicts during painting.
Fund a Mural: Budget-Saving Tips
You can fund a mural through grants or local business sponsorships to cover major expenses. Organize community fundraisers to raise smaller amounts and build local buy-in.
Use cost-saving materials and volunteer labor to stretch your budget without sacrificing quality.
Grants And Sponsorships
If you’re working on a mural and want to stretch your budget, grants and sponsorships can cover materials, permits, or artist fees you’d otherwise have to pay out of pocket. You’ll research arts councils, community foundations, and corporate programs; tailor applications to show impact, cite mural history and color theory when relevant, and include clear budgets and timelines.
Build relationships with local businesses and document outcomes to secure repeat support.
- Target arts grants that fund public art
- Pitch businesses with visibility benefits
- Provide professional proposals and visuals
- Track expenses and report results to sponsors
Community Fundraisers
Wondering how to rally neighbors and raise cash without draining your own wallet? You’ll organize small events—bake sales, yard fairs, and benefit nights—with clear goals and transparent budgets.
Invite local artists to demo techniques, talk about color psychology and mural symbolism to spark donations and ticket sales.
Use social media, flyers, and neighborhood meetings to recruit volunteers and in-kind sponsors.
Offer tiered recognition: donor plaques, paint-day passes, and preview nights.
Track funds publicly so people trust the process.
With creative appeals and community ownership, you’ll fund the mural while strengthening local pride and participation.
Cost-Saving Materials
When you’re trying to stretch a mural budget, smart material choices make the biggest difference. Pick durable, lower-cost paints (buy in bulk or student-grade for large fills), and scout recycled or donated scaffolding and drop cloths.
Prioritize primers and sealants to protect your work and save on future touch-ups. Keep your color palette tight to reduce wasted cans, and plan mural symbolism simply so fewer specialty supplies are needed.
- Buy bulk latex for base coats
- Use community-donated brushes and rollers
- Reuse scrap wood for frames and stencils
- Trade supplies with local artists to save money
Source Discounted Materials and Paint
Looking to save money without sacrificing quality? You can find discounted tools and paint by checking local surplus stores, online marketplaces, and community swap groups.
Find discounted tools and paint at surplus stores, online marketplaces, and local swap groups to save without skimping.
Inspect brushes, rollers, and drop cloths for serviceable wear; buy discounted tools in person when possible to test them.
Watch for seasonal sales at home centers and sign up for newsletters to get coupons.
For paint, consider mistints and reclaimed gallons—prime and test a small patch first. Keep receipts and labels for color matching.
Balance savings with durability: choose weather-resistant exterior formulas even when budget shopping to avoid costly repairs.
Hiring a Pro vs DIY: When to Call an Expert
Saving on supplies is smart, but you’ll also want to decide whether to tackle the mural yourself or hire a pro. You’ll weigh time, skill, and the complexity of design: detailed color psychology choices or layered mural symbolism may need an experienced hand.
If you’re confident with scaling, scaffolding, and weatherproofing, DIY saves money and teaches skills. Call a pro when deadlines, height, or intricate imagery exceed your comfort.
- Time constraints or access issues
- Technical surfaces and priming needs
- Complex color psychology or layered symbolism
- Long-term durability and finish choices
Legal and Copyright Basics for Public Art
Before you start painting, make sure you’ve got written permission from the property owner and any required city permits.
Know who owns the copyright to the artwork and how to document ownership or licensing if you’re collaborating.
Also check liability risks and carry appropriate insurance so you’re protected if someone or property gets harmed.
Permission And Permits
Because public walls are someone’s property and often fall under city rules, you’ll need permission and possibly permits before you paint a mural. You should contact the owner, check local ordinances, and confirm any historical or neighborhood restrictions that affect design choices like color theory nods to mural history.
Permit processes vary—plan fees, timelines, and insurance.
- Ask property owner for written consent and scope.
- Research municipal mural or sign ordinances and application steps.
- Prepare site photos, design mockups, and safety plans.
- Verify required insurance, bonding, and inspection schedules before starting.
Copyright And Ownership
While you’ll likely need property permission to paint, copyright and ownership determine who controls the artwork itself and how it can be used.
You’ll own copyright automatically as the creator, but contracts can transfer or license rights, so get agreements in writing.
Consider moral rights, reproduction rights, and public display terms when negotiating with property owners or commissioners.
Address copyright protection explicitly: state who can photograph, reproduce, alter, or sell prints.
Consult a lawyer for complex deals or if multiple artists collaborate.
Clear written terms prevent disputes and protect your creative and financial interests.
Liability And Insurance
If you’re painting a mural on someone else’s property, you need to think beyond copyright: liability and insurance determine who pays if someone gets hurt, property is damaged, or the artwork causes a dispute.
You’ll review Liability considerations with the property owner, agree who covers accidents, and confirm Insurance requirements before work begins.
Get written agreements specifying indemnity, scope, and maintenance responsibilities.
Check local permits; some require contractor-level coverage.
Keep records of communications and receipts to resolve claims quickly.
- Confirm minimum insurance limits and named insured
- Define who’s responsible for injuries
- Specify property damage coverage
- Outline dispute resolution steps
Troubleshooting Common Outdoor Mural Problems
When your outdoor mural starts showing issues—peeling, fading, drips, or mold—you’ll want to diagnose the cause quickly and choose the right fix. Inspect substrate, paint type, and exposure; poor priming or moisture often causes peeling and mold.
For fading, assess UV exposure and repaint with UV-resistant pigments, remembering color theory to preserve contrasts and mural symbolism.
Fix drips by sanding and recoating in thin, controlled layers.
Clean mold with appropriate biocide and improve drainage or ventilation.
Touch-ups should match original sheen and pigment load.
Document repairs and schedule preventive maintenance to extend the mural’s life.
Adapt Designs for Different Textures & Sizes
Because every wall speaks a different language, you’ll adapt your design to texture and scale before you mix colors or tape outlines. Assess rough, stucco, brick, or smooth surfaces and plan texture adaptation: simplify details on coarse walls, preserve fine lines on smooth ones.
For size scaling, step back often, use grids or projector guides, and enlarge motifs proportionally so they read from intended viewing distances.
Choose brushes and rollers that suit the surface. Test a small mockup to confirm contrast and legibility.
Balance composition for architectural features like windows and corners so your mural feels integrated, not pasted on.
- Simplify details for coarse textures
- Use grids/projector for size scaling
- Match tools to surface type
- Mockup tests for contrast and legibility
Market and Promote Your Finished Mural
Although the painting is done, your work isn’t finished — you’ll need to promote the mural to turn it into visibility, community engagement, and potential commissions.
Photograph it at golden hour, create before-and-after visuals, and share progress reels that highlight creative techniques you used.
Photograph at golden hour, craft before-and-after visuals, and share progress reels showcasing your creative techniques.
Tag location, collaborators, and sponsors; write a short artist statement explaining concept and color psychology choices to help viewers connect emotionally.
Host a small reveal or guided walk, invite local press, and pitch to community calendars.
Keep an organized portfolio and update social profiles so future clients can find your work and reach out.
Monetize Murals and Fund Future Projects
You can turn your mural into income by selling limited-edition prints and offering paid live workshops that teach your techniques. Look into grants and public arts funding to cover larger project costs and expand your portfolio.
Combining sales, teaching, and grant support helps you fund future murals and grow your practice.
Sell Limited-Edition Prints
When your mural draws steady attention, turn that buzz into income by offering limited-edition prints—signed, numbered reproductions create scarcity and value people will pay for. You’ll photograph or scan at high resolution, adjust color theory for print fidelity, and write a note on mural symbolism to deepen buyer connection.
Price thoughtfully, cap editions, and offer a certificate of authenticity.
- Choose archival paper and inks for longevity
- Limit editions (e.g., 25–100) and track numbers
- Promote via social media and local shops
- Ship securely with tracking and insurance
These steps fund future projects while honoring your original work.
Host Paid Live Workshops
If you want to turn your mural skills into steady income, host paid live workshops that teach techniques, site planning, and mural business basics while people watch you work. You’ll guide participants through color theory, surface prep, and mural history context, showing real-time problem solving. Promote hands-on segments, Q&A, and follow-up resources. Price tiers, limited spots, and partner with local businesses to offset costs.
| Workshop Type | Benefit |
|---|---|
| Demo + Q&A | Fast learning |
| Hands-on Session | Skill practice |
| VIP Critique | Personalized feedback |
Track feedback and reinvest earnings into supplies and outreach.
Apply For Grants
Looking for steady funding to expand your mural work? You’ll apply for grants to secure resources and scale projects. Learn to write a clear grant application, target local arts councils, and track funding opportunities that match your mission. Show community impact, include strong visuals, and budget realistically. Apply consistently and follow up.
- Research grants that fund public art and community engagement
- Tailor each grant application to funders’ priorities and evaluation criteria
- Prepare visuals, letters of support, and a transparent budget
- Track deadlines, outcomes, and feedback to improve future submissions
Grants can stabilize your mural practice and access larger commissions.
Case Studies: Successful Outdoor Murals
Because real projects show what works, this section examines several successful outdoor murals and the practical lessons you can apply to your own wall. You’ll study how artists used color psychology to guide mood and attention, how mural symbolism connected with community identity, and how scale and sightlines ensured readability from streets.
Learn logistical wins: durable materials, weatherproofing, and simple maintenance plans. Notice outreach strategies that built local support and secured permissions. Adopt compositional choices that matched wall texture and viewing distance.
Use these case studies as templates—adapt proven decisions rather than copying designs outright—to make your mural resilient and resonant.
Further Learning: Workshops, Books, and Resources
When you want to take your mural skills further, join hands-on workshops, read targeted books, and tap curated online resources that build technical skill and creative confidence. You’ll sharpen color theory, composition, surface prep, and scaling methods while exploring mural symbolism to deepen meaning.
Choose workshops with live critique, local site visits, and spray/brush techniques. Pair books on color and public art with tutorial sites and artist talks. Practice assignments and community projects reinforce learning, and keep a reference library for palettes and permits.
Choose workshops offering live critique and site visits, pair books with tutorials, and reinforce skills through practice and community projects.
- Local mural workshops with live demos
- Books on color theory and public art practice
- Online tutorials and artist talks
- Community projects for hands-on experience
Frequently Asked Questions
How Do I Insure Liability for Volunteers During Mural Painting?
You should require liability insurance and enforce volunteer safety protocols: get a general liability policy, have volunteers sign waivers, provide PPE and training, document inspections, limit tasks to qualified people, and keep emergency contacts and incident reports.
Can Murals Be Removed or Painted Over Without Permission Later?
Can they be removed or painted over without permission? You can’t assume that; murals preservation often depends on local laws, property owner consent, and mural durability measures you’ve installed, so check ordinances and secure written agreements first.
What Tax Implications Exist for Donated Mural Materials or Revenue?
You can claim tax deductions for donated mural materials if you follow donation regulations, keep receipts, and document fair market value; you’ll report revenue from sales or paid commissions as taxable income and may need receipts and professional advice.
How Do I Handle Graffiti Removal or Vandalism Prevention Long-Term?
You’ll deter graffiti by applying anti-graffiti coatings, improving lighting, and using community mural programs; you’ll implement vandalism strategies like surveillance, rapid removal policies, protective barriers, and neighborhood partnerships to prevent recurring damage long-term.
Are There Accessibility Guidelines for Mural Placement and Content?
Yes — you should follow accessibility standards: you’ll guarantee mural visibility from sidewalks, crossings, and transit, avoid obstructing signage or tactile elements, use high-contrast colors and clear imagery, and provide inclusive, readable content for diverse viewers.
Conclusion
You’ve gone from blank brick to bold story — and the quiet wall is now a loud invitation. You’ll feel patience and adrenaline in the same heartbeat as brushes meet weathered stone. Celebrate the permission slips, the late-night touch-ups, the crowd that stops and the neighbor who once doubted. Keep learning, keep funding, keep painting: your mural will age and glow, both fragile and fearless, proof that risk and beauty belong together.