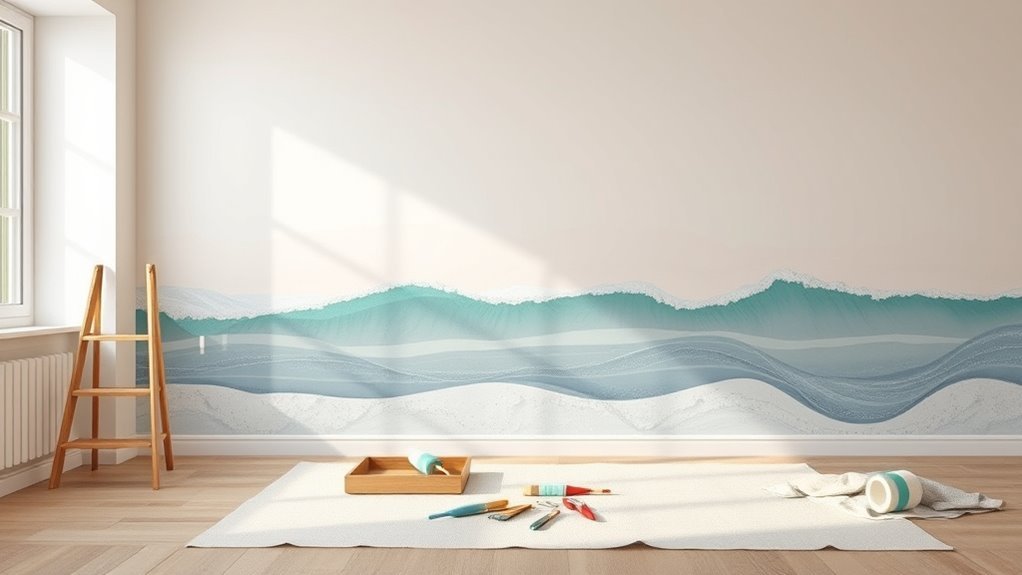
How to Paint Waves on a Wall (Ocean Wall Design)
Pick a wall, measure it, and transfer a proportional chalk grid from your sketch to scale the design. Prep the surface—clean, patch, sand, prime—then lay a thin basecoat. Choose a 3–5 color palette (deep indigo, teal, sea green, whites) and work top-down in sections, using rollers for broad fields, sponges for foam, and stencils for crests. Layer mid-tones, shadows, and highlights with wet-on-wet blending, step back often, seal when dry, and keep going to learn more.
Quick Plan: Paint Waves on a Wall in 6 Steps
Ready to tackle a wave mural? You’ll follow six concise steps to move from idea to finish.
First, plan composition and reference photos so your shapes read from afar.
Begin by sketching layout and gathering reference photos so your wave shapes read clearly from a distance.
Second, consider color theory to choose harmonious blues, accents, and contrast.
Third, map outlines lightly on the wall to guide flow.
Fourth, do wall preparation: clean, patch, and prime so paint adheres evenly.
Fifth, block in base layers and build gradients, working top-down for drips.
Sixth, add highlights, details, and seal the surface.
Review each step, adjust as needed, and enjoy the process.
Gather Supplies to Paint Waves on a Wall
Before you start painting, gather the right supplies so the job goes smoothly: quality interior or exterior latex paints in your chosen blues and accents, primers, painter’s tape, drop cloths, rollers and trays, a range of brushes (flat, angled, and round), sponges or blending tools, chalk or pencil for layout lines, a level or straightedge, sandpaper and patching kit, a ladder or step stool, rags, a utility knife, gloves, and a clear sealer.
Check paint samples under your room light and apply color theory basics—contrast, saturation, and value—to pick harmonious blues.
For effective wall preparation, include cleaner, filler, and a sanding block so paint adheres evenly.
Choose Your Wall, Scale, and Layout
When you pick the wall, think about visibility, lighting, and how the waves will interact with furniture and architectural features. Choose a wall that becomes a focal point without competing with windows, doors, or busy decor.
Pick a wall for visibility and lighting—let waves complement furniture and architectural features, not compete with them.
Measure height and length to set scale—small rooms suit low, continuous waves; large walls handle tall, dramatic swells. Sketch placement relative to trim, outlets, and shelving.
Test how wall texture changes brushwork and how lighting effects alter highlights and shadows. Mark a horizon line and key crest positions with pencil.
Plan negative space so the mural complements rather than overwhelms the room’s layout.
Pick Paint Colors and Finishes for a Realistic Wave Mural
Since color and finish set the mood and realism of your waves, pick a palette that captures depth, motion, and light—start with a base of three to five hues (deep indigo or phthalo blue, a mid-tone teal, a sea green, and at least one pale highlight) and add a darker shade for shadow and a warm or cool neutral for foam and spray.
Consider color psychology to evoke calm, drama, or energy: cooler tones soothe, warmer accents energize.
Test paint finish options—matte for blended depth, satin for subtle sheen, semi-gloss for wet highlights.
Swatch combinations on the wall before committing.
Simple Wave Designs for Beginner → Advanced
Start by sketching simple curves to map the basic rhythm of your wave.
Then add overlapping layers of crescents and troughs to create depth and motion.
As you get comfortable, increase complexity by varying scale, spacing, and color between layers.
Start With Simple Curves
Wondering how to tackle wave painting without fuss? You’ll start with simple curves to build confidence and rhythm. Use basic arcs that repeat and flow; they read as waves even before adding detail.
Keep color theory in mind—choose harmonious blues and accents—so your shapes already feel oceanic. Practice steady brush techniques: pressure control, wrist motion, and stroke length.
Try these steps:
- Sketch gentle S-curves with pencil.
- Paint one smooth curve per brushstroke, varying pressure.
- Step back, adjust spacing, and repeat until composition feels balanced.
This approach keeps beginnings approachable and effective.
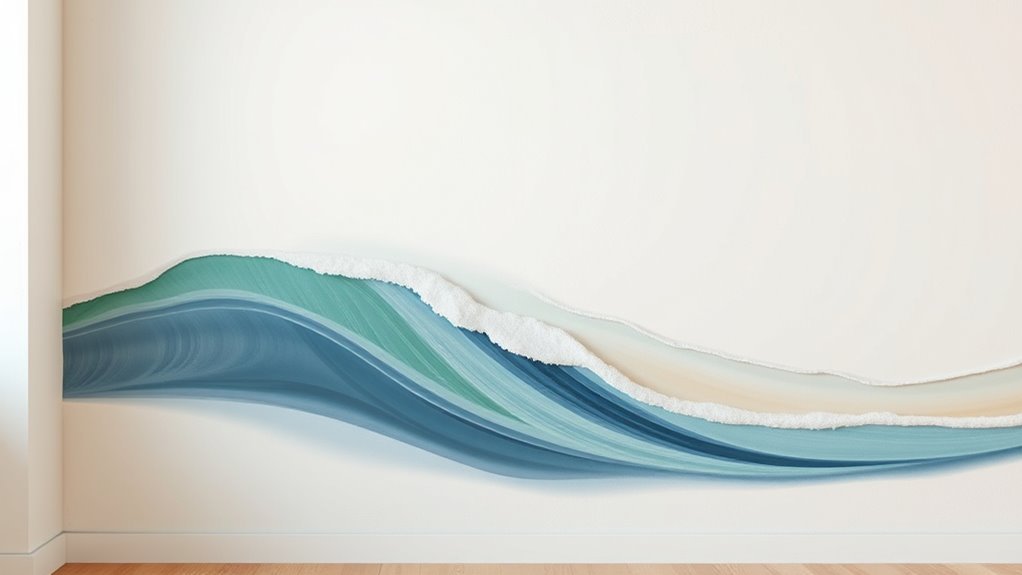
Build Layered Waveforms
When you layer waveforms, you’re creating depth and movement by stacking translucent arcs, scallops, and foamy edges so each layer reads independently yet works as a whole. You’ll plan three to five tonal layers, darkest at the back, lighter and more detailed forward.
Mask edges with low-tack tape or freehand with a steady brush. Vary stroke direction and opacity to suggest undercurrents and surf. Add highlights and spray for foam; let some layers show through for translucence.
Think about wave symbolism and ocean mythology as inspiration for shapes and rhythm, letting narrative guide contrast and scale.
Sketch Wave Shapes and Mark Guides on the Wall
Start by planning the overall flow of your waves so they move naturally across the wall. Lightly sketch the main wave shapes with a pencil, spacing peaks and troughs the way you want them to read from a distance.
Then mark straight guide lines for horizons and key reference points to keep your composition balanced as you paint.
Plan Your Wave Flow
How will your waves move across the wall? You’ll consider rhythm, scale, and storytelling while respecting wave symbolism and cultural significance. Decide flow direction, focal points, and energy before you touch paint.
- Map main currents — gentle, rolling, or crashing — to match mood.
- Place repeats and gaps to create visual rhythm and balance.
- Choose scale and overlap to guide the eye toward focal areas.
As you plan, imagine walking past the wall; let movement feel natural. Keep sketches loose but intentional so your final lines will read as a cohesive, meaningful ocean scene.
Draw Guide Lines
Because you’ve planned the flow, sketch the main wave shapes directly on the wall with light, erasable lines so you can adjust proportions as you go. Use a pencil or chalk to map crests, troughs, and focal points, keeping lines confident but thin.
Mark horizon and reference lines for scale, symmetry, and perspective. Note where highlights and shadows will sit, informed by color theory so your palette reads realistically.
Add small guide marks for foam, spray, and gradient shifts. Label areas for specific brush techniques—dry brush, blending, stippling—to speed execution and keep your composition consistent as you paint.
Apply a Basecoat and Build Paint Layers
Once you’ve prepped and taped the wall, apply a thin, even basecoat to create a uniform surface for your waves. Your wall preparation sets the stage; consider color psychology when choosing a base—soft blues calm, warm turquoises energize. Work in sections, letting each thin layer dry before the next to avoid streaks.
Prep and tape thoroughly, then roll a thin basecoat—choose calming blues or energizing turquoises and work in thin, even layers.
- Start with a roller for coverage.
- Add mid-tones to define wave positions.
- Use smaller brushes to layer highlights and shadows.
Build paint layers progressively, keeping edges crisp where needed. Step back often to check balance and adjust tones as you go.
Blending Techniques for Flowing Water and Soft Gradients
When you’re ready to make the waves look fluid, focus on wet-on-wet blending and soft feathering to create seamless shifts between tones. Start with slightly thinned paint so edges merge; work quickly while the surface stays damp.
Use a soft brush to drag colors together in sweeping, wave-shaped motions for realistic color blending. For gradient gradations, move from darker to lighter hues in short, overlapping strokes, lifting pressure near highlights.
Blend vertically and horizontally to mimic water movement, then step back often to judge flow. Finish by refining edges with a dry brush to keep contrasts natural and subtle.
Use Stencils, Sponges, and Rollers for Wave Textures
Pick stencil shapes that match the motion you want—curved templates for rolling breakers, thin crescents for ripples.
Use sponges with varied pore sizes to press and lift paint for organic texture.
Rollers with patterned covers can lay down base rhythms, then you can tweak edges for a natural look.
Choosing Stencil Shapes
Although stencils, sponges, and rollers each create different wave effects, you’ll want to choose shapes that match the movement and scale you’re aiming for. Focus on stencil patterns and shape variety to get consistent ripples or bold swells. Select sizes that fit wall height and viewing distance. Test combos on scrap board before committing.
- Small scallops for fine, repetitive ripples.
- Large curves for dramatic, flowing swells.
- Mixed sizes for natural, layered depth.
Trace placement lightly, work top-down, and keep edges crisp by securing stencils. Swap shapes until the composition reads like ocean motion.
Sponge Texture Techniques
Now that you’ve settled on stencil shapes and placements, add sponge techniques to bring those waves to life with texture and subtle color shifts.
Use natural sea-sponge or synthetic sponges to dab diluted paint along stencil edges and inside wave bodies, building translucent layers. Vary pressure and sponge density to create subtle texture patterns that mimic foam, depth, and reflected light.
Blend coastal blues, teals, and a hint of white, working wet-on-wet for soft gradations. Clean sponges between tones to avoid muddiness.
Practice on scrap before the wall so your sponge techniques remain controlled and consistent.
Roller Pattern Application
When you combine stencils, sponges, and rollers, you’ll quickly cover large areas while keeping the wave textures precise and layered. Start by choosing hues using color theory to set depth: base, mid, highlight. Load a nap roller lightly, then stamp stencils for crest shapes. Dab sponges for foam details. Keep roller maintenance simple—clean after each color to avoid muddy tones.
- Plan zones: background, mid-waves, highlights.
- Roll thin coats, blend edges with a damp sponge.
- Stencil selectively for repeating crests.
Work methodically, stepping back often to balance contrast and rhythm.
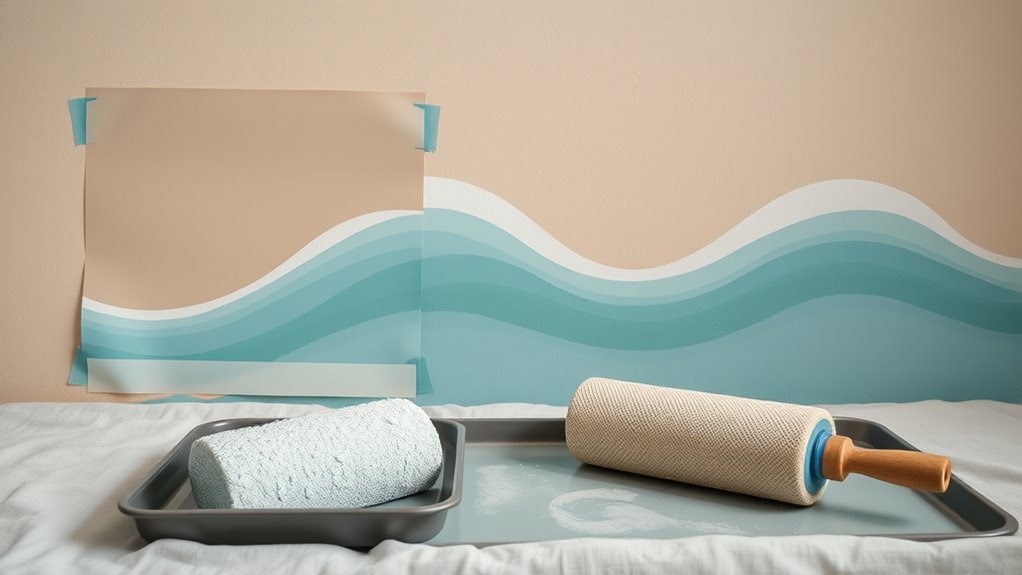
Scale a Small Sample Design to a Large Wall
Start by measuring your wall and your sample design so you can establish a clear scale factor—divide the wall dimensions by the sample dimensions to determine how many times larger each element needs to be.
Use a grid: transfer a proportional grid from your sample to the wall with chalk lines, marking focal points for wave crests and troughs.
Resize brushes and rollers to match larger strokes.
Keep color theory in mind when enlarging gradients so hues read correctly from distance.
Let artistic inspiration guide composition adjustments, but uphold proportions.
Step back often to ensure rhythm and balance across the expanded mural.
Common Problems and Fixes (Bleeding, Uneven Blends, Scale)
If you notice paint bleeding, uneven blends, or scaling errors, address them quickly so small issues don’t ruin the whole mural.
You can fix common problems with targeted steps: Bleeding issues often come from too-wet brushes or low-quality tape; dry, blot, and repaint edges.
Uneven blends need feathering with a clean, slightly damp brush or gentle scumbling while paint’s tacky.
Scale mistakes are corrected by stepping back, re-gridding, and adjusting proportions with light pencil guides.
- Remove bleed and repaint edges.
- Soften uneven blends with blending strokes.
- Re-grid to correct scale.
Seal, Maintain, and Update Your Wave Mural
Now that you’ve fixed bleeding, blends, and scale, protect your work with proper sealing and a simple maintenance routine to keep the waves looking fresh for years.
Apply a clear acrylic sealer suited for interior walls, using thin, even coats and allowing full drying between layers.
Clean gently with a soft cloth and mild soap; avoid abrasive cleaners that harm pigments and disrupt marine life motifs.
Touch up chips promptly, matching colors and varnish sheen.
For long-term wall preservation, inspect annually for humidity damage or flaking and reseal every 3–5 years to maintain color depth and protection.
Frequently Asked Questions
Can I Paint Waves on Wallpapered Walls?
Yes — you can paint waves on wallpapered walls, but you’ll check wallpaper compatibility first and make certain proper surface prep so paint adhesion’s strong; otherwise priming or removing wallpaper prevents peeling and guarantees a lasting ocean design.
How Long Does a Mural Project Typically Take From Start to Finish?
Quickly and slowly: you’ll finish a mural project in a few days to several weeks depending on mural preparation and paint type selection. You’ll plan, prep, prime, paint layers, add details, and seal—allow drying times accordingly.
Are There Health Risks From Paint Fumes for Children or Pets?
Yes — paint fumes can harm children and pets; you should avoid high-VOC paints, ventilate well, use low- or zero-VOC options, keep occupants away during drying, and follow health precautions like masks, fans, and sealed food storage.
Can I Transfer a Wave Mural Between Homes?
About 70% of murals survive careful removal; you can transfer a wave mural between homes with proper wall transfer techniques. You’ll plan mural relocation, use adhesive backings or paneling, and hire pros to avoid damage.
What Permits Are Needed for Exterior Ocean Murals?
You’ll need to check local murals permit requirements and exterior painting regulations: many cities require a public art or sign permit, landowner consent, zoning approval, and sometimes historic district or environmental reviews before painting.
Conclusion
Wrap up your wave mural knowing it’s more than paint — it’s a living backdrop. I once watched a neighbor stop mid-run to trace a painted curl with a fingertip; that small pause reminded me murals invite interaction. Studies show art in homes boosts wellbeing, so your wall will do more than look good — it’ll change how people move through the room. Seal it, maintain it, and let the surf keep calming your space.