How to Remove Tape Residue From Painted Walls
You can remove tape residue from painted walls safely by starting gentle: blot a hidden spot, then try warm soapy water with a microfiber cloth and light rubbing. If that fails, dab a little cooking oil, white vinegar, or rubbing alcohol on a cloth and work carefully, or soften adhesive with a hair dryer and lift with a plastic scraper. Always test first, avoid harsh solvents, and touch up any nicks; continue for step‑by‑step tips and precautions.
Who This Guide Is For and How to Use It
Whether you’re prepping for a fresh paint job, fixing a removed sticker, or cleaning up after painting trim, this guide is for you. You’ll find clear steps suited to homeowners, renters, handypersons, and DIY creators tackling tape residue without harming paint or creative wall art.
Use the sections in order: assess the residue, choose an appropriate gentle method, test a hidden spot, then remove and finish. You’ll learn precautions for delicate finishes and tips on minimizing damage while maintaining furniture protection nearby.
Follow instructions, move methodically, and you’ll restore walls quickly and confidently.
Quick Answer: Safe First-Step to Remove Tape Residue
If the residue looks soft or rubs off slightly, start with a gentle, non-abrasive approach. You’ll protect paint finishes while freeing sticky bits that ruin Creative wall art or decorative edges from Decorative painting techniques. Test a hidden spot first.
Work slowly, using light pressure and short strokes until sticky film lifts.
Work slowly, using gentle, short strokes and light pressure until the sticky film lifts away.
- Feel relieved as residue softens and peels away.
- Enjoy renewed confidence knowing your artwork and walls stayed intact.
- Smile when the surface looks clean and ready for new projects.
Stop if paint dulls or flakes; seek alternatives before proceeding further.
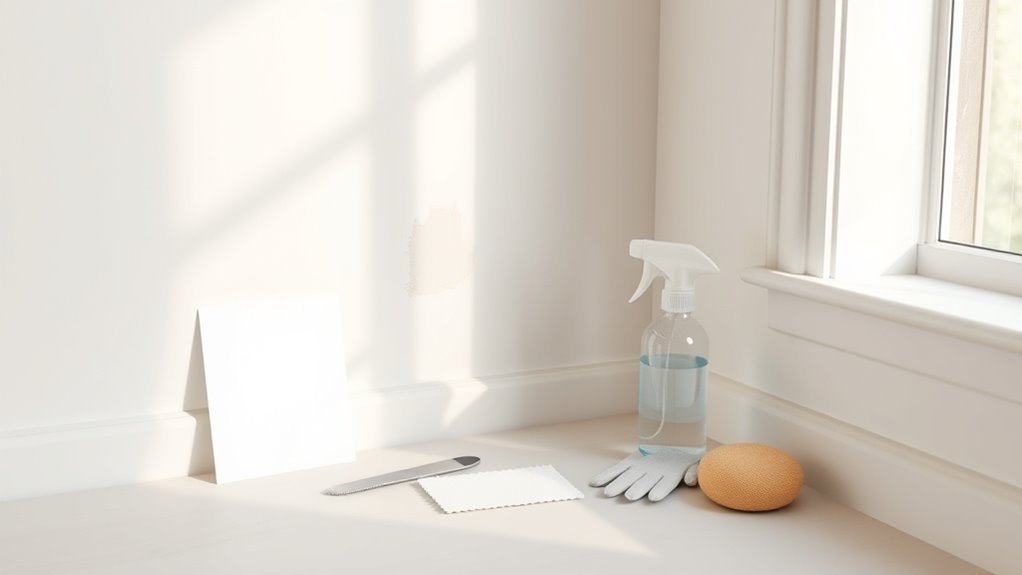
Tools for Removing Tape Residue
You’ll want a few key tools on hand: soft cloths and sponges, gentle solvents like rubbing alcohol or citrus-based removers, and protective items such as painter’s tape or drop cloths.
Test solvents on a hidden spot first and apply them with a soft cloth to avoid damaging paint.
Use protective materials to catch drips and keep the surrounding area safe while you work.
Soft Cleaning Tools
Although tape residue can seem stubborn, the right soft cleaning tools let you lift sticky gunk without damaging paint. You’ll appreciate how gentle options respect decorative techniques and varied wall textures while restoring a clean surface. Use tools carefully to avoid abrasion.
- Microfiber cloths — You’ll glide away residue with controlled pressure, preserving finishes and delicate paint.
- Soft rubber erasers — They rub off tackiness without scraping, great for spot-cleaning decorative trim.
- Soft-bristled toothbrush — You’ll coax residue from textured grooves and corners without harming the paint.
Test any tool in an inconspicuous spot first to guarantee safe results.
Gentle Solvent Options
When residue resists soft tools, reach for gentle solvents that dissolve adhesive without stripping paint. You can control their strength and application to match your wall’s finish. Choose isopropyl alcohol, white vinegar, or a citrus-based adhesive remover, testing first in an inconspicuous spot.
Apply sparingly with a soft cloth, blotting rather than rubbing to protect decorative finishes and varied wall textures. Work in small sections, rinse with mild soapy water, then pat dry.
For delicate or antique paints, dilute solvents or skip them altogether. If residue persists, stop and reassess to avoid damage.
Protective Application Materials
If solvents don’t do the job or you want to avoid chemicals altogether, use the right tools to protect paint while lifting residue. You’ll choose soft microfiber cloths for gentle wiping, plastic scrapers to coax stubborn bits without gouging, and painter’s tape to mask nearby trim and delicate finishes.
Consider wall texture and current decorating trends—matte walls need different care than glossy or textured surfaces. Use light pressure, test in an unseen spot, and swap tools if you see damage.
These materials keep you confident, calm, and in control as you restore a flawless wall.
- Microfiber cloths
- Plastic scrapers
- Painter’s tape
How to Spot-Test Painted Walls First
Before you start, pick an inconspicuous spot—behind a door or near a baseboard—and test your chosen remover there. Apply a small amount, wait the recommended time, and then gently wipe to see if the paint softens or discolors.
If the finish looks unchanged after a full inspection, it’s safe to proceed on the visible areas.
Test Inconspicuous Area
Want to avoid damaging your paint? Test an inconspicuous area first so your creative decorating ideas don’t backfire. Choose a corner behind furniture or inside a closet where wall texture and finish match the visible surface. Apply the same remover or tape gently, wait briefly, then blot—don’t rub.
- Relief: you’ll feel safer trying solutions without ruining a focal wall.
- Confidence: a small success lets you proceed calmly with larger sections.
- Pride: preserving paint shows care for your space and decorating vision.
Record results and move forward only if there’s no discoloration or texture change.
Wait And Inspect
How long should you wait after applying a remover or pressing adhesive? You’ll usually wait 10–15 minutes, but follow product instructions and consider paint age and sheen.
After that pause, inspect the test spot closely: look for softening, discoloration, lifting, or dulling. Gently rub with a clean cloth to see if residue lifts without paint transfer.
If paint resists, stop and try a milder method. Record what worked so you can repeat it across the room.
Proper tape removal depends on careful wall preparation and patient spot-testing to avoid damage and guarantee a consistent finish.
How Paint Type Changes Your Approach (Latex, Oil, Enamel, Flat)
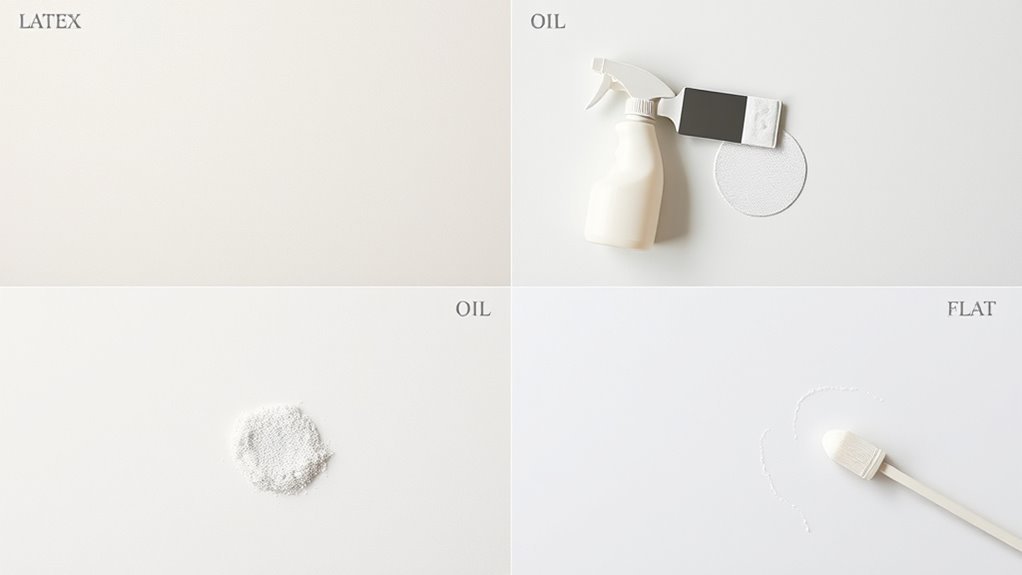
Because different paints react differently to solvents and scrubbing, you’ll need to adjust your removal method based on whether the wall is latex, oil, enamel, or flat.
Consider wall texture and paint sheen before you start: glossy enamel and oil resist water but show scratches; latex tolerates mild soap; flat absorbs cleaners and needs gentle blotting.
Test a hidden spot first.
- Feel relieved: enamel cleans with solvent sparingly.
- Stay cautious: oil needs mineral spirits, careful rubbing.
- Be gentle: flat or matte requires minimal moisture to avoid staining.
Work patiently to protect finish.
Residue Age: Fresh Tape vs. Months-Old Adhesive
If the tape’s recent, you can usually peel it off and wipe the tacky strip away with a damp cloth.
When the adhesive’s dried for weeks or months, you’ll want gentler methods like warm soapy water or a hair dryer to soften it first.
For really stubborn residue, try stronger solutions such as rubbing alcohol or a dedicated adhesive remover, testing a hidden spot first.
Fresh Tape: Quick Removal
When the tape’s only been off for a few hours, you can usually peel up any sticky bits with minimal effort—use a fingernail or a plastic scraper at a low angle and pull slowly to avoid lifting paint. You’ll save time and avoid extra wall work when you act fast, especially after Creative decorating sessions.
If small residue remains, rub gently with a damp microfiber cloth and mild soapy water; test a hidden spot first to protect paint. For stubborn spots, warm the area briefly with a hair dryer, then try again.
- Relief — instant progress
- Satisfaction — neat results
- Confidence — ready for Wall repair
Dried Adhesive: Gentle Methods
Peeling tape right away often spares you extra work, but dried adhesive calls for gentler tactics so you don’t damage paint. You’ll test a small area first, considering adhesive chemistry and wall texture. Use a soft cloth, mild soapy water, or a little rubbing alcohol applied sparingly. Warmth from a hair dryer can soften residue; don’t overheat. Work slowly, blotting rather than scraping. If paint peels, stop and reassess.
| Method | When to use | Risk |
|---|---|---|
| Soapy water | Slight residue | Low |
| Rubbing alcohol | Older residue | Medium |
| Heat | Stubborn but soft | Medium |
| Oil | Greasy residue | Low |
Stubborn Residue: Stronger Solutions
Although stronger cleaners can rescue stubborn residue, choose them based on how long the adhesive’s been stuck to the paint. If tape is fresh, try rubbing alcohol or a citrus-based remover; they lift residue quickly without harming creative painting details.
For months-old adhesive, you’ll need heavier solvents and slow, gentle scraping to protect wall textures. Test a hidden patch first. Work patiently and ventilate the room.
- Relief: imagine the satisfaction as gummy streaks dissolve.
- Caution: feel the tension ease when you protect delicate finishes.
- Pride: enjoy restored walls that showcase your creative painting.
Try Warm Soapy Water and a Microfiber Cloth First
If the residue’s fresh or light, start with warm soapy water and a microfiber cloth to avoid harsher chemicals. Dampen the cloth, wring it well, and gently rub the residue in circular motions. Test a hidden spot first to check paint reaction and wall texture differences.
For textured surfaces, use a soft-bristled brush with the same soapy solution to get into grooves without scrubbing hard. Rinse the cloth frequently and blot dry to prevent water damage.
This simple approach protects paint during creative decorating, saves time, and often removes sticky film without escalating to stronger cleaners.
Using Oils (Cooking Oil, Peanut Butter) Safely on Paint
When tape residue resists soap and water, try applying a small amount of cooking oil or peanut butter to soften the adhesive before you scrape it away; the oil breaks down the sticky bonds without harsh solvents. Dab oil with a cotton swab, wait a few minutes, then gently wipe—test behind furniture or near Creative wall art first to verify paint won’t darken.
Use minimal pressure to protect Decorative wall decals and surfaces. Clean remaining oil with mild detergent and a damp cloth, then dry.
- Relief — residue lifts easily.
- Satisfaction — murals stay intact.
- Caution — test first.
Use Rubbing Alcohol Safely on Painted Walls
Because rubbing alcohol evaporates quickly and cuts grease, it’s a handy option for removing tape residue—but you should use it cautiously on painted walls. Test a hidden spot first, dab alcohol on a soft cloth, and work gently to avoid dulling finish or damaging Creative wall art or areas slated for Wallpaper removal. Rinse with a damp cloth and dry. Limit exposure and use small amounts; don’t soak the wall. For delicate paints, consider alternative methods.
| Surface Type | Strength | Recommendation |
|---|---|---|
| Gloss | Mild | Safe, quick wipe |
| Matte | Moderate | Test first, gentle |
| Textured | Low | Use sparingly, blot only |
White Vinegar as a Mild Adhesive Remover
Although it’s gentler than many commercial solvents, white vinegar still removes tape residue effectively on most painted surfaces—so apply it cautiously and test a hidden area first.
You’ll dampen a soft cloth with diluted vinegar, blot gently, and let it sit briefly to loosen adhesive without harming paint or wall texture.
Work in small sections, rinsing with water and drying to prevent streaks.
If you’re into creative decorating, this method helps preserve finishes while removing residue from frames or decals.
Trust your touch and patience.
Choosing a Commercial Adhesive Remover (What to Avoid)
When choosing a commercial adhesive remover, avoid harsh solvents like acetone or lacquer thinner that can strip or soften paint.
Check the product label for paint compatibility and test on an inconspicuous spot first.
If the label’s unclear, opt for a milder remover or consult the manufacturer.
Avoid Harsh Solvents
If you’re trying a commercial adhesive remover, pick one formulated for painted surfaces and steer clear of strong solvents like acetone, methyl ethyl ketone, or paint thinners that can strip or soften paint. Those chemicals attack finishes, ruin creative painting effects, and damage delicate wall textures.
You’ll protect color, sheen, and any faux or layered work by choosing gentler formulas labeled safe for paint. Test in an inconspicuous spot first. If residue persists, repeat short, gentle applications rather than escalating to harsher products.
Your patience preserves the wall’s look and your careful choices prevent costly repairs.
- Fear — don’t risk ruining art
- Relief — safe options exist
- Pride — you preserved the finish
Check Paint Compatibility
Before you buy or apply any commercial adhesive remover, check that it’s compatible with your wall’s paint type and finish so you don’t accidentally strip color or sheen. Test a small, hidden area first and wait for the recommended dwell time to observe effects.
Avoid removers labeled for industrial use only; they often harm paint durability and release harsher chemicals. Look for products with clear compatibility charts and low-VOC formulations to balance environmental safety with effectiveness.
If unsure, consult the paint manufacturer or choose milder options like oil-based cleaners applied gently. When in doubt, hire a pro to prevent costly damage.
Heat Method: Hair Dryer vs. Low-Heat Gun Without Damage
Although both a hair dryer and a low-heat heat gun can soften adhesive, you’ll want to choose the tool and technique that loosens tape residue without harming the paint.
For Tape removal with Paint preservation, aim low: hold the hair dryer or gun 6–8 inches away, use a gentle sweep, and test a hidden spot.
Heat until adhesive softens, then lift residue with a soft cloth; don’t overheat glossy or thin-painted surfaces.
If seams or corners resist, reheat briefly. Stop if paint blisters or softens.
You’ll feel relief when the wall looks clean again.
- Relief
- Confidence
- Satisfaction
Plastic Scrapers, Credit Cards, and Erasers: Mechanical Removal
Once the heat has softened the adhesive, you can switch to mechanical removal to lift stubborn residue without chemicals.
Use a plastic scraper at a low angle to avoid gouging paint, working gently along the grain. A credit card works great in tight spots; bend it slightly to follow contours.
For small sticky bits, rub a white eraser in short strokes until residue forms crumbs.
Test each tool on a hidden spot first.
These tactics preserve painted surfaces and suit Creative wall art or DIY home projects where you want clean edges and no solvent smell, keeping results neat and safe.
Stubborn Residue: Safe Step-by-Step Method Combinations
If stubborn tape residue won’t budge with heat and scraping alone, combine gentle mechanical action with mild solvents in short, controlled steps to protect your paint. You’ll want to test in an inconspicuous spot, especially near creative wall designs or areas last touched during wallpaper removal.
Work slowly: apply solvent with a soft cloth, rub gently with a plastic scraper, then rinse and dry.
- Feel relief when residue lifts without damage.
- Feel cautious pride as patterned paint stays intact.
- Feel calm knowing you stopped at testing, avoiding overwork.
Removing Residue From Textured and Glossy Painted Walls
When you’re tackling tape residue on textured or glossy painted walls, adjust your approach to match the surface.
For textured walls, start with a soft-bristled brush to lift loose bits. Then use a mild solvent—like diluted dish soap or rubbing alcohol—applied sparingly with a cloth. Dab rather than rub to protect the texture.
For glossy finishes, use a gentler, non-abrasive cleaner and a microfiber cloth to avoid dulling the shine. Test any product in an inconspicuous spot first.
These techniques help preserve creative wall designs and fit into routine seasonal paint maintenance without causing scuffs or uneven sheen.
Touch Up Minor Paint Damage After Residue Removal
Although tape removal rarely damages paint deeply, you’ll sometimes find small nicks, scuffs, or thin spots that need touching up to restore a uniform finish. Clean the area, let it dry, then test your original paint on a hidden scrap. Match sheen and color, and consider creative painting to disguise progressions if needed.
For textured walls, use a stipple brush or sponge to mimic wall texture before the touch-up dries. Work lightly and build thin layers.
- Feel relieved when the spot disappears.
- Enjoy the satisfaction of a seamless fix.
- Smile at your renewed wall.
Preventing Residue: Best Painter’s Tape Practices
To prevent residue, pick a tape formulated for your surface and paint type so it sticks firmly without leaving adhesive behind. Apply it smoothly, press the edges down, and remove it slowly at a 45-degree angle while the paint’s still tacky or fully cured according to the tape instructions.
Those simple habits will cut down on cleanup and protect your finish.
Choose The Right Tape
Want cleaner lines and less sticky residue? You’ll pick tape by surface, paint age, and desired edge. Know tape types and adhesive chemistry: crepe paper for crisp lines, delicate low-tack for fresh paint, and foam for textured surfaces.
Match tack to paint curing to avoid peel.
- Choose low-tack if the paint is new — protect your work and your patience.
- Use medium tack on latex walls — balance hold with safe removal.
- Go for specialty tapes on textured or glossy finishes — save time and emotion.
Selecting wisely prevents damage, stress, and extra cleanup later.
Apply And Remove Correctly
When you apply and remove painter’s tape the right way, you’ll avoid sticky residue and protect your paint finish. Press tape edges firmly with a plastic putty knife or your thumb to seal lines for creative wall designs, preventing bleed-through.
Work on clean, dry surfaces and remove tape within an hour of topcoat drying—don’t wait days. Pull tape back on itself at a 45° angle, slowly and steadily, keeping tension low to prevent paint lift.
For crisp stripes, score the tape edge with a utility knife before removal. Match timing and technique to paint color matching for flawless results.
Quick Fixes If Paint Softens, Bubbles, or Peels
If the paint softens, bubbles, or peels after removing tape, don’t panic—act quickly to prevent further damage by evaluating the affected area and choosing the right repair method. You’ll want to assess whether decorative techniques or wall textures were involved, since textured or specialty finishes need gentler handling.
Remove loose paint with a putty knife, sand smooth, and clean residue. Prime bare spots, then touch up with matching paint. If you’re nervous, practice on a hidden scrap first.
- Feel relieved—small fixes restore beauty.
- Feel empowered—your skills matter.
- Feel proud—your wall looks whole again.
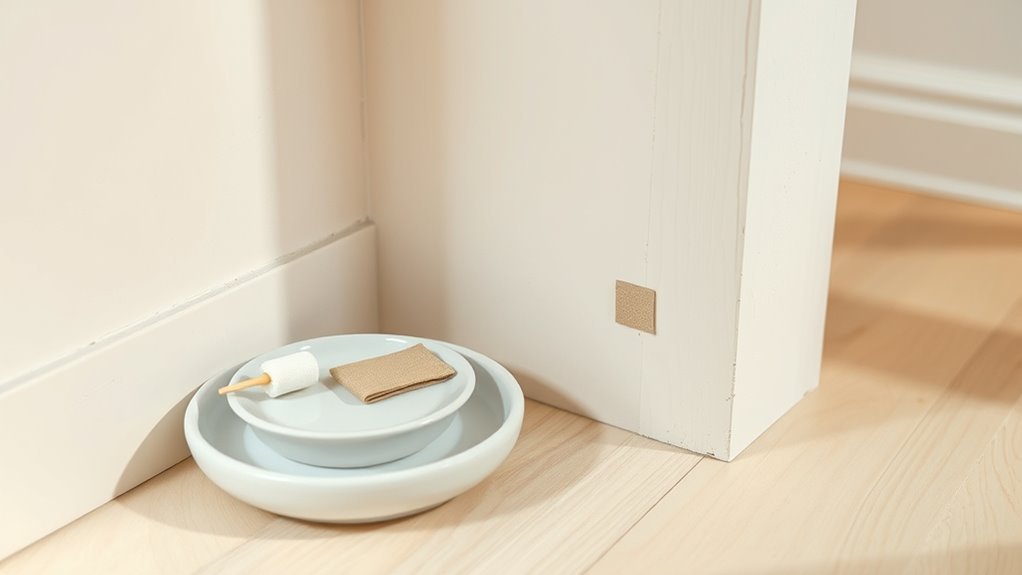
Removing Tape Residue From Painted Trim and Baseboards
Because trim and baseboards sit in high-traffic zones, tape residue can be both visible and annoying. However, you can remove it without damaging the paint by using gentle cleaners and careful technique.
First, test a mild detergent solution on an inconspicuous spot, especially where wall textures meet trim. Use a soft cloth or plastic scraper to lift softened adhesive, working with the grain of moldings.
For stubborn bits, apply a small amount of rubbing alcohol or a commercial adhesive remover sparingly, then rinse and dry.
Consider Tape alternatives for future projects to avoid residue and protect painted edges.
Eco-Friendly, Non‑Toxic Remover Alternatives
While you’re tackling tape residue, try eco-friendly, non‑toxic options that work without harsh chemicals. You’ll protect paint and breathe easier using simple, safe methods. Eco friendly cleaning and Non toxic solutions like gentle oils or baking soda blends lift sticky bits without damage. Test a small spot first, rub gently, then wipe clean with a damp cloth. If residue’s stubborn, repeat patiently rather rather than scraping.
Try eco-friendly, non-toxic methods — gentle oils, baking soda, or vinegar — test first and rub patiently.
- Olive oil + cloth — comforting, effective, gentle on finish.
- Baking soda paste — satisfying grit that brightens and removes adhesive.
- White vinegar spray — sharp, revitalizing, dissolves sticky film.
When to Call a Pro: Signs You Need Expert Help
When residue won’t budge after gentle cleaning or you spot paint lifting, call a pro—you’re risking bigger damage if you keep at it. If scrubbed areas still show sticky streaks, bubbling, or color loss, a pro can assess adhesive composition and recommend safe solvents.
Ignore tape myths that promise miracle fixes; improper chemicals or heat can harm finishes. Also call if large sections are affected, textured surfaces are involved, or you lack confidence with tools.
Professionals understand adhesive science, matching removal methods to paint type and substrate so repairs and repaints preserve your wall’s appearance and value.
Frequently Asked Questions
Can Tape Residue Cause Long-Term Paint Discoloration?
Yes — tape residue can cause paint damage and residue staining over time if left; you’ll notice discoloration, softened finish, or trapped dirt altering color. Prompt, proper cleaning helps prevent long-term staining and surface deterioration.
Can Residue Removal Void My Home Insurance or Warranty?
Yes—you usually won’t void insurance implications or warranty coverage by removing tape residue, but you’ll want to use approved methods and document care; coincidentally, following manufacturer guidelines and keeping receipts often prevents disputes and preserves coverage.
Is It Safe to Use WD-40 on Painted Walls?
You can, but you shouldn’t: WD-40 may harm some paint finishes. Prioritize Chemical Safety, test a hidden spot, and consider Household Alternatives like mild soap, vinegar, or rubbing alcohol for safer residue removal and warranty-friendly care.
How Do I Remove Residue From Wallpapered Surfaces?
Like peeling sunshine, you’ll start gentle: test a hidden spot, then use wallpaper removal solution or warm soapy water for surface cleaning, scrape with a plastic spatula, blot residue, and repeat until the wallpaper removal’s clean and safe.
Can Residue Attract Pests or Mold Over Time?
Yes — you could face pest attraction and mold growth over time if residue’s sticky or traps moisture. You’ll want to clean residue promptly and keep areas dry so pests and mold don’t get a foothold.
Conclusion
You’ve now got practical steps to tackle tape residue without wrecking your paint. Try the safe first-step methods and always spot-test—about 60% of DIYers damage paint by skipping tests, so this part’s key. If residue won’t budge or paint softens, switch methods or stop and call a pro. For trim and eco-friendly options, work gently and patient—small fixes usually save a lot of repainting time and cost.