Is Door Paint Different From Wall Paint?
Yes — door paint is different from wall paint. You’ll want tougher, harder‑drying formulas for doors because they get knocked, touched, and cleaned a lot. Door paints use stronger binders, higher solids, and glossier sheens so they resist scuffs and wipe clean. You can use wall paint in a pinch, but it’ll chip faster and show wear. Keep going to see when leftovers work, when to buy specialty paint, and pro tips.
What Searchers Mean By “Door Paint Vs Wall Paint

What do people mean when they compare door paint to wall paint? You’re asking whether finish, durability, and appearance differ. Searchers want practical guidance: doors need harder, more washable coatings because they get touched.
Walls prioritize broad, even coverage and matte options for hiding flaws. You’ll consider Color psychology too—doors often get bold hues to create contrast or focal points while walls stay neutral to calm a room.
You’ll also think about paint removal: stripped door surfaces require different prep than painted drywall. Overall, you’re weighing function, aesthetics, and maintenance when choosing between the two.
Quick Answer: Can You Use Wall Paint On Doors?
If you’re in a hurry, yes—you can use wall paint on doors, but it’s usually not the best choice because most wall paints aren’t formulated for the wear, scuffs, and frequent cleaning doors get.
You’ll get acceptable Door aesthetics for low-traffic rooms or closets, but finish durability and washability may fall short. Check paint branding for product claims: some wall paints offer stain-resistant or scrub-able formulas that bridge the gap.
If you prioritize longevity and cleaner maintenance, choose a door-specific or trim-grade enamel. For quick cosmetic updates, wall paint works; for lasting performance, pick the right product.
Decision Flow: Use Leftover Wall Paint Or Buy Door Paint?
You’ll want to weigh three things before deciding: whether the leftover paint’s finish and sheen match the door’s needs, how much wear and cleaning the door will face, and whether saving money is worth the extra prep and touch-ups.
If the leftovers are the right sheen and the door won’t get heavy use, you can often save time and cash.
But for high-traffic doors or a more durable finish, buying proper door paint is usually the smarter choice.
Match Finish & Sheen
Because doors get more wear and show brush marks and fingerprints differently than walls, matching the finish and sheen matters as much as matching color when deciding whether to use leftover wall paint or buy door paint.
You’ll check door color and sheen contrast: a matte wall paint on a glossy door will highlight imperfections and look mismatched. If leftover wall paint’s sheen matches your door’s existing finish, you can save money, but test a small panel first.
Apply the paint, let it cure, and inspect in different light. If the finish reads wrong, choose a paint formulated for doors with the proper sheen.
Durability And Wear
Matching sheen is only the first check; now consider how the door will stand up to daily use. You’ll want paint that resists scuffs, frequent contact, and cleaning without dulling door aesthetics.
Door-specific formulations often include tougher binders and higher abrasion resistance than typical wall paint. If you’re tempted to use leftover wall paint, test a small area for wear after drying and simulated rubbing.
Also think about paint storage: older leftover cans may have lost some properties, reducing durability. For a high-traffic door, choose a durable door paint; for low-traffic rooms, well-preserved wall paint can suffice.
Cost Versus Effort
When weighing cost versus effort, think about the true expense: time to prep and paint, potential extra coats, and whether leftover wall paint will hold up where hands and hardware hit. You’ll save money using leftovers, but you might spend time sanding, sealing, or adding a durable topcoat. Consider color psychology if matching trim or creating contrast, and weigh eco friendly finishes versus buying new low-VOC door-specific paint. Use the table to compare options quickly.
| Option | Upfront Cost | Effort |
|---|---|---|
| Leftover wall paint | Low | Higher prep |
| New door paint | Higher | Lower prep |
When Wall Paint Will Fail On High-Traffic Doors
Ever wondered why wall paint chips and scuffs so quickly on busy doors? You’ll notice failure when the paint meets repeated contact, moisture, and friction near edges and hardware. Pay attention to door hinge preservation and paint color fading as warning signs. Typical causes include:
- Constant rubbing from hands, bags, or pets that abrades flat wall finishes.
- Moisture and temperature swings that soften paint and break adhesion.
- Impact and edge wear from closing, causing flakes and loss of gloss.
When you see these, wall paint won’t hold — consider a tougher finish made for doors.
Cost Comparison: Leftover Wall Paint Vs Door-Specific Paint
Although using leftover wall paint might seem like the cheapest option, you’ll often pay more in time and touch-ups than with a small can of door-specific paint. You’ll save on upfront cost by using leftovers, and paint recycling reduces waste, but mismatched sheens and durability mean more sanding and recoats.
Choosing door-specific paint cuts maintenance and preserves finish where hands meet surface. Also consider color psychology: doors in bold, durable finishes communicate welcome and focus, while dulled leftovers can undermine that effect.
Factor labor, longevity, and aesthetic impact—sometimes the modest extra cost prevents recurring expenses and frustration.
How Door And Wall Paint Formulations Differ Chemically
Because doors get more handling and need a tougher finish, door paints use higher levels of binding resins and crosslinkers than typical wall paints, which boosts hardness and adhesion. You’ll notice formulations differ chemically to prioritize durability, gloss control, and faster cure.
Key contrasts include:
- Higher crosslinker content accelerates chemical reactions that form a dense, wear-resistant film.
- Adjusted solvent blends control open time and flow for smoother door surfaces.
- Additive packages enhance paint adhesion, impact resistance, and stain blocking on trim and edges.
These tweaks mean you should pick door-specific paint where frequent contact and cleaning occur.
Binders And Resins Used In Door Paint
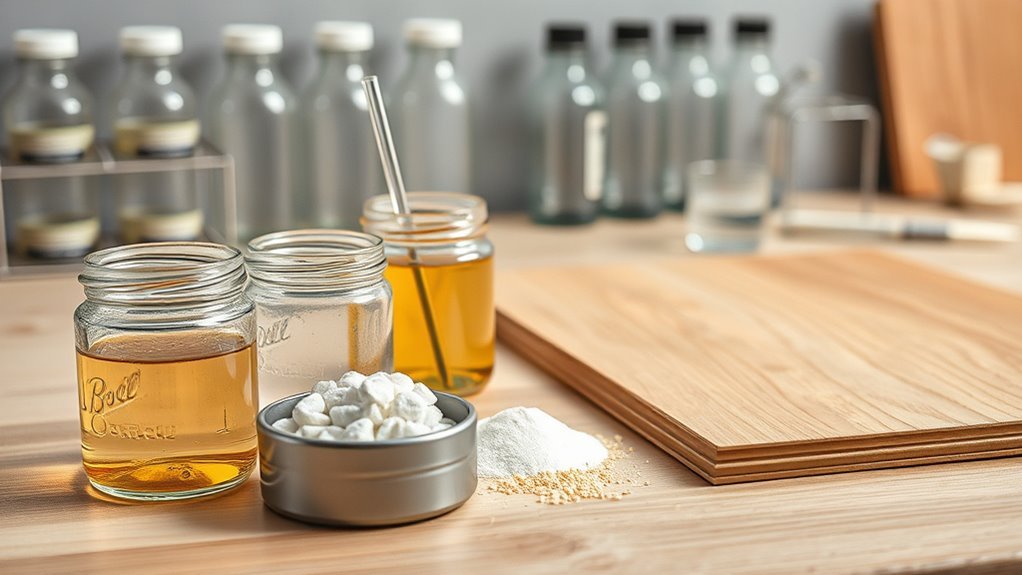
When you pick a door paint, the binder — often called the resin — determines how tough, flexible, and long-lasting the finish will be. You’ll find alkyds give hard, durable skins that resist scuffs and keep a smooth paint texture.
Waterborne acrylics balance flexibility with quick drying and easier cleanup. Urethanes and hybrid resins boost chemical and abrasion resistance for high-traffic doors and preserve your chosen door color longer.
Blend choice affects adhesion to wood, metal, or primed surfaces and influences sheen control. Match binder properties to use: durability, movement, and maintenance needs dictate the right resin.
Pigments And Fillers Common In Wall Paint
If you’re choosing wall paint, pigments and fillers are what give it color, opacity, and body. You’ll pick inorganic or organic pigments for hue and pigment stability; fillers like calcium carbonate add bulk and control sheen.
Eco friendly paints often use safer pigments and natural fillers without sacrificing coverage. Consider how pigments affect tint strength and lightfastness, and how fillers influence texture and sanding.
Compare formulations by testing swatches for true color and hiding power. Think about durability versus cost, and choose a product that balances aesthetic needs with environmental priorities.
- Pigments: hue, stability, lightfastness
- Fillers: body, opacity, texture
- Eco friendly paints: safer choices
VOCs And Indoor-Air-Quality Differences
When you pick a paint for doors versus walls, check the VOC content levels since some door enamels can be higher.
You’ll also want to take into account off-gassing duration because stronger solvents may linger longer and affect indoor air quality.
Make sure you plan ventilation and mitigation—like airing out rooms and using low-VOC options—to reduce exposure.
VOC Content Levels
Because VOCs evaporate into the air long after paint dries, the type of paint you choose for doors versus walls can meaningfully affect indoor air quality, odor, and health—especially in small or poorly ventilated spaces. You should check VOC levels on labels: door paints (often alkyd or high-gloss) usually list higher VOCs than many wall formulas.
Choose low-VOC or zero-VOC options when possible to protect vulnerable people. Consider these factors when selecting paint:
- VOC levels on the Product Data Sheet.
- Intended room ventilation and occupancy.
- Finish type—gloss tends to have higher VOCs than matte.
Off-Gassing Duration
Although paint feels dry to the touch, it can keep releasing VOCs for days to months afterward, and that ongoing off-gassing makes a real difference in indoor-air quality.
You’ll notice stronger odor off gassing from high-gloss or oil-based door paints versus many wall paints because formulations and surface area affect VOC release.
That lingering chemical emission can aggravate sensitivities and create prolonged indoor exposure even after visible curing.
Pay attention to product labels and choose lower-VOC options if you’re sensitive, since the duration and intensity of off-gassing vary by resin, solvent, film thickness, and ambient conditions.
Ventilation And Mitigation
How can you keep paint fumes from lingering indoors? You’ll want deliberate ventilation and mitigation to protect air quality while choosing hues that suit color psychology and appropriate paint texture. Follow these steps:
- Open windows, run exhaust fans, and use HEPA air purifiers to reduce VOC concentration rapidly.
- Select low-VOC or water-based door and wall paints; let each coat cure completely before closing rooms.
- Store cans sealed outdoors or in ventilated areas; clean brushes with minimal solvent indoors.
You’ll reduce odors and health risks, preserve intended finish, and maintain indoor-air-quality differences between door and wall applications.
When To Choose Oil-Based Or Alkyd Door Paint
When you’re choosing paint for doors, pick oil-based or alkyd when you need a tough, smooth finish that resists scuffs and holds up to frequent handling. You’ll want oil or alkyd for entryways, high-traffic rooms, or surfaces near pets and kids.
They level nicely around door hardware and hide brush marks, so hinges and knobs look clean after painting. Choose gloss or semi-gloss to emphasize trim and protect edges, matching your desired paint color for a cohesive look.
Expect longer drying times and stronger fumes, so ventilate and cure fully before heavy use to avoid sticking or damage.
When Waterborne Paints Are Fine For Doors
If your doors don’t face constant wear and you want quicker drying, lower fumes, and easier cleanup, waterborne paints are a fine choice. You’ll still prep surfaces, tighten a loose door hinge, and sand for proper adhesion.
Waterborne formulas suit interior doors that see light traffic and where you prefer minimal odor.
- Choose acrylic latex for stable adhesion and flexible film.
- Match paint texture to nearby trim to avoid visible differences.
- Use abrasion-resistant variants if occasional scuffs occur.
You’ll get fast cure times and easy soap-and-water cleanup without sacrificing a smooth, durable finish.
How Finish Type Matters More On Doors Than Walls
When you pick a finish for a door, durability matters more than the exact sheen because doors get bumped and handled constantly. A harder finish resists scuffs and holds up to cleaning better than a softer one.
Also, touch-ups on doors stand out more, so you’ll want a finish that hides repairs and maintains a uniform look.
Durability Trumps Sheen
Because doors take the brunt of daily use, you should prioritize a finish that resists scuffs, chips, and frequent cleaning over chasing the perfect sheen. You’ll find durability matters more than whether a door is satin or semi-gloss; it affects longevity, color consistency, and budget considerations.
Choose a harder, washable formula for high-traffic doors and reserve softer wall paints for less-handled surfaces. Consider these practical points:
- Durability: pick finishes that tolerate abrasion and repeated cleaning.
- Maintenance: smoother, tougher finishes clean easier without wearing.
- Cost-benefit: higher-quality durable paint saves replacement and touch-ups.
Touch-Up Visibility
Along with choosing a durable finish, think about how easy it’s to patch up dings—doors show touch-ups far more than walls. You’ll notice glossy or semi-gloss hides corrections better because light skims the surface, while flat finishes can reveal texture differences.
Match sheen and use color-matched touch-up kits so repairs vanish; consider how color psychology affects perception—darker hues hide scuffs, lighter ones spotlight flaws. Prep a small dab kit and practice feathering strokes to blend.
If you prefer eco-friendly options, pick low-VOC touch-up paints formulated for the chosen finish to keep results seamless and safe.
Gloss And Sheen Levels Explained For Doors Versus Walls
Although they look similar at a glance, gloss and sheen levels behave very differently on doors than on walls, and choosing the right one changes both appearance and durability. You’ll weigh aesthetics, maintenance, and finish depth; consider color psychology when a high sheen brightens tones, and pick eco-friendly formulations if indoor air matters.
Gloss and sheen behave differently on doors versus walls—choose finishes for appearance, durability, and indoor air quality.
Use these guidelines:
- High gloss: durable, easy to clean, highlights imperfections — ideal for doors.
- Semi-gloss: good balance of durability and subtle reflectivity for trim and cabinets.
- Eggshell/satin: low sheen hides flaws, suits walls where touch-ups and warmth matter.
Minimizing Hardware Glare: Choosing The Right Sheen
When you want hardware to fade into the background, pick a lower-sheen finish for surrounding surfaces so light doesn’t jump off metal and draw the eye. You’ll reduce hardware glare by choosing matte or low-sheen paints on doors and nearby trim; they absorb reflections instead of amplifying them.
For high-traffic doors you might still use semi-gloss for durability, but balance it with low-sheen adjacent panels to keep knobs unobtrusive. Sheen selection should consider finish durability, cleaning needs, and the amount of direct light hitting hardware.
Test samples under real lighting to confirm the glare stays minimized before you commit.
How Sheen Changes Perceived Color And Texture
Pay attention to sheen because it can shift how a color reads, making hues look deeper or lighter depending on gloss level.
You’ll also notice that higher sheens make surface texture more pronounced, while flatter sheens mute imperfections and create a smoother look.
Choosing the right sheen helps you control both the color impression and the door’s visible texture.
Sheen Alters Color
Because sheen controls how light reflects off a surface, it can make the same pigment look noticeably different on a door than on a wall. You’ll notice gloss throws highlights, while matte softens tones; that shift affects mood through color psychology and how you perceive contrast during paint drying.
Consider these quick observations:
- High sheen boosts saturation and appears brighter.
- Eggshell balances reflection for subtler depth.
- Matte mutes glare, showing truer undertones.
When you choose sheen, think about the room’s lighting and desired emotional impact; the finish will change perceived color even though the pigment’s identical.
Texture Appears Enhanced
How does sheen make texture pop on a painted surface? You’ll notice sheen affects texture enhancement by reflecting light differently across finish levels. Higher sheen throws light off bumps and valleys, so surface irregularities become more visible; matte hides them by scattering light.
When you choose door paint with a glossier sheen, you’ll spot brush marks, dents, or grain more easily than on a flat wall paint. Use this to your advantage: pick sheen to highlight or conceal details.
For doors that get handled, a slight sheen balances durability and subtle texture suppression without shouting imperfections.
How Durability And Abrasion Resistance Compare
While both door and wall paints protect surfaces, door paints are formulated to handle more rubbing, scuffs, and contact. They use tougher binders and often higher-solids finishes like satin or semi-gloss to resist abrasion.
Door paints are tougher than wall paints, using stronger binders and glossier finishes to resist scuffs and abrasion.
Wall paints, on the other hand, prioritize coverage and washability over heavy-duty wear resistance. You’ll pick door paint when durability matters, especially in high-traffic rooms where color psychology and paint color trends guide choice without sacrificing toughness.
Consider performance differences:
- Scratch resistance — door paints resist marks better.
- Cleanability — door finishes tolerate harsher cleaning.
- Longevity — tougher formulations mean fewer touch-ups.
Curing Vs Drying: Impact On Door Durability
If you want a door finish that actually stands up to daily use, you need to know the difference between drying and curing: drying is the solvent or water evaporating so the paint feels dry, while curing is the chemical process that hardens the film and gives it lasting strength.
You’ll wait beyond touch-dry to avoid scuffs and adhesion failure; cured enamel tolerates knocks, cleaning, and hinge stress better. Plan door hinge maintenance around full cure time, not just surface dryness.
Also consider paint color psychology—gloss and depth affect perceived quality, so choose a finish that complements both aesthetics and durability.
How Drying Time And Recoat Windows Differ
You’ll notice door paints usually dry to the touch faster but need longer curing before heavy use.
Wall paints often allow quicker recoats.
Check the manufacturer’s recoat window—doors often require extended wait times or specific tack-free conditions before you repaint.
Following those guidelines prevents smudges, adhesion problems, and uneven finishes.
Drying Time Differences
Because doors get more handling and need a tougher finish, door paints usually dry and cure on a different schedule than wall paints. You’ll notice faster drying speed on some door formulations so you can sand and recoat sooner, while paint curing—full hardness—still takes longer.
Consider these practical differences:
- Surface: smooth, dense door surfaces often speed film formation.
- Formulation: alkyd or fast-dry acrylics shorten tack-free time.
- Environment: temperature and humidity shift both drying speed and ultimate paint curing.
You should plan work stages around manufacturer times rather than assuming wall-paint intervals will apply.
Recoat Window Guidelines
When planning recoats, remember that door and wall paints often give you different workable windows—so check the product’s specified tack-free and recoat times rather than assuming they match.
You’ll find doors often need longer cure before sanding or heavy use, while walls accept quicker recoats. Follow manufacturer guidance, note temperature and humidity effects, and test a small area to confirm tack-free status.
Factor color psychology when timing final coats—deeper hues may show imperfections if rushed. Choose eco-friendly formulations where possible; they might alter recoat intervals.
Proper scheduling prevents finish failures and keeps your project on track.
Adhesion And Primer Needs By Door Surface
Although doors share the same room as your walls, their materials and finishes demand different attention for good adhesion. You’ll check the door frame edges, panels, and hardware areas for glossy coatings or contaminants that impede paint adhesion. Sanding and cleaning prepare surfaces; primer choice depends on substrate porosity and existing finish.
Consider these steps:
- Inspect surface for gloss, chips, or old sealers—remove or sand to promote grip.
- Clean thoroughly with a degreaser; dust kills adhesion.
- Spot-prime bare wood, repaired areas, or exposed metal to unify absorption and improve topcoat performance.
Best Primers For Wood, Metal, Fiberglass, And Hollow Cores
Now that you’ve prepped and primed trouble spots on a door, pick a primer matched to the door’s material to get reliable adhesion and finish.
For wood, use an oil-based or stain-blocking acrylic primer to seal tannins and guarantee uniform paint color. Consider paint color psychology when choosing sheen to convey warmth or formality.
For metal, use a rust-inhibiting, etch or bonding primer to protect and maintain door security by preventing corrosion.
For fiberglass, use a high-adhesion bonding primer formulated for nonporous surfaces.
For hollow-core doors, choose a lightweight acrylic primer that promotes even coverage without soaking through.
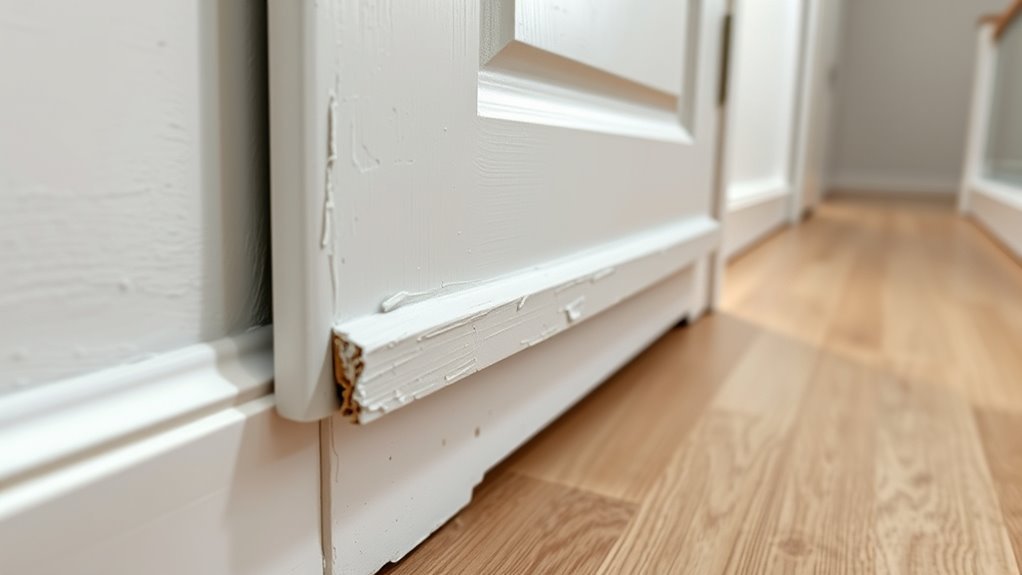
Preparing A Door: Sanding, Cleaning, Deglossing
Before you paint, sand the door to smooth rough spots and feather out old finishes so the new coat adheres evenly.
Then clean thoroughly to remove dust, grease, and fingerprints.
If the surface is glossy, use a deglosser or light sanding to dull the sheen and promote better paint bonding.
Sanding For Smoothness
When you’re prepping a door for paint, sanding is the step that creates a smooth, even surface so paint will adhere properly and look professional. You’ll remove gloss, smooth imperfections, and stop paint peeling from recurring around edges and hardware.
Take off or mask the door lock and hinges so you can sand close to metal without damage.
Follow a simple progression:
- Start with 120-grit to remove old finish and high spots.
- Move to 180-grit for smoothing visible scratches.
- Finish with 220-grit for a fine, paint-ready surface.
Work with the grain and vacuum dust between grits.
Cleaning And Deglossing
After sanding, clean and degloss the door so paint can bond to a dust-free, slightly abraded surface. You’ll wipe away dust with a tack cloth or microfiber, then remove grease and grime using a mild degreaser or TSP substitute.
For gloss reduction, use a liquid deglosser or fine sandpaper; deglossing prevents poor adhesion that leads to paint peeling. Rinse and dry thoroughly.
Inspect for color fading; if uneven, apply a primer or stain blocker before topcoat.
Work in a ventilated area, wear gloves and eye protection, and allow full cure time for lasting results.
Painting Hollow-Core Vs Solid Wood Doors
Because hollow-core and solid wood doors take paint differently, you’ll want to adjust your prep and technique depending on which you’ve got. You’ll remove door hardware, repair dents or veneer, and decide whether paint removal is needed for solid wood.
For hollow-core, focus on sealing edges and using light sanding; for solid wood, grain filling and proper priming matter.
- Hollow-core: clean, sand lightly, prime, use thin coats.
- Solid wood: strip or degloss if needed, fill grain, prime.
- Both: remove hardware, mask gaps, use appropriate topcoat for durability.
How To Paint Metal And Fiberglass Doors Correctly
If you’re tackling metal or fiberglass doors, prep and product choice make the difference between a lasting finish and peeling paint. Remove door hardware and hang the door or lay it flat. Clean thoroughly with a degreaser, then sand lightly to scuff glossy surfaces; use a rust converter for metal if needed.
For paint removal, strip old loose layers or feather edges for adhesion. Prime with a metal- or fiberglass-specific bonding primer, then apply a high-quality exterior acrylic or oil-based door paint in thin, even coats.
Allow recommended drying between coats and reattach hardware only when fully cured.
Tools For Painting Doors: Brushes, Rollers, Sprayers
Now that the door’s prepped and primed, pick the right tools to get a smooth, durable finish. You’ll choose based on door material, paint color choice, and primer application quality. Consider these options:
- Angled sash brush — precise for panels and trimming, great with latex or oil-based door paints.
- Mini foam roller (¼”–⅜”) — speeds coverage on flat surfaces, reduces lap marks when you roll with grain.
- HVLP or airless sprayer — fastest for factory-like smoothness on good primer application, needs masking.
Match tool to finish and paint type, keep brushes clean, and test on scrap before committing.
Tips To Avoid Brush Marks And Orange Peel On Doors
Get the door smooth before you paint by sanding, filling gaps, and wiping away dust so the finish lays down evenly.
Choose a paint formulated for doors and apply it thinly with the right brush or a high-quality foam roller to reduce brush marks.
Work in consistent, light strokes and follow the manufacturer’s recoat times to avoid orange peel and achieve a flat, professional look.
Proper Surface Preparation
Because a flawless finish starts before any paint touches the door, proper surface prep is essential to avoiding brush marks and orange peel. You’ll strip old gloss, sand to a smooth, consistent profile, and clean thoroughly so paint lays down evenly, aiding color blending and texture enhancement. Follow these steps:
- Remove hardware, fill imperfections with lightweight filler, sand from coarse to fine grit.
- Degrease and tack-rag the surface; guarantee dust-free conditions.
- Prime repaired areas and feather edges for uniform absorbency.
Do each step patiently; rushed prep guarantees flaws, while careful prep prevents brush strokes and orange peel.
Paint Type And Application
When choosing paint for doors, pick a product designed for trim or cabinetry—these have higher solids and flow agents that reduce brush marks and orange peel. Then match it to your application method (brush, roller, or spray) for best results.
You’ll avoid texture issues by sanding between coats, using thin even layers, and keeping a wet edge.
For brushes, choose high-quality synthetic bristles; for rollers, a short nap; for spray, control pressure and distance.
Practice color blending on a scrap to ensure uniform sheen.
Proper application not only prevents flaws but also improves paint longevity and finish durability.
Testing Compatibility Between Wall Paint And Door Surfaces
Before you commit to painting a door with wall paint, test a small, inconspicuous area to confirm adhesion, sheen match, and durability on the door’s actual surface. Wear gloves and ventilate to avoid paint fumes near the door handle.
Try these steps:
- Clean, sand lightly, and apply primer if needed.
- Paint a 2×2 inch patch; let dry fully, then check adhesion and sheen.
- Rub and press to simulate contact; watch for scuffing or lifting.
If the sample performs well over several days, you can proceed with more confidence, knowing the finish will hold up.
Quick Fixes: Using Wall Paint For Temporary Door Touch-Ups
If your patch test went well but you need a fast, temporary fix, wall paint can work for small door touch-ups with a few practical adjustments.
You’ll clean and sand the nick lightly, mask door hardware to avoid drips, and choose a concentrated coat so it dries quicker and looks smoother.
Apply thin layers, letting each dry fully to reduce visible brush marks and minimize paint fumes in confined spaces.
After curing, buff gently to blend edges.
Remember this is temporary: monitor adhesion and wear, and plan proper refinishing later if the touch-up starts to peel or yellow.
When To Repaint Vs Refinish Or Replace A Door
Although a fresh coat can restore appearance and hide minor wear, you should choose repainting, refinishing, or replacing based on the door’s condition and your goals.
Inspect for cracks, rotted edges, sticking at the door hinge, or warped panels. Consider paint texture mismatches and whether sanding will smooth them.
- Repaint: choose when surface damage is minor and hardware works; fix paint texture by sanding and priming.
- Refinish: opt for solid wood when you want natural grain visible; repair minor structural issues first.
- Replace: necessary for severe rot, warping, or damaged frames beyond repair.
Maintenance Expectations And Repainting Frequency
Expect a painted door to show wear faster than a wall—usually within 3–7 years in high-traffic spots—so plan inspections accordingly.
You should clean doors regularly with mild soap and a soft cloth to remove grime and protect the finish.
Repaint when you see chipped edges, noticeable scuffs, or when touch-ups no longer blend with the surrounding finish.
Expected Wear Timeline
Because doors take more bumps, scuffs, and hand contact than most walls, you’ll usually need to repaint them sooner. Consider how Color psychology influences your timeline: high-traffic entry doors may lose vibrancy faster, affecting perceived cleanliness. Choose finishes and Eco friendly options to balance durability with low VOCs.
Typical repaint intervals depend on use:
- Low traffic (bedrooms) — 7–10 years.
- Moderate traffic (interior common doors) — 5–7 years.
- High traffic (entry, kids’ rooms) — 2–4 years.
Touch-ups extend time between full repaints; prioritize tougher finishes where wear is imminent.
Cleaning And Care
When you clean and care for painted doors regularly, you’ll keep finishes looking fresher and delay full repainting. You should dust, wipe with mild detergent, and avoid abrasive tools to protect sheen and respect historical trends in finish choices. Pay attention to hinges and edges; small touch-ups prevent larger jobs. Color psychology matters—darker shades hide scuffs but show chips; lighter hues reveal dirt. Track cleaning frequency monthly and deep clean seasonally. Use the table below to guide tasks and timing.
| Task | Frequency | Tip |
|---|---|---|
| Dusting | Monthly | Soft cloth |
| Wiping | Seasonal | Mild soap |
| Touch-ups | As needed | Match sheen |
| Hardware care | Annually | Lubricate |
Repaint Triggers
If you notice peeling, significant scuffs, or fading that alters the door’s color or sheen, it’s time to plan a repaint. You’ll monitor Door aesthetics and choose timing based on use and exposure. High-traffic doors or those facing sun need attention sooner than interior doors.
- Inspect annually for chips, wear, and uneven paint textures.
- Recoat every 3–5 years for exterior doors; 5–7 years indoors, adjusting for finish and climate.
- Spot-treat scuffs immediately; full repaint when multiple repairs affect overall appearance.
Staying proactive preserves functionality, protects surfaces, and maintains consistent Door aesthetics.
Eco-Friendly Door Paints And Trade-Offs
Want a greener finish for your doors without sacrificing durability? You can choose low-VOC or water-based formulas that use eco-friendly pigments and meet current VOC regulations, reducing odors and indoor pollutants.
Expect slightly different drying and leveling compared with solvent-based paints; you’ll need proper ventilation and patience for full cure.
Expect different drying and leveling than solvents; ensure good ventilation and allow extra time for a full cure
Some eco options may scuff more easily or require more coats to match opacity, so test first.
For hardware-heavy doors, pick durable topcoats or hybrid acrylic-alkyds labeled low-VOC to balance environmental goals with scratch resistance and washability without compromising performance.
Color And Sheen Matching: Doors, Walls, And Trim
When you pick paint for doors, walls, and trim, pay attention to matching finish levels so light reflects consistently across surfaces.
You’ll also want to guarantee the color reads the same in different sheens, since gloss and matte can shift perceived hue.
Testing swatches together under your room’s light will show whether your choices create a cohesive look.
Matching Finish Levels
Because doors, walls, and trim catch light differently, you’ll want to take into account both color and sheen when coordinating them. Match finish levels to function: doors need tougher sheens; walls benefit from forgiving, lower sheens; trim often uses a durable, semi-gloss for clean lines.
Consider these steps:
- Assess traffic and cleaning needs before selecting sheen.
- Test small patches on a door frame and adjacent wall to judge appearance under room light.
- Use consistent paint application methods (brush, roller, spray) to avoid gloss variation.
This approach keeps transitions intentional and maintains a cohesive, practical look.
Consistent Color Across Surfaces
Although doors, walls, and trim may share the same paint formula, you’ll need to adjust for how each surface reflects light and wears over time to keep color consistent. You should test samples on each substrate and view them at different times of day; sheen differences change perceived hue and saturation.
Consider Color psychology when choosing tones—trim crispness affects mood as much as wall color. Use matching primers and appropriate sheens: satin for doors, eggshell for walls, semi-gloss for trim to balance durability and reflection.
Also factor Environmental impact by selecting low-VOC options that still deliver true, lasting color.
How Lighting Changes The Perceived Finish On Doors
If you stand at different angles or change a light source, you’ll notice paint on a door can look dramatically different than it does on a wall. You’ll catch glare on glossy panels, shadow in recessed trim near a door hinge, or a subtle shift in paint color under warm bulbs.
Consider how lighting alters finish perception:
- Direct overhead: emphasizes sheen and highlights imperfections.
- Side lighting: reveals texture and brush strokes along edges.
- Diffuse ambient: softens contrast, makes colors read truer.
You should test finishes in the room’s actual light before committing to a door finish.
Manufacturer Labels: What To Look For On Paint Cans
When you pick up a paint can, pay close attention to the label — it tells you the finish, coverage, drying time, and substrate compatibility so you can avoid surprises on doors or trim.
Check finish terms: satin, semi-gloss, or gloss suit doors; flat or eggshell suit walls.
Check finish terms: choose satin, semi-gloss, or gloss for doors; flat or eggshell works best for walls.
Look for VOC levels, recommended coats, and recoat times to plan work.
Note mentions of adhesion or mold resistance for trims.
Swatch photos hint at color psychology effects under different lights.
Feel descriptions indicate paint texture and leveling.
Manufacturer application instructions and recommended primers guarantee the best, long-lasting result.
Common Mistakes DIYers Make When Painting Doors
Because doors get heavy use and show every imperfection, DIYers often make avoidable mistakes that ruin the finish or waste time. You’ll want to avoid common traps and protect yourself from paint fumes. Remove or mask door hardware, sand lightly, and clean before priming. Follow these critical points:
- Skipping primer: paint won’t adhere or hide stains.
- Using wall paint: it may scuff; choose a durable door formula or semi-gloss.
- Rushing between coats: leads to drips and uneven sheen.
Take time to prep, ventilate, and let each coat cure for a lasting, professional look.
Case Studies: Success And Failure Using Wall Paint On Doors
Although you can sometimes get away with using wall paint on a door, real-world case studies show why that’s often a gamble. You’ll read quick wins where smooth prep and sealed door hardware prevented chipping, and failures where thin wall paint sagged, resisted cleaning, or stuck during paint drying. You learn to test adhesion, mimic door sheen, and watch handling after coats cure. Below are concise examples to guide choices.
| Outcome | Key Cause |
|---|---|
| Success | Proper sanding |
| Failure | Low-durability wall paint |
| Mixed | Incomplete prep |
| Success | Sealed door hardware |
| Failure | Poor paint drying conditions |
Professional Alternatives: When To Hire A Pro
If your door project involves complex surfaces, high-traffic areas, or a finish you want to last, hire a pro—they’ll bring the right prep, tools, and coatings to avoid common DIY pitfalls. You’ll save time, avoid mistakes with tricky trim or hinges, and protect door hardware from damage.
Pros control paint fumes, use proper ventilation, and apply durable coatings that resist scuffs. Consider hiring when you face:
Pros manage fumes, ventilate properly, and apply tough, scuff-resistant coatings—hire one when durability matters.
- Structural repairs or warped panels
- Specialty finishes (gloss, lacquer, or sprayed coats)
- Historic doors needing precise restoration
A pro gives warranty, consistent results, and peace of mind.
Checklist: Choosing The Right Paint For Each Door
When choosing paint for each door, start by matching function to finish. You’ll consider traffic, material, and desired Door aesthetics. Pick durable, washable sheens for high-use doors and softer sheens where less wear occurs. Coordinate paint color schemes with room tones and hardware. Test samples, check drying times, and confirm compatibility with existing coatings. Use this checklist to decide quickly:
| Door Type | Recommended Sheen | Notes |
|---|---|---|
| Entry | Semi-gloss | Durable, weather-resistant |
| Interior high-traffic | Satin | Washable, hides wear |
| Closet/bedroom | Eggshell | Softer appearance, low wear |
Follow the checklist, then paint confidently.
Frequently Asked Questions
Can Door Paint Be Used on Kitchen Cabinets and Built-Ins?
Yes — you can use door paint on kitchen cabinets and built-ins if you want improved door aesthetics and strong paint durability; just sand, prime, and choose a durable sheen, and you’ll get a long-lasting, attractive finish.
How Do Paint Warranties Differ for Doors Versus Walls?
Warranties for doors usually cover higher Paint durability and finish wear, while wall warranties focus on coverage for fading and Color matching over time; you’ll need to read terms, since coverage limits and labor exclusions often differ.
Are Door-Specific Paints Pet-Safe for Chewing or Licking?
A vet once treated a pup for paint flakes; you shouldn’t assume door paint safety. Choose certified pet friendly finishes with low VOCs and non-toxic resins, and keep pets away until manufacturer-recommended cure times pass.
Can I Apply Door Paint Over Lead-Based Finishes Safely?
You shouldn’t; lead based paint requires safety precautions. You’ll need certified lead-safe contractors, proper containment, HEPA cleanup, and either encapsulation with approved products or full removal following EPA/OSHA rules before applying door paint.
Do Fire-Rated Doors Require Special Paint Certifications?
Yes — you’ll need paints that meet fire-rated certifications; your door material and paint durability matter, and certified intumescent or fire-resistant coatings guarantee compliance while preserving finish, performance, and safety for approved rated assemblies.
Conclusion
You can use leftover wall paint on a door for a quick refresh, but don’t expect it to hold up like door-specific paint—wall paint’s flatter finish and lower durability can scuff, chip, and show fingerprints faster. If you’re worried about cost, a durable satin or semi-gloss touch-up is affordable and worth it for high-traffic doors. So if longevity and easy cleaning matter, spend a little more now to avoid repainting sooner.