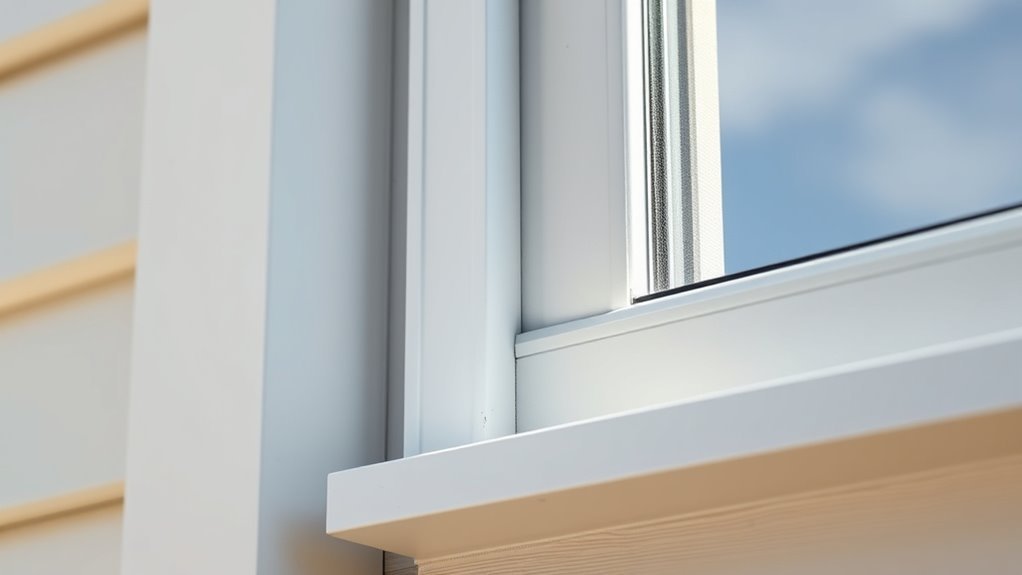
What Paint to Use on Exterior Window Frames?
Use a high-quality exterior acrylic-latex for most frames—you’ll get good adhesion, flexibility, and mildew resistance. For wood that sees heavy wear or older metal frames, consider oil-based or hybrid alkyd paints for a tougher, smoother finish; metal also benefits from a rust-inhibiting primer. Vinyl usually needs light sanding and a high-adhesion acrylic. Pick satin to semi-gloss for durability and washability. Keep temps mild and humidity low, and keep going for practical prep and application tips.
Best Paint Types for Exterior Window Frames (Quick Answer)
Choosing the right paint for exterior window frames matters because it affects durability, maintenance, and curb appeal.
You’ll usually pick between high-quality acrylic latex and oil-based enamels: acrylic latex resists fading, expands with temperature, and simplifies future touch-ups, while oil-based enamels give a harder, smoother finish for metal or heavily trafficked frames.
For wooden frames, use exterior paint formulated for wood with good adhesion and mildew resistance.
Always prep surfaces—clean, sand, prime—since that reduces repainting.
Always prep surfaces—clean, sand, prime—to cut repainting needs and keep frames lasting longer.
Prioritize products labeled for exterior use to ease frame maintenance and guarantee long-lasting protection and appearance.
Quick Decision Matrix: Pick by Frame Material and Climate
If your frames are wood, pick an oil-based paint for better penetration and durability; for metal or vinyl, use acrylic latex for flexibility and adhesion.
Consider your climate—humid or coastal areas need paints with mildew and salt resistance.
Use this quick matrix to match material and environment so you get long-lasting results.
Wood Frames: Oil-Based Paint
When your window frames are wood and you want long-lasting protection, oil-based paint is a strong choice because it soaks into grain, seals joints, and resists peeling in wet climates.
You’ll appreciate oil paint benefits: durable film, excellent adhesion, and slower curing that levels brush marks for smooth wood frame finishes.
Prep thoroughly—remove old loose paint, sand glossy surfaces, and apply a compatible oil-based primer to prevent tannin bleed.
In cold or humid regions, expect longer dry times but better moisture resistance once cured.
Maintain with periodic inspections and touch-ups to keep frames sealed and attractive for years.
Metal & Vinyl: Acrylic Latex
For metal and vinyl frames, acrylic latex paint is usually your best bet because it flexes with temperature changes, resists chalking and UV damage, and bonds well to modern substrates; pick a formulation labeled for exterior metal or vinyl and match sheen to adjacent trim for consistent weatherproofing. You’ll prep by cleaning and scuffing, use a compatible primer for metal frame finishes, and rely on quality acrylics for vinyl paint durability. Choose high-adhesion products in your climate: colder regions need flexible formulas; hot, sunny areas need UV-resistant variants.
| Material | Best Tip |
|---|---|
| Metal | Use rust-inhibiting primer |
| Vinyl | Light sanding, high-adhesion acrylic |
What to Consider Before You Buy Exterior Window Paint
Why choose one exterior window paint over another? You’ll weigh paint finish and environmental factors first: sheen affects durability and cleanup, while climate, UV exposure, humidity, and pollution dictate formulation.
Consider substrate compatibility—metal, vinyl, or primed surfaces need specific adhesives—and check for rust inhibitors or flexible acrylics.
Evaluate longevity versus ease of touch-up, VOC limits for health and local regulations, and colorfast pigments for fade resistance.
Think about application method—brush, roller, or spray—and required primers or sealers.
Finally, compare warranties and reviews so you buy a product suited to your windows and local conditions.
Wood Frames: Overview and Paint Priorities
If you’ve settled on the right sheen and formulation for your climate and substrate, turn your attention to wood frames—where paint choices and prep work matter most because wood reacts to moisture and temperature.
For exterior wood windows you should prioritize flexible, breathable coatings that shed water yet allow trapped moisture to escape. Choose high-quality primers and paints formulated for wood; they resist cracking, peeling, and UV damage.
Consider long-term wood frame maintenance—regular inspection, touch-ups, and sealing joints will extend life.
Balance durability with curb appeal by following current paint color trends that complement your home while protecting the substrate.
Prep for Wood Window Frames: Step-by-Step
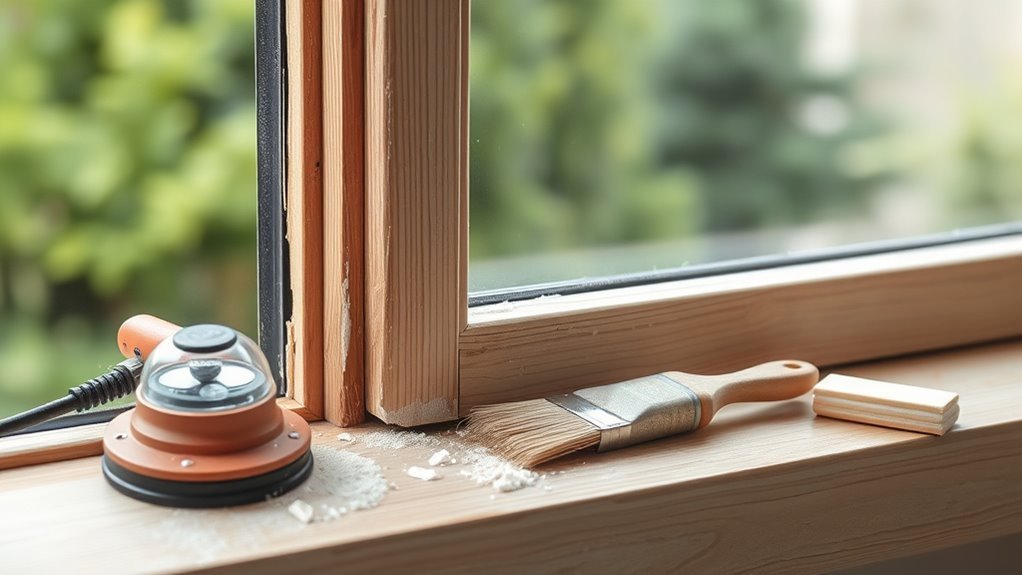
Start by evaluating the frame for loose paint, rot, gaps, and damaged glazing putty so you know exactly what repairs and prep steps you’ll need.
For reliable window care and frame maintenance, follow a clear sequence: remove loose paint, repair rot, clean, and protect surfaces. Use sturdy tools and safety gear, and work on dry days.
- Scrape and sand to sound wood
- Cut out rot and splice or use epoxy
- Re-caulk joints and replace glazing putty
- Clean dust, prime bare wood, and mask glass
You’ll save time and guarantee long-lasting paint adhesion.
Primers for Wood: Stain-Blocking and Tannin Control
After you’ve stripped, repaired, and cleaned the frame, pick a primer that blocks stains and tannin bleed to protect your topcoat and keep color true.
You’ll choose between oil-based, shellac, or high-performance acrylic primers; each offers reliable stain blocking techniques for knots, water marks, and old finishes.
Apply per manufacturer directions, sealing end grains and joints.
For heavy tannin woods like cedar or redwood, use dedicated tannin control methods—shellac or blocked-formula primers work best.
Sand lightly between coats, wipe dust, and allow full cure before topcoating to guarantee adhesion and long-lasting, consistent color on exterior frames.
When to Repair vs. Replace Rotten Wood Frames
You’ll want to inspect the rot to judge how deep and widespread the damage is before deciding.
Compare the repair costs and expected lifespan of patched wood versus a full replacement to see which gives you better long-term value.
If the rot compromises structural integrity or keeps recurring, replacing the frame is usually the smarter investment.
Assessing Damage Extent
When evaluating a rotted window frame, focus on how deep and widespread the decay is rather than just its appearance: surface soft spots and shallow rot can usually be repaired, but extensive rot that compromises the structural members or the sill almost always calls for replacement.
You’ll perform a careful damage assessment to decide between repair options or full replacement. Probe with a screwdriver, look for mold or insect damage, and check adjoining trim and interior finishes.
Consider these signs:
- Soft, crumbling wood beyond a shallow area
- Warped or sagging sill
- Repeated moisture stains nearby
- Visible structural separation
Cost Versus Longevity
If you’re weighing repairs against full replacement, balance upfront costs with how long each option will last and what future maintenance will cost you.
You should perform a cost analysis: compare repair materials, labor, and paint against replacement frames and installation.
Consider longevity factors like wood species, exposure, and existing rot extent—small, dry rot often responds to epoxy and patching, lasting years with proper paint and sealant.
Extensive structural decay or recurring moisture problems usually justify replacement to avoid repeated expense.
Factor resale value and energy efficiency too; sometimes higher initial spend saves money and hassle long term.
Aluminum Frames: What Makes Them Different
Because aluminum conducts heat and resists corrosion differently than wood or vinyl, painting these frames calls for specific prep and coatings.
You’ll notice aluminum frame advantages like low maintenance and durability, but also aluminum frame disadvantages such as thermal expansion and poor paint adhesion if untreated.
Consider these points before you choose paint:
- Choose coatings formulated for metal adhesion and flexibility.
- Expect thinner, smoother surfaces that show imperfections sooner.
- Match paint sheen to heat absorption concerns to limit warping.
- Factor longevity: proper primers and topcoats extend life despite expansion stresses and weathering.
Prep Steps for Aluminum and Metal Frames
Now that you know the particular challenges of aluminum—poor natural adhesion, thermal movement, and a smooth surface—you’ll want to follow a careful prep routine to get paint to stick and last.
Start by cleaning with a mild detergent and rinsing thoroughly; remove dirt, oils, and old flaking paint. Degrease with a solvent where needed, then sand lightly with fine-grit abrasive to dull the surface.
Mask glazing and hardware. Use a tack cloth to clear dust, and roughen crevices with a brush.
For metal frame durability, choose compatible primers and paints as part of ongoing aluminum frame maintenance.
Rust-Preventive Primers for Metal Window Frames
Before you paint metal frames, pick a rust-inhibiting primer—zinc-rich, etch, or epoxy primers each bond differently and resist corrosion.
You’ll need to remove loose rust, clean the surface with a degreaser, and sand or use a wire brush so the primer can adhere.
Apply the primer per manufacturer instructions—thin, even coats and proper drying times guarantee the topcoat sticks and rust stays out.
Rust-Inhibiting Primer Types
When you’re prepping metal window frames, choosing the right rust-inhibiting primer is essential to stop corrosion and guarantee a long-lasting finish. These primers chemically bond to metal, block moisture, and provide a stable base for topcoats.
You’ll weigh options based on exposure, metal type, and desired durability while focusing on rust prevention and primer selection.
Consider common types:
- Zinc-rich primers: offer sacrificial protection for severe corrosion risks.
- Epoxy primers: provide excellent adhesion and chemical resistance.
- Acrylic primers: faster drying, UV-stable, good for mild conditions.
- Oil-based primers: penetrate well, excellent under alkyd topcoats.
Application And Surface Prep
Having picked a rust-inhibiting primer that suits your metal and exposure, you’ll next focus on preparing and applying it to guarantee it bonds and performs as promised. Start with thorough surface cleaning—remove dirt, grease, and loose rust with a solvent and wire brush. Sand glossy areas for adhesion, wipe residue, and mask glass. Apply primer in thin, even coats per manufacturer directions, allowing full cure between coats. Check weather considerations: avoid high humidity, imminent rain, or temperatures outside the recommended range. Inspect and touch up edges after cure to seal vulnerable seams.
| Step | Tip |
|---|---|
| Clean | Solvent then brush |
| Sand | Feather edges |
| Prime | Thin, even coats |
| Cure | Dry conditions only |
Vinyl and PVC Frames: Painting Possibilities
Vinyl and PVC frames can be painted, but they need special prep and the right products to stick and stay durable. You can change vinyl colors, but you’ll respect PVC durability limits and thermal expansion.
Choose flexible, exterior-grade acrylic or specialty vinyl paint and a primer made for plastics. Consider light shades to avoid heat problems.
- Test a small, inconspicuous area first.
- Use cleaners that remove oils and mold release agents.
- Apply adhesion promoter if recommended by paint maker.
- Finish with a UV-resistant topcoat for longer life.
Follow manufacturer guidance and avoid heavy, dark colors that trap heat.
Prep Steps for Vinyl and Fiberglass Frames
Before you paint vinyl or fiberglass frames, clean and degrease them thoroughly so the new coating will stick.
Lightly sand the surface to scuff the gloss, then wipe away dust with a tack cloth.
Finish by applying a compatible primer recommended for plastic or fiberglass to guarantee adhesion and durability.
Clean And Degrease
Start by thoroughly cleaning and degreasing the frames so paint will stick and finish evenly. You’ll remove dirt, oils, and mildew with proper cleaning techniques before any sanding or priming.
Use mild detergent first, then a targeted degreasing solution for stubborn residues. Rinse and dry completely to avoid trapped moisture.
- Mix warm water with a gentle soap for initial wash.
- Apply an alcohol or trisodium phosphate-based degreaser sparingly.
- Scrub with a soft brush or microfiber to protect vinyl and fiberglass.
- Rinse thoroughly and let air-dry, checking for remaining film.
Proper cleaning prevents adhesion failures and uneven sheen later.
Sand And Prime
Lightly scuff the frames with fine-grit sandpaper (220–320 grit) to create a key for primer, then wipe away dust with a tack cloth so the primer bonds properly. You’ll use careful sanding techniques to avoid gouges; sand lightly along profiles, then clean. Choose primer types suited to vinyl or fiberglass—adhesion-promoting, flexible primers work best. Apply thin, even coats and follow flash times. Test a small area first.
| Surface | Recommended Primer |
|---|---|
| Vinyl | Adhesion-promoting primer |
| Fiberglass | Flexible, oil- or latex-based primer |
| Test | Small-area adhesion test |
Bonding Primers for Slick Vinyl and PVC
When working with slick vinyl or PVC window frames, you’ll need a bonding primer designed to chemically adhere rather than just stick like regular primers do.
You’ll prep surfaces with PVC surface treatment and follow vinyl adhesion techniques to guarantee long-lasting paint. Choose a solvent-based or specialty acrylic bonding primer labeled for vinyl.
- Clean with a low-residue cleaner and rinse thoroughly.
- Lightly scuff with fine abrasive to promote mechanical grip.
- Apply bonding primer in thin, even coats per manufacturer directions.
- Topcoat with compatible exterior paint after primer cures.
These steps help prevent peeling and assure a durable finish on slick frames.
Fiberglass Frames: Best Paints and Prep
If you’ve handled bonding primers for vinyl, you’ll find fiberglass frames simpler to prep and paint because their surface accepts a wider range of primers and topcoats.
You’ll start by cleaning thoroughly with mild detergent, rinsing, and scuff-sanding lightly to promote paint adhesion.
Begin by cleaning with mild detergent, rinse well, then scuff-sand lightly to ensure paint adhesion.
Use a high-quality acrylic latex or a polyurethane-based exterior paint for UV resistance and fiberglass durability.
Spot-prime bare or repaired areas with a compatible primer, then apply two thin coats, allowing proper cure time.
Avoid heavy buildup at corners.
Proper prep and the right topcoat will keep frames looking good and resisting weathering for years.
Oil-Based Enamel: Pros and Cons for Exterior Frames
Although oil-based enamels offer exceptional hardness and a smooth, glossy finish that resists chipping, they require longer drying times and stronger solvents for cleanup than waterborne paints.
You’ll weigh oil-based advantages against oil-based disadvantages when choosing for exterior frames. Consider durability, adhesion, and climate before you commit.
- Tough, durable surface that withstands knocks and abrasion.
- Excellent leveling gives a glassy, low-brushmark look.
- Longer cure means slower project completion and recoat waits.
- Requires mineral spirits for cleanup and emits stronger odors.
You’ll choose oil when toughness outweighs longer work time and solvent needs.
Water-Based Acrylics: Benefits for Window Trim
You’ll appreciate water-based acrylics for window trim because they combine strong durability with flexibility that resists cracking as frames expand and contract.
They also dry quickly, so you can apply multiple coats in a day and get the job done faster.
That fast curing time also reduces the window’s exposure to dust and debris between coats.
Durability And Flexibility
When choosing paint for exterior window trim, water-based acrylics stand out for their blend of durability and flexibility; they resist cracking and chalking while flexing with seasonal expansion and contraction.
You’ll appreciate how they handle weather resistance and UV protection without brittle failure. They bond well, shed moisture, and accommodate movement so caulk and joints last longer.
Consider these practical advantages:
- Maintains adhesion on wood and composite frames
- Resists peeling under temperature swings
- Preserves finish color against sun fade
- Withstands rain and humidity without blistering
Choose acrylics to keep frames intact and looking sharp.
Fast Drying Time
How quickly do you want your exterior window trim ready for a second coat or back in service? You’ll appreciate water-based acrylics’ fast drying properties: they curb downtime and let you finish multi-coat jobs in a day.
Because they dry quickly, you’ll need proper application techniques—thin, even coats applied with quality brushes or a fine-tip sprayer prevent lap marks and blistering. Work in moderate temperatures and low humidity to maintain open time.
Light sanding between coats improves adhesion. Overall, choosing acrylics speeds the project and reduces weather-related delays, so your windows look finished and protected sooner.
Hybrid Alkyd-Acrylic Paints: When to Choose Them
Although they blend the best traits of oil and latex, hybrid alkyd-acrylic paints really shine when you need tough, fast-drying coverage for exterior window frames that will see heavy use and weather exposure.
Although combining oil and latex advantages, hybrid alkyd-acrylics excel on exterior window frames needing fast-drying, durable protection
You’ll appreciate hybrid paints benefits: durability, flexibility, and easier cleanup than oils. Use proper application techniques to get smooth, long-lasting results. Consider them when surfaces need resilience but you want quicker recoat times.
- Ideal for high-traffic trim and sills
- Bonds well to primed wood and previously painted surfaces
- Resists cracking and chalking in sun and rain
- Requires thinner coats and light sanding between layers
Fast-Dry Latex vs. Traditional Oil: Side-by-Side Comparison
If you need a quick turnaround and easy cleanup, fast-dry latex gets you back to work sooner, while traditional oil gives you thicker, more buildable coverage that can better hide imperfections but takes longer to cure.
You’ll appreciate fast dry advantages like low odor, water cleanup, and rapid recoating for tight schedules. Choose latex for flexible adhesion on wood that moves with temperature.
But weigh oil paint drawbacks: longer curing, stronger solvents, and harder stripping if you need to remove old layers.
For trim detail where leveling matters, oil can outperform, though maintenance and ventilation needs are higher.
Specialty Coatings: Elastomeric & Marine-Grade Options
When you need extreme flexibility and waterproofing for window frames—especially in climates with wide temperature swings or frequent moisture—elastomeric and marine-grade coatings offer specialized protection that standard paints can’t match.
You’ll choose these when cracking, peeling, or constant dampness are concerns. Consider elastomeric benefits and marine grade durability for vulnerable frames.
Choose elastomeric or marine-grade coatings when cracking, peeling, or persistent dampness threaten vulnerable window frames.
- Elastomeric seals hairline cracks and stretches with the substrate.
- Marine-grade coatings resist salt, mildew, and heavy moisture exposure.
- Surface prep and compatible primers are essential for adhesion.
- Expect thicker application, longer cure, and targeted use on trim, sills, and exposed joints for lasting protection.
High-UV Paint Formulas for Sun-Exposed Frames
Because intense sun can rapidly fade and break down ordinary finishes, you’ll want a paint specifically formulated for high-UV exposure on exterior window frames.
Choose acrylic-latex or 100% acrylic coatings with added pigments and stabilizers that boost UV resistance and slow color fading. Look for formulations labeled for exterior trim, reflective pigments to lower heat buildup, and lightfast pigments that hold true longer.
Apply per manufacturer directions over properly primed surfaces, keeping coats thin and even. Recoat intervals may be shorter in extreme sun; inspect annually for chalking or hue shift and touch up before degradation accelerates.
Mildew- and Mold-Resistant Paints for Humid Climates
In humid climates, you should pick paints labeled mildew- or mold-resistant to help prevent stains and coating breakdown.
Pay close attention to products with antimicrobial additives and good breathability.
Before painting, clean and dry the frames thoroughly and repair any rot so the finish can adhere and perform.
Choose Mildew-Resistant Formulas
If your home sits in a humid climate, pick an exterior window paint labeled mildew- or mold-resistant to prevent unsightly and damaging growth. These formulas contain biocides or moisture-resistant binders that inhibit spores and keep trim cleaner longer.
You’ll get better mildew resistance and improved paint longevity when you choose purpose-made products. Look for EPA-registered additives or manufacturer claims, and match sheen and base to your substrate.
Consider these quick pointers:
- Choose acrylic latex with antifungal agents for wood and vinyl
- Prefer higher-gloss finishes where appropriate for easier cleaning
- Confirm UV stability alongside mildew resistance
- Follow application temperature and drying guidelines
Proper Surface Preparation
Selecting a mildew-resistant paint is a smart start, but proper surface preparation will determine how well that product performs in humid conditions.
You should begin with thorough surface cleaning: remove dirt, mildew, and peeling paint using a mild bleach solution or mildew cleaner, rinse well, and let frames dry completely.
Sand glossy or rough areas to promote paint adhesion, then vacuum or wipe away dust.
Repair cracks and rot with appropriate fillers or replacements before priming.
Use a mold-inhibiting primer compatible with your chosen finish.
When you prep correctly, your mildew-resistant paint will last longer and protect window frames effectively.
How to Select Finish: Satin, Semi-Gloss, or Gloss
Everyone wants window frames that look great and hold up to weather, so choose a finish that balances appearance and durability: satin for subtle sheen and good hide, semi-gloss for easy cleaning and moderate reflectivity, or gloss for maximum toughness and highlight.
Use finish selection tips and a sheen comparison guide to match style with exposure. Consider color depth, trim detail, and maintenance schedule.
Match sheen to exposure and style—consider color depth, trim detail, and your maintenance routine.
Compare samples in daylight and after curing. Pick a finish that complements your architecture and painting routine.
- Satin: low sheen, hides imperfections
- Semi-gloss: versatile, crisp edges
- Gloss: durable, bold look
- Test: small area first
How Paint Sheen Affects Dirt Build-Up and Cleaning
You’ll notice higher sheens tend to repel dust and shed water better, so dirt usually sticks less to gloss or semi-gloss finishes.
That makes higher-sheen frames easier to clean with a quick wipe, while matte or eggshell surfaces can trap grime and show smudges more readily.
We’ll compare how gloss versus matte maintenance differs and what that means for your cleaning routine.
Sheen And Dirt Attraction
The paint’s sheen plays a big role in how much dirt clings to your exterior window frames and how easy they’ll be to clean; glossier finishes repel grime and wipe down more readily, while flatter sheens hide imperfections but trap dust and stains.
You should consider sheen impact and dirt repulsion when choosing finish. Balance appearance with maintenance: higher sheen boosts moisture resistance but can show flaws. Lower sheen camouflages texture yet collects particles.
Think about exposure and your willingness to clean.
- Gloss: strong dirt repulsion, shows flaws
- Satin: moderate repulsion, subtle sheen
- Eggshell: softer look, more dirt pickup
- Flat: best camouflage, highest trapping
Cleaning Ease By Sheen
Since sheen affects both appearance and grime resistance, it also changes how often you’ll need to clean your window frames and how easily dirt comes off. You’ll notice higher sheens resist particulates and waterborne stains better, so grime wipes away with less elbow grease.
Lower sheens can hide minor blemishes but trap dust in microscopic texture, needing more frequent attention. For a practical sheen comparison, test samples outdoors and observe seasonal soil.
Match cleaning techniques to sheen: soft cloth and mild detergent for eggshell or satin; gentle scrubbing pads or repeat rinses for flatter finishes to avoid abrasion.
Gloss Versus Matte Maintenance
When you pick gloss over matte, expect less dirt adhesion and easier wiping—gloss’s smoother surface sheds particulates and waterborne stains, while matte paints trap dust in tiny peaks and need more frequent, careful cleaning.
You’ll notice gloss benefits in rain runoff, simple soap-and-water maintenance, and resistance to smudges; matte drawbacks show up as more frequent gentle scrubbing and visible wear patterns.
Balance aesthetic preference with upkeep willingness: choose gloss for low-maintenance frames, matte if texture matters and you’ll clean often.
Quick tips:
- Use mild detergent for both finishes
- Test a small area before scaling
- Avoid abrasive pads
- Recoat when finish dulls
Color Selection Tips to Limit Heat Absorption and Fading
Pick colors that reflect rather than soak up heat and choose finishes that resist UV damage so your frames stay cooler and fade less over time.
You’ll use heat reflection techniques like selecting lighter hues and satin or semi-gloss sheens to bounce solar energy away.
Consider color temperature effects: cool-toned paints absorb less infrared than deep, warm tones, so lean toward pale blues, greens, or off-whites for sun-exposed frames.
Cool, pale hues—like blues, greens, or off-whites—absorb less infrared, keeping sun-exposed frames cooler.
Test small samples in direct sunlight to compare fading over weeks.
Also pick high-quality UV-resistant pigments and topcoats to maintain appearance, and avoid overly dark shades on long-facing elevations.
How Many Coats Do Exterior Window Frames Need?
Before you paint, make certain you strip loose material, sand smooth, and prime any bare wood or metal so the finish will adhere.
For most exterior window frames you’ll want two coats of quality exterior paint over a primer—one for coverage and a second for durability.
If the frame is heavily weathered or changing color, plan for an extra coat or a thicker primer to guarantee long-lasting protection.
Surface Preparation Needed
How many coats you need on exterior window frames depends on the frame material, the paint type, and the condition of the existing finish; typically two coats—one primer (if needed) and one topcoat—give durable coverage.
However, rough or bare wood, severe weather exposure, or a color change often call for a primer plus two finish coats.
For surface preparation, focus on surface cleaning, repairing, and choosing the right abrasives.
Prep steps:
- Remove loose paint and caulk gaps.
- Clean grime, mildew, and chalk with appropriate cleaners.
- Sand smooth, feather edges, and remove dust.
- Pick tool selection for precise scraping, sanding, and brushing.
Recommended Coat Count
Typically, you’ll apply two coats to exterior window frames: a primer when the substrate or color change requires it, then a single topcoat for protection and color—though bare or badly weathered wood, extreme exposure, or a dramatic color shift usually benefit from primer plus two finish coats for added durability.
You’ll choose an ideal coat strategy based on material, climate, and paint type. Thin, even coats bond better than thick ones; sand lightly between finish coats if needed. Allow full flash and cure times.
More coats don’t always equal better exterior durability—proper prep and quality products do.
Dry Times Between Coats for Different Paint Types
When you’re choosing paint for exterior window frames, the dry time between coats determines how fast you can finish and how durable the final film will be.
You’ll want clear dry time comparisons and paint type effectiveness so you can plan work and avoid weather risks. Typical guidelines:
- Water-based latex: recoat in 2–4 hours; full cure longer.
- Alkyd/oil: recoat in 24 hours; caution in cool or humid weather.
- Hybrid or enamel: recoat 6–8 hours; balance of speed and hardness.
- Primer-specific: follow label; some need longer for adhesion.
Always check manufacturer times for best results.
How to Avoid Brush Marks, Lap Lines, and Streaks
A few smart techniques will help you eliminate brush marks, lap lines, and streaks so your window frames look smooth and professional.
Work in manageable sections, keeping a wet edge to prevent lap lines, and apply thin, even coats. Use high-quality brushes and proper brush techniques—light pressure, long strokes, and minimal reloading—to reduce marks.
Watch drying times and only recoating when the film is tack-free; rushing causes streaking. Sand lightly between coats with fine grit for a uniform surface.
Clean and condition brushes regularly to maintain smooth application. Finish with a final inspection and touch-up while paint is still workable.
Spray vs. Brush vs. Roller: Which Method to Use?
If you’re after speed, spraying gets a smooth, even coat across multiple frames fast.
Use a brush when you need control around panes, corners, and tight trim.
A roller can work for flat sash areas, but you’ll still reach for a brush for detail.
Spray For Speed
Think about how much surface area you’ve got and how fast you need the job done—spray painting covers large, detailed window frames far quicker than a brush or roller, but it demands careful masking and ventilation.
You’ll appreciate spray techniques for even coats and speed, though practice reduces overspray. Follow these application tips: prep, thin paint if needed, and test spray patterns.
Mask thoroughly, including glass and hardware. Work in calm weather and cross-ventilate. Keep the nozzle moving for uniform coverage. Clean the gun promptly and inspect for runs.
Spray saves time when you control setup, technique, and cleanup.
Brush For Detail
One tool you’ll reach for when precision matters is a brush, because it lets you cut in tight corners, work around hardware, and lay paint into profiles without overspray.
You’ll choose a high-quality angled sash brush for control and a small round brush for intricate corners. Use short, confident strokes, feathering edges to avoid lap marks. Keep a wet edge and reload sparingly to prevent drips.
For best results, sand and prime first, then apply thin coats, letting each dry. These brush techniques give superior detail finishing on frames where appearance and longevity matter most.
Tools and Brushes Best for Exterior Window Paint
Before you start painting exterior window frames, gather the right tools so the job goes smoothly and the finish lasts.
Choose quality brush types and learn application techniques to control edges, avoid lap marks, and get even coverage.
Have these on hand:
- A 2–2.5″ angled sash brush for trim and corners
- A small 1″ synthetic round or sash brush for tight spots
- A short-nap roller for flat muntins and wider rails
- Fine-grit sanding block and foam brush for spot smoothing
You’ll also want a sturdy tray, painter’s tape, and a shop cloth to keep lines clean and work efficient.
How to Remove Old Paint Safely and Effectively
Before you start, make sure you’ve got gloves, eye protection, a respirator, and proper clothing to protect against dust and chemicals.
Choose a removal method—chemical stripper, heat gun, or scraping—based on the paint type and window material, and use the gentlest effective option first.
After removal, clean, sand, and repair the wood so the new paint will adhere properly.
Safety Gear First
Start by gearing up: you’ll want a respirator with HEPA or P100 filters, chemical-resistant gloves, eye protection, and disposable coveralls to keep dust, lead particles, and solvent fumes off your skin and out of your lungs.
Before work, inspect gear and fit the respirator properly. Use safety goggles and protective gloves at all times. Keep bystanders clear and pets inside.
- Check respirator seal and filter type.
- Wear safety goggles over eyeglasses or contacts.
- Choose protective gloves rated for solvents.
- Use coveralls and shoe covers to contain dust.
Dispose of contaminated PPE per local regulations.
Paint Removal Methods
Now that you’re protected, it’s time to remove the old paint safely and efficiently.
Choose paint stripping techniques based on frame condition: chemical strippers loosen layers quickly, while heat guns and infrared tools soften paint for scraping. Use eco-friendly removers where solvents are a concern—look for low-VOC gels labeled for exterior use and follow manufacturer directions.
Mechanical methods like sanding or hand-scraping work for small areas but produce dust; use a vacuum and dust mask.
Test a small section first to avoid damaging wood or metal. Dispose of waste per local hazardous-waste rules and keep pets and children away.
Surface Prep Steps
Because proper prep determines your finish’s longevity, take the time to remove loose paint, dirt, and failing coatings methodically.
You’ll start with surface cleaning to identify remaining adhesion points and soft spots. Use these preparation techniques to work safely and efficiently:
- Scrape loose flakes with a flat scraper, keeping blades sharp and angled.
- Sand feathered edges and rough areas to a smooth profile for primer grip.
- Use a chemical stripper or heat gun on stubborn layers, following safety and ventilation rules.
- Wash, rinse, and dry thoroughly; mask glass and hardware before priming.
Finish with a compatible primer before repainting.
Best Caulks and Sealants for Window Frames Before Painting
Before you paint, pick a caulk and sealant that match your window material and the movement they’ll need to handle—silicone for nonpaintable, high-flex needs; polyurethane or advanced acrylic-latex for paintable, exterior wood and vinyl.
You’ll want to understand caulk types and sealant advantages: silicone stays elastic and resists moisture, polyurethane bonds strongly to wood and metal, and high-quality acrylic-latex accepts paint and cures with less odor.
Choose paintable products where finish matters, and nonpaintable where flexibility and durability matter most.
Pick paintable caulk where appearance counts; choose nonpaintable where maximum flexibility and long-term durability are needed.
Apply in dry conditions, tool joints smooth, and allow full cure before priming or painting.
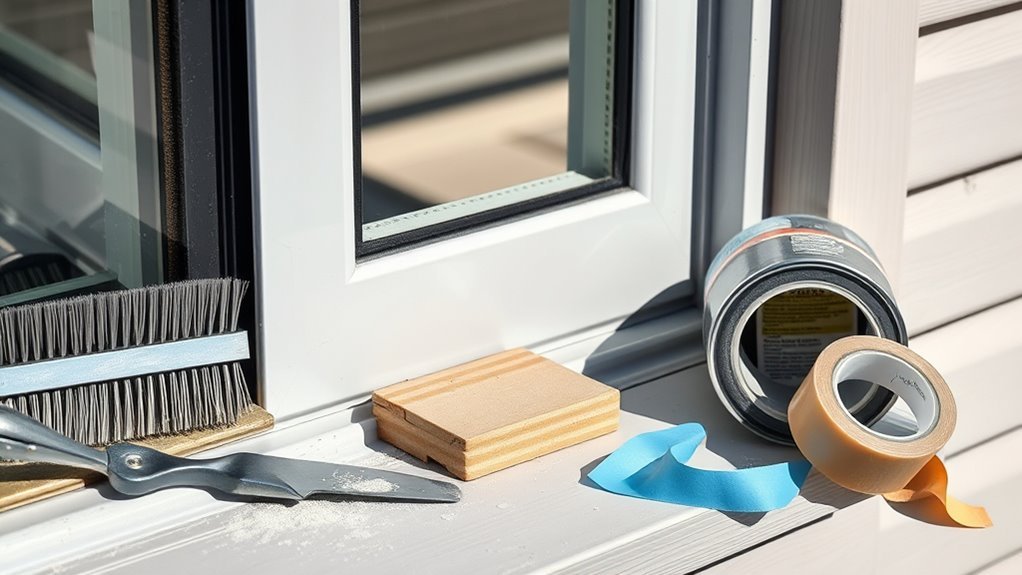
Masking and Protecting Glass and Hardware
Start by removing any loose hardware you can—locks, cranks, and removable stops—and cover the remaining glass and fixed hardware with high-quality painter’s tape and low-tack masking film so paint won’t seep under edges or leave residue.
You’ll also want to:
- Inspect sash and panes for dust before applying glass protection.
- Apply tape with a firm, even edge for clean lines.
- Use thin plastic masking for large panes to speed work.
- Label removed parts and bag fasteners to simplify reassembly.
For hardware masking, overlap tape at corners, avoid thick layers that trap paint, and remove tape while paint is tacky for crisp edges.
Ideal Weather and Temperature for Exterior Painting
You’ll get the best results painting exterior window frames on dry, mild days when surfaces and the air are free of moisture.
Aim for moderate temperatures—check the paint can for the manufacturer’s recommended range—and avoid working in extreme heat or cold.
Also watch humidity; low-humidity windows help paint cure evenly and prevent trapping moisture.
Dry, Mild Days
When conditions are dry and temperatures stay mild—typically between 50°F and 85°F—you’ll get the most reliable drying, adhesion, and curing for exterior window-frame paint.
You should plan for dry weather and mild temperatures to avoid tacky finishes, bubbling, or poor bonding.
Follow simple practices:
- Paint mid-morning after dew evaporates and before late-afternoon humidity rises.
- Avoid painting during forecasted rain or high humidity within 24 hours.
- Work in shaded areas to prevent skinning or blistering from direct sun on hot surfaces.
- Check substrate temperature, not just air temp, for consistent adhesion and even curing.
Moderate Temperatures Only
If temperatures stay in the moderate range—roughly 50°F to 85°F—you’ll get the most consistent drying and adhesion for exterior window-frame paint, so plan your workdays around these conditions.
You’ll notice temperature effects on cure time: colder air slows chemical reactions, warmer air speeds them and can cause surface skinning before proper flow.
Check daily forecasts as part of weather considerations and avoid painting during rapid swings between sun and shade.
Work in the cooler morning or late afternoon when temperatures are steady, and use products rated for the range you’ll encounter so your finish bonds and performs long-term.
Low Humidity Windows
Along with steady temperatures, low humidity makes exterior painting for window frames much more reliable because moisture in the air can interfere with paint adhesion and extend drying times.
You should choose dry days to avoid humidity effects that cause blistering or slow curing. Guarantee window ventilation while painting to speed solvent release and prevent trapped moisture.
Follow these concise steps:
- Check local humidity forecasts; under 60% is ideal.
- Avoid painting after rain or heavy dew; surfaces must be dry.
- Use fast-drying primers and paints formulated for exterior conditions.
- Maintain gentle airflow without dust to promote even drying and strong adhesion.
Common Painting Mistakes and How to Fix Them
Anyone can make painting mistakes, but the good news is most are easy to fix if you catch them early; you’ll avoid frustration by knowing common misconceptions and proper painting techniques. If paint drips, sand lightly and recoat thinly. If brush marks show, use a quality brush and thin coats. If edges peel, clean, prime, and feather the surrounding paint.
| Feeling | Problem | Fix |
|---|---|---|
| Annoyed | Drips | Sand, thin coats |
| Worried | Brush marks | Better brush, flow |
| Relieved | Peeling | Clean, prime, recoat |
Troubleshooting Checklist for Paint Adhesion Problems
When paint won’t stick, start by checking the basics: surface cleanliness, dryness, and whether old coatings are compatible with your new paint.
You’ll want a quick troubleshooting checklist to spot adhesion issues and apply practical troubleshooting techniques without redoing everything.
- Scrape and sand loose paint; roughen glossy surfaces for better bite.
- Test for oil/latex incompatibility; use a proper primer if needed.
- Check for moisture: condensation, leaks, or wet wood will block adhesion.
- Confirm correct temperature and humidity during application; follow label specs.
Follow this order and you’ll diagnose causes fast and fix them efficiently.
Maintenance: Cleaning Painted Exterior Window Frames
After you’ve fixed any adhesion problems, keep painted exterior window frames looking their best with regular cleaning and quick touch-ups.
Start by rinsing frames with a hose to remove loose dirt, then wash with mild detergent and warm water using a soft cloth or sponge. Rinse thoroughly and dry to avoid streaks.
For stubborn grime, try a diluted vinegar solution or a nonabrasive cleaner. Inspect seals and paint edges while cleaning.
These cleaning techniques and maintenance tips prevent buildup and extend finish life. Repeat seasonally, and address chips promptly to avoid moisture intrusion and further damage.
Spot Repairs: How to Blend New Paint With Old
Because small chips and scuffs stand out on a freshly cleaned frame, you’ll want to blend new paint into the old so repairs vanish and the finish stays protective; prep, match, and feather carefully.
Because small chips show on a fresh frame, blend repairs into the old finish—prep, match, and feather carefully.
Use blending techniques to avoid hard edges and prioritize color matching before you paint.
Steps you’ll follow:
- Clean and sand the damaged spot smooth, removing loose paint and dirt.
- Use primer on bare wood or metal, thin at the edges to feather.
- Apply matched topcoat in thin layers, feathering outward to merge.
- Finish with light sanding between coats and final inspection for uniformity.
Painting Windows on Historic or Period Homes
If you’re working on a historic or period home, paint choices and techniques should respect the original materials and profiles while protecting the sash and trim for years to come.
You’ll prioritize historic preservation: research original colors, finishes, and glazing putty types before stripping or sanding.
Match period accuracy by using brush-applied, oil- or alkyd-based primers and topcoats compatible with existing layers, avoiding modern film-build that hides moldings.
Test small areas, document layers, and consult local conservation guidelines or a preservationist for significant work.
Proper prep, gentle cleaning, and controlled drying will extend lifespan while retaining architectural integrity.
Eco-Friendly and Low-VOC Paint Choices
When you’re choosing paint for exterior window frames and want to minimize environmental impact, look for low-VOC or zero-VOC formulas and certifications from trusted third parties (like GreenGuard or ECOLOGO); these products cut harmful fumes without sacrificing durability.
You’ll appreciate eco-friendly options that resist fading and moisture while improving site air quality. Consider these practical points:
- Choose water-based acrylics for adhesion and easy cleanup.
- Verify third-party labels to confirm low VOC benefits and performance.
- Prefer paints with mildew inhibitors for damp climates.
- Test colors on a small area to validate coverage and weather resistance.
Cost Comparison: Budget Paints vs. Premium Lines
Although you can save up front by picking a bargain paint, you’ll often pay more over time in maintenance and touch-ups. Budget formulas cut initial cost but typically thin out sooner, need more coats, and offer weaker UV and moisture resistance than premium lines.
You should weigh budget paint advantages—lower sticker price and acceptable short-term coverage—against premium paint benefits like longer life, better adhesion, and superior color retention.
For exterior window frames, factor labor, frequency of repainting, and local climate. Choose based on how long you want results to last and whether upfront savings justify likely future work and expense.
How to Evaluate Paint Warranties and Longevity Claims
Because warranties and lifespan estimates vary widely, you should read claims with a critical eye and verify what’s actually covered.
Because warranties and lifespan claims vary, scrutinize them closely and confirm exactly what’s covered.
When doing a warranty comparison, focus on real conditions, not ideal lab results. Ask how surface prep, substrate, and climate affect coverage and check whether labor, fading, peeling, or chalking are included.
- Confirm the warranty duration and what voids it.
- Compare exclusions and required maintenance.
- Evaluate stated longevity factors like UV, moisture, and temperature.
- Look for documented field performance or independent reviews.
Don’t assume marketing equals durability; verify terms and match them to your window’s exposure.
Product Checklist: What to Buy Before You Start
Start by gathering the essential tools and materials so you won’t interrupt the job for a missing item. You’ll need exterior-grade paint (compare paint brands for durability), primer formulated for your frame material, quality brushes and a sash brush for tight corners, rollers, drop cloths, painter’s tape, sandpaper and a sanding block, a scraper, caulk and a caulking gun, and a respirator or mask.
Include eco-friendly options like low-VOC or water-based primers and paints if you prefer. Add cleaning supplies, rags, a paint tray, and a small ladder—get everything ready before you begin.
When to Hire a Pro for Exterior Window Painting
If you’re short on time, lack the right tools, or face complex repairs like rot, lead paint, or custom trim, hire a pro—this guarantees the job gets done safely, quickly, and with a durable finish.
You should call for professional painting when safety, warranty, or finish quality matters more than saving money. Pros keep your project timeline realistic and handle permits, hazardous material abatement, and tricky sash work.
Consider hiring if you want color consultation, guaranteed adhesion, or long-term maintenance plans.
- Safety concerns (height, lead)
- Extensive rot or sash repair
- Tight project timeline
- Desire for warranty and expertise
Quick Final Checklist: Prep, Paint, Apply, Maintain
When you’re ready to finish, run through a quick, focused checklist so nothing gets missed: wipe frames, remove loose paint, sand rough spots, and fill gaps with exterior-grade filler.
Mask glass and hardware, prime bare wood or metal, and choose the proper exterior paint.
Use proper painting techniques—thin coats, brush direction with grain, and drying time between layers.
Apply thin coats, brush with the grain, and allow full drying time between layers for a smooth, durable finish.
Inspect seals and reglaze if needed.
Clean tools and remove tape carefully.
Note maintenance intervals for window frame maintenance; touch up chips promptly and recoat as weather or wear dictates.
Store leftover paint labeled for easy future repairs.
Frequently Asked Questions
Can I Paint Window Frames Myself if They’re Lead-Painted?
Yes — you can, but you shouldn’t without precautions: if your frames have lead paint, use proper PPE, containment, wet methods, HEPA cleanup, and follow local rules; consider hiring certified pros for safer DIY precautions.
Will Painting Void My Window Manufacturer’s Warranty?
Yes — altering finishes can void warranty implications if you ignore manufacturer guidelines; you should check the warranty terms and contact the manufacturer first, because unauthorized painting or modifications often cancel coverage for finish-related or performance issues.
Can I Change Frame Color From Dark to Very Light Without Extra Steps?
You can, but you shouldn’t expect perfect coverage without extra work; color selection tips include choosing high-coverage paint and lighter primers, and surface preparation techniques like cleaning, sanding, and priming guarantee adhesion and even, long-lasting results.
How Soon After Installation Can New Frames Be Painted?
Like a fresh canvas, you can usually paint new frames after 24–48 hours; you’ll follow a painting timeline that allows full curing, and you’ll do proper frame preparation—cleaning, sanding, and priming—before applying paint.
Are There Safe Paint Options for Homes With Asthma or Chemical Sensitivities?
Yes — you can pick low VOC options and eco friendly paints that’re safer for asthma or chemical sensitivities; you should choose certified water‑based acrylics, ventilate well, test a small area, and let coatings fully cure before occupancy.
Conclusion
You’ve got the essentials to pick the right paint, prep like a pro, and keep your exterior window frames looking sharp for years. Follow the quick checklist, match paint to material and climate, and don’t cut corners on prep — it’s the whole ball of wax for durability. If the job’s too big or frames need repairs, call a pro. With the right choices and routine upkeep, your windows will stand up to weather and wear.