What to Paint on Walls? Simple Wall Art Ideas
You can refresh any room with simple wall art that suits your style: paint geometric shapes for order, bold color-block panels for drama, or soft nature motifs for calm. Use stencils for repeatable patterns, framed fabric for texture, or faux trim to fake architectural detail. Test swatches in different light, choose scale that fits the room, and keep painter’s tape and a small roller handy for clean edges. Keep going and you’ll find easy step-by-step projects and tips.
Quick How-To List: Simple Wall Art Projects to Try First
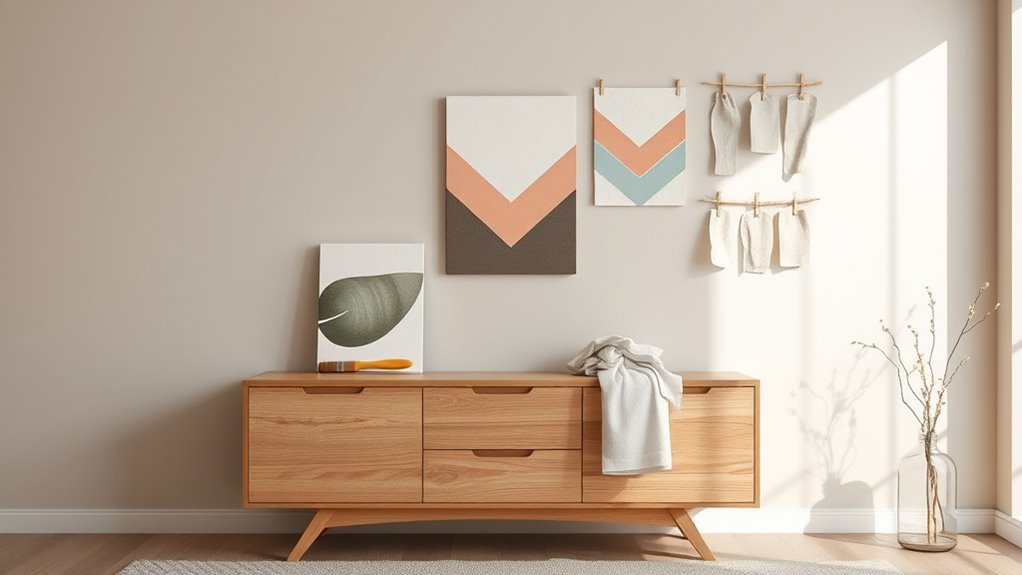
Start with three easy projects that use materials you probably already have: framed fabric swatches, a simple gallery wall of mismatched frames, and a DIY abstract canvas.
You’ll test wall texture by taping samples and viewing them at different times of day. For framed fabric, cut, mount, and hang symmetrically or staggered; heavy fabrics add depth.
For the gallery wall, mix frame sizes and balance negative space.
For the abstract canvas, block in color, scrape, and layer to explore color psychology—use warm hues to energize or cool tones to calm.
Finish by stepping back, adjusting placement until it feels right.
Choose a Style That Fits Your Room (Minimal, Bold, Boho, Modern)
Think about your room’s color palette and pick wall art that complements those tones so everything feels cohesive.
Consider how you use the space—calm, minimal pieces suit a bedroom, while bold or boho work well in lively living areas.
Match style to function to keep the room both beautiful and practical.
Match Existing Color Palette
When you pick wall art, let your room’s existing colors guide you so the pieces feel intentional rather than tacked on; match tones and accents to create color harmony and maintain aesthetic balance.
You’ll decide whether to echo dominant hues, accent with contrast, or introduce a subtle new shade that complements the palette.
Stick to your chosen style—minimal, bold, boho, or modern—so the art supports the room’s voice.
Consider scale and saturation so nothing fights for attention. Use texture and finish to deepen the connection between wall and decor.
- Echo main tones for cohesion
- Add one contrasting accent
- Use texture to unite elements
Consider Room Functionality
Matching color and texture sets a visual foundation, but you also want art that works with how you use the room. Choose a style that aligns with wall purpose: serene minimal pieces for bedrooms, bold statements for living areas, boho tapestries for relaxed nooks, or modern abstracts near workspaces.
Think about activity zones and room flow so art supports rather than disrupts movement and function. Consider space usage and user needs—place calming imagery where you rest, energetic pieces by play or workout spaces.
Let design function guide scale, placement, and material so your walls enhance daily living.
Paint Geometric Shapes on Walls for Instant Structure
A few bold shapes can redefine a room instantly: paint triangles, circles, or grids to introduce rhythm and anchor your furniture without clutter.
You’ll use geometric patterns to create visual order, pairing simple forms with deliberate color combinations that reflect mood and scale.
Work with proportions that suit your wall and furniture, and position shapes to guide sightlines.
Keep edges crisp and contrasts balanced so the design feels intentional, not busy. This approach makes a small wall feel purposeful and a large wall feel curated.
- Shapes can emphasize focal points.
- Scale controls perceived space.
- Palette links art to room mood.
Create Color-Block Walls: Easy Masking Tips
If you want bold, modern walls without fuss, color-blocking with crisp masked edges gives instant impact while staying simple to execute.
You’ll plan with color selection strategies: pick two to three hues with balanced contrast and test swatches on the wall light. Measure and mark clean shapes, then apply high-quality masking tape techniques—press edges firmly and seal with a thin base coat of the background color to prevent bleed.
Paint blocks in order from lightest to darkest, remove tape while paint’s tacky, and touch edges with a fine brush. Keep lines geometric and confidently simple for maximum effect.
Use Stencils and Templates for Repeatable Patterns
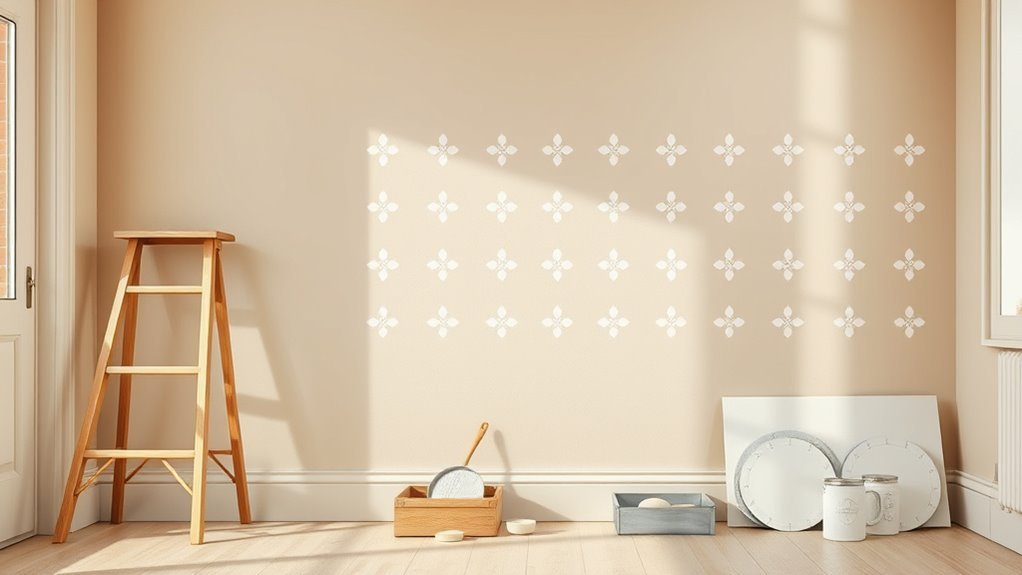
Once you’ve mastered crisp color blocks, stencils and templates let you repeat motifs with the same clean edges and minimal fuss. You’ll plan placement strategies and project planning before taping templates, do surface preparation for smooth paint adhesion, then use application tools that suit your stencil techniques.
Focus on pattern repetition and layering methods to build depth without muddiness. Make deliberate color choices and test on scrap material. Keep edges sealed and work from center outward to avoid bleed. Clean edges come from steady pressure and easy lifts; swap templates to vary rhythm while maintaining cohesion.
Layer patterns thoughtfully, test colors on scraps, seal edges, and stencil from center outward for crisp, clean layers.
- Use durable template designs for consistency.
- Practice layering methods on samples.
- Map placement strategies beforehand.
Try Minimalist Line Drawings and Single-Stroke Murals
When you strip a mural down to a single flowing line, you create striking, elegant work that reads clearly from across the room; minimalist line drawings and single-stroke murals lean on deliberate movement and confident marks rather than detail.
You’ll plan composition, weight, and rhythm, practicing line drawing techniques on paper before committing. Choose a contrasting color and a steady brush or marker to maintain continuous motion.
Embrace minimalist aesthetics by limiting elements and negative space. Work slowly to avoid hesitations, and scale your stroke to suit wall size.
The result feels intentional, modern, and surprisingly expressive with minimal fuss.
Paint Simple Nature Motifs: Leaves, Mountains, Suns
Pick three simple motifs—leaves, mountains, and suns—and use bold, clean shapes to bring nature indoors.
You’ll work with nature inspiration and basic artistic techniques to craft calming focal points. Choose a limited palette, mask edges with painter’s tape, and layer flat colors for contrast.
Scale motifs to suit furniture and sightlines; repeat or vary them for rhythm. Keep strokes confident and shapes readable from a distance.
- Leaves: growth, renewal, gentle movement.
- Mountains: grounding, resilience, perspective.
- Suns: warmth, energy, optimism.
Paint Faux Panels and Trim for Architectural Interest
If you want architectural polish without major renovation, paint faux panels and trim to mimic wainscoting, picture rails, or paneled molding—it’s a fast, affordable way to add depth and proportion.
You can create convincing architectural elements by measuring simple rectangles, adding trim lines with painter’s tape, and layering paint.
Use faux finishes and paint textures to suggest material differences; try layered colors for subtle shadowing.
Add accent highlights on edges to sell the illusion and increase visual depth.
This approach refreshes a room instantly, works on many budgets, and lets you customize style without carpentry.
Scale and Placement: How Big to Paint and Where to Start
After sketching your faux panels, decide on size and location with the room’s proportions in mind so the molding looks intentional rather than tacked on. Measure wall dimensions, note ceiling height, and position panels to enhance focal points like a fireplace or bed.
You’ll want consistent spacing and symmetry for visual balance, or deliberate asymmetry for a modern feel. Start with a simple layout in pencil, step back often, and adjust before taping.
Consider sightlines from main entry points so the design reads correctly from typical viewpoints.
- Prioritize scale over detail to avoid overwhelm
- Use proportion to guide placement
- Think about how people move through the space
Essential Tools & Beginner-Friendly Paints
Tools matter more than you’d think when you’re starting faux molding and wall painting; having the right brush, tape, roller, level, and a few quality paints will make the process faster and the finish cleaner.
You’ll want angled brushes for edges, a 2–3″ sash brush for detail, a dense roller for smooth coverage, and painter’s tape that removes cleanly.
Pick low-VOC, washable latex for easy cleanup and predictable color. Test swatches for color selection under different lighting.
Use a small foam brush for touch paint application in tight spots. Keep a mini sanding block and a damp cloth handy.
Fast Fixes: Touch-Ups, Color Swaps, and Removal Tips
When you notice a nick, paint overlap, or an outdated hue, quick fixes keep your walls looking intentional without a full redo. You’ll match paint from leftover cans or swatches, focus on color selection, and do minimal wall preparation—clean, sand, and prime small spots.
For color swaps, test samples on the wall, let them dry, and view at different times. For removal, gently lift adhesive with heat and a scraper, then repair the surface before painting. Keep tools handy and act fast to avoid larger repairs.
- Touch up precisely to preserve your design
- Swap colors using small, reversible tests
- Remove marks carefully, repair, then repaint
Frequently Asked Questions
Can Painted Wall Art Damage Rental Security Deposits?
Yes, painted wall art can affect your security deposit if your rental agreement bans alterations or specifies paint types; you should get landlord approval, use removable or approved paints, and document condition to avoid disputes.
How Do I Seal Wall Paint Against Smoke or Cooking Odors?
You seal wall paint against smoke or cooking odors by cleaning, priming with a stain-blocking primer, applying odor-resistant paint or topcoat, and using paint sealing techniques like shellac or specialty odor-resistance sealers to lock in smells.
Can Kids Safely Help With Wall Mural Projects?
Yes — you can involve kids safely: choose non-toxic mural materials, supervise constantly, give age-appropriate tasks, use drop cloths and gloves, secure ladders, and discuss child safety rules before painting to prevent accidents and messes.
What Lighting Best Showcases Painted Wall Art?
You’ll want directional wall lighting with adjustable heads to create focused beams that highlight texture and color; for a polished art display, use warm LEDs at 2700–3000K, dimmers, and even spacing to avoid glare.
How Do I Prepare Textured Walls for Painting?
Measure twice, cut once — you’ll clean, sand, and fill cracks for proper wall texture preparation. Prime patched areas, choose suitable painting techniques like skim-coating or using thicker nap rollers, then paint smoothly for lasting results.
Conclusion
Wrap up with confidence: choose a simple style, start small, and savor the satisfying speed of a successful splash. Pick bold blocks, gentle geometrics, or boho brushwork, then plan placement, prep properly, and practice patience. Use stencils, tape, or faux trim to transform tired terrain quickly. Keep tools tidy, test colors, and touch up promptly. With smart steps and steady strokes, you’ll craft charming, creative wallwork that brightens your space.