How to Remove Exterior Lead Paint Safely at Home
Confirm the paint has lead with a test kit or pro inspection, then plan and get any permits. Set up containment with plastic sheeting, sealed entry/exit, and heavy drop cloths. Wear proper PPE and use wet scraping and HEPA-filtered vacuums to minimize dust; avoid open flame, dry sanding, and heat guns. Bag and label waste, follow local disposal rules, and do clearance testing before reoccupation. Keep going to learn practical steps, costs, and when to hire pros.
Quick Safe Checklist for Exterior Lead Paint Removal
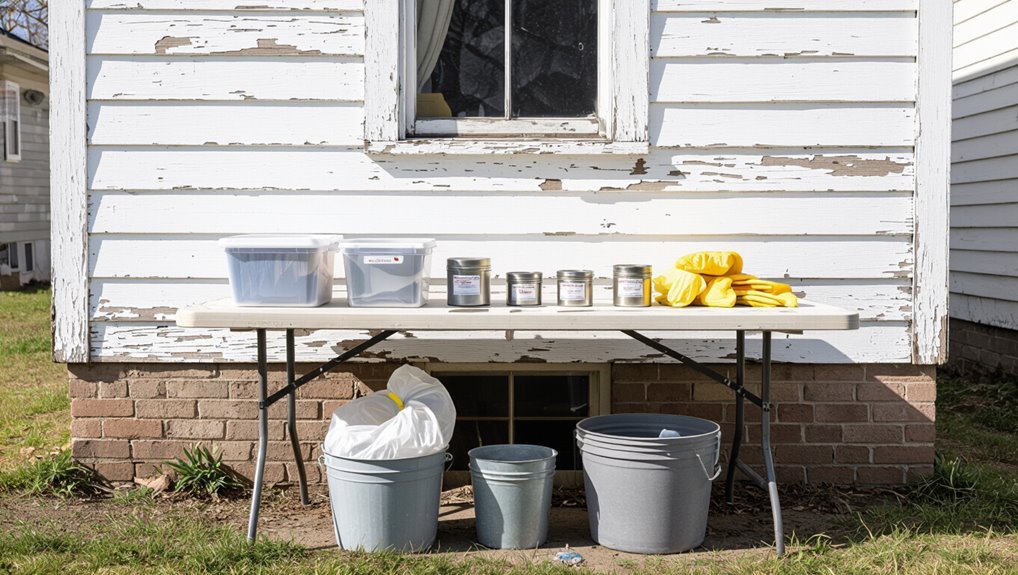
Start by confirming the paint contains lead with a certified test kit or professional inspection.
Then wear PPE, seal work areas, and post warning signs.
Use wet methods, HEPA vacuums, and avoid power sanding.
Collect debris in labeled containers and dispose per local rules.
Wash tools and yourself thoroughly.
Follow safe practices, document steps, and monitor for dust until clearance confirms safety.
Why Removing Exterior Lead Paint Safely Matters
When you remove exterior lead paint, you’re protecting your family and workers from serious health risks like cognitive damage and respiratory issues.
You’re also preventing toxic dust and chips from contaminating soil and nearby water. Doing the job safely stops long-term exposure and limits environmental harm.
Health And Safety Risks
Because lead dust and chips can contaminate your yard, tools, and HVAC system, removing exterior lead paint improperly puts everyone in and around your home at risk.
You must understand lead exposure effects — neurological, developmental, and systemic — and take health precautions: wear proper PPE, control dust, isolate work areas, and avoid bringing contaminants inside.
Get testing and medical advice if exposure occurs.
Environmental Contamination
Beyond personal health, improper exterior lead paint removal creates long-lasting environmental contamination that can affect whole neighborhoods.
You must prevent lead exposure by following safe practices to limit soil contamination and protect wildlife concerns.
Raise community awareness, track legislation updates, and understand health risks so your cleanup reduces environmental impact.
Coordinate disposal, testing, and professional help when needed.
How to Spot Likely Lead Paint on Exterior Surfaces
Want to know whether exterior paint might contain lead? You’ll use visual clues and history for lead paint identification, focusing on surface age and condition. Look for chalking, multiple layers, or old bright colors. Compare likely risk factors:
| Clue | What it suggests |
|---|---|
| Chalking | Weathered layers |
| Many layers | Older coatings |
| Bright colors | Pre-1978 pigments |
| Peeling | Flaking lead dust |
When to Test: DIY Kits vs. Professional Testing
If you’re dealing with small, isolated chips or suspect a single painted item, a DIY lead test kit can give you a quick, affordable answer.
Hire a certified professional when paint covers large areas, you’re planning major renovations, or you need official documentation for a sale or rental.
Choosing the right option now can protect your health and save time and money later.
When To Use DIY
When you’re facing chipped or peeling paint, decide whether a DIY test will answer your question or if you need a professional.
DIY kits are handy for quick, low-cost screening, but they’ve limits in sensitivity and legal defensibility. So call a certified tester when results will affect health decisions, renovations, or real estate transactions.
Use DIY Benefits for initial checks; weigh DIY Challenges like false negatives, limited scope, and no certification.
When To Hire Pros
Because lead hazards can pose serious health and legal risks, hire a certified inspector or abatement pro whenever test results will guide major decisions—like renovating, selling, or protecting young children or pregnant household members—and whenever you need results that are legally defensible or thorough beyond what DIY kits can reliably provide.
You’ll get professional evaluation, risk assessment, cost analysis, safety training, project management, compliance guidelines, and health considerations.
If Your Test Is Positive: Immediate Next Steps
After a positive lead test, act quickly to protect yourself and anyone who lives in the home: leave contaminated areas, shut off HVAC, and keep kids and pets away.
Document findings, wear PPE, and wet-clean surfaces to minimize dust.
Document your findings, wear proper PPE, and wet-clean surfaces to reduce hazardous lead dust.
Seek Immediate actions guidance and consult Lead paint resources for safe removal options.
Consider temporary relocation until hazards are controlled and professionals assess risk.
Legal Rules and Local Regulations to Check First
Before you touch any paint, check your local lead laws so you know what’s required where you live.
You’ll also need to confirm permit requirements and follow specific disposal rules for lead-contaminated waste.
Ignoring these regulations can lead to fines and health risks, so get the facts from your municipality or state agency first.
Local Lead Laws
When you’re planning any work that disturbs old paint, check your city and state lead laws first so you know what permits, notification rules, and contractor certifications apply; failing to comply can lead to fines, legal liability, and health risks for occupants. Verify lead regulations, document neighborhood compliance, and notify tenants or neighbors as required.
| Jurisdiction | Requirement | Contact |
|---|---|---|
| City | Licensing | City HUD |
| State | Rules | State Enviro |
| Local | Notices | Health Dept |
Permit And Disposal Rules
If your project will disturb lead-based paint, you’ll need to confirm both permit requirements and disposal rules with local authorities so you don’t create hazards or face fines.
Check permit requirements, notification forms, and contractor certifications.
Ask about approved lead disposal methods, hazardous waste drop-off locations, container labeling, and transport rules.
Follow documentation and receipts to prove compliant disposal and avoid penalties.
Who Should Avoid DIY Lead Removal (And Why)
Because lead dust and chips can harm you long after work ends, certain people really shouldn’t tackle lead paint removal themselves.
You should weigh DIY Risks and immediate Health Concerns before proceeding; if you’re vulnerable or untrained, hire a pro.
- pregnant people and infants’ caregivers
- those with respiratory or immune issues
- inexperienced homeowners without protective gear
Plan Scope, Phases, and Realistic Timeline
Start by defining the project scope so you know which surfaces and rooms need lead-safe treatment.
Break the work into clear phases—containment, removal, cleanup, and clearance testing—to keep risks controlled.
Then set a realistic timeline that accounts for prep, drying or curing times, and possible contractor availability.
Project Scope Definition
When you define the project scope for removing lead paint, list the specific areas, surfaces, and methods you’ll address. Set clear exclusions and break the work into manageable phases—assessment, containment, abatement, cleanup, and verification—with realistic time estimates for each phase. This way, you can schedule permits, contractor availability, and drying or clearance times without surprises.
You’ll state project objectives and plan resource allocation clearly.
- Front porch trim, siding
- Window frames, shutters
- Deck railings, steps
Work Phasing Strategy
With the scope and phases defined—assessment, containment, abatement, cleanup, and verification—you’ll now sequence those steps into a practical phasing plan that matches site conditions, permits, and contractor availability. Use clear work sequencing and task prioritization: start critical containment, then abatement, followed by cleanup and verification.
| Phase | Priority |
|---|---|
| Containment | High |
| Abatement | High |
| Cleanup | Medium |
Realistic Timeframe Estimate
Because accurate timing keeps your project on budget and compliant, you should translate the scope and phases into a realistic timeline that accounts for assessment, containment, abatement, cleanup, and verification milestones.
You’ll set clear project milestones, assign durations, and build buffers for weather or permit delays. Use this simple plan to track progress and adjust resources.
- Assessment and permit: 1–3 days
- Containment and prep: 1–2 days
- Abatement, cleanup, verification: 2–5 days
PPE You Need for Lead Paint Work
You’ll need specific personal protective equipment to keep lead dust and chips off your skin, out of your lungs, and away from your clothes; the essentials are a properly fitted respirator, disposable coveralls, gloves, eye protection, and shoe covers.
Choose protective gear certified to safety standards, replace disposable items between jobs, fit-test respirators, and use nitrile gloves.
Inspect gear for damage and discard contaminated items properly.
Setting Up Containment and Clean Work Zones
Now that you’re properly protected, set up containment to keep lead dust and chips from spreading beyond the work area.
Use clear containment strategies and focused work zone preparation to limit contamination, control traffic, and simplify cleanup.
Contain the work area, control foot traffic, and prepare the zone to prevent contamination and ease cleanup.
- Seal doors/windows with plastic sheeting and tape
- Create a labeled entry/exit decon station
- Lay heavy-duty drop cloths and use a HEPA vacuum for final cleanup
Reduce Dust Before You Start: Pre-Removal Steps
Start by removing loose paint chips and dust using a wet method so you don’t kick particles into the air.
Next, use pre cleaning techniques: damp cloths, HEPA-filter vacuuming, and controlled rinsing.
Set up dust containment with plastic sheeting and tape, seal nearby vents, and wear PPE.
Dispose of waste in sealed bags and label them for safe removal.
Safe Outdoor Mechanical Removal Techniques
With dust contained and loose chips removed, move outdoors to handle stubborn lead paint with mechanical methods that minimize airborne contamination.
You’ll prioritize dust containment and consider lead encapsulation afterward.
Use mechanical scrapers and avoid open abrasive sanding; select power sanders with HEPA vacuums, low-speed paint grinders sparingly, and keep pressure washers set low while collecting runoff.
- mechanical scrapers
- power sanders
- pressure washers
Using Chemical Strippers on Exterior Lead Paint: Safety Checklist
Because chemical strippers dissolve old paint instead of abrading it, you’ll reduce airborne lead dust—but only if you follow strict safety steps designed for exterior work. You’ll choose chemical stripper types labeled for lead, wear PPE, contain runoff, and use proper application techniques to prevent spread.
| Step | Action |
|---|---|
| PPE | Respirator, gloves, goggles |
| Containment | Tarps, barriers, waste disposal |
Heat and Flame Methods: Risks and Safer Alternatives
Chemical strippers can cut down airborne lead by dissolving paint rather than sanding, but you shouldn’t assume every removal method offers the same safety profile—heat and open flames pose considerably higher risks.
You should avoid torching; flame hazards and increased lead exposure override convenience. Choose alternative methods, follow heat safety and safe practices, and rely on effective tools.
- Fire ignition risk
- Vaporized lead dust
- Safer mechanical options
Protecting Soil and Nearby Surfaces From Contamination
When you remove lead paint, protect the surrounding soil and surfaces by containing dust and debris at the source; failing to do so can leave toxic particles in gardens, mulch, and crevices where children and pets play. Use soil protection mats, erect surface barriers, sweep with HEPA tools, and wash exposed areas carefully.
| Action | Purpose |
|---|---|
| Lay mats | Capture debris |
| Tape barriers | Seal edges |
| HEPA vacuum | Remove dust |
| Wet wipe | Reduce spread |
| Rinse zone | Final clean |
Handling, Labeling, and Disposing of Lead-Painted Debris
When you finish scraping or sanding, seal chips and dust in heavy-duty, puncture-resistant bags to prevent leaks.
Clearly label each container with “Lead Paint Waste” and the date so handlers know the hazard.
Store and transport the bags in a secure, covered area and follow local disposal rules to keep people and the environment safe.
Properly Bagging Contaminated Debris
Start by containing all lead-painted debris immediately so dust and chips can’t spread—seal scrap, dust, and used cleanup materials in heavy-duty, tear-resistant plastic bags or lined containers.
You’ll label, double-bag if needed, and keep materials away from living areas to guarantee safe disposal and contamination prevention.
- Bag wet or HEPA-vacuumed debris
- Tie and tape seams securely
- Store in a sealed outdoor bin until disposal
Clear Hazard Labeling Practices
After sealing and storing contaminated materials, label them clearly so anyone handling the waste knows exactly what’s inside and how hazardous it is.
Use strong, legible labels that state “Lead-contaminated waste,” date, source, and contact info.
Follow hazard communication protocols and local labeling standards, include pictograms if required, and keep records so handlers and inspectors can identify risks and disposal requirements quickly.
Safe Storage And Transport
Because lead dust and chips can travel easily, you should handle, store, and transport contaminated debris with strict controls to protect people and the environment.
Seal debris in heavy-duty bags, label them clearly as hazardous, and keep them off living areas.
Arrange certified pickup or take to a hazardous-waste site for disposal to guarantee proper lead paint storage and safe transport.
- Double-bag and tape
- Hazard labels visible
- Secure vehicle placement
Thorough Cleanup Checklist and Verification Steps
When you’ve finished paint removal, follow a compact, methodical cleanup checklist to make sure every hazardous particle is gone and the area’s safe for occupancy.
You’ll want to collect debris, HEPA-vacuum surfaces, wet-wipe all horizontal areas from cleanest to dirtiest, and properly bag and label waste for disposal.
Use proven cleanup techniques, document each step, re-clean high-risk zones, and apply verification methods like wipe sampling protocols and photographic records.
Clearance Testing: How to Confirm a Successful Job
Before you clear the worksite for re-occupancy, run formal clearance testing to confirm the cleanup removed lead to acceptable levels.
Before reoccupying the site, perform formal clearance testing to ensure lead has been reduced to safe levels.
You’ll follow established testing protocols and choose clearance methods (wipe, dust, or soil sampling) that match the job.
Interpret results against standards, document everything, and don’t reoccupy until results pass.
- Wipe samples from surfaces
- Dust cloud checks
- Soil perimeter tests
When to Hire Certified Lead Abatement Professionals
If you see visible structural damage or peeling lead paint, you should call certified lead abatement professionals because the risk of creating hazardous dust is high.
Also hire professionals right away if vulnerable people live in the home—young children, pregnant people, or anyone with respiratory issues.
They’ve got the training and equipment to safely contain and remove the hazard.
Visible Structural Damage
Because significant paint loss, rotting trim, or crumbling plaster can expose deep layers of lead-based paint, you should hire certified lead abatement professionals whenever structural damage is visible or suspected.
They’ll assess lead paint deterioration and preserve structural integrity, contain contamination, and perform safe removal.
- Peeling exterior clapboard with exposed layers
- Soft, sagging window sills or trim
- Cracked, dusty plaster near foundations
High-Risk Occupant Presence
When young children, pregnant people, or anyone with compromised immunity live in your home, hire certified lead abatement professionals to assess and address any lead hazards.
You shouldn’t attempt risky removal when occupant safety is critical.
Professionals reduce lead exposure, use containment and testing, and provide clearance documentation.
If you suspect contamination or frequent dust, call certified abatement to protect vulnerable household members immediately.
Cost Factors and Budgeting for Safe Removal
Several key factors determine what you’ll pay to remove lead paint safely: the size and condition of the treated area, the removal method, local labor and disposal rates, required containment and testing, and whether you hire certified professionals or do it yourself.
Costs to remove lead paint depend on area size, method, local rates, testing, containment, and labor choice.
You should include budget considerations and set up expense tracking to avoid surprises.
- contractor quotes vs. DIY
- containment and disposal fees
- testing and certification costs
Common Homeowner Mistakes and How to Avoid Them
Ever wonder which missteps cause the most harm during a lead-paint project? You might skip containment, use power sanding, or neglect PPE — common pitfalls that spread dust and risk exposure.
Follow clear prevention strategies: isolate the area, wet methods, HEPA vacuuming, proper respirators, and wipe-downs.
Don’t rush; plan, work methodically, and limit household access until cleanup’s confirmed.
Where to Get Permits, Testing, and Safe Disposal Services
After you’ve planned containment and chosen safe methods, the next step is lining up permits, testing, and disposal so the job meets local rules and keeps your household safe.
Contact local agencies for permit application help, compliance guidelines, testing services, disposal options, and contractor resources.
Check lead regulations before hiring.
- Local permitting office
- Certified testing labs
- Licensed hazardous waste haulers
Frequently Asked Questions
Can Children or Pets Stay Inside the House During Exterior Lead Removal?
No, you shouldn’t keep children or pets inside during exterior lead removal; you’ll increase lead exposure risks. Follow safe removal practices, evacuate vulnerable occupants, seal and ventilate work areas, and hire certified professionals for containment and cleanup.
How Long Before Repainted Siding Is Safe to Touch or Occupy?
Like fresh snow beside warm brick, you shouldn’t rush: after lead paint curing, you’ll wait at least 24–48 hours for paint skin, but a safe touch timeframe for full occupancy is typically 7 days—sometimes longer per manufacturer.
Can I Pressure-Wash Lead-Painted Surfaces Safely?
You shouldn’t pressure wash lead paint; you’ll spread toxic dust and chips. Use containment, wet methods, or hire certified abatement pros experienced with lead paint to minimize exposure and comply with safety regulations.
Will Lead Paint Removal Affect My Home Insurance or Resale Value?
Yes — you should expect insurance implications and resale concerns: you’ll need disclosures, you’ll need remediation documentation, you’ll reduce liability with certified removal, and you’ll preserve marketability with clear records, so get thorough inspections and professional reports.
Are There Seasonal/Weather Restrictions for Safe Exterior Lead Removal?
Yes — you should avoid extreme weather; wet, windy, or freezing conditions increase hazards and cleanup difficulty. You’ll follow weather conditions guidelines and local lead paint regulations, so plan removal during mild, dry periods and get permits.
Conclusion
You’ve got this—think of tackling lead paint like gardening: one neighbor I helped dug up a small patch and found poison ivy under easy-looking leaves, so you’ll want gloves, the right tools, and a plan. Follow the checklist, test before you scrape, and call pros for big jobs. With care, permits, and safe disposal, you’ll protect your family and your home without stirring up more hazards than you fix.