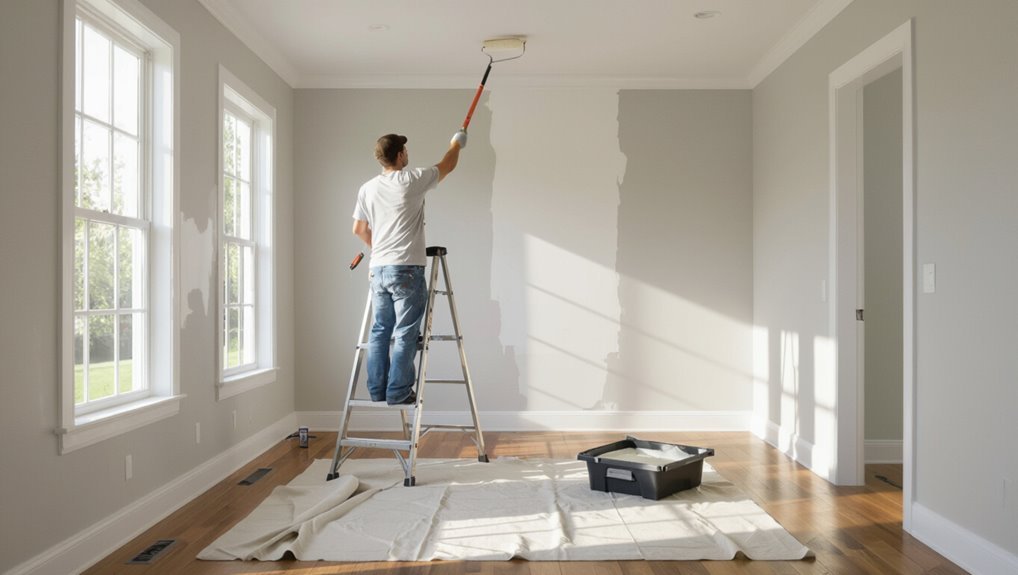
How to Paint My Ceiling: Easy Diy Ceiling Painting Guide
You can quickly refresh your room by prepping, priming, and rolling your ceiling with simple tools and safety steps. Clear and cover furniture, tape edges, turn off power, and patch any cracks or stains before priming. Cut in with an angled brush, then roll with a thick-nap cover for textured ceilings, keeping a wet edge to avoid drips. Allow proper dry times between coats, clean your tools, and follow ventilation guidance — keep going to learn detailed tips and troubleshooting.
Step-by-Step Ceiling Painting Guide
Start by clearing the room and protecting everything you don’t want painted: move furniture out or center it and cover with drop cloths, tape off trim and light fixtures, and lay down plastic over the floor.
Then prime, cut in edges, and roll in consistent strokes.
Choose finish based on ceiling paint trends and color psychology, test swatches, work from corner to exit, clean up.
When to Repaint a Ceiling: Common Signs
If you spot water stains on your ceiling, that’s a clear warning you should repaint after fixing the leak.
Peeling paint or flaking areas mean the finish has failed and needs attention.
Likewise, widespread discoloration or yellowing is a sign the ceiling’s protective layer has aged and it’s time for a fresh coat.
Water Stains Visible
When you see discoloration or brownish rings on your ceiling, water stains are a clear sign it’s time to investigate and likely repaint. These marks usually mean moisture has penetrated the paint or drywall and can lead to mold or structural damage if ignored.
You should address water damage promptly: perform leak detection, control humidity, apply mold treatment, and plan ceiling repairs for long-term stain prevention and ceiling maintenance.
Paint Peeling Areas
After addressing water stains, check the ceiling for paint peeling—flaky, curling, or hanging strips of paint mean the coating has lost adhesion and won’t protect the surface.
You should remove peeling paint, perform surface cleaning, diagnose moisture issues, and choose repair techniques.
Use filler application for gaps, sand for texture matching, and follow proper ceiling preparation to restore paint adhesion before repainting.
Discoloration Or Yellowing
Discoloration or yellowing on a ceiling signals that the finish has been compromised and you’ll want to investigate before repainting.
Check for leaks, nicotine, cooking smoke, or aging materials—common yellowing causes.
Clean stains with appropriate cleaners, treat mold or water damage, then prime with stain-blocking primer.
For durable discoloration solutions, fully repair sources and use quality ceiling paint to prevent recurrence.
What You Can Realistically DIY vs. Hire a Pro
Although painting a ceiling can look intimidating, you can handle many common jobs yourself with the right prep and tools. You’ll save money on simple repairs, sanding, priming, and painting textured or flat ceilings.
Know your DIY Limitations: major water damage, structural issues, or complex textures call for experts.
Weigh Professional Benefits like speed, safety, and warranty when deciding.
Estimate Time and Paint for a Single-Room Ceiling
Plan for about 1–2 hours to prep the room and 2–4 hours to roll primer and two coats on a typical 12×12-foot ceiling.
You’ll usually need roughly one gallon of paint for two coats on that size, or more for textured ceilings.
Use these estimates to schedule your time and buy the right amount so you don’t run out mid-job.
Time Breakdown
A typical single-room ceiling takes about 3–6 hours from prep to cleanup, depending on room size, ceiling height, and whether you need to patch or prime first; budget roughly half that time for setup and taping.
1–2 hours are needed for two coats of paint, and the rest for touch-ups and drying between coats.
Plan time allocation: prep/taping, cutting in, rolling, drying, and cleanup in your project timeline.
Paint Quantity
Now that you’ve mapped out the time for prep, cutting in, rolling, and drying, you’ll want to estimate how much paint and extra time you’ll need for a single-room ceiling.
Measure ceiling area, then plan one gallon per 350–400 sq ft for one coat.
Consider paint types and paint finishes—flat hides flaws best; eggshell or satin may need extra coats.
Allow drying time between coats.
Tools You Need for a DIY Ceiling Paint Job
Before you start rolling, gather the right tools so you won’t stop mid-job to hunt for supplies. You’ll need brushes, rollers, extension poles, drop cloths, ladder, spackle, sandpaper, primer, mask, goggles, and painter’s tape for ceiling preparation, surface repairs, fixture protection, texture considerations, paint types, roller techniques, color selection, drying times, safety precautions, and cleanup tips.
| Brushes | Rollers | Tape |
|---|---|---|
| Ladder | Spackle | Drop cloths |
| Mask | Sandpaper | Primer |
Ceiling Paint Types: Flat, Matte, and Ceiling Formulas
Three common choices—flat, matte, and specialty ceiling formulas—cover most ceiling needs, and picking the right one affects coverage, stain hiding, and washability.
Choose flat, matte, or specialty ceiling paints to balance coverage, stain hiding, and washability for lasting results.
You’ll consider finish differences, paint durability, lighting impact, texture options, surface preparation, and ceiling maintenance. Compare brands for application techniques and color trends to match color selection.
- Flat: hides imperfections
- Matte: slight sheen, washable
- Ceiling formulas: higher hide
Picking the Best Ceiling Color and Finish
Wondering how to choose a ceiling color and finish that complements the room while standing up to wear?
Think about ceiling color psychology: light hues make spaces feel larger and calm, while warmer tones add coziness.
For choosing finishes, pick flat or matte to hide flaws, satin for slight sheen and durability in high-traffic areas.
Test swatches under your room’s lighting first.
How Much Ceiling Paint to Buy: Simple Math
Now that you’ve picked a color and finish that suits the room, you’ll need the right amount of paint to avoid extra trips to the store or running short mid-job.
Use a paint calculator or coverage estimator, measure ceiling area, and factor two coats. Save a small extra can for touch-ups.
- Measure length × width
- Check square feet per gallon
- Add 10% for waste
Pick Rollers, Extension Poles, and Trim Brushes
Pick rollers and extension poles that match your ceiling texture and reach so you paint efficiently and reduce shoulder strain.
For roller selection, choose nap based on ceiling finishes; pair with a sturdy extension pole.
Use quality trim brushes for edges and corners.
Consider paint types and color choices before starting.
Proper surface preparation and painting techniques guarantee smooth coverage and fewer touch-ups.
Safety Gear and Ladder Setup for Ceiling Work
Before you climb, gear up: wear safety glasses, a dust mask or respirator for sanding/priming, non-slip shoes, and a hard hat if debris might fall.
Use proper safety equipment and check ladder stability before starting.
- Tighten locks and place feet on firm ground
- Keep tools on a belt, not the top step
- Work with a spotter for balance and safety
Preparing the Room: Move Furniture and Protect Floors
With your ladder and safety gear set, clear the room so you can move freely and keep paint off everything.
Move smaller items to another room and group larger pieces centrally with a purposeful furniture arrangement that preserves pathways.
Cover remaining pieces and all floors with drop cloths or plastic sheeting.
Tape edges securely to guarantee consistent floor protection and prevent paint seepage.
Masking Trim, Vents, and Fixtures Without Damage
Before you start cutting in, protect trim edges with painter’s tape and thin paper to keep crisp lines without peeling paint.
Remove or loosely secure light fixtures and cover bulbs so you don’t stress wiring while you work.
Tape over air vents or remove their grilles and cover openings to prevent dust and paint from getting inside.
Protecting Trim Edges
Masking trim, vents, and light fixtures is the key step that keeps a clean line between ceiling paint and existing finishes.
You’ll save time on touch-ups by doing it right the first time. Use proper trim protection and precise edge masking to prevent bleed and damage.
- Apply low-tack painter’s tape firmly.
- Cover vents with lightweight paper.
- Protect fixtures with plastic wrap.
Securing Light Fixtures
Start by turning off power and removing bulbs so you don’t risk a shock or stain; then gently cover fixtures with plastic sheeting or disposable light covers, securing the edges with low-tack painter’s tape so you won’t pull off finishes when you remove it.
For light fixture safety, label wires and fasteners if you do any minor fixture removal, avoid tugging, and keep hardware in a marked bag.
Covering Air Vents
1. Cover vents with painter’s tape and plastic to prevent paint overspray and protect ducts; don’t seal permanently to preserve air quality.
You’ll remove covers before paint fully cures to avoid sticking. For ventilation tips, use thin mesh or paper filters that catch splatter without blocking flow.
- Label vent covers
- Use low-tack tape
- Check airflow afterward
Repair Cracks, Holes, and Peeling Paint on Ceilings
Patch any cracks, holes, and peeling paint before you roll—addressing these issues guarantees a smooth, long-lasting finish and prevents future problems.
For crack repair and hole filling, scrape loose paint, sand, and match ceiling texture.
Use appropriate primer application after surface preparation.
Consider mold treatment if needed, choose proper paint selection, follow finishing techniques, and observe safety precautions throughout.
Treat Water Stains and Surface Mold Before Painting
Before you paint, identify and fix the source of any water stains so the problem doesn’t come back.
If you see surface mold, kill it with an appropriate cleaner (like a bleach solution or commercial mold remover) and scrub the area until it’s gone.
Let the ceiling dry completely before priming and painting.
Identify Stain Causes
If you spot discoloration on your ceiling, don’t ignore it—identify the cause before you paint so the stain doesn’t return or spread.
Determine whether stains come from leaks, smoke, or humidity to choose proper stain types and stain prevention measures.
Check attic, plumbing, and ventilation. Fix the source, then clean and prime.
- Inspect attic and roof
- Test plumbing joints
- Assess ventilation and insulation
Kill And Remove Mold
Kill mold and remove water stains thoroughly so your new paint won’t peel or the spores won’t come back.
Work in a ventilated area, wear gloves and a mask, and scrub affected spots with a bleach solution or commercial remover.
Rinse, dry, and treat with a mold-resistant primer.
Follow mold prevention steps and proven cleaning techniques to stop recurrence before you repaint.
When and How to Prime a Ceiling Surface
Priming a ceiling matters when the surface is stained, repaired, porous, or you’re changing from a dark to a light color; do it whenever you want even coverage and better paint adhesion.
Assess surface compatibility and do ceiling preparation: clean, repair, and choose primer types matched to conditions.
Follow priming techniques, application methods, drying times, and ideal conditions for stain prevention and primer benefits.
- Prep, clean, assess
- Apply evenly, watch drying
- Match primer to surface
Best Primers for Stains, New Drywall, and Textures
Now that you’ve cleaned, repaired, and chosen the right primer type for general coverage, pick primers tailored to the specific challenges of stains, fresh drywall, and textured ceilings.
For stain blocking choose oil or shellac-based options; for drywall adhesion use high-quality latex or bonding primers.
Check texture compatibility, follow surface preparation, use proper application techniques, note drying times, and consider product recommendations like Zinsser and Kilz.
Dealing With Popcorn and Textured Ceilings
If your ceiling has old popcorn texture, you’ll first decide whether to remove it or work around it.
Removing popcorn can be messy and may require testing for asbestos, but painting over textured ceilings is a quicker option if the surface is sound.
I’ll explain safe removal steps and the best painting techniques for textured surfaces.
Removing Popcorn Texture
When your ceiling still has that popcorn or heavy texture, you’ll want to remove it before painting so the finish is smooth and durable. Start by testing for asbestos, then choose popcorn removal methods or consider ceiling texture alternatives if removal’s impractical.
Protect floors, score and mist, then scrape gently.
- Wear mask and eye protection
- Keep area wet to reduce dust
- Patch and sand before priming
Painting Over Textured Ceilings
Removing or repairing popcorn texture isn’t always practical, so you may decide to paint over it instead; doing so can save time and still produce a tidy, long-lasting ceiling when done right. Clean, patch, prime with a high-build primer, then roll with a thick-nap roller. Choose proper textured ceiling techniques and ceiling paint choices.
| Step | Tip |
|---|---|
| Clean | Dust, vacuum |
| Prime | Stain-blocking |
| Roll | Thick nap |
| Finish | Flat sheen |
Cutting In Along Walls and Corners (Step-by-Step)
Before rolling across the main ceiling, you’ll cut in the edges so the paint meets walls and corners cleanly; this step uses a brush for control and steady strokes to prevent lap marks.
Use proper cutting technique with wall preparation and corner precision. Choose brush selection for edge control based on ceiling types and paint finishes.
- Pick compatible color choices.
- Watch drying times.
- Follow cleanup methods.
Roller Technique to Avoid Lap Marks and Streaks
Load the roller evenly so you’ve got enough paint without drips, and keep a wet edge as you work across the ceiling.
Use consistent pressure and overlapping strokes to blend each pass into the next and prevent lap marks.
If you notice streaks, adjust your roller loading and pressure immediately before the paint starts to set.
Proper Roller Loading
Start by pouring a manageable amount of paint into the tray well and rolling your roller through the paint so it’s evenly saturated but not dripping.
Use correct roller technique and monitor paint consistency to prevent blobs.
- Reload when the roller skims the tray edge
- Shake off excess on the tray ridges
- Keep a smooth, steady pressure while rolling
Maintain A Wet Edge
When you keep a wet edge, you blend each new pass into the previous one so lap marks and streaks never form; work quickly and overlap each roller stroke by about one-third to two-thirds of the previous area while maintaining steady pressure.
Use wet edge techniques like rolling into still-wet paint, angling the roller slightly, and keeping a consistent pace to guarantee even coverage and avoiding streaks.
Consistent Pressure Technique
Press the roller evenly and keep a steady rhythm to prevent uneven paint buildup that causes lap marks and streaks. You’ll control pressure application and master a simple roller technique to maintain an even coat across the ceiling.
Move smoothly, overlap lightly, and avoid stopping mid-pass.
- Keep a consistent wrist feel
- Reload before the roller goes dry
- Step back to spot streaks early
Use an Extension Pole Safely and Comfortably
If you want to paint a ceiling without ladders, an extension pole is your best tool—hold it like a ski pole, keep your arms slightly bent, and let your shoulders do the work so you can move smoothly and avoid strain. Use extension pole techniques for a comfortable grip, balanced stance, and controlled strokes.
| Grip | Stance | Stroke |
|---|---|---|
| Soft foam | Feet shoulder-width | Slow, even |
| Thumb lock | Slight bend | Overlap edges |
Working Around Light Fixtures and Ceiling Fans
Before you start, shut off the power to the room at the breaker to avoid shocks.
Remove light fixtures if you can, or securely cover them and the fan motor with plastic to keep paint off.
If the fan stays in place, paint carefully around each blade or temporarily remove the blades for a cleaner job.
Turn Off Power
Turn off the power at the circuit breaker so you won’t risk shocks while removing or painting around light fixtures and ceiling fans.
As a safety precautions step, identify all power sources feeding the room, label the breaker, and test with a voltage tester before you start.
Stay organized and never assume a switch kills power.
- Label breakers
- Test with a voltage tester
- Keep phone handy for emergencies
Remove Or Protect Fixtures
One clear step is to remove or shield light fixtures and ceiling fans so paint won’t splatter on them or complicate reinstallation.
You should cut power, unmount removable fixtures for fixture safety, and label wiring.
For installed items, secure cover materials like plastic sheeting and painter’s tape, wrap bases tightly, and keep screws and hardware in labeled bags so reassembly’s quick and error-free.
Paint Around Fan Blades
Work around ceiling fan blades carefully to avoid drips and damage: switch the fan off at the wall and at the breaker, then use a ladder to reach each blade and either remove them or wrap them tightly with plastic and painter’s tape so paint won’t seep underneath.
You’ll guarantee proper fan blade coverage during paint application.
- Tape blades securely
- Use angled brush for edges
- Check for drips
How Many Coats Your Ceiling Needs
How many coats your ceiling needs depends on the color, paint type, and the surface’s condition. You’ll adjust for ceiling texture and paint sheen: darker colors and lower sheen often need more coverage. Start with one even coat, inspect for streaks, then add a second if needed. Quick reference:
| Color | Texture | Coats |
|---|---|---|
| Light | Smooth | 1–2 |
| Dark | Textured | 2–3 |
Drying Times, Recoat Windows, and Ideal Conditions
Because drying depends on paint type, humidity, temperature, and airflow, you’ll want to check the manufacturer’s recoat window before applying another layer. Most latex paints are ready in 2–4 hours, while oils can take 24 hours or more.
Drying varies by paint, humidity, temperature, and airflow — check the manufacturer’s recoat window before recoating.
Aim for ideal conditions: stable temperature range, moderate humidity levels, and good air circulation.
- Monitor drying times closely
- Respect recoat windows
- Optimize air circulation and temperature range
Quick Fixes for Drips, Runs, and Splatter
Catch drips, runs, and splatter early to keep a ceiling finish looking professional—grab a clean brush or a small roller while the paint’s still tacky, lightly feathering the edges to blend and smooth any uneven spots.
For drip removal, gently lift excess then smooth; use run correction by pulling paint downward.
For splatter prevention, mist water lightly; monitor paint absorption to avoid reworking.
Painting Vaulted and High Ceilings Safely
When you’re tackling vaulted or very high ceilings, safety comes first: set up ladders or scaffolds on level ground and secure them before you climb.
Use long-handled rollers and extension poles so you can paint more from the floor and reduce time spent aloft.
I’ll walk you through proper ladder/scaffold techniques and the best long-handled tool methods next.
Safe Ladder And Scaffold Use
Working at height needs extra care, so set up ladders and scaffolds properly before you paint vaulted or high ceilings.
You’ll check ladder safety, lock spreaders, and level feet. Inspect scaffold stability, guardrails, and planked platforms.
Don’t overreach; move equipment instead. Use a helper when possible and wear slip-resistant shoes.
- Inspect equipment
- Position securely
- Keep tools organized
Long-Handled Tools Technique
If you’re tackling vaulted or high ceilings, long-handled tools let you paint from the floor or a stable platform so you don’t have to climb as often; choose a sturdy extension pole and a compatible roller or brush, secure attachments tightly, and balance the tool in your hands to keep strokes smooth and controlled.
| Tool | Use | Tip |
|---|---|---|
| long handled rollers | reach center | keep even pressure |
| Brush on pole | cut ceiling edges | use angled head |
| Extension pole | stability | lock sections securely |
Sprayer vs. Roller: Pros, Cons, and Tips
Although both sprayers and rollers can give you a smooth ceiling finish, each tool has different speed, coverage, and cleanup trade-offs you should weigh before starting.
Choose sprayer for sprayer efficiency and fast work; pick roller for better roller coverage and control. Consider prep, ventilation, and cleanup.
Choose a sprayer for speed or a roller for control — factor in prep, ventilation, and cleanup.
- Sprayer: fast, overspray
- Roller: precise, slower
- Hybrid: best of both
Painting Ceilings Dark or Bold Without Mess
Once you’ve picked between a sprayer and a roller, you can tackle painting a dark or bold ceiling without creating a mess by planning for extra prep, masking, and lighting checks.
Use bold color techniques like gradual test patches and tinted primers.
Follow ceiling preparation tips: clean, sand, and seal stains, tape edges, drop cloths, and work from the darkest area toward exits.
Get a Uniform Finish on Textured Ceilings
Before you start, you’ll want to prep the surface by cleaning, patching any holes, and ensuring loose texture is secured.
Choose the right tools—thick-nap rollers, an angled brush, and a good extension pole—to reach nooks without flattening the texture.
Use a steady, overlapping technique and light pressure to apply paint evenly and avoid drips or roller marks.
Prep The Surface
If your ceiling has texture, you’ll want to start by evaluating and stabilizing it so paint goes on evenly: knock down any loose material with a soft-bristled brush, patch holes and deep gouges with a flexible joint compound, and sand high ridges lightly to blend them into the surrounding surface.
Clean, prime where needed, and address moisture issues for good paint adhesion.
- Consider ceiling materials and ceiling textures.
- Match paint types to desired ceiling finish and light reflection.
- Think about wall contrast and color selection.
Choose The Right Tools
With the surface prepped and primed, pick tools that’ll help you lay paint into every nook of a textured ceiling without leaving thin spots or heavy ridges.
Focus tool selection on nap length and quality rollers for your paint types and desired paint finishes.
Consider ladders, poles, masks for safety measures, match color choices to lighting, follow DIY techniques, and schedule equipment maintenance after use.
Apply Correct Technique
Start by cutting in along the ceiling’s edges and around fixtures with a brush. Then load a thick-nap roller and work in consistent, overlapping passes across the textured surface so you lay paint into crevices without building ridges.
Use proper brush techniques and roller methods to avoid lap marks and drips.
- Keep steady pressure
- Maintain wet edges
- Reload before dry patches appear
Clean Brushes, Rollers, and Reusable Supplies
Rinse brushes and rollers promptly after you’re done—letting paint dry on the fibers makes cleaning much harder and shortens their life.
Use proper brush maintenance and roller cleaning methods: flush with water or solvent per paint type, comb bristles, spin rollers to remove excess.
Plan supply reuse with labeled paint storage and eco friendly options.
Follow proven cleaning techniques to prolong tools and save money.
Dispose of Leftover Paint and Empty Cans Properly
When you’re done painting, don’t toss leftover paint or empty cans in the regular trash.
Check local hazardous-waste guidelines for proper paint disposal and take cans to a recycling or drop-off center if they’re empty and dry.
Following these steps keeps chemicals out of the environment and keeps cans recyclable.
Proper Paint Disposal
1 simple rule will keep you safe and legal: don’t pour leftover paint or rinse water down drains, storm sewers, or onto the ground.
Take leftover paint to hazardous-waste sites, use eco friendly options like donating usable cans, or follow community programs for collection.
Choose dry-out kits for small amounts.
- Drop off at certified centers
- Donate usable paint
- Solidify small leftovers and trash
Recycling Empty Cans
Before you toss that empty paint can, check whether your community accepts them for recycling or reuse; many centers and curbside programs take clean, dry metal cans and lids. Empty cans qualify for can recycling, or you can use them for creative storage.
| Clean | Dry | Lids |
|---|---|---|
| Local drop-off | Curbside rules | Repurpose jars |
| Donate usable paint | Label cans | Store brushes |
Cost-Saving Tips Without Sacrificing Quality
Although you might be tempted to cut corners, you can save money on ceiling painting without compromising results by choosing smart materials, doing prep work right, and using efficient techniques; prioritize quality primer and a durable, washable paint, rent specialty tools when needed, and focus your effort on proper surface prep to avoid costly touch-ups later.
- Use cost effective materials like mid-grade paint
- Apply budget friendly techniques: correct tape and drop cloth use
- Rent rollers or scaffolding for speed and safety
Common Beginner Mistakes and How to Avoid Them
Anyone can make a few common mistakes when painting a ceiling, but knowing what to watch for will keep your finish professional and save time.
You’ll avoid beginner pitfalls by preparing surfaces, using proper roller nap, and cutting in carefully.
Prevent drips by not overloading tools, work in consistent light, and address common oversights like inadequate ventilation and skipping primer for stained or new drywall.
When to Stop DIY and Call a Pro
If the job risks your safety, your time, or the room’s condition, call a pro.
You should hire professional painters when complexity, height, or hidden damage threatens ceiling aesthetics or structural soundness.
Don’t gamble on ladders or uneven finishes; pros have tools and experience to protect your home.
- Tall or vaulted ceilings
- Water damage or mold
- Intricate textures or trims
Touch Up Ceilings Later Without Full Repaint
After a pro fixes major issues or you finish a full repaint, you can handle small blemishes yourself without redoing the entire ceiling.
Clean spots, sand lightly, apply primer to stains, then feather new paint with a small roller or brush. Use matching sheen and keep paint thin.
Regular maintenance tips include inspecting annually and addressing chips quickly with simple touch up techniques.
Seasonal and Humidity Considerations for Ceilings
Because temperature and moisture change with the seasons, you’ll want to plan ceiling work around those swings to avoid adhesion and drying problems.
Monitor seasonal humidity and aim for recommended paint temperature. Prep, timing, and ventilation matter.
- Paint on low-humidity, moderate days
- Use heaters or dehumidifiers to control conditions
- Wait for manufacturer-specified paint temperature before starting
How Ceiling Color Changes Light and Space Perception
When you pick a ceiling color, it directly shapes how light behaves and how roomy a space feels; lighter tones bounce daylight and artificial light back into the room, making ceilings seem higher and areas brighter, while darker hues absorb light and can visually lower height and add intimacy.
You’ll use color psychology for mood influence, light reflection for spatial enhancement, and design cohesion for visual continuity, shaping ambient perception and architectural impact.
Prepare the Room for Use After Painting: Ventilate & Odor Control
Now that you’ve chosen a ceiling color to shape light and mood, plan how you’ll get the room back to normal by ventilating and controlling paint odor.
Use ventilation methods like fan operation and window opening during paint drying, monitor room temperature and humidity control, protect furniture, and consider air purifiers, odor neutralizers or scent masking to bring in fresh air.
- Open windows and run fans
- Use air purifiers, odor neutralizers
- Keep furniture protection until fully dry
Paint Day Checklist for Smooth, Professional Results
Start with a simple checklist so you don’t miss a step: gather your tools (roller, extension pole, angled brush, tray, drop cloths, ladder), confirm paint is well-mixed and at room temperature, tape edges and cover furniture, and set fans and windows for airflow—this lets you work efficiently, keeps edges crisp, and speeds drying for a professional finish.
Then verify ceiling paint choice, color selection, tool organization, safety measures, surface preparation, ventilation strategies, texture choice, and cleanup tips.
Troubleshooting Guide: Fixes for Frequent Ceiling Issues
If you run into drips, uneven coverage, or visible seams while painting your ceiling, you can usually fix them without redoing the whole job—identify the problem, let the paint dry fully, then sand, spot-prime, and recoat as needed.
- Sand low spots, adjust primer selection for paint absorption and ceiling texture.
- Address moisture issues before repainting; consider paint durability and ceiling height.
- Reassess lighting effects and color psychology to hide imperfections.
Frequently Asked Questions
Can I Paint a Ceiling in Winter With a Home Humidifier Running?
Yes—you can paint a ceiling in winter with a home humidifier running, but you’ll need to monitor humidity levels closely. Too much moisture slows paint drying, so keep humidity moderate to guarantee proper curing and finish.
Will Ceiling Paint Yellow Over Time From Normal Cooking Fumes?
Yes—over time cooking fumes can yellow your ceiling, especially near kitchens. You’ll prevent this with regular ceiling maintenance, good ventilation, and using high-quality, durable paint designed for stain resistance to preserve paint durability and appearance.
How Long Must Windows Stay Open After Painting to Remove Odor?
You should keep windows open at least 24–72 hours after painting for effective odor removal; use odor removal techniques and active ventilation methods like fans and cross-breezes, and continue airing for several days if smell persists.
Are There Ceiling Paint Options Safe for Nurseries and Infants?
Yes — you can choose non toxic options and baby safe paints; they’re low‑VOC, zero‑VOC, or water‑based, yet still durable. You’ll breathe easier and protect your infant while enjoying long‑lasting, washable ceiling finishes.
Can I Paint Over Nicotine-Stained Ceilings Without Professional Cleaning?
Yes — you can paint over nicotine-stained ceilings if you prep properly. Use smoke damage primers, degrease surfaces, sand lightly, patch flaws, and apply stain-blocking primer first; preparation tips prevent bleed-through and guarantee lasting coverage.
Conclusion
You’ve got the basics to tackle your ceiling with confidence—prep, the right tools, and patience make a big difference. If you’re unsure, start small: a friend painted their 12×12 bedroom in one weekend, avoided drips by cutting in carefully, and finished with a smooth roller pass. You can do the same—take breaks, ventilate, and inspect for missed spots. When in doubt, hire a pro for complex repairs or high ceilings.