How to Clean a Paint Brush With Dried Paint: Restoring Hardened Brushes
You can often revive a hardened paint brush by loosening dried paint with the right solvent, then gently working it out and reshaping the bristles. Start by testing the bristles’ flexibility, then soak water‑based paint in warm, soapy water and oil‑based paint in mineral spirits or paint thinner; use denatured alcohol for shellac. Agitate, comb or pinch stubborn clumps, rinse, reshape, and dry upright. Follow safety precautions and maintenance tips to improve longevity, and learn how to handle tougher problems next.
Quick Answer: Revive a Dried Paint Brush (Step-by-Step)
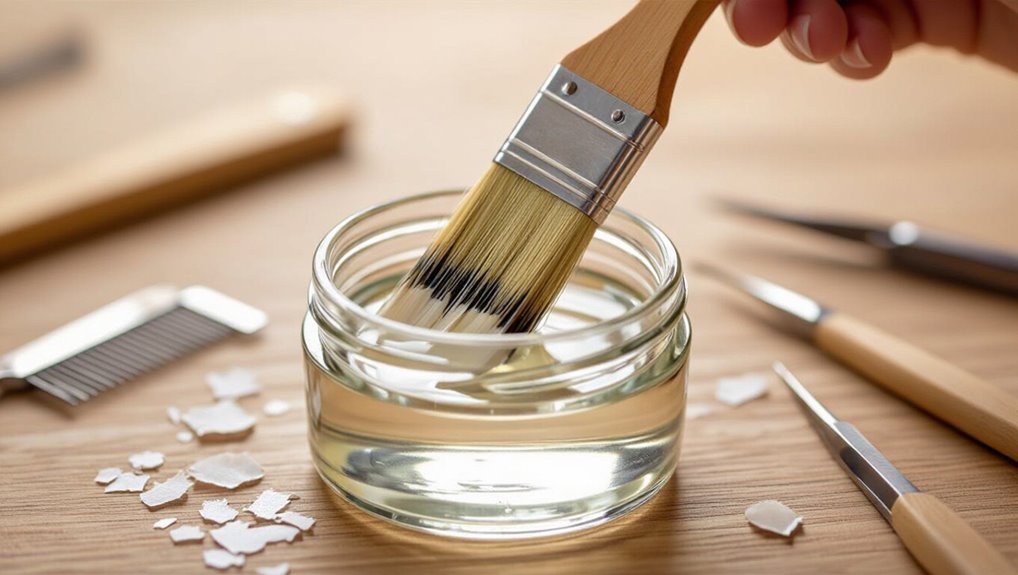
Soak the dried brush to loosen the paint: start by removing excess dried clumps with a brush comb or your fingers.
Then soak the bristles in a solvent appropriate to the paint type (water for latex, mineral spirits or brush cleaner for oil-based) for 15–30 minutes.
After soaking, rinse, work bristles gently, reshape, and let dry upright.
This quick routine boosts brush maintenance and improves painting techniques.
Triage: Can This Brush Be Saved? Quick Tests
After you’ve tried loosening and rinsing a dried brush, next ask whether it’s worth saving. Do a quick brush assessment: flex bristles, check tip shape, and smell for solvent residue. Consider paint types—latex vs oil—when deciding. Use this simple reference:
| Test | Indicator |
|---|---|
| Flexibility | Springs back |
| Tip | Holds point |
| Smell | Solvent present |
Safety First: Gloves, Ventilation, and Solvent Precautions
Before you start scrubbing, protect yourself: wear chemical-resistant gloves, work where fresh air circulates, and keep solvents sealed when not in use.
You should check safety equipment—gloves, goggles, and a respirator if needed—and read labels for proper solvent selection.
Use small amounts, avoid open flames, store solvent waste safely, and wash hands after handling chemicals to prevent irritation or accidental exposure.
Gather Tools and Supplies
Gather the right tools and supplies so cleaning goes quickly and your brush lasts longer.
You’ll need a stiff comb or brush cleaner, container for solvent, disposable rags, gloves, and eye protection.
Choose solvent appropriate for brush types and label it.
Include a wire brush for metal ferrules and a jar with a lid to store used solvent.
Note cleaning frequency to prevent heavy buildup.
Soften Water‑Based Paint With Warm Water and Soap
Soak the brush in warm, soapy water to loosen and dissolve water‑based paint—use water that’s pleasantly hot to the touch but not boiling.
Agitate bristles gently, working soap into tips to exploit paint properties that soften with heat and alkalinity.
Rinse frequently, repeat as needed, and reshape the bristles.
Proper brush maintenance prevents permanent hardening and preserves performance for future projects.
Dissolve Oil‑Based Paint With Mineral Spirits or Thinner
If you’ve used oil‑based paint, pick the right solvent—mineral spirits for most jobs or a stronger thinner for stubborn enamel.
Set up a well‑ventilated area, wear gloves, and protect surfaces before you start.
Then soak the brush and gently agitate the bristles until the paint loosens.
Choose The Right Solvent
When you’re cleaning oil-based paint from a brush, pick a solvent that actually dissolves the binders—mineral spirits or paint thinner are the go-to choices for most alkyd and oil formulas.
Assess solvent types by compatibility with the paint, bristle material, and safety.
Test effectiveness on a small clump, choose the mildest solvent that works, and discard contaminated solvent properly.
Prepare A Safe Workspace
Now that you’ve picked the right solvent, set up a well-ventilated, fire-safe workspace before you start dissolving oil‑based paint with mineral spirits or thinner.
Lay down a disposable drop cloth, keep solvents in sealed metal containers, and position a broad tray for drips.
Use gloves, goggles, and a respirator.
Good workspace organization speeds cleanup and helps you follow safe cleaning techniques.
Soak And Agitate Gently
Start by pouring a small amount of mineral spirits or paint thinner into a metal or glass container and submerging the bristles so the solvent covers the painted area; let the brush soak just long enough to loosen the paint — typically 5–15 minutes depending on how set the finish is.
After the soaking duration, gently agitate the bristles with a wooden stick or by stroking against the container sides using careful agitation techniques.
Household Alternatives: Vinegar, Fabric Softener, Baking Soda
You can use common household items to restore brushes without harsh chemicals.
Try a vinegar soak to loosen dried paint, a fabric softener mix to soften bristles, or a baking soda scrub for stubborn residue.
I’ll walk you through each technique so you can pick the simplest fix for your brush.
Vinegar Soak Technique
1 simple household soak can revive a stiff paint brush: immerse the bristles in white vinegar heated until warm (not boiling) so the acid loosens dried paint without harsh solvents. You’ll appreciate vinegar benefits and note soaking duration—check every 15–30 minutes, gently combing out softened paint. Rinse and reshape bristles before drying.
| Step | Time | Tip |
|---|---|---|
| Soak | 15–60 min | Warm vinegar |
| Check | 15 min | Comb bristles |
| Rinse | 5 min | Warm water |
| Dry | Overnight | Hang brush |
| Repeat | As needed | Fresh vinegar |
Fabric Softener Revival
If warm vinegar isn’t loosening all the stubborn varnish, fabric softener and baking soda offer gentle, household alternatives that can soften dried paint without harsh chemicals.
You can dilute a capful of fabric softener in warm water to soak bristles briefly, enjoying fabric softener benefits like reduced stiffness and improved brush conditioning.
Rinse thoroughly and reshape bristles before drying upright to preserve performance.
Baking Soda Scrub
For stubborn dried paint that vinegar or fabric softener didn’t fully remove, try a baking soda scrub to gently lift grit without harsh solvents.
You’ll make a paste, work it into bristles with a toothbrush, rinse, repeat as needed.
This method shows baking soda effectiveness as one of several brush cleaning alternatives, is inexpensive, non-toxic, and preserves bristle shape when used gently.
Soaking Techniques to Loosen Paint on Brushes
Soaking is one of the easiest ways to loosen dried or tacky paint from brushes without damaging the bristles. You’ll choose solvent by paint type, monitor soaking duration, and protect ferrules.
Use gentle agitation and fresh solvent when needed.
- Water-based: warm soapy soak
- Oil-based: mineral spirits
- Shellac/varnish: denatured alcohol
- Rinse and reshape bristles
Mechanical Cleaning: Combing, Pinching, and Brush Comb Use
Once the paint has softened, you’ll comb and strip the bristles to remove loose pigment and restore the brush’s shape.
Pinch out any stiff, dried bits with your fingers or needle-nose pliers before they bend the hairs.
Finish by running a metal brush comb through the bristles to catch stubborn clumps and straighten the tips.
Comb and Strip Bristles
Grab a brush comb or your fingers and start working from the ferrule toward the tip to strip out dried paint and lift embedded debris.
You’ll focus on bristle maintenance and proven cleaning techniques to restore shape without damage. Work gently, repeat passes, and remove loosened flakes.
- Separate clumped bristles
- Comb toward tip
- Tap out debris
- Rinse and reshape
Pinch Out Stiff Paint
After combing and tapping out loose flakes, you’ll need to physically pinch out any stubborn, stiff paint that remains clinging to the bristles. Use a gentle pinch technique, working from ferrule to tip to avoid splaying. This preserves shape and aids Brush preservation. Repeat until pliable, rinse, and reshape.
| Step | Action | Tip |
|---|---|---|
| 1 | Pinch | Gentle |
| 2 | Work out | Short strokes |
| 3 | Rinse | Warm water |
Use A Metal Brush Comb
Reach for a metal brush comb to finish clearing paint from the bristles; it cuts through stubborn clumps the pinch technique can’t remove.
You’ll improve bristle care and brush maintenance by choosing proper tool selection and combing techniques for paint types.
Follow safe cleaning methods and restoration tips, working root-to-tip gently to avoid damage.
- Remove loose flakes
- Comb root-to-tip
- Rinse solvent
- Reshape bristles
Deep Clean With Commercial Restorers and Gels
When solvent and soap won’t budge dried paint, use a commercial brush restorer or gel designed to dissolve stubborn residue—these products penetrate the bristles, swell and break down dried film, and make it possible to reshape and salvage brushes that would otherwise be discarded.
Apply commercial products per instructions, soak briefly, agitate with a comb, rinse thoroughly, and repeat if needed to assess gel effectiveness and restore tip flexibility.
Synthetic vs. Natural Bristles: What Differs
You’ll notice synthetic and natural bristles are made from different materials—synthetics from nylon or polyester, naturals from animal hair—and that affects how they hold and release paint.
Synthetic brushes often handle water-based paints better and need gentler cleaning to avoid heat damage, while natural bristles excel with oil-based finishes but require thorough solvent cleanup.
Knowing these differences helps you choose the right care routine so brushes last longer and perform reliably.
Bristle Material Differences
Although both types handle paint, synthetic and natural bristles behave differently enough that choosing the right one matters for cleanup and performance.
- Synthetic: better bristle durability, resists solvents, easier to clean.
- Natural: softer, superior bristle flexibility, holds oil-based paints well.
- Mixed: balances durability and flexibility for varied jobs.
- Your choice affects drying, clogging risk, and cleaning methods.
Performance And Care
Picking the right bristle isn’t just about how a brush feels on the job — it changes how you should use and care for it. You’ll treat synthetic and natural bristles differently to maximize brush longevity; follow clear maintenance tips: clean solvents for natural, warm soapy water for synthetic, reshape, and store dry.
| Bristle | Care |
|---|---|
| Synthetic | Water, soap, reshape |
| Natural | Solvent, gentle, dry |
Revive and Reshape Bristles After Cleaning
A clean brush can still look limp and misshapen, so gently reviving the bristles after washing is key to keeping it performing.
You’ll want to focus on bristle conditioning and brush reshaping to restore taper and snap.
Follow these steps:
- Comb bristles with a wide-tooth brush.
- Apply a small amount of conditioner.
- Rinse and squeeze gently.
- Reshape and let air-dry flat.
When to Use Heat (Hair Dryer/Steam) : and When to Avoid It
You can use heat—like a hair dryer or steam—to speed drying and help reshape natural-bristle brushes, but only on low settings to avoid damage.
Avoid heat on synthetic bristles, glued ferrules, or brushes with loose hairs because high heat can melt fibers or loosen the ferrule.
I’ll explain how to choose the right method and safe settings next.
When Heat Helps
When solvents can’t remove stubborn paint, applying controlled heat with a hair dryer or steam can soften dried bristles and make cleanup quicker; however, you’ll want to use heat only with appropriate paints and brushes to avoid damage.
- Use heat application for latex or water-based paints.
- Keep dryer moving to prevent melting.
- Test on a small section first.
- Combine with brush maintenance solvents for best results.
When Heat Harms
Although heat can loosen dried latex, it can also warp synthetic bristles, melt ferrules, and ruin natural-hair brushes if you overdo it, so use it carefully and only in the right situations.
You should test a hidden area, use low settings, and avoid prolonged exposure.
Know heat effects on materials to prevent brush damage, and opt for solvents when heat risks outweigh benefits.
Fixing Hardened Ferrules and Wooden Handles
Rescue ferrules and wooden handles that’ve hardened from dried paint with a few targeted steps:
- Soften ferrule with penetrating solvent, then wiggle bristles to free crusts — ferrule repair.
- Protect bristles, clamp ferrule gently, avoid heat that warps metal.
- Sand handle lightly to remove tacky layers.
- Apply linseed or tung oil for handle restoration and let cure before reuse.
Clean Routine After Each Job to Prevent Buildup
Start by rinsing your brush immediately after you finish to stop paint from drying into the ferrule and handle; the quicker you act, the less elbow grease you’ll need later.
Wipe excess paint, use appropriate solvent, then comb bristles and reshape.
Adopt simple cleaning habits: rinse, solvent, comb.
Consistent maintenance tips prevent buildup, save time, and extend brush life.
Storage and Drying to Protect Bristle Shape
Once your brush is clean, dry it properly and store it to keep the bristles aligned and springy.
You’ll protect bristle preservation by reshaping the tip, drying horizontally or hanging, and choosing proper storage solutions to prevent crushing.
- Reshape bristles before drying.
- Dry horizontally or hang by handle.
- Use breathable storage cases.
- Store upright without pressure.
Repair vs. Replace: Cost and When to Buy New
When deciding whether to repair a paint brush or buy a new one, weigh the brush’s condition, cost of fixes, and how often you’ll use it.
Minor issues like loose ferrules or splayed tips can often be fixed for less than replacement, but heavily worn bristles or persistent shedding mean it’s time to replace.
Do a cost comparison: factor repair price, expected brush longevity, and tool performance before buying.
Troubleshooting: Persistent Clumps, Odor, and Stiffness
If you decide to keep a brush rather than replace it, you’ll still need to tackle common problems that reduce performance: persistent paint clumps, lingering solvent odors, and bristles that feel stiff or hard.
- Soak in appropriate solvent for targeted clump removal.
- Use a brush comb to loosen stubborn clumps.
- Rinse thoroughly, then neutralize persistent odors with vinegar or baking soda.
- Condition bristles with fabric softener or oil, reshape, and air dry.
Frequently Asked Questions
Can Dried Acrylic Paint Damage Bristle Glue Bonds Permanently?
Yes — dried acrylic can weaken or dissolve bristle glue over time, so you should perform regular brush maintenance and prompt paint removal to avoid permanent bond damage and extend your brushes’ usable life.
Are There Eco-Friendly Disposal Methods for Used Paint Solvents?
Yes — you can dispose eco-friendly: use biodegradable solvents, collect leftover solvents and take them to hazardous waste facilities, explore recycling options through local programs or paint stores, and never pour solvents down drains or into soil.
Will Cleaning Old Brushes Affect Paint Color Contamination Later?
Yes — if you don’t clean thoroughly, old residue can cause unwanted color mixing later. You’ll prevent contamination by diligent brush maintenance, rinsing until clear, using appropriate solvents, and storing brushes separated by color.
Can Antique or Specialty Brushes Be Professionally Restored?
Like a phoenix rising, yes — you can have antique or specialty brushes professionally restored; specialists use advanced restoration techniques to preserve bristle integrity and historical brush value, and they’ll assess whether restoration outweighs potential risks.
How Long Can a Cleaned Brush Sit Unused Before Re-Stiffening?
You can usually leave a cleaned brush unused for weeks to months before it starts re-stiffening; proper brush maintenance and correct paint storage extend that window, and you should store brushes flat or hanging to preserve shape.
Conclusion
You can rescue that brush — and probably save your sanity. With the right soak, gentle combing, and maybe a little solvent wizardry, dried bristles will loosen and limp brushes can spring back to life like phoenixes of paint. Treat stubborn globs with patience, keep solvents ventilated and gloves on, and adopt a simple cleaning-and-storage ritual. Do that, and you’ll never mourn a ruined brush again — you’ll hoard them like tiny, bristled treasures.