How to Paint a Mural on a Wall: Step-By-Step Creative Guide
You can paint a mural in six clear phases: plan your concept and goals, assess and prep the wall, sketch and scale the design, block in colors, refine details, then seal for protection. Get written permission, permits, and a clear contract for commissions. Use proper primers, tools, and safety gear, estimate paint and time, and involve the community for stronger impact. Keep photos and notes for marketing and lessons—continue for supplies, techniques, and step-by-step tips.
Mural Workflow: Finish a Simple Mural in 6 Steps
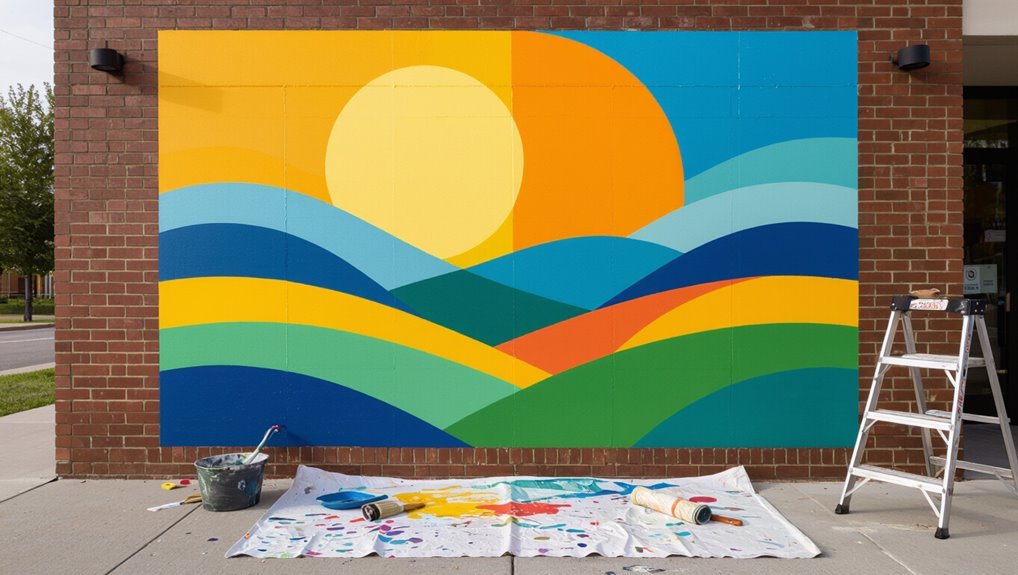
Start by breaking the mural into six clear phases: planning, prepping the wall, sketching the design, blocking in colors, adding details, and sealing the work.
You’ll follow mural techniques stepwise, plan tools and time, and use color theory to guide harmonious palettes.
Work efficiently: prep surfaces thoroughly, transfer sketches accurately, block broad shapes, refine details, then seal for durability and easy maintenance.
Who This Mural Guide Is For
This guide is for you if you’re a beginner-friendly artist looking to tackle your first mural with clear, practical steps.
It’ll also help community groups planning collaborative projects and commercial artists managing client work and timelines.
You’ll get straightforward advice that applies whether you’re painting for your neighborhood or a paid commission.
Beginner-Friendly Artists
If you’re new to large-scale painting, this guide is aimed at you—someone who’s comfortable with basic art supplies but hasn’t tackled a wall-sized project yet.
You’ll learn mural design basics, color theory and painting techniques, read about wall textures and mural history, and use planning tools.
Expect tips on mural storytelling, community engagement, artistic inspiration, and how to approach collaborative projects confidently.
Community And Commercial
Who are you painting for—your neighborhood, a business, or both—and what do you want the mural to do for them?
You’ll balance community engagement and commercial benefits, foster artistic collaboration, and pursue funding opportunities.
Aim for local impact and clear brand representation while respecting community identity.
Use mural festivals and public spaces to showcase work and build business partnerships that sustain projects.
When to Choose a Mural vs Framed Art
Think about the wall’s size and how the artwork will fit the space and scale.
Consider your budget and the time, materials, and help you’ll need to complete a mural versus buying or commissioning framed art.
Also weigh how long you want the piece to last and whether you need something permanent or portable.
Space And Scale
Because scale changes how people experience an image, choose a mural when the space calls for immersive impact and framed art when you need portability or a focused focal point.
You’ll weigh scale considerations, space dynamics, visual balance, perspective techniques, mural dimensions, area impact, wall interaction, and viewer engagement.
- Read the room.
- Map sightlines.
- Match scale to purpose.
Budget And Resources
1 major factor in choosing between a mural and framed art is your budget and the resources you can commit: murals demand more time, materials, and often permits or skilled labor, while framed pieces let you control costs, scale, and turnaround more tightly.
You should use budget planning, resource allocation, cost effective materials, funding options like mural grants or community sponsorship, DIY supplies, and paint discounts.
Intended Longevity
When you expect the artwork to be a long-term landmark—lasting years or becoming part of a building’s identity—a mural often makes more sense.
But if you want flexibility, portability, or a seasonal change, framed art fits better.
- Consider mural durability considerations, paint lifespan factors, and environmental impacts.
- Plan maintenance strategies, weather resistance techniques, and fading prevention methods.
- Use color retention tips and surface protection options to decide.
Assess the Wall: Material, Condition, Feasibility
Before you pick colors or sketch designs, take a close look at the wall’s material and condition so you know what you’re really working with.
Conduct a wall assessment and material analysis, perform condition evaluation and feasibility study, check surface compatibility and texture evaluation, note height measurement, anticipate installation challenges, weigh environmental considerations, and judge design impact to confirm the site’s suitability.
Check Permission and Legal Requirements for Your Wall
Before you start painting, get explicit permission from the property owner so there’s no confusion later.
Check local permit rules and sign or mural ordinances — some cities require permits or design approval.
If you’re on leased or public property, confirm any time limits, insurance, or restoration obligations.
Property Owner Permission
If the wall isn’t yours, get written permission from the property owner and confirm any local rules that apply; verbal okay isn’t enough.
You’ll respect property rights and secure mural permissions in writing, specifying duration, maintenance, and removal terms.
- Document scope and timeline.
- Agree on materials and access.
- Record liability and insurance obligations.
Local Permit Rules
When you’re planning a mural, check local permit rules early so you don’t run into fines or forced removal later; many cities treat murals like signs or public art and have specific applications, fees, and review periods you’ll need to satisfy. You’ll follow local regulations, submit permit applications, respect zoning laws, mural guidelines, neighborhood approvals, project documentation, artistic restrictions, and rules for public spaces.
| Item | Tip |
|---|---|
| Permits | Apply early |
| Zoning | Verify use |
| Docs | Keep copies |
Set Mural Goals: Scale, Style, Message, Viewing Distance
Because a mural is meant to be seen and felt, you should define its scale, style, message, and ideal viewing distance before you pick colors or brushes.
Clarify mural purpose and artistic vision, outline target audience and emotional impact, and guarantee visual narrative honors cultural relevance and design intent.
Then list practical goals:
- Scale and viewing distance
- Style and creative expression
- Message and audience focus
Gather References and Build a Mood Board
Now that you’ve set clear goals for scale, style, and message, gather visual materials that will guide your decisions and keep the project cohesive. Use reference sources and artistic influences to collect mood inspiration, color themes, artistic styles, cultural influences, design elements, and examples of visual storytelling. Prioritize emotional impact and personal expression.
| Source | Purpose |
|---|---|
| Photos | Reference sources |
| Artworks | Artistic influences |
| Palettes | Color themes |
| Textures | Design elements |
| Icons | Cultural influences |
Sketch a Strong Mural Composition on Paper
Start by choosing a clear focal point so your mural reads from a distance and draws the viewer in.
Sketch several small thumbnails to map out different compositions and balance before committing to a full-size drawing.
Once you pick the strongest thumbnail, refine lines and block in values to test contrast and rhythm across the wall.
Define Your Focal Point
A strong focal point anchors your mural and guides the viewer’s eye, so sketch a clear, dominant element on paper before you touch the wall.
Use focal point techniques to test size, contrast, and placement, establishing visual hierarchy.
Try these quick checks:
- Scale the main element.
- Increase contrast.
- Position for flow.
Refine until the focal pulls attention reliably.
Map Composition With Thumbnails
With your focal point defined, sketch multiple thumbnail compositions to test how elements interact across the whole wall.
Use quick thumbnail sketches to explore scale, rhythm, and balance. You’ll map sightlines, negative space, and movement, ensuring visual storytelling reads from different viewing distances.
Label key anchors, note color zones, and pick the strongest layout to transfer confidently to a full-scale grid.
Refine Lines And Values
Before you transfer anything to the wall, tighten your sketch on paper: clarify contour lines, reinforce the focal area, and establish a clear value hierarchy so every form reads at a distance.
Use line techniques, edge refinement, and detail accuracy. Plan value contrast, gradient application, and texture integration with layering techniques to guarantee focal emphasis.
- Define edges
- Block values
- Refine details
Scale Your Design: Grids or Projection Files
Once your sketch feels right, decide how you’ll transfer it to the wall: grid it by hand or use a projector file to trace.
Use grid techniques and projection methods, combine measurement tools and visual aids, and apply scaling strategies to preserve design accuracy.
Plan your layout, mark reference points, and work methodically for artistic precision so the mural matches your refined sketch.
Choose a Mural Style That Suits the Space
Think about how the room is used and pick a style that supports that function—calm, energetic, or neutral.
Match colors, materials, and motifs to the existing decor so the mural feels intentional, not tacked on.
Keep scale and proportion in mind so elements read well from typical viewing distances.
Consider Room Function
Because the room’s purpose shapes how people feel and behave in it, choose a mural style that supports that function—calming motifs and muted colors for bedrooms, energetic patterns or bold graphics for playrooms and studios, and professional, understated designs for offices or waiting areas.
Use mural themes and color psychology to guide choices.
- Function first
- Mood goals
- Practical durability
Match Existing Aesthetics
Now that you’ve settled on a style that supports the room’s function and mood, make certain the mural complements the space’s existing aesthetic.
You’ll seek color harmony and texture matching, guarantee design coherence and style integration, and maintain theme continuity.
Prioritize cultural relevance and architectural alignment so the piece achieves artistic synergy with furnishings, lighting, and the room’s visual rhythm.
Scale And Proportion
When you pick a mural style, match it to the room’s proportions so the artwork feels intentional rather than overpowering or lost; large-scale, bold motifs suit high, wide walls, while delicate, detailed scenes work best on smaller or narrow surfaces.
Use scale techniques and measure for proportion accuracy.
- Step back and view.
- Grid or projection.
- Adjust motif size.
Pick a Color Scheme That Reads From Distance
Choose colors that read clearly from the distance you expect viewers to stand. You’ll test contrast, simplify palettes, and apply color psychology to guide mood and focal points while prioritizing distance visibility. Balance saturated accents with muted backgrounds so shapes resolve at range.
| Element | Purpose |
|---|---|
| High contrast | Legibility |
| Accent color | Focus |
| Background | Depth |
| Saturation | Readability |
Calculate Paint Quantities and Budget Accurately
Before you buy a single can, measure the wall area and convert your design into square footage so you can work out exact coverage and costs.
Use a paint calculator or budget estimator to size coats, priming, and waste. Estimate required cans, then:
Use a paint calculator to size coats, primer, and waste—estimate cans first to budget accurately.
- Calculate base color liters.
- Add accent color allowance.
- Include primer and touch-up reserve.
Stick to those figures.
Where to Buy Mural Paint and Supplies
Supplies and suppliers matter — you’ll want paints formulated for murals, quality brushes and rollers, primers, sealers, and the right safety gear, all sourced from reliable vendors so your mural lasts.
Visit supply stores and online resources for mural paint, compare paint types and color palettes, consult local artists, test mural kits, and focus on tool selection to get professional results.
Choose Paint Types: Exterior vs Interior
When you’re deciding between exterior and interior paints, match the paint’s formulation to the wall’s environment: exterior paints resist UV, moisture, and temperature swings, while interior paints prioritize low odor, ease of cleaning, and indoor air-quality standards.
Match paint to place: exterior formulas fight UV, moisture, and temperature; interior paints focus on low odor, cleanability, and air quality.
Choose by considering:
- Weather resistance and color durability.
- Finish types and application methods.
- Environmental impact and project longevity.
Select Primers, Sealers and Protective Coatings
Before you start painting, make sure the wall is clean, dry, and repaired so primers and sealers will bond properly.
Choose a primer based on your surface and paint type—masonry primers for concrete, stain-blocking for patched areas, and bonding primers for slick surfaces.
Finally, pick a protective coating (UV-resistant varnish, clear acrylic, or anti-graffiti lacquer) that matches the mural’s location and desired durability.
Surface Preparation Essentials
Although a fresh coat of paint can transform your mural, choosing the right primer, sealer, and protective coating is what makes that color last and resist damage.
You’ll want products matched to your wall type, environment, and finish. Use surface assessment tips, surface cleaning techniques, wall texture consideration, paint adhesion factors, wall material compatibility, moisture prevention strategies, and repair techniques overview.
- Clean
- Repair
- Seal
Primer Selection Guide
Pick primers, sealers, and protective coatings based on your wall material, exposure conditions, and the finish you want, since each product plays a specific role in adhesion, durability, and color fidelity.
Choose primer types for surface compatibility, consider environmental factors like humidity and UV, follow proper application techniques, and respect drying times.
Match primer to desired finish options for lasting results.
Protective Coating Options
Which protective coating you choose will determine how long your mural survives weather, cleaning, and UV exposure.
You’ll pick based on surface, budget, and durability factors, weighing eco friendly options when possible.
Consider:
- Acrylic varnish — UV and moisture resistant.
- Polyurethane — tough, suited for high-traffic areas.
- Graffiti-resistant coatings — sacrificial or permanent layers for easy cleaning.
Brushes, Rollers and Specialty Mural Tools
Three essential tool types—brushes, rollers, and a few specialty items—will shape how efficiently and cleanly your mural goes up.
You’ll focus on brush selection for edges and detail, master roller techniques for large fields, and use specialty tools like sponges, scrapers, and airbrushes.
They influence paint application, color mixing, design elements, mural maintenance, and require basic safety precautions.
Choose Scaffolding, Ladders and Safety Gear
Decide whether scaffolding or ladders fit your mural’s height, access and work duration—scaffolding gives stability for long jobs, ladders work for quick touch-ups.
You’ll also need essential safety gear like harnesses, hard hats, non-slip shoes and gloves.
Inspect equipment before use and always follow manufacturer and site safety guidelines.
Scaffolding Versus Ladders
If you’re tackling large or high sections of wall, choose scaffolding over ladders whenever possible because it gives you a stable, spacious platform to move, mix paint, and step back to evaluate your work safely.
Ladders can still be useful for quick touch-ups or tight spots, but always pair them with proper safety gear like non-slip shoes, a harness when required, and a spotter.
- Scaffolding advantages: better workspace accessibility.
- Ladder limitations: reach and stability constraints.
- Safety considerations: inspect equipment, secure footing, use a spotter.
Essential Safety Gear
Before you climb, gear up: proper safety equipment lets you work confidently whether you’re on scaffolding or a ladder.
Wear safety goggles and respirator masks, practice gloves usage, and secure fall protection.
Guarantee proper ventilation, maintain workspace organization, and keep first aid accessible.
Review emergency procedures before starting, and inspect gear regularly so you stay safe, focused, and efficient while painting.
Prepare the Wall: Cleaning and Repairs
Start by giving the wall a thorough inspection and cleaning so your paint will stick and your mural will last.
You’ll assess wall materials and wall textures, choose cleaning solutions, and plan surface repairs. Use repair techniques suited to damage and paint types. Consider primer options later.
- Remove dirt/grime
- Patch cracks/holes
- Sand and smooth before painting
Prime Common Wall Materials Correctly
Before you start painting, prime painted drywall with a quality bonding primer so your mural colors lay down evenly and won’t peel.
For porous masonry, seal with a masonry primer or masonry-specific sealer to block moisture and prevent paint from soaking in.
These steps make your finish more durable and keep colors true.
Prep Painted Drywall
If your drywall already has paint, you’ll still need to clean, sand, and prime it to give new mural paint the best adhesion and color clarity.
Use mural preparation techniques and drywall maintenance tips:
- Wash with mild detergent, rinse, dry.
- Sand glossy spots, fill dents.
- Apply stain-blocking primer, let cure before sketching.
Seal Porous Masonry
Porous masonry soaks up paint and primer like a sponge, so you’ll need to seal it properly to protect your artwork and confirm even color.
Identify masonry types and surface textures, then apply appropriate sealing techniques and primer options to improve paint adhesion and create moisture barriers.
That guarantees color retention and finish durability, so your mural lasts and looks consistent across varied substrates.
Transfer Your Sketch: Grid, Projector or Pouncing
Choose the transfer method that fits your space, skill level, and available tools—gridding for precise scaling, a projector for speed, or pouncing for textured or curved surfaces.
Use grid techniques for design scaling and measurement accuracy; consider projector options for fast sketch transfer; practice pouncing methods on test surfaces.
- Grid
- Projector
- Pouncing
Map Complex Areas With Registration Marks
When you’re working across multiple panels, corners, or irregular surfaces, place clear registration marks so each section lines up precisely.
These reference points—simple crosses, numbered dots, or small alignment lines—let you reconnect divided pieces during painting, touch-ups, or when using a projector or grid.
Use consistent registration techniques and marking systems, combine measurement tools for design alignment, and check spatial accuracy to guarantee mural precision.
Plan Your Painting Schedule and Sectioning
Before you start rolling paint, map out a realistic schedule and divide the wall into manageable sections so you know which parts you’ll tackle each day. This prevents rushing, reduces mistakes, and helps coordinate helpers, weather windows, and drying times.
You’ll use mural planning to create a clear painting schedule.
- Prioritize sections
- Assign days/helpers
- Track drying windows
Block In Large Shapes and Base Colors Efficiently
With your schedule set and sections marked, start by blocking in the mural’s large shapes and base colors to establish scale and rhythm across the wall.
Use broad brushes, rollers, and taped edges to apply flat fields quickly. Rely on color blocking techniques for clear shifts, work from background to foreground, and favor efficient application—short passes, consistent paint load, and quick drying primers to keep momentum.
Build Depth: Layering and Midtones
Start by glazing and glazing again: lay down translucent midtones to bridge your base colors and highlights, letting each thin layer dry so you can judge depth without muddying hues.
Start by glazing—layer translucent midtones, letting each thin wash dry so depth appears without muddying hues.
Use layering techniques, precise midtone application, and deliberate paint mixing to enhance depth perception, color harmony, visual contrast, texture creation, and artistic intention.
- Thin glazes
- Controlled strokes
- Layer sequencing
Render Highlights, Shadows and Subtle Gradients
Now you’ll layer light and dark to define form and mood, working from broad shapes to targeted highlights and deep shadows.
Use soft brushes and glazing to build smooth color shifts without muddiness.
Keep checking from a distance so your gradients read properly across the whole wall.
Layering Light And Dark
Although it’s tempting to block in colors and call it done, layering light and dark is what gives your mural depth and life. You’ll build form by working from broad midtones into progressively sharper highlights and deeper shadows, blending subtle gradients where planes curve or meet.
Use light layering and dark layering with:
- contrast techniques for depth perception
- shadow play and highlight techniques
- color blending, texture variation, mood creation for visual impact
Smooth Color Transitions
When you work on smooth color shifts, think of them as gentle bridges that guide the eye from light to shadow.
You’ll use color blending techniques to merge hues, glazing for subtle shifts, and controlled brushwork to soften edges.
Plan gradient application—map highlights and shadows, mix connecting tones, and blend while paint’s wet for seamless changes that read naturally from a distance.
Mix Paint for Consistent Color Across Batches
If you’ll be mixing multiple batches for a mural, set up a simple recipe and measure every ingredient so each batch matches the last; small variations in pigment or binder will show up across large areas.
You’ll use consistent color mixing techniques for batch consistency and record ratios.
- Scale ingredients
- Stir uniformly
- Keep samples sealed and labeled
Use Spray Paint and Aerosols Safely and Effectively
Grab your respirator and plan your approach before you open any cans: spray paints and aerosols speed coverage but demand careful handling to protect your health, preserve color accuracy, and avoid overspray.
You’ll follow spray paint safety and aerosol techniques, use ventilation importance and protective gear, control spray patterns, manage paint storage responsibly, minimize environmental impact, and perform thorough project cleanup afterward.
Use Stencils and Masks for Sharp Repeated Motifs
Choose stencil materials that hold crisp edges and withstand repeated use, like mylar or adhesive vinyl, so your motifs stay sharp.
Mask carefully around the cut edges and test a small area to prevent bleed and overspray.
Use alignment marks or a registration system to keep repeated elements perfectly placed as you work.
Choosing Stencil Materials
When you want crisp, repeatable shapes on your mural, pick stencil materials that balance durability with flexibility so they conform to textured walls without tearing. Mylar, adhesive vinyl, and heavyweight cardstock each offer different trade-offs in reusability, edge sharpness, and cost.
Use stencil types for material durability, design flexibility, paint compatibility, stencil maintenance, resizing options, and artistic styles.
- Mylar: durable, reusable
- Vinyl: great adhesion, slick edges
- Cardstock: cheap, easy to resize
Masking And Alignment
Start by laying out your stencil sequence and masking plan so each repeated motif lines up exactly where you want it. Tape, temporary adhesive spray, and registration marks keep edges clean and placements consistent.
Use masking techniques like low-tack tape and frisket film. Align each stencil using measured guides, and employ alignment strategies such as jigs or reference lines so motifs repeat sharply and confidently across the wall.
Add Texture and Mixed Media Elements
Although paint alone can make a strong statement, adding texture and mixed media will bring your mural to life and invite touch.
Paint makes a statement, but texture and mixed media bring murals to life and invite tactile engagement.
You’ll plan textured surfaces and integrate mixed media thoughtfully. Consider materials, adhesion, and weatherproofing.
Decide focal texture points, then:
- Apply base texture (plaster, gesso).
- Attach elements (tile, fabric).
- Seal and protect for durability.
Work With Assistants and Manage a Small Team
Because a mural is often bigger than one pair of hands, you’ll get farther and work smarter by organizing a small, reliable team.
Define role clarity, set communication strategies, and establish feedback loops so team dynamics stay positive.
Use task delegation and motivation techniques to keep momentum.
Encourage creative collaboration, document plans, and address disputes quickly with fair conflict resolution to maintain focus and quality.
Safe Techniques for Painting at Height
Once you’ve organized a dependable team, you’ll need safe methods for working at height so everyone comes back down in one piece.
Perform a risk assessment, enforce safety protocols, and check ladder stability and height equipment.
Keep workspace organization tight, use fall protection, rehearse emergency procedures, and maintain team communication.
- Inspect gear
- Anchor ladders
- Share signals
Adapt Technique for Windy, Hot or Rainy Conditions
Check the forecast and prep your workspace with tarps, weights, and secure scaffolding so gusts or sudden showers won’t ruin your setup.
Choose fast-drying or weather-rated paints and thin or thicken mixes to suit heat or rain, and switch to rollers or brushes that handle wind without splattering.
Keep backup tools and a contingency plan so you can pause or protect the mural quickly if conditions change.
Prep For Weather Conditions
If you expect wind, heat, or rain while painting, plan your schedule and materials around the forecast so you don’t waste time or ruin the work.
Use weather preparation with seasonal considerations and note temperature impacts plus humidity effects.
Consider:
- Wind challenges: secure dropcloths and scaffolding.
- Rain precautions: cover work and defer varnish.
- Painting techniques: adjust for drying times.
Adjust Paint And Tools
After planning for wind, heat, or rain, adjust your paints and tools so they perform under those conditions.
You’ll tweak paint viscosity for changing drying times, choose brush types and application methods for surface compatibility, and adapt color mixing and layering techniques.
Prioritize reliable paint brands, regular tool maintenance, and practical clean up tips so your mural stays durable despite weather.
Fix Mistakes: Remove Drips and Correct Proportions
Spot trouble spots as you step back often—catching drips, runs, or skewed proportions early makes corrections much easier.
You’ll handle drip removal and proportion correction with deliberate steps:
- Sand or blot fresh drips, then recoat thinly.
- Measure and mark reference points for scale.
- Use grid transfers or sighting sticks to realign shapes and adjust lines before rehanging layers.
Add Fine Detail and Crisp Edges at Large Scale
Once drips are smoothed and your proportions read correctly from a step back, you’re ready to bring the mural into sharper focus by adding fine detail and crisp edges at scale.
Use fine detailing techniques like small brushes, stippling, and controlled glazes.
Combine edge definition methods—masking tape, flat brushes, and feathering—with consistent viewing distance checks so lines stay sharp and details read from afar.
Photograph and Document Mural Progress
Start photographing your mural at regular milestones so you can track progress, catch issues early, and build a visual record for clients and your portfolio.
Use mural photography techniques and document progress tips to capture lighting, scale, and detail.
- Shoot wide for context
- Capture close-ups for texture
- Log dates and settings for consistency
Protect Your Finished Mural From Weather and UV
Seal the artwork with a quality UV-resistant clear coat so your colors stay true and the paint resists weathering.
After curing, apply recommended protective coatings in thin, even layers for lasting weather protection and UV resistance.
Inspect annually for chips or fading as part of mural maintenance, touch up small areas promptly, and keep records of products used to simplify future care.
Choose Anti-Graffiti Coatings and Set a Maintenance Plan
After protecting the mural with a UV-resistant clear coat, think about long-term defense against vandalism and routine upkeep.
Choose anti graffiti coatings (sacrificial or permanent), document cleaning methods, and schedule inspections.
Create a maintenance plan that notes supplies, contact info, and response times.
- Train volunteers
- Stock cleaners
- Log interventions
Troubleshoot Paint Adhesion and Peeling Problems
1 common cause of peeling is poor surface preparation, so check whether the wall was cleaned, sanded, and primed properly before painting.
You’ll assess paint adhesion by testing small areas, review primer choices and paint types for surface compatibility, consider temperature considerations and humidity effects, adjust application techniques, and address environmental factors.
Use targeted peeling solutions like re-prep, compatible primer, and correct curing conditions.
Refresh or Repaint Sections Without Color Mismatch
When you need to refresh or repaint part of a mural without creating a visible color mismatch, start by testing small, inconspicuous patches to compare wet and dry tones, sheen, and texture.
Use color matching techniques and precise touch up strategies to blend.
Use careful color matching and delicate touch-up techniques to seamlessly blend repaired mural areas.
- Layer thin glazes.
- Feather edges with dry brush.
- Match sheen, then varnish.
Involve the Community and Secure Stakeholder Buy-In
If you want your mural to resonate and last, bring the community and key stakeholders into the process early—invite local residents, businesses, and officials to give input, share concerns, and help shape the theme so they feel ownership and support.
Hold meetings, surveys, and site walks to foster community engagement and transparent stakeholder involvement.
Address feedback, build partnerships, and celebrate milestones together.
Price a Commissioned Mural and Write a Clear Contract
Pricing a commissioned mural requires balancing your time, materials, and the client’s expectations.
Start by calculating a realistic hourly or square-foot rate that covers prep, painting, travel, scaffolding, permits, and touch-ups.
Calculate an honest hourly or per-square-foot rate that includes prep, painting, travel, scaffolding, permits, and touch-ups.
You’ll set commission pricing and include contract essentials:
- Scope and timeline
- Payment schedule and revisions
- Liability, permits, and ownership rights
Market Your Mural: Press, Social and Events
Once your contract is signed and the mural’s complete, you’ll need to get it seen — clients pay for impact as much as paint.
Use mural promotion strategies: craft press releases, boost social media engagement with mural storytelling and artist interviews, and organize event collaborations.
Drive community outreach and nurture local partnerships to amplify visibility, attract coverage, and turn a site-specific piece into a shared neighborhood asset.
Convert a Mural Into Prints, Products or Portfolio Pieces
When you want to extend a mural’s life beyond the wall, start by documenting it meticulously—high-resolution photos, flat scans of sketches, and color notes will let you reproduce the work faithfully as prints, apparel, or merch.
You’ll convert images into mural prints, focus on product design, and use portfolio development for creative branding, art licensing, print quality, market trends, and audience engagement.
- Prepare files
- Test prints
- Launch products
Post-Project Debrief: Lessons and Scaling Up
After you finish the mural, take time to debrief with your team and document what worked, what didn’t, and why—this turns raw experience into repeatable processes you can scale.
Use project reflections and collaboration insights to gather community feedback on mural storytelling and mural impact.
Note scaling techniques for future projects, track artistic growth, and set clear action steps so lessons become scalable practice.
Frequently Asked Questions
Can I Legally Copyright My Mural Once It’s Painted on Someone Else’s Wall?
Yes, you can generally copyright your mural, but you’ll need to secure mural ownership rights and legal permissions from the property owner first; without permission, your copyright may be limited or contested despite your creative authorship.
How Do I Handle Paint Fumes Around Sensitive Neighbors or Nearby Businesses?
Worried about fumes? You’ll use fume precautions: choose low-VOC paint, ventilate, and schedule work when fewer people are around. You’ll buy masks, post signage, and practice neighbor communication so businesses and neighbors stay informed and safe.
What Insurance Should I Carry for Public Mural Commissions?
You should carry general liability coverage and commercial auto insurance, maybe professional liability if you consult; they’ll protect you and support project pricing, so you’re covered for claims, damage, or bodily injury during public mural commissions.
How Do Seasonal Temperature Swings Affect Long-Term Color Stability?
Seasonal temperature swings accelerate color fading because temperature fluctuations expand and contract paint layers, causing micro-cracks, binder breakdown, and UV sensitivity; you’ll need UV-resistant pigments, proper primers, and flexible coatings to preserve long-term stability.
Can Murals Be Used in Fire-Rated or Egress Wall Assemblies?
Yes — you can, but you’ll need fire rated materials and must follow egress regulations; imagine a mural wrapping a stairwell light, and you’ll guarantee coatings, substrates, and installation won’t compromise fire safety or evacuation paths.
Conclusion
You’ve turned a blank wall into a story, and that first mural is your seed—nurture it. Let the lessons from planning, permits, pricing, promotion and prints root into your process so each new piece grows taller and more confident. Keep refining your workflow, photographing every stage, and asking for feedback; those small edits are sunlight and water. Soon you’ll be painting not just walls but a reputation that spreads like color down the street.