How to Paint a Drop Ceiling Easily Without Mess
You can paint a drop ceiling cleanly by prepping, masking, and using low‑splash latex in thin coats. Clear the room, ventilate, dust tiles, and tape edges and fixtures; cover floors with drop cloths. Use a low‑nap roller or a fine‑spray sprayer set for minimal overspray, paint tiles and grid separately, and remove tape while paint’s tacky for sharp lines. Work systematically and touch up as needed, and keep going to learn tips for materials, repairs, and upkeep.
Quick One‑Day Drop‑Ceiling Painting Plan
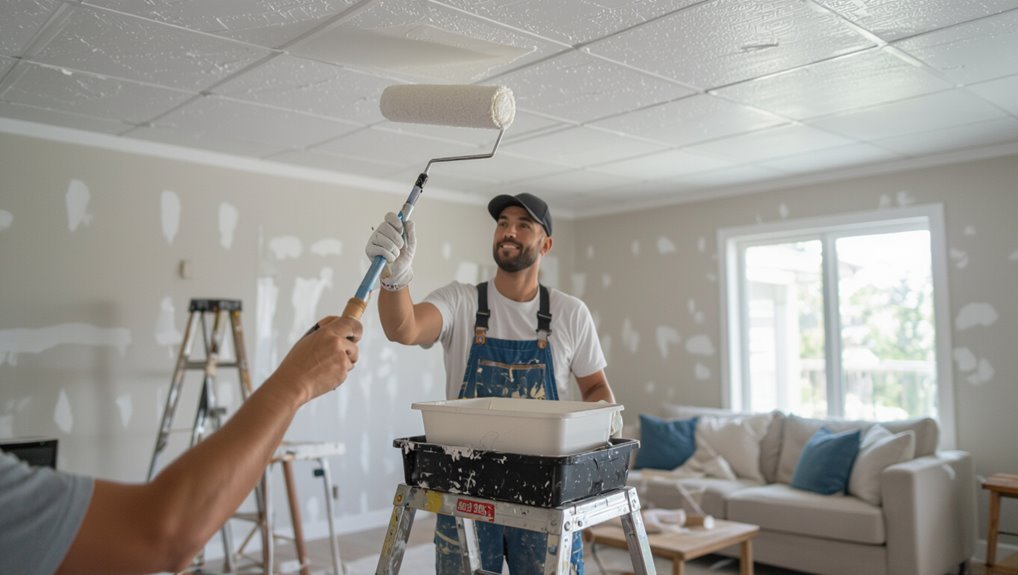
Pick a weekend morning and clear the room so you can work uninterrupted; you’ll finish this project in a single day if you follow a tight plan.
Start by dusting tiles, prepping drop ceiling maintenance tasks, and protecting floors.
Use DIY painting tips: tape edges, choose quick‑dry primer and paint, work in sections, and allow brief cure times before reinstalling fixtures.
Why Painting a Drop Ceiling Pays Off
Because a fresh coat transforms both look and function, painting a drop ceiling is one of the quickest, highest‑impact upgrades you can make.
You’ll boost aesthetic improvements, brighten the room, and hide stains without major disruption. You’ll also enjoy cost benefits compared with replacement, lower maintenance, and faster turnaround.
It’s a practical, affordable way to refresh a space you use every day.
Paint vs. Replace: When to Choose Which
Brightening and hiding stains with paint is often the fastest route, but there are times when replacement makes more sense.
You’ll weigh paint longevity versus replacement costs, assess aesthetic choices and ceiling maintenance needs, and factor renovation benefits against installation challenges.
Consider material options and budget considerations to decide whether painting saves time and money or replacement delivers lasting value.
- Paint longevity
- Replacement costs
- Aesthetic choices
- Ceiling maintenance
Assess Your Drop‑Ceiling Material and Condition
Start by identifying what your tiles are made of—fiberboard, mineral fiber, metal, or vinyl—because each material takes paint differently.
Inspect for sagging, cracks, water stains, mold, or crushed edges to decide if cleaning and priming will be enough or if replacement is required.
That quick assessment will guide the prep steps and paint products you’ll need.
Material Type Identification
Before you grab paint, take a close look at your drop ceiling to identify what it’s made of and how sound or water damage might affect it.
- Note material characteristics and tile composition.
- Identify ceiling types and installation methods.
- Check texture options, sound absorption, moisture resistance.
- Use maintenance tips, color selection, aesthetic considerations before painting.
Damage And Stain Assessment
Now that you’ve identified the tile type and its properties, inspect the ceiling for damage and stains so you know what you’re dealing with before painting.
Perform a thorough tile inspection and damage evaluation to plan stain removal and repair methods.
Consider surface preparation, maintenance tips, aesthetic considerations, ceiling longevity, visual impact, and cost implications to decide whether to clean, repair, or replace.
Signs a Tile Needs Replacement, Not Paint
If a drop ceiling tile shows warping, sagging, or crumbling edges, you shouldn’t try to mask the damage with paint — you’ll need a replacement.
Do a visual inspection and weigh tile age, material longevity, and maintenance tips before deciding.
Inspect tiles visually and consider their age, durability, and upkeep before choosing replacement or repair
Consider ceiling upgrades, replacement costs, aesthetic choices, and DIY considerations.
- Severe mold or water damage
- Structural deformation
- Excessive discoloration
- Broken support tabs
Best Paint Finishes for Drop Ceilings
When choosing a finish for your drop ceiling, you’ll weigh flat and eggshell for how much texture and light they hide.
Semi-gloss gives extra durability and makes cleaning stains or cooking grime easier.
Consider paint sheen durability so high-traffic or moisture-prone areas get a tougher finish that lasts.
Flat vs. Eggshell
Although both flat and eggshell finishes can work on drop ceilings, your choice should balance appearance, durability, and light response.
Flat hides flaws and diffuses glare, while eggshell offers a slight sheen that cleans more easily and brightens a room.
- Note flat finish advantages: hides texture, reduces reflections.
- Note eggshell finish benefits: easier wiping, subtle warmth.
- Choose flat for low-maintenance, low-light spaces.
- Choose eggshell where brightness and light cleaning matter.
Semi-Gloss Benefits
A semi-gloss finish gives drop ceilings a durable, washable surface that stands up to frequent cleaning and resists scuffs better than flat or eggshell paints.
You’ll appreciate the semi gloss sheen for reflecting light in dim rooms and highlighting clean lines.
It’s practical when you want easy maintenance—wipe away dust and stains without redoing the whole ceiling.
Paint Sheen Durability
Semi-gloss offers clear advantages, but choosing the right sheen comes down to how much wear and light you expect; higher sheens give more durability and are easier to clean, while lower sheens hide imperfections better.
- Use satin for moderate traffic — balanced sheen selection and easy cleaning.
- Eggshell hides flaws; low sheen, low maintenance.
- Semi-gloss wins durability comparison for washability.
- Flat minimizes glare but needs touch-ups more often.
Paint Types That Resist Stains and Moisture
1 clear choice for drop ceilings exposed to humidity and stains is an acrylic latex paint formulated for bathrooms and kitchens.
You’ll want moisture resistant paints to prevent peeling and mildew, and use stain blocking primers on water marks or smoke stains first.
These products stick well to metal and tiles, clean easily, and keep the ceiling looking fresh with minimal maintenance.
Picking Ceiling Paint Color to Brighten Rooms
Now that you’ve picked a moisture-resistant finish for durability, turn your attention to color choices that will make the room feel brighter.
Use color psychology and lighting effects to guide you. Consider these options:
Let color psychology and lighting guide your choice—opt for hues that brighten and uplift the space.
- Pure white to maximize reflectance.
- Warm off-white to add cozy glow.
- Very pale blue to enhance perceived height.
- Soft cream to balance brightness and warmth.
Tools You Must Have Before You Start
Before you lift a panel or open a can of paint, gather a few essential tools so the job goes smoothly and safely:
Choose brushes and rollers matched to paint types, a sprayer requiring sprayer adjustments, scrub brushes for surface cleaning, patching tools for damage repair, tape and drop cloths for ceiling preparation, ventilation methods, and a checklist for project planning and safety measures while considering color choices and roller techniques.
Protective Gear and Dust‑Control Essentials
When you’re sanding, scraping, or lifting panels, wear a respirator rated for dust and paint particles, safety goggles, and disposable coveralls so you don’t inhale debris or track contamination through the house.
Use protective gear and simple dust control strategies to keep the job clean.
- N95 or P100 respirator
- Sealed goggles
- Disposable coveralls
- HEPA vacuum and tack cloth
Protect Floors and Furniture Without a Mess
If you want to keep paint, dust, and debris off your floors and furniture, set up layered protection before you touch a brush or roller.
Lay heavy-duty floor coverings, tape seams, and use drop cloths under ladders.
Move small items or wrap with plastic for furniture protection.
Have a spill prevention plan—sealed trays and drip guards—and a simple cleanup strategy with rags, solvent, and a trash bag.
Shield Lights, Vents, and Sprinklers Quickly
1 simple step can save you from a lot of extra cleanup: cover all ceiling fixtures with protective barriers before you start painting.
You’ll shield bulbs, vents, and sprinkler heads fast. Use light fixture protection and simple ventilation strategies so airflow isn’t blocked.
Follow these quick steps:
- Plastic bags
- Painter’s tape
- Mesh covers
- Temporary filters
Remove Tiles Safely: Step‑By‑Step
Before you start, gather the right tools and safety gear—gloves, goggles, a dust mask, and a sturdy ladder.
You’ll remove tiles one at a time by gently lifting and angling them toward the grid to avoid bending or breaking.
Move carefully to protect fragile tiles and keep debris contained.
Tools And Safety Gear
Gloves, eye protection, and a sturdy ladder are the basics you’ll need to remove drop ceiling tiles safely; having the right tools and safety gear ready keeps the job quick and prevents damage or injury.
- Protective gloves, safety goggles, and dust masks.
- Check ladder stability; use ventilation fans.
- Lay down drop cloths and place paint trays.
- Keep paint brushes clean and accessible.
Tile Removal Technique
Now that you’ve got your gear, it’s time to remove the tiles carefully so you don’t damage the grid or the tiles themselves.
Work one tile at a time: lift center, angle out, set aside on a padded surface. Label reusable pieces. Bag damaged tiles for tile disposal.
Inspect grid and joists for dirt or rust. Note issues for future ceiling maintenance before painting.
Label and Store Tiles for Easy Reinstallation
Label each tile as you remove it so you can return it to the same spot and keep the ceiling pattern intact.
Use clear tile labeling and simple storage solutions to protect edges and finish. This creates an organized workflow and enables easy reinstallation.
- Number tiles sequentially.
- Wrap edges with paper.
- Stack flat in labeled bins.
- Photograph layout before removal.
Best Applicator to Paint a Drop Ceiling
When you’re prepping a drop ceiling, choosing the right applicator makes the job faster and gives a more even finish. For most panels, a low-nap roller or a paint sprayer will outperform brushes.
You’ll pick the best roller for ceiling paint or use a paint sprayer depending on paint types and coverage options.
Follow applicator tips, texture techniques, application methods, and routine ceiling maintenance.
Setting Up an Airless Sprayer for Ceilings
Set up your airless sprayer on a flat, protected surface near the work area, then attach the correct tip, filter, and hose for ceiling work—smaller tips (0.013–0.019″) give better control and less overspray on drop panels.
You’ll prep, test, and maintain for consistent paint application and sprayer maintenance.
- Prime and purge air
- Check pressure settings
- Test spray pattern
- Clean filters promptly
Using a Short‑Nap Roller on Drop Tiles
Pick a short‑nap roller (1/4″ to 3/8″) so the texture of your drop tiles shows through and the paint goes on evenly.
Prep tiles gently by dusting and wiping with a damp cloth to avoid damaging the finish.
Roll with light, even pressure to prevent sagging or streaks and to keep edges crisp.
Choose The Right Nap
Texture matters: choose a short‑nap roller (3/16″ or less) to get smooth, even coverage on drop ceiling tiles without packing paint into their subtle stipple.
- Match nap selection to ceiling textures and surface compatibility.
- Pick roller types and roller materials for low paint absorption.
- Consider nap thickness when planning application techniques.
- Balance painting strategies with finish options for consistent results.
Prep Tiles Gently
Now that you’ve chosen a short‑nap roller, prep tiles gently before you paint to avoid damaging their porous, stippled surface.
Focus on tile cleaning and surface preparation: dust prevention with soft brushes, gentle handling to protect texture, and moisture control—dampen lightly, don’t saturate.
Use protective measures for surrounding areas, apply paint in light application to promote paint adhesion, preserve texture maintenance, and enable quick drying.
Roll With Light Pressure
Start with a light touch: load your short‑nap roller sparingly and roll smoothly across the tile, letting the roller do the work rather than pressing hard.
You’ll use light pressure techniques and follow roller application tips to avoid drips and texture issues.
- Feather edges
- Work in overlapping strokes
- Reload sparingly
- Check for pooling
Painting Metal Gridwork Cleanly by Hand
Painting the metal grid by hand takes patience and a steady wrist, but it’s the best way to get clean lines and avoid drips on tiles.
You’ll use grid cleaning techniques first, wiping dust and grease so paint adheres.
Choose a small angled brush for edge painting methods, apply thin coats, steady strokes, and wipe mistakes immediately for crisp, professional results.
Mask Grid Lines to Avoid Drips
After you’ve hand-painted the grid edges, mask the lines you want to protect so paint won’t drip onto tiles or hang from the T-bars.
Use simple masking techniques for clean seams and reliable drip prevention.
- Apply low-tack tape along grout lines.
- Press tape firmly to seal edges.
- Cover tiles with paper or plastic.
- Remove tape while paint’s tacky.
Prime Stained or Porous Tiles First
If tiles are stained or feel chalky, prime them before you paint so the finish adheres evenly and stains don’t bleed through.
You’ll clean surfaces, sand lightly, and use appropriate stain sealing methods or a shellac/latex primer. These tile preparation techniques prevent raw, porous areas from soaking paint.
Apply thin, even coats, allow full drying, then proceed to paint.
Treat Water Stains Before Painting
Because water stains can bleed through new paint, you should address them before you start rolling, not after.
You’ll perform surface preparation and ceiling inspection, remove mineral deposits, and use water stain treatment and cleaning solutions to prevent recurrence.
Focus on moisture control for stain prevention and long-term ceiling maintenance.
- Inspect tiles
- Clean stains
- Treat deposits
- Control moisture
Fix Minor Tile Dents and Damage
Check each tile for dents, cracks, or soft spots so you know what needs repairing.
For small dents, press a lightweight filler into the damaged area and smooth it flush with the tile surface.
Once the patch is dry, sand lightly so the tile is even and ready for primer and paint.
Assess Tile Damage
Start by inspecting each tile closely for dents, dings, or surface irregularities that paint will only make more obvious.
You’ll note areas needing tile repair and signs of moisture damage; catalog affected tiles and estimate replacement costs. Consider color matching for replacements.
Then:
- Mark damaged tiles.
- Photograph problem spots.
- Measure tile sizes.
- Prioritize urgent replacements.
Patch and Smooth Surface
Repair minor dents and blemishes before painting so your finish looks smooth and professional.
You’ll follow surface preparation steps: clean with gentle cleaning methods, patch dents using recommended repair techniques, and sand lightly for texture preservation.
Choose product recommendations that boost paint adhesion and match finish options.
This ceiling maintenance keeps tiles uniform and guarantees long-lasting results without damaging panels.
Paint Textured Tiles Without Losing Texture
If you want to refresh textured drop-ceiling tiles without flattening their pattern, choose the right products and technique: use a paint designed for textured surfaces, thin it slightly if needed, and apply with a sprayer or a stipple roller to preserve peaks and valleys.
- Use textured tile techniques for consistent coverage.
- Test spray distance first.
- Stipple gently, follow texture.
- Avoid heavy brush strokes, preserving texture.
Paint Plain Tiles for a Uniform Finish
Start by prepping plain tiles — clean them, let them dry, and tape off edges so paint sticks evenly.
Pick a low-splash, low-VOC ceiling paint to cut mess and odor.
Use a short-nap roller on an extension pole for smooth, consistent coverage without climbing.
Prep Tiles Properly
Before you prime or paint, take time to clean and lightly scuff each plain tile so paint will stick evenly; wipe away dust, use a mild degreaser on any stains, and sand glossy surfaces with fine-grit sandpaper or a scuff pad.
- Tile cleaning and surface preparation first.
- Consider paint selection and color choices.
- Test application techniques and note drying times.
- Keep maintenance tips to preserve ceiling aesthetics.
Choose Low-Splash Paint
Pick a low-splash, water-based latex paint rated for ceilings so you’ll cut down on airborne droplets and get an even, uniform finish across plain tiles. Choose eco friendly options for low odor and easy cleanup; they still offer excellent paint longevity. Compare sheens and coverage.
| Feature | Benefit |
|---|---|
| Low-splash | Less mess |
| Matte/eggshell | Hides imperfections |
Use Roller And Pole
With low‑splash latex on hand, grab a quality roller and extension pole to reach the tiles without standing on a ladder for every pass.
Use smooth roller techniques and make pole adjustments to keep coverage even, avoid drips, and work steadily across panels.
- Load roller evenly
- Extend pole for reach
- Roll long, overlapping strokes
- Check for missed spots
Apply Thin, Even Coats to Prevent Sagging
Start by loading only a small amount of paint on your brush or roller so each pass lays down a light, even film; heavy coats soak into the tiles and can cause sagging or drips. Use paint application techniques, tile cleaning methods, surface preparation tips, paint finish options, ceiling height tricks, color selection strategies, moisture resistance considerations.
| Tip | Tool | Result |
|---|---|---|
| Thin coats | Roller | No sag |
| Light strokes | Brush | Even finish |
| Inspect | Lamp | Catch drips |
Drying Times: How Long to Wait Between Coats
Drying times between coats usually range from 30 minutes to several hours depending on paint type, humidity, and temperature.
So wait until the surface feels dry to the touch and no longer tacky before reloading your roller or brush.
- Check drying conditions: temp and humidity affect cure.
- Test tackiness gently.
- Adjust for coat thickness; thicker coats need more time.
- Resume painting when fully dry to avoid lifting.
Avoid Over‑Spray When Using a Sprayer
Set your sprayer to a fine, controlled pattern and test on cardboard so you’re not blasting excess paint.
Use targeted masking—plastic sheeting and paper—around lights, vents, and walls to catch any stray mist.
Together those steps’ll keep the ceiling covered without coating everything else.
Proper Sprayer Adjustment
Aim the sprayer so paint goes only where you want it: keep the nozzle at the manufacturer‑recommended distance, use the correct tip size and pressure for ceiling panels, and overlap passes minimally to avoid heavy buildup.
- Use sprayer techniques that match panel texture.
- Set pressure low to reduce drift.
- Choose tip size per paint viscosity.
- Test spray on cardboard and fine‑tune adjustment tips.
Use Targeted Masking
1 simple, well‑placed mask can keep overspray off vents, lights, and adjoining walls. Use targeted masking techniques: cover fixtures, trim, and seams, and choose effective tape types for clean edges. Work methodically, mask edges before spraying, and remove tape while paint’s tacky for crisp lines.
| Item | Action |
|---|---|
| Vents | Mask fully |
| Lights | Cover gaps |
| Trim | Tape edges |
| Seams | Seal carefully |
Painting Around Light Fixtures Safely
Before you start painting, turn off the power to the light fixtures at the breaker and confirm they’re dead with a tester so you won’t risk shocks while you work.
Follow light fixture safety and use careful fixture masking. Do these steps:
- Remove bulbs and covers.
- Tape and plastic around fixtures.
- Use a small brush near edges.
- Inspect and restore power after drying.
Acrylic vs. Mineral‑Fiber Tiles: What to Do
When deciding whether to paint your drop ceiling, check what the tiles are made of—acrylic tiles will accept paint differently than mineral‑fiber ones, and treating them the same can cause poor adhesion or clogged pores.
You’ll assess acrylic durability, do mineral fiber maintenance, choose appropriate painting techniques, and prioritize tile cleaning.
Test a small area first to confirm adhesion and finish.
Repaint Metal Gridframes to Prevent Peeling
A fresh coat on the metal gridframe not only improves appearance but prevents flaking and rust that can stain tiles.
So you should strip loose paint, sand lightly, clean the metal, and prime with a rust‑inhibiting product before repainting.
- Remove loose paint.
- Sand and wipe dust.
- Apply rust‑inhibiting primer.
- Paint with even strokes.
Use routine grid frame maintenance for peeling prevention.
Paint Tricks to Make a Ceiling Look Higher
Optical tricks in paint can make your drop ceiling feel taller without any structural work: use lighter colors on the ceiling than on the walls, paint the grid frame the same color as the tiles to blur edges, and add a glossy or satin finish to reflect light upward.
You’ll use ceiling colors and wall contrast to enhance height perception, add subtle vertical lines, ambient lighting, light reflections, minimalist decor, and optical illusions.
Brighten Basements With the Right Ceiling Paint
Want to make your basement feel brighter without rewiring or major renovations?
You can use light-reflective paints and current ceiling color trends to amplify light and complement basement lighting options.
Pick low-sheen white or soft warm neutrals, and match trim to tiles.
Consider:
- High-reflectance white
- Warm off-white
- Cool white with blue undertone
- Soft beige
Minimize Dust When Sanding or Cleaning Tiles
1 simple step can cut most of the dust: contain the work area before you sand or clean tiles.
You’ll use dust control via protective coverings and taped plastic, apply proper sanding techniques and gentle cleaning methods for tile preparation, keep workspace organization, run air filtration, and do vacuum usage with HEPA.
These steps focus on minimizing mess and guarantee efficient cleanup.
Clean Greasy or Smoky Residue Before Painting
Before you paint, remove any greasy or smoky residue from tiles so the primer and paint will stick and look even.
Use proper cleaning methods and cleaning tools for surface preparation.
Follow these cleaning techniques and residue removal tips:
- Test grease solvents on a hidden tile.
- Use effective cleaners and cleaning solutions.
- Wipe smoke treatment areas thoroughly.
- Rinse and dry before primer.
Manage Fumes and Ventilate Safely
Pick a low‑VOC paint to cut down on odors and health risks while you work.
Open windows and create cross ventilation with fans to keep fresh air moving through the room.
If ventilation’s limited, wear a properly rated respirator and follow the manufacturer’s fit and usage instructions.
Choose Low‑VOC Paint
Choose a low‑VOC paint so you cut fumes and keep the room safe while you work.
You’ll weigh low VOC benefits and eco friendly options against health considerations and environmental impact, while matching color selection, finish types, paint longevity, and application techniques to your ceiling.
- Read labels
- Pick certified brands
- Test samples
- Follow dry‑time instructions
Ensure Cross Ventilation
When you start painting, set up cross ventilation so fresh air flows through the room and fumes are pulled away from your breathing zone; open windows or doors on opposite sides, run a box fan facing out in one opening and an intake fan or a second window fan pulling air in at the other, and keep vents clear so airflow isn’t blocked.
Then monitor airflow management, adjust fan speed, and use basic ventilation techniques to maintain steady exchange without creating dust drafts.
Use Respirators Properly
Although good ventilation pulls most fumes away, you should still wear a properly fitted respirator to protect your lungs from paint vapors and fine particulates; follow respirator types guidance, usage guidelines, and proper fitting steps.
- Check maintenance tips and cleaning protocols.
- Practice safe removal to avoid contamination.
- Manage odors with filters rated for vapors.
- Follow storage advice between projects.
Estimate Paint Quantities for Drop Ceilings
Start by measuring the ceiling area you’ll actually paint—multiply the length and width of each panel run and subtract any large fixtures or openings—to get an accurate square footage.
Then check paint coverage on the can and factor in two light coats plus waste.
Check the can’s coverage and plan for two light coats plus a little extra for waste.
Account for tile preparation time and spot-priming.
Round up gallons for trims and touchups so you won’t run short.
Room‑By‑Room Workflow for Multi‑Room Projects
After you’ve totaled paint needs and factored prep time for each panel run, plan your room-by-room workflow so you move logically through the house and avoid recoating areas you’ve already finished.
Use a clear multi room strategy to maximize workflow efficiency and minimize drying conflicts.
- Start at farthest room
- Sequence by shared walls
- Group similar finishes
- Coordinate drying windows
Touch Up Spots After Reinstallation
When you’ve reinstalled the tiles, inspect the seams and fastener points for nicks, scuffs, or missed spots so you can spot‑paint before the light hits them.
Use gentle touch up techniques: small brushes, thin coats, and matching paint mixed from leftovers.
Work methodically row by row, let each patch dry, and follow reinstallation tips by keeping edges clean to avoid visible overlaps.
Troubleshoot Common Ceiling Painting Problems
If a patch looks uneven or the paint drips while you’re working, don’t panic—you can usually fix it quickly by identifying the cause (too-thick paint, wrong nap roller, or poor prep) and correcting that issue before continuing.
- Inspect for ceiling texture issues and feather edges carefully.
- Look for paint adhesion challenges on tiles.
- Note tile replacement indicators like sagging or stains.
- Watch moisture damage signs before repainting.
Fix Drips, Runs, and Uneven Coverage
Catch drips and runs as soon as you see them to prevent a noticeable ridge once the paint dries. You’ll use drip control by gently smoothing with a damp brush, combining run prevention and coverage techniques.
For uneven texture, sand lightly after drying and apply touch-up repair methods. Prioritize clean application, tile maintenance, and proper surface preparation to keep results consistent.
Know When Tiles Need Replacement Instead
Smoothed drips and even texture will fix many paint issues, but some tiles are beyond repair and should be replaced instead.
- Check replacement indicators: severe moisture damage, sagging, mold — tile lifespan ends.
- Do a cost analysis versus repair; include budget considerations and installation challenges.
- Consider ceiling aesthetics and acoustic performance when choosing replacements.
- Follow maintenance tips for long term solutions and avoid repeat problems.
One‑Day Timeline: Finish a Ceiling in a Day
You can finish a drop ceiling in a single day by splitting tasks into a morning and an afternoon.
Start the morning with quick prep: clear the area, remove or mask fixtures, and clean or replace tiles as needed.
In the afternoon you’ll paint, let coats tack up, and reinstall tiles and trim before cleanup.
Prep Work Morning
First thing this morning, set up a clear workspace and gather your tools so you won’t stop mid-job: ladder, painter’s tape, drop cloths, primer and paint, rollers with extension poles, angled brush, and a respirator or mask.
Prep focuses on surface preparation and evaluating drop ceiling materials. Follow basic painting techniques and plan ceiling maintenance tasks:
- Clean tiles
- Repair damage
- Tape edges
- Protect floor
Paint & Install Afternoon
Now that the tiles are clean, repaired, and edges taped, it’s time to paint and reinstall them so you can finish the ceiling today.
Use efficient painting techniques, pick materials with smart material selection, and apply color psychology for visual impact.
Keep workspace organization, follow DIY tips, monitor time management, include ceiling maintenance steps, and track project planning and cost estimation to finish neatly.
Paint Gridwork Separately From Tiles
Before painting tiles, paint the gridwork separately so you don’t splatter or overlap onto the panels.
Clean grids first using proven grid cleaning techniques and inspect for tile replacement signs before you begin.
Follow this sequence:
- Tape edges tightly.
- Sand light rust spots.
- Apply primer to metal.
- Paint with thin, even coats, letting each dry fully.
Use Spray Shields and Drop‑Cloth Alternatives
When you’re spraying the grid or tiles, use a shield to catch overspray and substitute inexpensive drop-cloth alternatives—like brown kraft paper, plastic sheeting, or old shower curtains—to protect floors and furniture; these materials lay flat, cut easily to size, and save you from chasing tiny paint flecks later.
Position shields close to edges, practice your spray technique on scrap, and choose practical drop cloth options for quick cleanup.
Choose Low‑VOC and Eco‑Friendly Paints
Since you’ll be working overhead and breathing nearby air, pick low‑VOC or zero‑VOC paints and eco‑friendly formulas to reduce odors and health risks; they dry faster, cut down on lingering smells, and make cleanup easier.
- Choose certified eco friendly options.
- Check VOC labels for paint safety.
- Test small areas for adhesion.
- Ventilate workspace and wear a mask.
Protect HVAC Registers and Sprinklers Properly
Before you start painting, cover HVAC registers securely with tape and plastic to keep paint out of the ducts.
Use rigid covers or breathable mesh over vents if you need airflow, and seal edges so overspray won’t sneak through.
For sprinkler heads, shield each one with a box or cone-shaped cover and remove the protection as soon as the paint is dry.
Cover Registers Securely
Start by locating every HVAC register and sprinkler head in the room and plan how you’ll protect each one before you spray or roll paint.
Use register protection like taped plastic or magnetic register covers. Fit covers snugly, label removed vents, and secure edges to prevent paint seepage.
- Clean surface first
- Apply tape around grille
- Press cover edges tight
- Check seals before painting
Shield Sprinkler Heads
When you’re protecting registers, don’t forget the sprinkler heads—covering them properly prevents paint from clogging the nozzles or triggering false alarms. You’ll use simple sprinkler protection: plastic caps or taped bags, labeled and ventilated. Follow careful painting techniques to avoid overspray, remove covers after drying, and test systems.
| Item | Purpose |
|---|---|
| Cap | Seal nozzle |
| Bag | Overspray shield |
| Tape | Secure cover |
| Label | Safety info |
Paint Acoustic Tiles Without Losing Performance
How can you paint acoustic ceiling tiles without turning them into sound reflectors? You’ll preserve acoustic performance by using thin, water-based acoustic paint and spraying lightly.
Follow tile maintenance guidelines and avoid saturating panels.
- Test one tile first.
- Use low-pressure sprayer.
- Replace damaged tiles instead of overcoating.
- Allow full drying between coats.
Estimate Labor if Hiring a Pro
When you hire a pro to paint your drop ceiling, ask whether they charge hourly or a flat rate so you can compare bids.
Expect labor to vary with factors like ceiling height, tile condition, prep work, and how much furniture or fixtures need covering.
Get written estimates that list what’s included so you can spot hidden charges.
Hourly Versus Flat Rates
Deciding between hourly and flat rates comes down to your project’s scope and risk tolerance: hourly billing flexes with unexpected work, while a flat rate gives you a fixed price and clearer budgeting.
- Ask pros for estimated hourly rates and typical job hours.
- Get flat rates for the whole ceiling to compare.
- Confirm what’s included in each quote.
- Choose based on cost predictability and trust.
What Affects Labor
Now that you’ve weighed hourly versus flat rates, you’ll want to estimate labor by looking at the job’s specifics.
Consider labor costs, labor efficiency, and the need for skilled labor; these shape the project timeline and labor estimates.
Explore subcontractor options, factor labor quality into pricing, and prepare for labor negotiation to lock a clear, realistic quote before hiring a pro.
Maintain a Painted Drop Ceiling Long‑Term
Although a fresh coat looks great, keeping a painted drop ceiling looking good over time takes simple, regular care; you’ll prevent stains, peeling, and discoloration by establishing a few easy maintenance habits and checking the ceiling periodically.
- Wipe tiles gently with a damp cloth — ceiling maintenance tips for dust and spots.
- Fix leaks immediately to avoid staining.
- Touch up chips with matching paint.
- Inspect grid and tiles every six months for long term care.
Keep a Simple Project Record for Updates
Anyone can keep a brief project record that makes future updates and repairs much easier; jot down the paint color, batch number, date of application, any primer used, and the vendor for tiles or paint. Keep a simple project timeline and painting checklist so you’ll know what changed and when.
| Item | Note |
|---|---|
| Color | White |
| Batch | #A123 |
| Date | 04/21/26 |
| Vendor | Local shop |
Frequently Asked Questions
Can Painted Drop Ceiling Tiles Affect Indoor Air Quality Long-Term?
Like Pandora’s box, painted drop ceiling tiles can impact indoor air quality long-term if you use wrong paint types; you’ll want low-VOC or water-based options, proper curing, and ventilation to minimize off-gassing and persistent pollutants.
Can I Paint a Drop Ceiling in a Rental Without Violating Lease Terms?
You can, but you’ll need landlord permission first; lease agreements often restrict alterations. Propose temporary, reversible paint colors, offer to restore original tiles, and get written approval to avoid disputes or forfeiting your security deposit.
Will Painting Tiles Change Their Fire-Resistance Rating?
About 60% of tested coatings altered tile performance; yes, painting tiles can change fire-resistance rating. You’ll need to evaluate fire resistance standards, assess painting implications, and follow manufacturer or lab-tested guidance.
How Do I Dispose of Old Painted Acoustic Tiles Safely?
You should first check local tile disposal methods and hazardous-waste rules, then bag and label tiles with lead or asbestos risk. Use eco friendly options like recycling centers, construction-waste programs, or specialized hazardous-material disposal services.
Can I Paint Gridwork in a Different Color Than Tiles for a Two-Tone Look?
Yes — about 60% of designers say two-tone ceilings boost perceived height. You can paint gridwork a contrasting shade; use color contrast sparingly, test swatches, and follow design tips for balance, sheen, and coordinated lighting.
Conclusion
You’ve got a simple, one‑day plan that saves time and money while giving your drop ceiling a fresh look. Tackle only tiles that’ll take paint, replace what’s beyond help, and use low‑drip tools to avoid mess. Keep records like a contractor’s notebook so future touchups go fast. With careful prep and the right paint, your ceiling will brighten the room like a clean white sheet hung to catch the light.