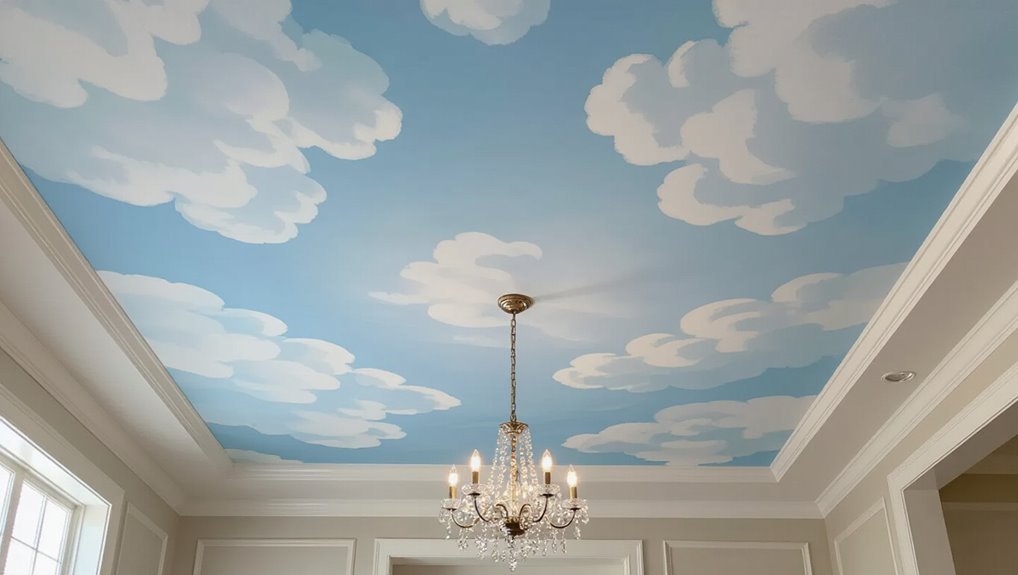
How to Paint Ceiling Clouds for a Dreamy Sky Effect
You’ll transform your ceiling into a soft, dreamy sky by prepping, priming, and layering blended washes, sponges, and glazes. Choose matte or eggshell blues, test swatches, and sand and prime for a smooth base. Block in shapes with torn sponges or large brushes, soften edges with feathered blending, then add highlights and shadows for volume. Seal with a clear satin or matte varnish, touch up after drying, and keep tools organized to work efficiently—keep going to learn techniques and troubleshooting.
Quick Overview: What You’ll Accomplish
In this project you’ll learn how to plan, prep, and paint soft, realistic clouds on a ceiling, plus which materials and techniques produce the best results and how to troubleshoot common problems.
You’ll create a dreamy atmosphere, gain practical steps for masking, base coats, and glazing, and express artistic expression while controlling scale, contrast, and workflow to finish efficiently and confidently.
Choose a Paint Finish and Sky Colors
Now that you’ve planned and prepped your ceiling, pick a paint finish and sky palette that suit the room’s light, mood, and maintenance needs.
Choose matte or eggshell for subtle, blended clouds; satin or semi-gloss if you need durability or easier cleaning.
For soft, blended clouds use matte or eggshell; choose satin or semi-gloss for durability and easy cleaning.
Test small swatches at different times of day.
Select color palettes with layered blues, soft whites, and pale grays for depth.
Gather Essential Tools and Materials
Before you start, lay out the essential tools and materials so you won’t be hunting for supplies mid-project: gather brushes, rollers, extension pole, trays, painter’s tape, drop cloths, sponges, blending brushes, and a ladder.
Focus on tool selection for soft edges and material sourcing for quality paints and primers. Organize everything nearby, check quantities, and replace worn items before you begin.
Prime the Ceiling for Smooth Blending
Before you start painting your clouds, make certain the ceiling is smooth by sanding rough spots and patching holes.
Apply a high-quality primer to create an even, absorbent base that helps paint blend seamlessly.
This prep step saves time and guarantees your cloud edges look soft and professional.
Smooth Surface Preparation
Start by checking the ceiling for stains, gloss, or patched areas that could show through your cloud paint—any uneven surface will break the soft, blended look.
You’ll want uniform surface texture and proper paint consistency.
Prep steps:
- Sand glossy patches smooth.
- Clean dust and grease.
- Feather patched seams.
- Wipe with a tack cloth before painting.
Use Quality Primer
Now that your surface is smooth and clean, prime the ceiling to create an even base that keeps your cloud layers from soaking in or flashing.
You’ll notice primer benefits immediately: consistent sheen, true color, and easier blending.
When choosing primers, pick a stain-blocking, low-odor acrylic designed for ceilings.
Apply two thin coats, let dry fully, and sand lightly for flawless soft-edge clouds.
Plan Cloud Layout and Sketch Placement
Measure your ceiling and note proportions so your clouds fit the space.
Visualize where larger and smaller clouds will sit and how they’ll balance across the room.
Mark a few light reference points to guide placement and keep compositions aligned.
Measure Ceiling Dimensions
Before you lay paint to ceiling, take precise room measurements so your cloud layout fits the space and looks balanced.
Use ceiling measurements and measuring tools to mark centerlines, note fixture locations, and record dimensions. Then sketch placement to scale.
- Measure length
- Measure width
- Mark obstructions
- Note ceiling height
Visualize Cloud Placement
With your ceiling dimensions and obstacle markers in hand, you can start planning where each cloud will sit so the composition feels balanced and natural. Visualize cloud types and scale them to ceiling height, sketching soft edges and overlapping clusters. Use a simple grid to map placement:
| Zone | Size | Density |
|---|---|---|
| A | Large | Low |
| B | Medium | Medium |
| C | Small | High |
Mark Light Reference Points
Start by tapping into the light sources you’ve marked and translate them into ceiling reference points so you know where highlights and soft shadows should fall; sketch small, faint crosses or dots at each light angle and note bulb type or window direction beside them.
You’ll then:
- Confirm reference angles.
- Map highlight zones.
- Mark shadow edges.
- Adjust for fixtures.
Mark Layout on the Ceiling (Lightly and Safely)
Pick a simple reference point—like the center light fixture or a corner—then lightly mark your cloud layout using a pencil or erasable chalk.
For ceiling safety, work from a stable ladder, keep tools secured, and avoid overreaching.
Use light markings, basic measurement techniques, and quick sketching methods to map shapes and spacing so you can refine edges when you paint.
Mix Paint Tints and Make a Value Chart
Now that your layout is penciled in, it’s time to mix the paints you’ll use for the clouds and organize them by lightness.
Use color theory to choose a base sky hue, then practice paint mixing to create tints and tones.
Create a simple value chart to guide shading:
- Darkest midtone
- Midtone
- Light tint
- Highlight white blend
This chart keeps shifts consistent.
Test Swatches and Adjust Color Samples
Before you commit to painting, lay out small swatches of each tint and tone on a section of ceiling board or poster paper and view them under the room’s actual lighting. This lets you see how values shift with natural and artificial light and spot any hues that read too warm, cool, or flat.
Use color theory and mixing techniques for sample testing, swatch evaluation, tone adjustments, palette selection, color harmony, and value comparison.
Apply a Soft Base Sky Wash for Depth
When you’re ready to build depth, start by laying down a thin, even sky wash across the ceiling—dilute your chosen base color with water or glazing medium until it’s translucent.
Load a large brush or roller, and work in long, overlapping strokes so the pigment settles smoothly without streaks.
Keep these steps in mind:
- Work wet into wet
- Vary dilution
- Blend edges subtly
- Use soft texture techniques and color blending
Block In Cloud Shapes With Brushes and Sponges
Start by sketching the cloud masses with a large, dry brush or a torn sponge to block in their basic shapes—work loosely and focus on overall form rather than details. You’ll use cloud shape techniques and simple brush sponge methods to map light and shadow. Practice varied pressure and rotation.
| Tool | Purpose |
|---|---|
| Large brush | Broad masses |
| Torn sponge | Texture |
| Fan brush | Accents |
| Rag | Lift paint |
| Small brush | Refinements |
Soften Edges and Blend Gradients for Volume
Soften the hard outlines you’ve blocked in by gently feathering the edges with a clean, slightly damp brush or a soft torn sponge.
Work from the cloud’s lit areas toward the shadows to create smooth tonal shifts that read as volume.
Use these blending techniques to refine your cloud shapes:
Use gentle blending techniques—light circles, dabs, cross-blends, and glazing—to refine and soften cloud shapes.
- Light circular strokes
- Soft dabbing
- Cross-blending
- Glazing for seamless changes
Add Highlights and Shadows for Realism
Now that your edges are blended and the cloud forms read as soft volumes, add carefully placed highlights and shadows to sell the illusion of depth.
Use subtle highlight techniques—dry brushing or glazing with lighter tones where light hits.
Apply shadow placement beneath and between masses using cool, diluted colors.
Step back often, adjust contrast, and keep shifts soft for believable, three-dimensional clouds.
Paint Different Styles: Fluffy, Wispy, Hazy
Now you’ll explore how to shape different cloud moods on your ceiling.
For fluffy clouds, use rounded brushes and soft layering to build volume and crisp edges.
For wispy or hazy looks, switch to dry brushing and thin glazes to create delicate streaks and soft diffusion.
Fluffy Cloud Techniques
Start by thinking about the mood you want: fluffy clouds read as soft, voluminous masses, while wispy and hazy styles give airiness or distance—each needs a different brush approach and paint consistency.
Focus on cloud texture and blending techniques. Use:
- Layered base
- Round brush dabs
- Soft feathering
- Highlight lifts
You’ll build depth without harsh edges.
Wispy And Hazy Styles
Although you’ll use many of the same tools as for fluffy clouds, wispy and hazy styles rely on thinner paint, lighter pressure, and more dragging motions to suggest distance and airiness.
You’ll feather edges, glaze thin layers, and pull long strokes to create subtle cloud textures and soft shifts. These atmospheric effects read like misted horizons, so step back often and refine translucency until it feels natural.
Match Lighting and Color to Room Ambiance
When you’re choosing paint and lighting for ceiling clouds, think about how each will affect the room’s mood: warm lights and soft, muted colors create a cozy, intimate feel, while cool lights and brighter tones make a space feel airy and energetic.
Consider paint and lighting together: warm tones and muted colors for cozy intimacy, cool lights and bright hues for airy energy.
Use lighting techniques and color psychology to match intent:
- Layered dimming
- Accent spots
- Warm gels
- Cool washes
Seal, Touch Up, and Protect Your Painted Sky
Once your clouds are dry, you’ll want to seal them with a clear varnish to protect the paint and make cleanup easier.
If you spot small flaws, gently touch them up with a soft brush and thinned paint to blend edges without lifting the finish.
Finish with a light protective coat so your painted sky stays vibrant for years.
Seal With Clear Varnish
Seal the painted sky with a clear varnish to lock in colors, hide brushstrokes, and protect your work from dust and moisture.
Use clear varnish benefits and proper sealing techniques: pick satin or matte, test compatibility, apply thin even coats, and let dry fully.
Maintain ventilation, avoid drips, and don’t overbrush between coats for an even, lasting finish.
- Pick finish
- Test first
- Thin coats
- Dry fully
Fix Imperfections Gently
Inspect your ceiling closely and address any flaws before the varnish fully sets: lightly sand nibs or drips, feather in touch-up paint where colors read uneven, and tack off dust so the final coats go on smooth and clear.
Work small, matching cloud texture and blending techniques to avoid hard edges. Seal repaired spots with a thin varnish layer, letting each coat cure fully before reinspection.
Common Mistakes, Fixes, Timeline, and Cost Estimates
When painting ceiling clouds, you’ll most often run into a few predictable problems—drips, uneven edges, patchy coverage, and poor adhesion—and knowing how to fix them will save time and money.
Note common mistakes, quick fixes, cost estimates, and timeline considerations.
Follow these steps:
- Sand and prime.
- Thin paint for soft edges.
- Blend wet.
- Allow 24–48 hours between coats; budget $50–300 total.
Frequently Asked Questions
Can Ceiling Paint Fumes Harm Pets or Children During and After Painting?
Yes — they can. You should minimize pet safety risks by using low-VOC paint, ventilating thoroughly, and keeping kids and pets away to reduce fume exposure. Don’t return until smells fade and air’s clear.
Can Murals Be Painted on Textured or Popcorn Ceilings Without Removal?
Like painting on a bumpy road, you can paint murals on textured ceilings without removal. You’ll adapt mural techniques—use thicker brushes, flexible primers, and gentle rollers—so your design reads clearly despite texture and uneven surfaces.
What Ceiling Height Is Ideal for a Convincing Cloud Perspective?
You’ll want a ceiling height around 8–12 feet for a convincing cloud perspective, since moderate ceiling dimensions let you scale clouds and add depth easily; taller ceilings can use larger, more diffused cloud formations for realism.
Can Sky Clouds Be Created Using Only a Paint Sprayer Instead of Brushes?
Yes — you can primarily use a paint sprayer, but you’ll want brushes for details. Combine cloud painting techniques and paint sprayer tips: spray base layers, feather edges, then add highlights and soft blends with brushes for realism.
How Do You Preserve Delicate Skylight or Fixture Finishes While Painting?
You’ll protect delicate skylights and fixtures by using ceiling protection: cover surfaces with drop cloths, use painter’s tape and precise paint masking around edges, remove hardware when possible, and work in thin, controlled spray or brush passes.
Conclusion
You’ve learned the steps to paint dreamy ceiling clouds, and with practice you’ll transform any room into a calming sky retreat. Fun fact: studies show environments with natural-feeling elements can cut stress by about 15%, so your painted ceiling isn’t just decorative — it can boost wellbeing. Tackle one cloud style at a time, match colors to your light, and seal your work. With care, your ceiling will feel like an everyday window to the sky.