How to Prep Drywall for Paint Like a Professional Painter
You’ll get pro results by prepping drywall right: clear the room and protect floors, inspect for nail pops, cracks, and water damage, then clean and sand seams smooth. Fill holes and dents with joint compound, let dry, and sand feathered edges. Prime new or patched drywall with the right primer to prevent blotchy absorption. Mask trim and vents, remove dust with a tack cloth, and do a final walk-through—keep going to learn step-by-step techniques and tool tips.
Quick-Start: Prep Drywall in 5 Steps
Start by clearing the room and setting down drop cloths so dust and paint won’t ruin your floors or furniture.
Next, clean and sand seams, prime fresh drywall, and mask trim.
Clean and sand seams, prime new drywall thoroughly, and carefully mask trim before painting.
Use proper joint compound and a sanding block, debunk drywall myths by trusting prep over shortcuts.
Finish by choosing brushes, rollers, and painting techniques that match your paint and texture.
Assess the Wall: Spot Nail Holes, Cracks, and Water Damage
Walk the wall slowly and scan for nail holes and hairline cracks so you can mark every spot that needs filling.
Check for discoloration, soft spots, or peeling paper to catch water damage early.
If you find any damp areas, stop and investigate the source before you repair and paint.
Nail Hole Identification
Before you apply primer, take a close look along baseboards, trim, and around light switch plates to find nail and screw holes—these small dings can telegraph through paint if you don’t fill them.
Identify nail hole types (brad, finishing, popped nail) and assess size.
Choose repair techniques: push out or drive in loose nails, fill with spackle or joint compound, sand smooth before priming.
Water Damage Assessment
If you’ve noticed discoloration, soft spots, or a musty smell, inspect the wall closely for water damage along with nail holes and cracks.
Check for bubbling paint, staining, and warped drywall.
Do a moisture testing probe and schedule a mold inspection if readings are high.
Cut out compromised sections, dry the cavity, and repair with appropriate materials before priming and painting.
Tools & Safety Checklist for Drywall Prep
Before you start patching, make sure you’re geared up with essential safety items like goggles, a dust mask, and work gloves.
You’ll also want must-have prep tools—sanding blocks, a putty knife, joint compound, and a utility knife—to get smooth, paint-ready walls.
Knowing what to wear and what to use keeps the job safe, faster, and neater.
Essential Safety Gear
Because you’ll be working with dust, sharp tools, and airborne particles, you should gear up properly: safety glasses, an N95 or P100 respirator, a good pair of work gloves, and knee pads are non-negotiable for drywall prep.
Use safety goggles, a dust mask or respirator, ear protection, work gloves, knee pads, and a safety harness when working elevated.
- Tight-fitting goggles
- P100 dust mask
- Padded knee pads
Must-Have Prep Tools
You’ll want a compact set of reliable tools to get drywall ready for paint: a sanding block or pole sander, quality sanding screens or 120–220 grit sandpaper, a drywall knife (6–12″), a taping knife, a mud pan, a hawk, a good utility knife, and a vac or shop vac with a HEPA filter for dust control.
| Tool | Purpose | Tip |
|---|---|---|
| Taping knife | Tape application | Feather edges |
| Sander | Smooth joints | Use proper grit |
| Mud pan | Mixing compound | Keep clean |
Use texture techniques sparingly, keep tools sharp, and control dust.
Clean Drywall for Better Paint Adhesion
When you clean drywall before painting, you remove dust, grime, and sanding residue that prevent primers and paint from sticking properly.
You’ll use mild cleaning solutions, tack cloths, and targeted adhesion techniques to prep surfaces. Focus on even wipes and drying.
Visualize the surface:
- A wiped, smooth wall
- No powdery dust left
- Clean corners and seams
Fix Nail Holes, Dents, and Small Surface Damage
Patch small nail holes and dents promptly to keep your newly cleaned drywall smooth and paint-ready. You’ll fill holes with lightweight spackle, smooth with a putty knife, sand when dry, and wipe dust away. For tiny surface repair, use fingertip pressure; for deeper dents, build thin layers. Test for flushness before priming.
| Tool | Use |
|---|---|
| Spackle | Fill nail hole |
| Sandpaper | Smooth surface repair |
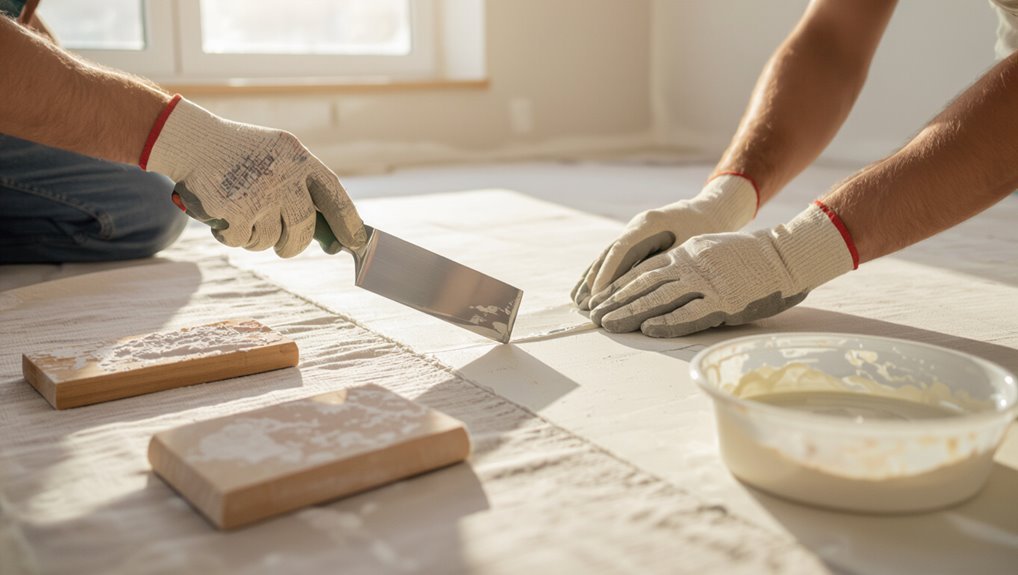
Repair Seams and Tape
After fixing small holes and smoothing dents, move on to seams and tape to stop visible lines from showing through your paint.
After filling holes and smoothing dents, tape seams and feather compound so lines vanish under paint
You’ll apply tape, embed it with joint compound, and feather edges so seams disappear.
Use proper taping techniques:
- Press tape into the V-groove smoothly
- Cover with thin compound layers
- Feather wider on each pass for a flat finish
Sand Drywall: Grit Choices and Techniques
Grab a sanding block and start with the right grit: use 120–150 for initial smoothing of joint compound, then switch to 180–220 for final feathering and prepping for primer.
You’ll sand with light, even pressure, keep the block flat, and use dust control.
Master sanding techniques and grit selection to avoid gouges, reveal imperfections, and create a consistent, paint-ready surface.
Feather and Blend Joints for a Seamless Finish
Start by feathering the joint edges so the compound thins smoothly into the surrounding drywall.
Then apply a thin coat to blend the repair with the wall’s plane, keeping knife strokes even.
Once dry, sand carefully until the seam is smooth and invisible to the touch.
Feather Joint Edges
Feathering the joint edges evens the change between taped seams and the surrounding drywall so paint won’t reveal ridges or bumps.
You’ll use feathering techniques and tight joint blending to taper compound edges smoothly.
Visualize the finish:
- thin, translucent edge fading into flat drywall
- knife strokes radiating outward, softening the lip
- seamless shift that disappears under primer
Work steadily, checking from low angles.
Blend With Thin Coat
Blend a thin coat of joint compound over your seams, working outward with light, even pressure so the compound tapers into the surrounding drywall; this thin layer fills minor texture differences and provides a smooth base for primer without hiding edges under excess mud.
Use simple blend techniques and keep tools clean; follow professional tips to feather junctions, avoid ridges, and let each coat set before proceeding.
Smooth And Sand Seamlessly
Now that you’ve laid a thin coat to feather the seams, you’ll want to smooth and sand for a truly seamless finish.
You’ll use progressive sanding techniques, blend edges, and inspect under raking light.
Finish with precise finishing touches:
- Light sanding to remove ridges
- Soft touch to blend feathered edges
- Clean dust before priming
Replace Drywall or Patch It: How to Decide
When should you replace drywall instead of patching it?
You’ll opt for drywall replacement when damage is widespread, waterlogged, moldy, or the board crumbles.
Patch small holes, dents, and isolated cracks using proven patching techniques.
Consider structural damage, repeated repairs, or electrical/plumbing access needs as reasons to replace.
Choose the option that’s safest, most durable, and saves time long-term.
Prime Drywall: When and Which Primer to Use
After you’ve decided to patch or replace damaged sections, priming is the next step to guarantee a uniform finish and proper paint adhesion.
You’ll choose primer types (latex for new drywall, stain-blocking for repairs, bonding for glossy surfaces) and follow careful application techniques.
Visualize the result:
- Smooth, sealed seams
- Even color base
- No blotchy absorption before topcoat
Protect Trim, Floors, and Fixtures During Prep
Because paint splatters and dust travel farther than you expect, protect trim, floors, and fixtures before you roll your first coat.
Use painter’s tape for crisp trim protection and mask hardware and switches.
Lay quality floor coverings—drop cloths or rosin paper—and secure seams.
Cover light fixtures and vents with plastic, and keep a small brush and tack cloth handy for immediate touch-ups and dust removal.
Final Check and Common Quick Fixes Before Painting
Before you pick up a roller, do a final walk-through of each wall and trim to catch any imperfections—look for nail pops, hairline cracks, dusty spots, or sanding haze.
Before you roll, perform a final walk-through—catch nail pops, hairline cracks, dust, and sanding haze first.
Perform a final inspection to confirm surface readiness.
Quick fixes:
- Pinpoint nail pops and counter-sink then fill
- Feather hairline cracks with joint compound
- Wipe sanding haze and dust before priming
Frequently Asked Questions
Can I Paint Over Textured Drywall Without Sanding the Texture?
Yes, you can paint over textured drywall without sanding the texture, but you’ll need proper painting techniques, primer, and the right tools to guarantee adhesion and an even finish that respects textured finishes and hides imperfections.
How Does Humidity Affect Joint Compound Drying Times?
Higher humidity slows joint compound drying, so you’ll need longer drying techniques and ventilation; lower humidity speeds it up but can cause cracking, so balance humidity levels with fans, dehumidifiers, and staged thin coats for best results.
Can I Use Regular Interior Paint as a Primer Substitute?
Think of bare drywall like thirsty earth; no, you can’t. You can use some primer alternatives, but regular interior paint won’t guarantee proper paint adhesion or seal porous surfaces, so you’ll risk uneven finish and peeling later.
What’s the Best Way to Repair Mold-Damaged Drywall?
You should remove mold fully, treating the area with appropriate cleaners and ensuring safety, then perform drywall replacement for sections overrun by mold; you’ll seal, prime, and finish to restore a healthy, paint-ready surface.
How Long Should I Wait After Priming Before Painting?
You should wait 1–4 hours for acrylic primers and 24 hours for oil-based primers; follow primer types’ instructions and ambient conditions. If humidity’s high or temperatures are low, let drying times extend to guarantee proper adhesion.
Conclusion
Now you’ve prepped the drywall like a pro, smooth and ready as glass before a mirror. Take one last walk-around to spot missed dents, sanding dust, or loose tape. Touch up quick fixes, wipe away dust, and roll on primer where needed. Protect trims and floors, let everything dry fully, and set up good lighting for your first coat. When paint goes on, you’ll get a cleaner, longer-lasting finish—worth the prep.