How to Remove Flaking Paint From Exterior Walls Properly
You should first test for lead, then protect yourself and nearby plants with masks, goggles, and drop cloths; scrape loose flakes with a putty knife or wire brush, sand feathered edges smooth, vacuum and wash the surface, and spot‑prime bare or chalky areas with a compatible exterior primer before applying a durable topcoat. Avoid painting on damp surfaces, fix moisture issues first, and hire pros for extensive or lead‑positive jobs — keep going to get detailed steps and tips.
What Problem Flaking Exterior Paint Creates
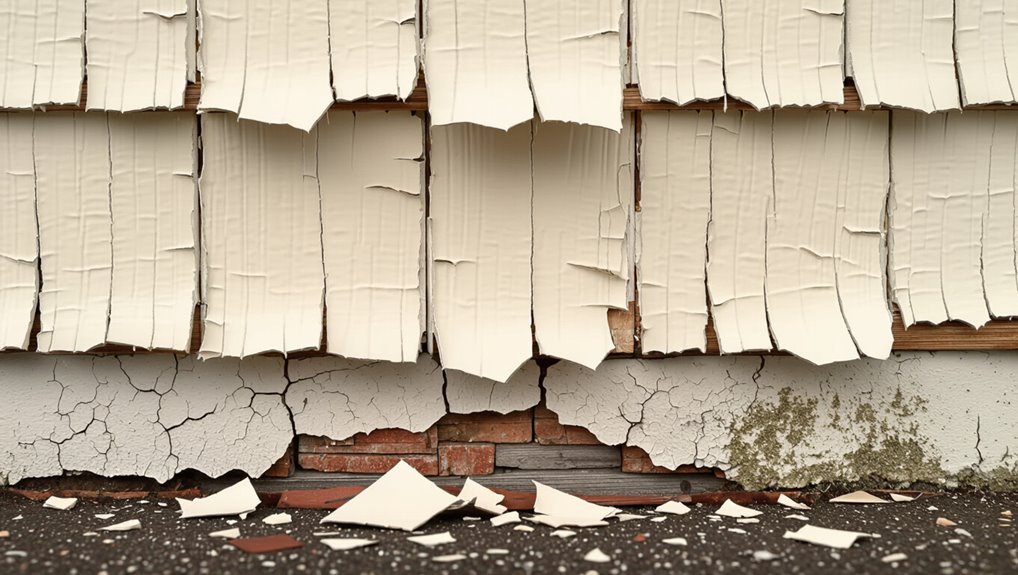
When exterior paint flakes, it doesn’t just look shabby—it exposes your siding to moisture, pests, and UV damage, which can lead to rot, rust, and costly repairs.
You’ll notice structural decline, staining, and decreased curb appeal as flaking effects worsen.
Understand causes of flaking like poor prep, moisture intrusion, and incompatible coatings so you can prioritize repairs and prevent recurrence.
Step‑By‑Step: Remove Flaking Paint Safely
Start by protecting yourself and the area: put on safety goggles, a dust mask or respirator rated for paint particles, work gloves, and cover nearby plants, windows, and fixtures with drop cloths or plastic sheeting.
Scrape loose flakes with a putty knife, sand edges smooth, vacuum debris, and wipe surfaces.
Use targeted flaking techniques to prep for primers that restore paint adhesion before repainting.
How To Tell Loose Paint From Sound Paint
After you’ve removed loose flakes and cleaned the surface, you need a reliable way to tell which remaining paint is truly sound and which will fail later.
Do a quick surface evaluation: probe edges, press with a fingernail, and look for cracking. Good paint shows firm paint adhesion and smooth edges; failing paint lifts, powders, or peels away easily.
Probe edges, press with a fingernail, and inspect for cracking—firm, smooth paint stays; flaky, powdery paint will fail.
- Visual inspection
- Thumb press
- Edge probe
Test For Lead Paint First
Concerned your old paint might be hazardous? You should perform lead paint testing before disturbance, especially in historical homes built before 1978.
Use EPA‑approved test kits or hire a certified inspector to sample layers.
Don’t sand, heat, or scrape until you know results.
Testing protects you, your family, and neighbors by preventing unsafe exposure during paint removal.
If Test Is Positive: Lead‑Safe Options and Hiring Pros
If your test shows lead, take steps to protect yourself and others by choosing lead‑safe methods or hiring certified professionals; don’t attempt aggressive removal like dry sanding or torching on your own.
You’ll want to follow lead safe practices and consider professional services for containment and cleanup.
- Encapsulation visuals: sealed surfaces.
- Controlled removal: HEPA, wet methods.
- Certified crew: permits, documentation.
What Local Rules You Must Check (Lead, Containment, Disposal)
When you decide on an encapsulation, controlled removal, or hiring a certified crew, check local laws before work begins: municipalities and states set different requirements for lead-safe practices, containment around sidewalks and streets, work notifications, and disposal of contaminated debris. You’ll confirm Local regulations, Permitting processes, Containment measures, Disposal guidelines, Lead safety, Environmental impact, and Health risks.
| Issue | Action |
|---|---|
| Permits | Verify |
| Containment | Plan |
| Disposal | Follow rules |
| Notifications | Send |
| Testing | Document |
Tools You Need Before You Start
Before you begin, gather the right safety gear, paint removal tools, and surface-prep supplies so you can work efficiently and stay protected.
You’ll want gloves, a respirator, goggles, scrapers, wire brushes, a heat or chemical remover if needed, drop cloths, and primer/patching materials ready.
Having everything on hand prevents delays and reduces the risk of mistakes or accidents.
Safety Gear Checklist
1 essential rule: protect yourself first. You’ll need proper safety gear and protective equipment before scraping flaking paint.
Choose items that fit well, breathe comfortably, and block dust and chips.
- NIOSH-rated respirator and disposable filters
- Safety goggles and a face shield
- Heavy-duty gloves, coveralls, and slip-resistant boots
Paint Removal Tools
Gather the right tools and you’ll speed through scraping while keeping the mess under control; you’ll need both handheld and power options, plus dust containment gear, to remove flaking paint safely and efficiently.
Grab scrapers, wire brushes, oscillating tools, a heat gun or infrared remover, HEPA vacuum, drop cloths, and respirator.
Choose eco friendly removers and practice proper paint scraping techniques for best results.
Surface Preparation Supplies
Now that you’ve picked your removal tools, get the surface ready with the right prep supplies so paint comes off cleanly and new finishes adhere properly.
You’ll use surface prep techniques and essential materials to prep efficiently. Imagine these items on your workbench:
- Wire brush, scraper, sanding block.
- Drop cloths, masking tape, plastic sheeting.
- Primer, exterior cleaner, rust inhibitor.
What PPE To Wear (And Why)
Before you scrape or sand, put on proper personal protective equipment so you actually stay safe—respirators to block dust and lead particles, goggles to protect your eyes from chips and debris, gloves to keep skin contact with old paint to a minimum, and coveralls to prevent contamination of your clothes. PPE Essentials highlight Safety Importance; use N95 or P100 respirators and snug goggles.
| Item | Purpose | Fit |
|---|---|---|
| Respirator | Filter particles | Snug |
| Goggles | Eye protection | Seal |
| Gloves | Skin barrier | Comfortable |
Choosing the Right Ladder and Fall Protection
Pick a ladder that matches the job and your height—an extension ladder for upper stories, a step ladder for lower walls—and inspect it for damage before each use.
Pick a ladder suited to the job and your height, and inspect it for damage before every use.
You’ll follow ladder safety rules, secure footing, and use fall prevention gear when needed.
Visualize setup:
- Stabilized feet on level ground.
- Proper angle and locked spreaders.
- Harness clipped to anchor above.
Protect Plants, Windows, and Landscaping
With your ladder and fall protection set, protect nearby plants, windows, and landscaping from chips, dust, and paint. Use plant protection like breathable fabric and secure landscaping covers. Tape plastic on glass, rake up debris, and wet down to limit dust. Work systematically from top to bottom and clean as you go to keep plants and hardscapes safe.
| Item | Action |
|---|---|
| Plants | Cover |
| Windows | Tape |
| Soil | Rake |
| Debris | Bag |
| Finish | Inspect |
Ideal Weather and Temperature for Paint Removal
Because weather affects adhesion, drying, and safety, choose a day when temperatures stay between about 50°F and 85°F, humidity is low, and winds are light so dust and paint chips won’t blow around.
You’ll follow ideal conditions and clear temperature guidelines to work efficiently and safely.
- Calm morning with cool air and steady light.
- Overcast but dry afternoon.
- No rain forecast and low humidity.
Prepare the Work Area for Containment and Cleanup
1 essential step before you start scraping is to seal off the work area so paint chips, dust, and debris stay contained; lay down heavy-duty drop cloths or plastic sheeting, tape seams and edges with contractor’s tape, and cover nearby plants, vents, and fixtures.
Then set up containment strategies like taped barriers and a negative‑pressure fan, and plan cleanup methods: sealed bags, HEPA vacuuming, and safe disposal.
Hand‑Scraping To Remove Flaking Exterior Paint Without Damage
Start with the right scraper — a sharp putty knife or a 3‑in to 4‑in angled scraper works best for exterior wood and siding.
Protect windows, trim, and nearby plants with drop cloths and painter’s tape so you only remove paint where you want to.
Work with steady, shallow strokes to lift flaking paint without gouging the surface.
Choose Proper Scraper
Choosing the right scraper is essential to remove flaking exterior paint efficiently without gouging the substrate, so pick a tool that matches the surface and the paint condition.
You’ll consider scraper types and scraper materials to balance stiffness and gentleness.
Visualize options:
- Wide metal blade for stubborn chips.
- Flexible plastic for delicate trim.
- Multi‑angle razor for tight corners.
Protect Surrounding Surfaces
Once you’ve picked the right scraper, protect windows, landscaping, and trim before you start hand‑scraping so chips and dust don’t create more work or damage.
Lay drop cloths and plastic sheeting for surface shielding, secure edges with painter’s tape, and cover plants.
Use a tarp or containment box to guarantee debris containment.
Work methodically, cleaning fallen paint frequently to prevent tracking.
Using Wire Brushes and Putty Knives Safely
Before you scrape, make sure you’ve got the right tools and protection: use a stiff wire brush and a flat or angled putty knife with a comfortable handle, wear eye protection, a dust mask or respirator rated for lead if the house is old, and heavy gloves to protect your hands.
Before scraping, gather a stiff wire brush, sturdy putty knife, eye protection, respirator, and heavy gloves.
Use wire brush techniques gently and practice putty knife safety.
- Scrape loose flakes outward.
- Brush along grain.
- Tap stubborn spots.
Power Sanding: When and How To Use a Sander
Power sanding can speed up prep on large exterior surfaces, but you should use it selectively and safely: choose correct sanding techniques for paint removal without damaging wood or siding.
Match grit and motion to the surface, use appropriate sander types (orbital, belt, or detail), wear PPE, secure drop cloths, and control dust with vacuums.
Inspect and feather edges before repainting.
Heat Guns vs. Chemical Strippers: Pros and Cons
While both heat guns and chemical strippers remove old paint effectively, they do so in very different ways and with different trade-offs you should weigh before starting work.
Heat guns and chemical strippers both remove paint—each with distinct methods, benefits, and safety trade-offs to consider.
You’ll choose based on surface, speed, and safety: heat gun advantages include quick softening and no mess; chemical stripper drawbacks involve fumes and disposal.
Visualize results:
- Bubbling paint peeling away
- Scraped chips revealing bare wood
- Cleaned, ready-to-prime wall
How To Use Chemical Paint Removers Outdoors
When choosing a chemical remover for outdoor walls, pick a product labeled for exterior use and matched to your paint type and substrate.
You’ll want to wear gloves, eye protection, and a respirator, work on a calm, dry day, and protect plants and nearby surfaces with tarps.
After the remover does its job, follow the label for neutralizing, scrape or wash residue, and dispose of waste according to local regulations.
Choosing The Right Remover
Before you pick a chemical remover, think about the surface you’re working on and the paint type, because different formulas are made for wood, masonry, metal, or multiple layers of oil- or water-based paint.
Choose between strong solvents, gel strippers, or chemical alternatives and eco-friendly solutions that suit substrate and layers.
Visualize results:
- Flaking wood
- Cracked masonry
- Rusty metal
Safe Application And Cleanup
Start by protecting yourself and the surrounding area: wear chemical-resistant gloves, long sleeves, eye protection, and a respirator rated for organic vapors.
Lay down drop cloths or plastic sheeting to catch runoff and debris.
Apply remover in small sections, follow dwell times, and scrub gently.
Contain spills, neutralize residues per product instructions, and bag waste for safe disposal.
Rinse tools and dispose of cloths responsibly.
Low‑Toxicity Paint Strippers: Types, Pros, and Use Cases
Although stronger chemical strippers can speed things up, low‑toxicity alternatives give you effective paint removal with far less risk to your health and the environment.
You’ll choose based on surface, paint age, and cleanup. Consider eco friendly alternatives and paint stripper comparisons to match needs.
- Soy or citrus gel — slow, gentle.
- Caustic-free solvents — balanced power.
- Mechanical aid — scraping after dwell.
Pressure Washing: Safe Settings and Distance
Set your pressure washer to a lower PSI and hold the wand farther from the wall than you think necessary—typically 500–1200 PSI for painted siding and 12–24 inches away—to blast loose paint without gouging the surface or driving water behind trim. Use proper pressure washing techniques and ideal nozzle settings.
| Surface | PSI | Distance |
|---|---|---|
| Vinyl | 600 | 18″ |
| Wood | 800 | 20″ |
| Masonry | 1200 | 12″ |
Avoiding Over‑Pressurizing and Surface Gouging
After pressure washing at the recommended PSI and distance, you’ll want to take extra care not to over‑pressurize the surface; too much force can strip sound paint, gouge wood, or force water behind siding and trim.
You’ll monitor surface pressure and use wand angles for gouging prevention. Visualize control:
- Sweep slowly, low angle.
- Keep 12–24 inches distance.
- Lower PSI for edges and trim.
Removing Paint From Wood Siding Without Harm
Before you start, check the siding for rot, loose boards, or thin spots so you know what the wood can handle.
Use soft methods—hand scraping, gentle chemical strippers designed for wood, or low-pressure washing—to avoid gouging or splintering.
If the wood seems fragile, pause and repair or consult a pro rather than forcing removal.
Assess Wood Condition
When you’re getting ready to remove flaking paint from wood siding, inspect the boards closely for rot, loose or split sections, and soft spots that won’t hold fasteners; these tell you whether you can safely proceed or need repairs first.
Look for wood decay and signs of moisture damage.
Imagine:
- Crumbling clapboard edges.
- Dark, damp seams.
- Soft spots under pressure.
Gentle Paint Removal
1 careful, controlled steps will protect both your wood siding and the health of your home as you remove flaking paint; use gentle methods like soft scraping, low-pressure sanding, and heat or chemical strippers formulated for wood to loosen paint without gouging or scorching the boards.
You’ll employ gentle techniques and effective solutions: work in small sections, test strippers, vacuum debris, and finish with primer to seal exposed wood.
Best Approach for Metal Surfaces and Trim
Metal trim and metal-clad walls need a different touch than wood: you’ll strip loose paint, remove rust, and apply corrosion-resistant primer before repainting.
Use metal surface preparation and trim paint techniques to get lasting results. Visualize steps:
- Wire-bristle sanding to bare metal.
- Rust converter applied, wiped clean.
- Zinc or epoxy primer, then topcoat for weatherproofing.
Stripping Paint From Masonry and Stucco
Switching from metal trim to masonry and stucco, you’ll use gentler but more abrasive methods to remove flaking paint without damaging the substrate.
Use masonry techniques like soft wire brushing, low-pressure washing, and masonry-safe chemical strippers.
Use masonry methods: soft wire brushing, gentle low-pressure washing, and masonry-safe chemical strippers for paint removal.
For stucco considerations, avoid aggressive grinding; test a small area, work in sections, and rinse thoroughly.
Wear protection and repair any surface erosion before repainting.
Dealing With Multiple Old Paint Layers
If your wall has several old paint layers, start by evaluating how thick they’re so you know whether spotting, scraping, or full removal is needed.
Use safe removal methods—chemical strippers rated for exteriors, heat tools with caution, or pressure washing at the correct setting—to protect the substrate and yourself.
Once layers are removed or feathered, clean and prime the surface properly before recoating to guarantee adhesion and longevity.
Assess Layer Thickness
Before you start scraping, take a close look at how many paint layers you’re dealing with and how they’re bonded to the substrate.
You’ll do a quick surface evaluation to judge paint adhesion and plan effort. Visualize layers, thickness and failure points:
- Thin, single coat flaking in spots.
- Several brittle layers peeling in sheets.
- Thick built-up layers with interlayer delamination.
Safe Paint Removal
When you’re dealing with multiple old paint layers, work methodically and prioritize safety: wear a respirator rated for dust and possible lead, eye protection, and gloves, and contain the work area with plastic sheeting to prevent contamination of landscaping and living spaces.
Use hand scraping, sanding with HEPA vacuums, and eco-friendly methods like heat-free chemical strippers as alternative solutions; test for lead first.
Prep For Recoating
Start by evaluating the condition of the existing layers so you know what you’re working with: note adhesion, blistering, and any soft or powdery areas, and test for lead if the paint predates 1978.
Then strip loose paint, sand to sound edges, and clean surfaces to counter weather effects and restore paint adhesion.
- Flaking chips
- Feathered edges
- Clean, dry substrate
Remove Flaking Paint Around Windows and Doors
Carefully scrape and sand the loose paint around windows and doors to expose a stable surface for repair; you’ll want to work in small sections so debris doesn’t fall into the frame or track.
Use gentle window trim techniques to preserve seals and glass, and apply masking tape.
Follow door frame strategies for tight corners, vacuum debris, wipe clean, and prime before repainting.
Repairing Damaged Wood After Paint Removal
Once you’ve scraped and primed around windows and doors, inspect the exposed wood for rot, splits, or soft spots so you can plan repairs.
After scraping and priming, check exposed wood for rot, splits, or soft spots to plan repairs.
You’ll remove rotten sections, apply wood treatment, and replace or splice pieces. Then use sealing techniques to protect joints before painting.
- Jagged rot removed
- Tight splice fitted
- Smooth sealant bead
Filling Cracks, Holes, and Nail Pops Correctly
Patch the surface methodically so paint will lay flat and last.
You’ll tackle crack sealing first, widening and cleaning gaps, then apply flexible exterior filler.
For hole patching, backer if needed, press compound flush.
Address nail pop repair by removing or countersinking nails, fill, and reseat fasteners.
Finish with careful surface smoothing, sand once cured, and wipe clean before painting.
Choosing Primer for Previously Flaking Areas
Because flaking often signals poor adhesion or moisture issues, you should start with a primer that restores grip and seals the surface.
Because flaking often indicates adhesion or moisture problems, begin with a primer that restores grip and seals the surface.
Choose primer types for substrate: high-build bonding for chalky areas, stain-blocking for tannin or mold, and oil-based for raw wood.
Use proper application techniques—brush into pores, roll evenly, and back-brush or thin coats to guarantee full adhesion.
- High-build bonding
- Stain-blocking
- Oil-based
How To Pick the Right Exterior Paint After Stripping
After you’ve stripped and primed the surface, pick a paint formulated for exterior durability and the substrate you’ll be covering; look for 100% acrylic latex for most siding, elastomeric paints for hairline-cracked stucco, or an exterior oil/enamel where wood or metal needs extra protection.
Choose appropriate paint finish types—flat, satin, semi-gloss—based on wear and maintenance, and prioritize color durability and UV resistance.
Matching Finish and Color to Existing Surfaces
Now that you’ve chosen the right paint type and finish for durability, you’ll want to make sure the new coat actually matches the existing surfaces so repairs don’t stand out.
Use color matching techniques and finish blending strategies to mimic sheen and weathering. Visualize the result:
Use color-matching and finish-blending techniques to recreate sheen and weathering for seamless, inconspicuous repairs.
- Feather edges for seamless flow.
- Match gloss with test patches.
- Blend pigments to age tones.
Proper Drying Time Before Priming and Painting
Before you prime or paint, check the weather and humidity — high moisture or impending rain will lengthen drying time.
Do a surface moisture test (press a piece of plastic film for a few hours) to confirm the substrate is dry.
As a rule, allow at least 24–48 hours in warm, dry conditions and longer in cool or humid weather before priming.
Weather And Humidity
Although good surface prep matters, weather and humidity determine how long you’ll wait to prime and paint; paint needs adequate drying time to adhere and cure properly.
You’ll monitor weather effects and humidity impact before starting.
Picture conditions:
- Warm sun drying a rough clapboard quickly.
- Muggy air slowing tack-free times on stucco.
- Cold nights extending cure times on trim.
Surface Moisture Test
You’ve checked the forecast and waited for warm, dry conditions, but the next step is confirming the wall itself is dry enough to accept primer and paint.
Perform moisture testing with a pin or non‑invasive meter, and record readings across areas.
Do a quick surface assessment for damp spots, efflorescence, or dark patches.
Only proceed when readings fall within acceptable dry limits.
Recommended Drying Durations
Aim for at least 24–72 hours of steady dry weather after any cleaning or repairs, and longer if materials or conditions demand it.
You’ll check drying conditions, use active drying techniques like air movement or dehumidifiers, and wait until surface moisture tests clear.
Visual cues matter: no dampness, cool spots, or peeling.
Picture:
- Sun-baked siding
- Fan-driven airflow
- Moisture-free touch
Cleanup: Collecting Chips and Hazardous Waste
Start by gathering all loose paint chips and dust with care, since exterior flaking can contain lead or other hazardous materials.
Begin by carefully collecting loose paint chips and dust—exterior flaking may contain lead or other hazards.
Wear PPE, wet-wipe surfaces, and use a HEPA vacuum for small debris.
Bag materials securely and label them.
Check local paint disposal methods and hazardous waste guidelines before transport.
Keep children and pets away until the area’s thoroughly cleaned and sealed.
Legally Dispose of Lead‑Contaminated Waste
After collecting and securely bagging paint chips, you need to handle disposal under the law because lead-contaminated waste is regulated to protect public health.
Follow local hazardous waste regulations and approved lead disposal methods; don’t mix with regular trash.
Contact your municipal hazardous waste program for drop-off or contractor pickup.
- Sealed, labeled bags
- Dedicated transport
- Certified disposal facility
Maintain Stripped and Repainted Exteriors
Once your exterior is stripped and repainted, you should schedule regular inspections to catch chips, cracks, or moisture intrusion early.
Reapply protective coatings as needed to preserve the finish and prevent future flaking.
Set a simple preventative maintenance schedule so you know when to inspect, touch up, or recoat.
Regular Surface Inspections
Inspect your exterior at least twice a year and after severe weather so you can catch flaking, cracks, or moisture damage early; regular checks let you spot small problems before they widen and force a full repaint.
You’ll use regular inspections to schedule paint maintenance and quick touch-ups, extending life and preventing larger repairs.
- Peeling corners
- Soft wood
- Hairline cracks
Protective Coating Reapplication
When you’ve stripped and repainted exterior surfaces, reapplying a protective coating is the next essential step to lock in durability and weather resistance. This layer shields fresh paint from UV, moisture, and abrasion so your work lasts.
Choose protective coating types suited to substrate and climate, and follow recommended application techniques—clean, prime where needed, apply evenly, and allow proper cure times to guarantee lasting protection.
Preventative Maintenance Schedule
A simple, regular maintenance schedule will keep stripped and repainted exteriors looking and performing their best.
You’ll use preventative tips and set maintenance frequency to avoid flaking, spot prime, and recoat as needed. Inspect annually, touch up every 3–5 years, and clean seasonally to prolong life.
- Check for bubbling and cracks.
- Spot-sand and prime.
- Rinse and remove debris.
Seasonal Maintenance To Prevent Future Flaking
Because paint failures often start slowly, keeping up with seasonal maintenance prevents small problems from turning into widespread flaking.
You should schedule seasonal checkups each spring and fall to inspect caulking, trim, and siding.
Promptly address moisture, mildew, and loose paint, and touch up exposed areas.
Regular cleaning and timely minor repairs support long-term paint preservation and reduce costly repaints.
Common Mistakes That Cause Paint To Flake Again
Keeping up with seasonal checks helps, but some common missteps will still make paint fail again. You’ll know it’s coming when you notice blisters, peeling, or mildew.
Fix the root causes:
- Skipping cleaning or sanding (poor surface preparation).
- Painting damp or in extreme temperatures.
- Using an inappropriate paint choice for exterior conditions.
When To Call a Professional Paint Remediation Crew
If you spot visible structural damage like cracking or rot, you should call a professional crew so the underlying issues get fixed before repainting.
If your home was built before 1978 and you suspect lead paint, don’t try to handle removal yourself—get a certified remediation team.
And when flaking affects large areas or the surface keeps failing after fixes, professionals have the tools and experience to restore it safely.
Visible Structural Damage
When you spot crumbling mortar, deep cracks, rotten wood, or bulging siding beneath flaking paint, don’t treat it as a simple cosmetic job—you need a professional paint remediation crew.
You should act fast: bad weather conditions and compromised structural integrity can worsen damage.
Imagine the hazards:
- Gaping foundation crack widening after rain.
- Sagging eave with decayed joist.
- Buckled siding pulling away.
Lead Paint Risk
Lead paint poses a serious health hazard, especially for young children and pregnant people, so call a professional remediation crew if your home was built before 1978 or you see deteriorating, chipping paint. You should hire pros when testing confirms lead exposure risk, the area’s large, or local safety regulations require containment.
| Indicator | Action | Urgency |
|---|---|---|
| Positive test | Hire crew | High |
| Chipping paint | Contain area | Medium |
| Renovation planned | Notify pros | High |
Extensive Surface Failure
After evaluating lead risks, you should call a professional paint remediation crew any time large areas of your exterior show widespread failure—peeling, blistering, or bare wood across multiple siding panels or more than a single wall.
Professionals assess flaking causes, contain hazards, and restore surfaces using proven prevention methods.
- Peeling across several walls.
- Blistered, soft siding.
- Exposed, rotten wood.
Cost Estimates and Budgeting for Paint Removal
Budgeting for paint removal starts with a clear estimate of scope: measure the affected area, note surface type and damage level, and decide whether you’ll hire pros or tackle it yourself. Use a cost breakdown and budgeting tips to list labor, materials, and unexpected repairs.
| Labor | Materials | Contingency |
|---|---|---|
| Estimate hours | Paint, tools | 10–20% buffer |
| Pro vs DIY | Rentals | Emergency fund |
Time‑Saving Tips for Large Exterior Jobs
When you’re tackling a large exterior paint‑removal job, plan your workflow around high‑yield tasks and equipment so you cut downtime and move steadily from one area to the next.
Use efficient techniques and strict time management:
- Stagger crews for prep, stripping, cleanup.
- Use power tools where safe to speed peeling.
- Prep materials and waste zones ahead.
Checklist To Review Before You Start Stripping
Before you strip a single square foot, run through a concise checklist so you won’t stall mid‑job: confirm permits, weather window, and access equipment.
Inspect for lead or mold, test paint adhesion, and plan containment.
Inspect for lead or mold, check paint adhesion, and set up containment before you start stripping.
Gather safety gear, compatible scrapers, and appropriate primers.
Verify surface preparation steps, disposal arrangements, and a clear schedule so you can work efficiently and safely.
Troubleshooting Stubborn Flaking Spots
Start by isolating each stubborn flaking spot so you can assess root causes—poor adhesion, trapped moisture, or incompatible previous coatings—and choose the right repair method.
You’ll test substrate, dry areas, and scrape to reveal depth.
Consider flaking causes, then pick treatment options:
- Sand to sound surface.
- Prime with compatible sealer.
- Replace rotten material and repaint.
Frequently Asked Questions
Can I Paint Over Flaking Areas With Flexible Exterior Paint Instead of Stripping?
You can, but you shouldn’t just paint over flaking areas; you’ll need thorough surface preparation to restore paint adhesion. Scrape loose paint, sand, clean, prime, then apply flexible exterior paint for a durable, bonded finish.
How Do I Prevent Paint Flakes From Staining Concrete or Driveways?
You’ll cover nearby concrete and driveways with heavy plastic sheeting or drop cloths, secure edges, and sweep flakes frequently; rinse gently with a hose to avoid concrete stains, and dispose of paint chips properly.
Are There Insurance Implications for DIY Lead Paint Removal?
A stitch in time saves nine: you should check your policy because DIY lead paint removal can void insurance coverage, and you’ll likely need special endorsements or professional certification to keep claims valid and avoid denied coverage.
Can Birds or Pests Be Harmed by Chemical Strippers Nearby?
Yes — chemical strippers can harm birds or pests if you don’t use them carefully. You’ll follow chemical safety guidelines, contain runoff, and protect wildlife protection zones so nearby animals aren’t exposed or poisoned by residues.
What Warranty Issues Arise After DIY Removal and Repainting?
“Measure twice, cut once.” You’ll void warranty coverage if DIY prep or materials don’t meet manufacturer specs; you’ll need proof of proper practice, since poor paint adhesion from incorrect methods can nullify guarantees and prompt denied claims.
Conclusion
You’ll want to walk the perimeter like a gardener inspecting dying leaves, spotting every loose curl of paint before you start. Tackle flaking in small stretches, use the right safety gear, and follow lead‑testing rules so you don’t stir up hidden hazards. With patience and proper tools, the wall will shed its flaky skin and reveal a smooth canvas ready for a fresh coat—bringing your exterior back to life, tidy and protected.