Can You Paint Over Cigarette Smoke Walls? Preparation Steps
Yes — you can paint over cigarette-smoked walls, but you’ll need to prep properly. Start by evaluating stains and odor, then dust and vacuum. Clean with a heavy-duty degreaser or trisodium phosphate, rinse, and let dry. Sand glossy spots and spot-prime stubborn areas. Apply a stain-blocking primer (shellac or oil-based for severe stains), then a low-VOC topcoat in thin, even layers. Follow drying times and use ventilation, and keep going to learn more tips and troubleshooting.
Can You Paint Over Cigarette-Smoked Walls?
Wondering if you can paint over cigarette-smoked walls? You can, but smoke damage often stains and odors linger, so you’ll need proper painting techniques.
You’ll assess severity, clean surfaces, and seal stubborn stains with a stain-blocking primer before topcoats. If you follow steps methodically, paint will adhere and hide discoloration, reducing odor and restoring a fresh appearance efficiently.
Quick Prep Checklist Before You Start
Before you open a can of paint, run through a quick prep checklist to save time and prevent problems: inspect walls for stains, peeling, or odor; test cleaning methods on a small area; wipe surfaces with appropriate cleaners; sand and spot-prime nicotine-stained areas; repair cracks and holes; cover trim and floors; guarantee ventilation and protective gear.
Start wall preparation only after surfaces are dry.
When to Paint vs. When to Remove or Replace
If the smoke damage is mostly surface stains and odor you’ve already treated, you can usually paint after thorough cleaning and spot-priming; but if you still smell nicotine, see heavy yellowing, or find peeling, warped drywall, it’s time to contemplate removing or replacing those sections instead.
You’ll choose between targeted painting, removal methods for contaminated areas, or full replacement options when odor, damage, or health risk persist.
How Cigarette Smoke Harms Paint, Drywall, and Trim
When deciding whether to paint or replace, you also need to understand how cigarette smoke attacks building materials so you can pick the right remedy.
Smoke residue discolors paint, weakens trim finishes, and soaks into drywall, causing persistent odor absorption that simple repainting won’t fix.
- Paint: surface staining and yellowing.
- Trim: varnish breakdown and tackiness.
- Drywall: porosity increases odor absorption.
Assessing Smoke Stain and Odor Severity
Because smoke damage varies by duration, intensity, and room ventilation, you should start by visually inspecting surfaces and smelling for lingering odors to gauge severity. Note discoloration, tackiness, and fabric absorption. Decide if deep cleaning, sealant, or repainting is needed for effective odor removal.
| Area | Signs | Action |
|---|---|---|
| Walls | Yellowing | Clean/prime |
| Ceilings | Streaks | Prime |
| Fabrics | Smell | Shampoo |
Safety Gear and Ventilating a Smoke-Damaged Room
Before you start cleaning or painting, you’ll want to protect yourself with proper personal protective equipment like a respirator, gloves, and eye protection.
Open windows, use fans to create cross-ventilation, and consider an air purifier to clear lingering smoke particles.
Monitor air quality with a simple particle counter or CO/TVOC detector so you know when it’s safe to work and reoccupy the room.
Personal Protective Equipment
Start by gearing up with proper personal protective equipment—gloves, goggles, an N95 or higher respirator, and disposable coveralls—to limit your exposure to tar, nicotine residue, and airborne particles while you work.
Follow safety protocols and use protective gear consistently.
- Inspect PPE for damage before starting.
- Replace respirator filters per manufacturer guidance.
- Dispose coveralls and gloves safely.
Effective Room Ventilation
When you’re preparing to clean smoke-damaged rooms, pair your PPE with strong ventilation to keep airborne contaminants down and fresh air moving through the space.
Open windows and doors, use box fans to exhaust air outward, and run HEPA-filtered air purifiers.
Choose ventilation methods that promote steady air circulation, reducing odor and particulate buildup while you clean and paint.
Air Quality Monitoring
Good ventilation and PPE will lower your exposure, but you’ll also want to measure what’s in the air to know when it’s safe to keep working or to re-enter a room.
Use portable monitors for air quality and smoke detection, record readings, and follow thresholds.
- Calibrate monitors before use.
- Log ppm and particle counts.
- Stop work if limits exceed safe levels.
Best Cleaners for Nicotine and Tar Stains
You’ll want a heavy-duty degreaser to break down nicotine and tar before you paint, since ordinary cleaners usually won’t cut it.
After cleaning, you’ll need a stain-blocking primer to seal any remaining residues and prevent bleed-through.
Use products labeled for smoke or nicotine stains and follow the manufacturer’s instructions for best results.
Heavy-Duty Degreasers
1 powerful heavy-duty degreaser can make the difference between staining and a clean repaint: these cleaners cut through nicotine and tar where ordinary soaps fail.
You’ll notice degreaser effectiveness during surface preparation—walls rinse clean, odors reduce, and paint adheres better. Choose strengths and safety gear wisely.
- Citrus-based for mild jobs
- Alkaline for heavy buildup
- Professional-grade for persistent tar
Stain-Blocking Primers
When nicotine and tar have stained your walls, a quality stain-blocking primer is the single most important step before repainting. It seals stains, prevents bleed-through, and gives new paint a uniform surface to adhere to.
You’ll evaluate stain types, choose primer options like oil-based shellac or water-based shellac alternatives, apply evenly, and allow full cure so new paint won’t lift or discolor.
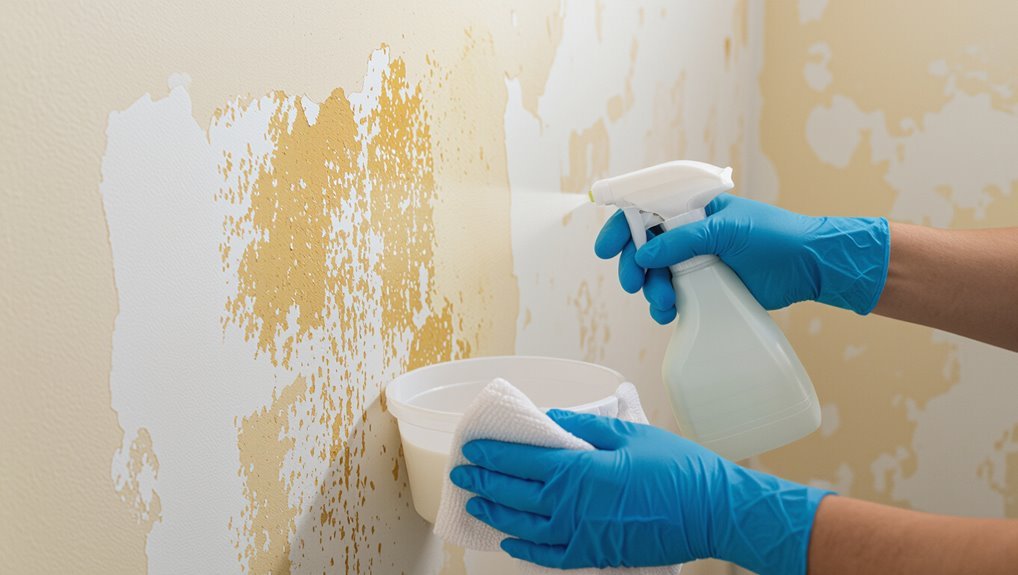
Step-by-Step Cleaning for Smoke-Stained Walls
Before you grab a brush, clear the room and ventilate it so you’re not breathing lingering smoke or cleaning fumes; open windows, run fans, and remove furniture and wall hangings.
Clear the room and ventilate—open windows, run fans, and remove furniture and wall hangings before you paint.
Use gentle cleaning techniques for initial wash and rinse to aid wall preparation.
Then:
- Dust and vacuum surfaces.
- Wash with mild detergent, rinse.
- Dry and inspect before priming.
Tackling Stubborn Stains: Degreasers and TSP Alternatives
If your initial wash didn’t remove all the yellowing and nicotine residue, you’ll need stronger cleaners to break down the remaining grime; degreasers and TSP alternatives are designed for that job without wrecking paint or drywall when used correctly.
Test a small area, follow dilution guidelines, and wear gloves.
Check degreaser effectiveness on stubborn patches, rinse thoroughly, and repeat only as needed to avoid over-saturating drywall.
Fixing Surface Damage: Sanding, Patching, and Drywall Paper Tips
Once you’ve neutralized the smoke’s oils, assess the wall for gouges, blistered paint, and paper tears so you can prioritize repairs and avoid trapping stains under new paint.
Use proper sanding techniques to feather edges, choose patching methods for holes, and replace torn drywall paper when needed.
- Sand edges smoothly.
- Apply patching compound.
- Sand and finish for paint.
When to Seal Stains and How to Choose a Primer
After you’ve sanded and patched the damaged areas, decide which stains need sealing so they don’t bleed through the new finish. You’ll assess nicotine, water marks, and odors, then pick a primer. Focus on stain sealing and primer selection based on adhesion and stain-blocking power.
| Stain Type | Seal? | Primer Tip |
|---|---|---|
| Nicotine | Yes | High-blocking |
| Water | Yes | Adhesion-focused |
| Smoke odor | Yes | Odor-locking |
Oil vs. Shellac vs. Water-Based Stain Blockers (Pros & Cons)
When you’re choosing a stain-blocking primer for nicotine and smoke, weigh oil-based, shellac, and water-based options by their blocking power, drying time, cleanup, and odor control.
You’ll consider oil advantages, shellac drawbacks, and water based effectiveness alongside recommended application methods.
- Oil: strong block, longer cure, solvent cleanup.
- Shellac: best seal, high odor, tricky recoat.
- Water-based: low odor, easier cleanup, slightly less block.
Priming Techniques for Adhesion and Odor Control
Having picked the right stain-blocking primer, you’ll need to focus on priming techniques that lock adhesion and trap lingering smoke odors. Apply thin, even coats, sand between coats, and allow full flash times. Prioritize primer selection for odor sealing and adhesion to nicotine-stained surfaces.
| Step | Action |
|---|---|
| 1 | Clean walls |
| 2 | Apply primer |
| 3 | Sand lightly |
| 4 | Recoat if needed |
Choosing Topcoat Paint and Finishes for Smoke Rooms
Because the topcoat is your last line of defense, pick paints and finishes that balance stain resistance, odor blocking, and cleanability.
Because the topcoat is your last defense, choose low-VOC, odor-blocking finishes that balance stain resistance and cleanability.
Choose topcoat options with low-VOC odor-blocking formulas and high finish durability.
Consider:
- Semi-gloss for scrubability and stain resistance.
- Satin for moderate durability with subtler sheen.
- Eggshell for lower sheen but limited cleanability.
Painting Tips to Prevent Bleed-Through and Uneven Coverage
If smoke stains have soaked into the drywall or trim, you’ll need to block those stains and seal the surface before you roll or brush—otherwise nicotine and tar can bleed through fresh paint and ruin an otherwise good job.
When you paint, use a stain-blocking primer, apply thin even coats, and sand lightly between layers. Proper surface preparation guarantees consistent paint application and prevents patchy sheen.
Drying, Recoat Timing, and When Odors Will Fade
When you finish priming and painting over cigarette-stained surfaces, allow each coat to dry fully before recoating—typically 2–4 hours for latex and 6–8 hours for oil-based products at room temperature—so solvents evaporate and the barrier can work.
You’ll speed curing with proper drying techniques and follow recoat intervals to lock in odor control.
- Increase ventilation.
- Use fans/dehumidifiers.
- Wait recommended times.
Common Problems After Painting and Cost/Time or Pro Help
After painting, you might still see stain bleed-through or notice lingering smoke odor even after several coats.
If stains persist or the smell won’t go away, expect extra sealing, cleaning, or repainting that adds time and cost.
Consider hiring pros when problems keep coming back or you want faster, guaranteed results.
Paint Stain Bleed-Through
Although you might think a fresh coat will hide everything, nicotine and tar can bleed through ordinary paint and leave yellowish stains that ruin the finish.
You’ll confront different stain types and possible adhesion issues; block them with proper primers or pro help.
Consider:
- Shellac primer for severe stains.
- Oil-based primer for moderate bleed-through.
- High-quality stain-blocking latex for light cases.
Lingering Odor Problems
Stain-blocking primers will stop visible discoloration, but they won’t always eliminate the stubborn smoke smell that lingers in walls, trim, and porous surfaces. You’ll need proven odor removal techniques: clean, seal, ventilate, and repeat. Consider ozone or activated charcoal for persistent cases and prioritize smoke odor prevention before painting.
| Step | Method | Result |
|---|---|---|
| 1 | Cleaning | Less residue |
| 2 | Sealing | Locked odor |
| 3 | Ventilation | Faster drying |
| 4 | Adsorbents | Reduced smell |
When To Hire Pros
If you’re dealing with persistent smoke odor, visible bleeding through new paint, or extensive nicotine-stained surfaces, call a pro—these problems often need specialized cleaning, sealing, or odor-removal equipment you probably don’t own.
You should hire pros when the job risks damage, impacts health, or exceeds DIY skills. Consider cost considerations and project timeline.
- Severe staining
- Lingering odor
- Large-scale prep
Frequently Asked Questions
Can Smoke Residue Affect HVAC Ducts and Vents in the House?
Yes — smoke residue can contaminate ducts and vents, spreading odor and particles throughout your home. You’ll need professional duct cleaning and filter replacement to remove buildup, protect HVAC efficiency, and improve indoor air quality.
Will Painted Smoke-Damaged Walls Impact Indoor Air Quality Long-Term?
Yes — if you just repaint, the stain’s shadow lingers like smoke drifting, and you’ll face long term effects as off-gassing and trapped residue can degrade air quality unless you seal, clean, and replace contaminated materials.
Can Wallpaper Over Smoke-Stained Walls Be a Good Alternative?
Yes — you can wallpaper over smoke-stained walls, but you’ll need proper wallpaper types and priming to avoid adhesion concerns; you’ll seal stains first, choose nonporous or vinyl-backed papers, and test adhesion before finishing.
Are Odor-Eliminating Gels or Ozone Machines Safe Indoors?
You shouldn’t run ozone machines around people or pets; they can harm lungs. Odor-eliminating gels are safer but limited. For effective odor removal methods, use proven indoor air purification like HEPA filters and ventilation instead.
How Long Before Furniture Can Return to a Freshly Painted Smoked Room?
Like waiting for a cake to cool, you’ll usually wait 24–48 hours before furniture placement; full drying time and paint cure can take up to 7–30 days, so avoid heavy use until odors and tackiness disappear.
Conclusion
You can paint over cigarette-stained walls, but you’ll want to prep, prime, and seal so stains and smells don’t sneak back. Coincidentally, the same stubborn yellow that marred your favorite wall will also teach you patience: sanding, cleaning, and a shellac or oil-based primer usually do the trick. If odors persist, you might need drywall replacement or pro help. Take your time—sometimes the fresh paint you crave starts as a small, careful chore.