What Type of Paint Is Best for a Popcorn Ceiling?
You should use a high-quality flat or matte acrylic latex paint, primed first with a stain-blocking or bonding primer to guarantee adhesion and hide imperfections. Thick, low-VOC latex gives good coverage without adding shine that highlights texture, and spray or a thick-nap roller helps reach crevices. Avoid high-sheen finishes and heavy coats that can weigh down popcorn. Follow prep and safety steps, especially for older ceilings, and keep going to learn detailed prep and application tips.
Quick Answer Best Paints for Popcorn Ceilings
You’ll want a flat or matte acrylic paint for the best coverage and to hide texture on popcorn ceilings.
Top choices include Benjamin Moore Waterborne Ceiling Paint, Sherwin-Williams Eminence Interior Ceiling Paint, and Valspar Ultra Interior Ceiling Paint.
Below I’ll explain why each works and how to apply them.
One-sentence recommendation
If you want the easiest, longest-lasting option, go with a high-quality flat or matte latex paint formulated for textured ceilings—paired with a stain-blocking primer—to hide imperfections and minimize shine.
For what type of paint for popcorn ceiling, choose a durable, low-VOC latex labeled for ceilings; it’s easy to roll without splattering, resists staining, and keeps texture looking uniform while simplifying touch-ups and future repainting.
Short list of top choices
Here’s a quick shortlist of top paints that work best on popcorn ceilings—each combines a matte finish, good coverage, and easy rolling to keep texture looking uniform:
- Benjamin Moore Regal Select (flat)
- Sherwin-Williams SuperPaint (flat)
- Behr Premium Plus (flat)
- Zinsser Interior/Exterior (flat)
Choose one with good hide and use a thick-nap roller; you’ll get even coverage without clumping.
Understanding Popcorn Ceilings
You’re looking at a textured ceiling that was sprayed or troweled on to hide imperfections and reduce echo.
That texture changes how paint sticks and which finish will hide shadows or drip less, so your choice matters.
Also know older popcorn mixtures sometimes contain asbestos or lead, so you’ll want to test before sanding or painting.
What is a popcorn ceiling?
A popcorn ceiling is a textured drywall finish that creates a bumpy, cottage-cheese–like surface across a room’s overhead plane.
You’ll find it on mid-20th-century homes, sprayed or troweled onto ceilings to hide imperfections and dampen sound.
Materials range from gypsum and vermiculite to cellulose.
It can be painted, repaired, or removed, but you’ll want to assess condition before altering it.
Why ceiling texture affects paint choice
Having identified what popcorn ceilings are and how they’re made, it’s important to understand how that bumpy texture changes your paint choices.
You’ll need paint with good coverage to fill shadows and hide irregularities, plus thicker, high-quality flat or matte formulas to minimize sheen.
Also choose tools—sprayers or thick-nap rollers—that reach crevices without knocking off texture.
Common materials and potential hazards (asbestos, lead)
Because popcorn ceilings were made from a mix of materials over many decades, you should assume older textured ceilings might contain hazardous ingredients like asbestos or lead unless testing proves otherwise.
You should:
- Test before disturbing the surface.
- Hire licensed abatement if positive.
- Avoid sanding or scraping yourself.
- Seal or encapsulate only after professional advice to reduce airborne risks.
How Paint Properties Affect Popcorn Ceilings
You’ll want paint that bonds well to the rough, uneven surface so flakes don’t fall later.
Consider sheen carefully — higher sheens highlight texture while flat finishes hide it — and pick a formula with good stain resistance for easier cleaning.
Also check breathability and moisture resistance to prevent peeling or mold in humid rooms.
Adhesion and bonding requirements
When you repaint a popcorn ceiling, the paint’s ability to stick to rough, flaky texture matters more than color or sheen; poor adhesion leads to peeling, flaking, and trapped moisture that can damage the clusters.
You should clean, prime with a bonding primer, choose flexible acrylic or latex formulas, and apply thin, even coats so the paint bonds without weighing down or hiding the textured peaks.
Sheen and light reflection impacts on texture
Light plays off a popcorn ceiling’s peaks and valleys, so sheen matters: higher-sheen paints reflect more light and make texture pop, while flatter finishes absorb light and mask imperfections.
You’ll choose sheen based on visibility goals: use flat or matte to minimize shadows and unevenness, eggshell for subtle definition, or satin for easier cleaning while still accentuating texture slightly.
Durability and stain resistance
Because popcorn ceilings trap dust and are prone to stains from cooking, smoking, or water, you’ll want paint that’s tough and washable so maintenance’s not a nightmare.
Choose high-quality acrylic latex or stain-blocking primers with a durable topcoat; they resist scuffs, yellowing, and common stains.
Look for mildew-resistant formulas and easy-clean finishes so you can spot-clean without damaging texture.
Breathability and moisture considerations
If your home holds moisture—whether from humidity, showers, or cooking—paint choices can make the difference between a healthy ceiling and peeling, moldy texture.
You should pick breathable, mildew-resistant paints that let vapor escape while blocking stains. Avoid high-gloss, nonporous coatings that trap moisture.
Use mold-inhibiting additives and guarantee proper ventilation; combined, they preserve texture and prevent deterioration.
Recommended Paint Types (Primary Options)
You’ll want to compare the main paint types so you can pick what fits your ceiling’s texture and stains. Below is a quick visual that contrasts common options and their key traits to guide your choice. Next, I’ll explain when to use each type and how application method affects finish and longevity.
| Paint Type | Key Traits |
|---|---|
| Flat/Matte Acrylic Latex | Good hide and low sheen; can show stains and scuffing |
| Eggshell/Low-Sheen Latex | Slight durability boost; use where light contact or cleaning may occur |
| Stain-Blocking/Primer-Paint Combos | Blocks stains and seals surface; saves a step but check coverage |
| Specialized Ceiling or Spray Paints | Formulated for uniform ceiling finish; spray gives even texture, rollers can be gentler on popcorn |
Flat/Matte Acrylic Latex pros and cons
Flat or matte acrylic latex is a go-to choice for many homeowners because it hides the irregularities and shadows of popcorn ceilings without adding shine.
You’ll appreciate its easy touch-ups, low sheen that minimizes texture, and good stain resistance.
Downsides: it can be harder to clean than glossier paints and may show scuffs or require recoat sooner in high-traffic or moisture-prone areas.
Eggshell and Low-sheen Latex when to use
After considering flat/matte options, eggshell and low-sheen latex offer a middle ground when you want more durability and washability without a glossy look.
Use them in higher-traffic rooms or where occasional cleaning is likely—hallways, living rooms, and bedrooms. They hide minor texture while resisting scuffs better than flat paints.
Apply lightly to avoid pooling on popcorn texture.
Stain-blocking/Primer-paint combos benefits
When stains, smoke, or water damage threaten your popcorn ceiling, stain-blocking primer-paint combos give you a fast, reliable fix: they seal tannins and marks while laying down a paint finish in one step, cutting labor and preventing bleed-through that would show up later.
You’ll save time, reduce coats, and get consistent coverage; choose oil- or shellac-based formulas for toughest stains.
Specialized ceiling paints features
Sealing stains is only part of the job; choosing a paint formulated for ceilings makes the rest easier.
Pick a low-sheen, high-hide flat or matte that minimizes glare and hides texture. Look for thicker-bodied formulas that resist spatter, offer good coverage in one coat, and contain mildew inhibitors for humid rooms.
Confirm compatibility with your primer and follow application instructions.
Spray-applied paints vs. roller-applied paints
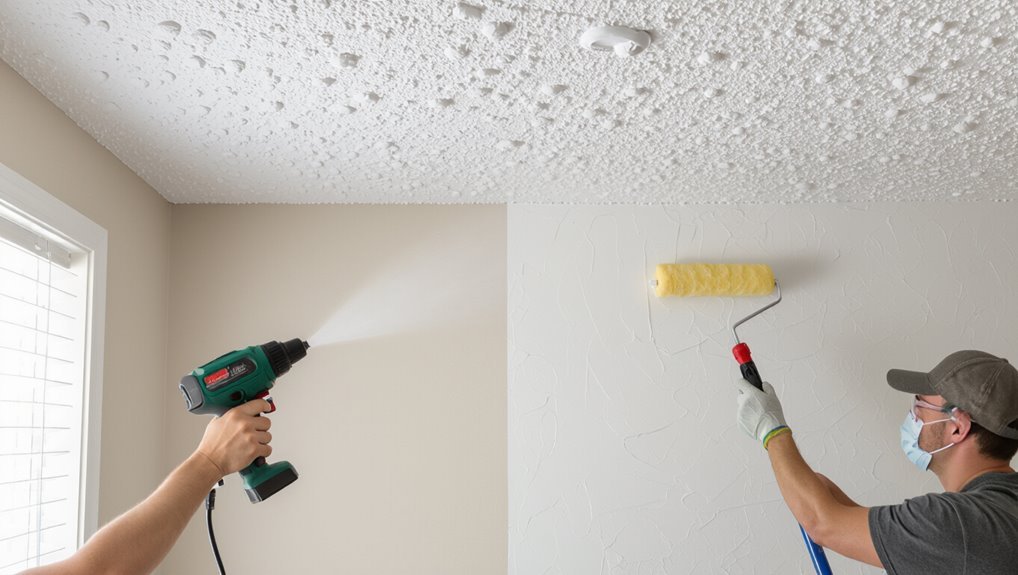
If you want the fastest, most even coverage on popcorn ceilings, go with a spray—while rollers give you more control and less prep.
You’ll get uniform texture concealment with a hopper gun or airless sprayer but need masking and ventilation.
Rollers (thick-nap) work for touch-ups or small rooms, reduce overspray, and require less equipment cleanup.
Choose by room size and tolerance for prep.
Step-by-Step Guide to Painting a Popcorn Ceiling
Before you start, inspect the ceiling for damage, take safety precautions, and cover floors and furniture.
Prime any bare or repaired areas with a suitable stain-blocking primer, then choose your application method—roller, sprayer, or brush—and follow a clear step 1, step 2, step 3 sequence.
Allow proper drying time before a second coat, then clean up and dispose of materials responsibly.
Preparation steps inspection, safety, covering
When you’re getting ready to paint a popcorn ceiling, start with a careful inspection to spot damaged areas, loose texture, or signs of moisture and mold so you know what needs repair or remediation.
Then follow safety and covering steps before you paint.
- Wear goggles, mask, and gloves.
- Test for asbestos if pre-1980.
- Repair loose texture gently.
- Cover floors, furniture, and vents tightly.
Priming: when and which primers to use
Priming a popcorn ceiling is the step that guarantees paint adheres evenly, hides stains, and seals any repaired or porous areas so your finish looks uniform.
You should prime when repairs, stains, or bare texture exist. Use a high-quality stain-blocking acrylic primer for water or smoke marks, and a bonding primer on glossy or chalky surfaces.
Let primer fully dry before painting.
Application methods: roller, sprayer, brush step 1, step 2, step 3
Choose the application method that fits your ceiling condition, tool access, and comfort level—roller for control, sprayer for speed, and brush for touch-ups and edges.
Step 1: protect floors and mask walls.
Step 2: use a thick-nap roller or adjustable sprayer, keeping even passes and light pressure to avoid dislodging texture.
Step 3: finish edges with a soft-bristle brush, blending into rolled areas.
Drying times and second coat guidance
Although drying times can vary with humidity and temperature, you should expect most latex paints on popcorn ceilings to be touch-dry in 1–2 hours and ready for a second coat in 4–6 hours under normal conditions.
Check adhesion by lightly touching an inconspicuous spot. If paint lifts or feels tacky, wait longer.
Apply the second coat evenly, keeping nap direction consistent for uniform texture.
Clean-up and disposal best practices
Once your second coat has cured and you’ve confirmed there’s no tackiness, it’s time to clean up and dispose of materials safely.
Remove drop cloths by folding inward to trap debris, bag used rollers, brushes, and masking tape.
Wipe reusable tools with appropriate solvent, dry thoroughly, and store.
Label and seal leftover paint; take hazardous waste to a local disposal facility—never pour it down drains.
Comparison: Paint Choices vs. Ceiling Outcomes
You’ll want to weigh how each paint affects appearance, longevity, and cost so you get the ceiling result you expect. Below is a quick comparison to help you match paint types to the outcomes you care about:
| Paint Choice | Typical Outcome |
|---|---|
| Flat Latex | Good coverage, hides minor texture but shows stains |
| Eggshell/Satin | Slight sheen, texture more visible, easier to wipe |
| Acrylic/Elastomeric | Durable, resists cracking, higher cost |
| Professional Spray Coat | Smoothest look, best coverage for crevices, labor-intensive |
Appearance (coverage, texture visibility)
When you’re choosing paint for a popcorn ceiling, think about how each formula affects coverage and how much of the texture will show through.
Flat and matte paints hide imperfections and minimize sheen, offering even coverage over bumps.
Eggshell or satin reflect light, making texture more noticeable.
Thicker paint or a primer-sealer reduces translucency and gives a more uniform appearance across uneven surfaces.
Longevity and maintenance
Although popcorn ceilings can hide flaws, the paint you pick determines how long that disguise lasts and how much upkeep you’ll face; durable, breathable coatings and proper priming cut down on peeling, staining, and frequent touch-ups.
You should choose mildew-resistant, washable finishes and avoid heavy gloss that highlights texture. Regular gentle cleaning and prompt spot-priming extend finish life and preserve appearance.
Cost and labor differences
If you want to balance budget and results, pick your paint and prep carefully: premium acrylics and mildew-resistant primers raise upfront costs but cut labor by reducing re-coats and repairs.
Cheaper paints may seem like a savings until textured areas need repeat work or spot touch-ups. You’ll spend more time scraping, masking, and patching with low-cost options; durable products speed the job and lower long-term labor.
Common Mistakes and How to Avoid Them
Don’t use high-sheen paints that’ll call attention to every bump and repair on a popcorn ceiling.
Always prime properly — skipping or using the wrong primer can cause poor adhesion and blotchy coverage.
And take safety seriously with older ceilings: avoid overworking the texture, and test for asbestos before you touch or disturb it.
Using high-sheen paints that highlight imperfections
When you pick a high-sheen paint for a popcorn ceiling, it’ll make every bump, seam, and uneven texture jump out instead of hiding flaws.
You should choose a flat or low-sheen ceiling paint so light won’t emphasize imperfections. High gloss highlights shadows and irregularities, forcing you to repair or retexture.
Save gloss for trim; keep ceilings matte for a cleaner, forgiving finish.
Skipping primer or improper priming
Because popcorn ceilings are porous and uneven, skipping primer or applying it poorly usually leads to poor adhesion, blotchy coverage, and visible stains bleeding through the topcoat.
You should always use a stain-blocking, high-adhesion primer formulated for textured surfaces.
Apply evenly with a roller or sprayer, let it fully dry, and spot-prime any repairs so your finish coat covers uniformly and lasts longer.
Overworking the texture and flattening popcorn
Although you’ll be tempted to smooth out every rough spot, overworking the texture can crush and flatten the popcorn, leaving patchy, glossy areas that ruin the desired look.
Work quickly and lightly with a full-nap roller or gentle spray. Apply thin, even coats and resist multiple passes.
If touch-ups are needed, feather edges carefully rather than scrubbing the texture.
Ignoring safety for old ceilings (asbestos risk)
If your ceiling was installed before the late 1970s, don’t assume it’s safe to sand, scrape, or disturb the popcorn—you could release asbestos fibers that put you and your family at serious risk.
Always test by a certified lab before painting. If asbestos is present, hire licensed abatement professionals or encapsulate without disturbing the texture.
Don’t DIY risky removal—protect health, not just aesthetics.
Tips and Best Practices
When choosing paint for a popcorn ceiling, you’ll pick a finish based on the room—moisture-resistant satin for bathrooms and kitchens, flat or matte for living areas.
Use the right tools: thick-nap rollers for texture, and consider brush types for edges to avoid knockdown.
Decide whether to repaint, retexture, remove, or hire a pro by weighing ceiling condition, budget, and your comfort with messy, delicate work.
Selecting the right finish for room type (bathroom, kitchen, living room)
Which paint finish should you pick for each room depends on how much moisture, grease, or wear the ceiling will face.
For bathrooms, use a mildew-resistant satin or semi-gloss for easy cleaning.
In kitchens, choose semi-gloss to handle grease splatter.
For living rooms and bedrooms, opt for flat or eggshell to hide texture and imperfections while keeping a soft, low-sheen look.
Choosing tools and nap length for rollers
1 key choice for painting popcorn ceilings is the roller nap: pick a long-nap roller (3/4″–1″) to reach into the texture, pair it with a sturdy extension pole, and use a brush only for cut-ins and edges.
Use a high-quality roller frame, keep extra covers handy, load rollers evenly to avoid drips, and work in overlapping passes for consistent coverage.
When to repaint vs. retexture or remove
If your popcorn ceiling shows only minor discoloration or a few stains, you can usually refresh it with a new coat of paint.
But if you’re dealing with widespread damage, sagging, heavy texture loss, or suspected asbestos, consider retexturing or removal instead.
Patch small spots, fix leaks, and clean before painting.
Choose retexturing for uniform appearance; remove only when safety and long-term value justify it.
Hiring a pro vs. DIY decision checklist
Deciding whether to hire a pro or tackle your popcorn ceiling yourself comes down to scope, skill, and risk: assess the ceiling’s condition, how comfortable you’re on ladders and with textured surfaces, the tools and time you’ll need, and any safety concerns like asbestos or extensive water damage that demand licensed help.
- Inspect
- Estimate time/cost
- Check safety/asbestos
- Choose pro if unsure
Cost Estimates and Timeframe
Expect to pay anywhere from budget latex to higher-end acoustic or stain-blocking paints, and plan material costs accordingly so you can choose the right product for your ceiling.
You’ll need several hours to a day for prep depending on repairs and protection, a few hours to paint with a roller or sprayer, and 24–48 hours for full drying before rehanging fixtures or cleaning.
I’ll break down typical price ranges and a realistic timeline so you can budget time and money.
Typical material costs by paint type
When budgeting for painting a popcorn ceiling, you’ll want to know how paint type affects both price and labor time; flat or matte ceiling paints and low-VOC acrylics cost less per gallon but may need extra coats, while specialty products like stain-blocking primers, texture-specific paints, or sprayable ceiling paints raise material costs but can cut application time.
| Paint Type | Typical Cost |
|---|---|
| Flat/matte | $20–$40/gal |
| Specialty/primer | $30–$70/gal |
Time needed for prep, painting, drying
Knowing paint type helps set material costs, but you also need to plan the hours for prep, painting, and drying to get an accurate budget and timeline.
You’ll spend 1–3 hours masking and protecting furniture, 2–4 hours priming or touching textured areas, and 2–6 hours applying paint (may need two coats).
Allow 4–24 hours drying between coats and 24–48 hours before normal use.
FAQs
You probably have a few quick questions about painting popcorn ceilings, and this FAQ will answer the most common ones.
You’ll learn whether you can tackle the job yourself, if paint will change the texture, which sheen hides flaws best, and how to handle stains or water damage.
It’ll also explain when a primer is necessary so you can finish with a durable, even result.
Can I paint a popcorn ceiling myself?
Curious if you can tackle a popcorn ceiling yourself? Yes — with prep, patience, and the right tools.
Protect floors and furniture, wear a mask and goggles, and test for asbestos before disturbing older texture.
Use a roller with a thick nap and flat or eggshell ceiling paint. Work in small sections, keep edges feathered, and clean up carefully afterward.
Will paint ruin the popcorn texture?
After prepping and testing for asbestos, you’ll want to know whether painting will change the look or integrity of the popcorn texture.
If you use a quality, lightweight ceiling paint and apply with a sprayer or light roller, the texture should stay intact.
Heavy coats, thick glazes, or excessive brushing can flatten or clog the popcorn, so work lightly and evenly.
What paint sheen is best to hide imperfections?
Although higher-sheen paints reflect more light and can make flaws stand out, flat or matte ceiling paints are usually best at hiding imperfections because they absorb light and minimize shadows.
You’ll also want a paint labeled for ceilings—it’s formulated to spray or roll smoothly and resist spattering.
Use thin, even coats and good lighting to spot missed areas before the paint dries.
How do I paint a popcorn ceiling with water damage or stains?
If your popcorn ceiling has water damage or stains, start by identifying and fixing the leak before you paint so the problem doesn’t return.
Once dry, gently clean loose debris and treat stains with a stain-blocking solution suited for textured surfaces.
Patch any soft areas, let repairs cure, then repaint using products designed for high-humidity or previously stained ceilings to guarantee coverage.
Is it necessary to use a primer on popcorn ceilings?
Wondering whether you need a primer on popcorn ceilings? Yes—primer’s usually necessary.
It seals porous texture, improves paint adhesion, and hides stains or repairs so paint covers evenly. Use a stain-blocking primer for water or nicotine marks and a high-quality acrylic primer for clean surfaces.
Apply with a roller made for textured ceilings; one coat typically suffices before topcoat.