How to Cut in Paint at Ceiling With Tape Like a Pro
You can get razor-sharp ceiling-to-wall lines by prepping, taping, and cutting in like a pro. Clean and sand surfaces, patch holes, and test tape adhesion on textured areas. Apply high-quality edge-release painter’s tape, press and seal the edge with a putty knife, then cut in with a loaded angled sash brush using short, confident strokes. Feather with a mini roller and remove tape while paint’s slightly tacky. Keep going and you’ll find tips for tricky ceilings, trims, and speed techniques.
Quick Method: Cut In at the Ceiling With Painter’s Tape
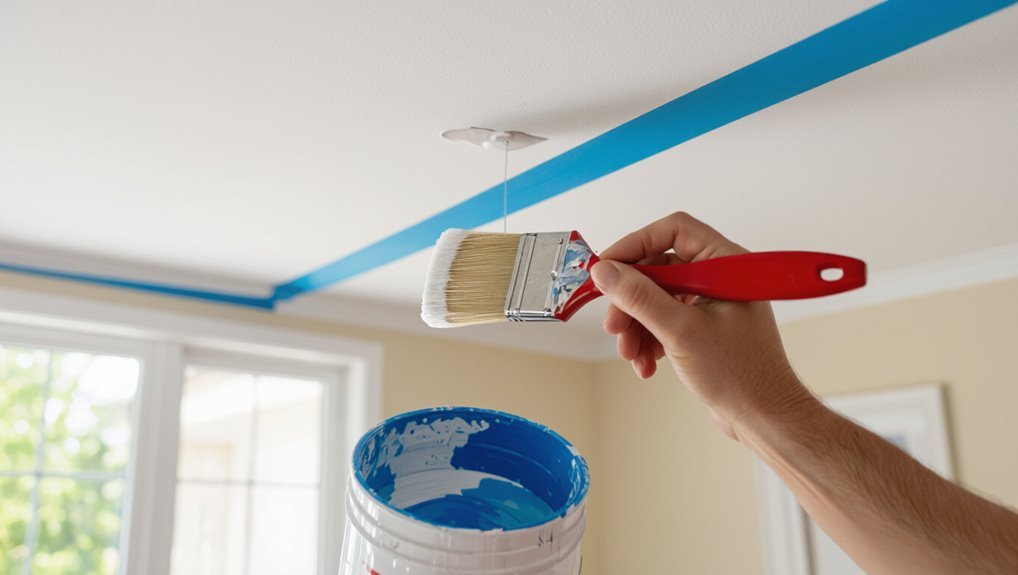
Start by taping a straight line along the ceiling where the wall meets the paint—press the tape down firmly so paint won’t seep underneath.
You’ll handle tape application with steady hands, smoothing edges as part of ceiling preparation.
Paint the wall up to the tape’s edge, let it dry, then remove tape slowly at a 45° angle for a crisp line that keeps ceiling paint clean.
Best Painter’s Tape for Ceilings
When choosing tape for cutting in at the ceiling, you’ll want one with strong adhesion that stays put but removes cleanly.
Look for a tape that gives an edge-clean release so your lines stay sharp without peeling paint.
Also check the label for surface compatibility to make sure it works on textured or freshly painted ceilings.
Tape Adhesion Strength
Because the right tape sticks firmly without peeling but still lifts cleanly, choosing based on adhesion strength is essential for cutting in at the ceiling.
You’ll want tape durability that holds against drips and brushing yet removes without residue. Test adhesive properties on a small area, consider surface texture, and pick a tape rated for delicate or multi-surface use to balance grip and clean removal.
Edge-Clean Release
While you’re cutting in at the ceiling, choosing a tape with edge-clean release makes the difference between crisp lines and frustrating touch-ups; you’ll want tape that won’t bleed or lift paint when removed.
Use edge clean techniques: press edges firmly, pull tape back on itself slowly, and follow tape removal tips like removing at 45° while paint’s tacky but not fully cured for clean results.
Surface Compatibility
Ceilings come in many finishes, and the right painter’s tape must match the surface to give you clean lines without damage.
You’ll assess ceiling types and ceiling materials, check surface texture and surface cleanliness, and choose tape compatibility for paint types and paint finishes.
Consider ceiling height, plan wall preparation to avoid adhesion issues, and pick tape rated for your specific surface and finish.
Tools and Supplies to Gather First
Before you start cutting in at the ceiling, gather the right tools so the job goes smoothly: you’ll need quality painter’s tape (compare tape types), a sharp angled sash brush, a mini roller, trim scissors, a putty knife, and drop cloths.
Include prep essentials like low-tack tape for delicate surfaces, cleaning wipes, and a small bucket for paint—organized tools speed accurate, clean cutting-in.
Inspect and Prep Ceiling and Wall: Clean, Repair, Sand
Before you start cutting in, clean the ceiling and wall to remove dust, grease, and cobwebs so paint will stick.
Patch any cracks or holes and let filler dry completely.
Sand repaired and rough areas smooth for a crisp edge when you paint.
Clean The Surface
Start by thoroughly inspecting the ceiling and adjoining wall for dirt, grease, cracks, and loose paint so you know exactly what needs fixing before you cut in. You’ll focus on surface cleaning and dust removal: wipe with a damp cloth, vacuum corners, and let dry. Use gentle sanding only to de-gloss before painting.
| Task | Tool |
|---|---|
| Wipe | Cloth |
| Vacuum | Brush |
Repair Damaged Areas
Inspect the ceiling and adjoining wall for cracks, holes, bubbling, or loose paint so you know exactly what to fix before you cut in.
You’ll perform a damage assessment, remove loose material, and clean the area.
Apply appropriate repair techniques—fill holes with spackle or joint compound, reinforce larger gaps with tape, and let repairs dry fully before proceeding to sanding and priming.
Sand For Smoothness
Once repairs are dry, sand the patched areas and the surrounding surface until they’re feathered smooth with the rest of the ceiling and wall. You’ll use proper sanding techniques—start coarse, finish fine—to achieve smooth finishes before priming. Remove dust and inspect for low spots; repeat as needed.
| Tool | Grit | Purpose |
|---|---|---|
| Sandblock | 80–120 | Flatten |
| Sponge | 150–180 | Smooth |
| Vacuum | — | Dust removal |
| Hand pad | 220 | Final touch |
Measure and Mark the Tape Line Accurately
Because a straight tape line sets the foundation for a clean edge, measure and mark carefully before applying any painter’s tape.
Use a level and pencil to map tape placement consistently along the ceiling, marking studs or seams.
Employ simple marking techniques: small ticks, a chalk line for long runs, and recheck measurements.
You’ll reduce errors and keep the final cut-in crisp and repeatable.
How to Apply Painter’s Tape for a Straight Ceiling Line
Before you tape, make sure the ceiling and wall are clean and completely dry so the tape will stick and the paint won’t bleed.
Press the tape down along your marked line, working from one end to the other and smoothing as you go to keep it straight.
Run a putty knife or your fingernail along the edge to seal the tape before you paint.
Clean And Dry Surface
To get a crisp, straight ceiling line, start by making certain the surface is clean and completely dry; dust, grease, and moisture will prevent painter’s tape from sticking properly.
You should remove cobwebs, wipe with a mild cleaner, and let the area dry fully. Proper surface preparation boosts paint adhesion and guarantees tape seals, reducing bleed and giving you a sharp edge.
Tape Application Technique
Start by measuring and marking a faint guide line where the ceiling meets the wall. Then press the painter’s tape along that line with steady, overlapping strokes so it lies flat without gaps.
Choose tape types suited to surface and paint, align tape placement precisely, smooth edges with a fingernail, and seal the lower edge.
Remove tape at a 45° angle after paint cures for a crisp line.
Seal Painter’s Tape Edge to Prevent Paint Bleed
Once the tape’s down, press its edge firmly along the ceiling line so paint can’t seep underneath; run a plastic putty knife or your fingernail along the tape to create a tight seal. That improves tape application and paint adhesion so you’ll avoid bleed.
| Tool | Purpose |
|---|---|
| Putty knife | Seal edge |
| Fingernail | Quick press |
| Roller | Smooth tape |
| Cloth | Clean edge |
Brush and Roller Techniques for Cutting In at the Ceiling
Choose the right angled sash brush for clean lines and a dense roller with a sharp edge for backing up the cut.
You’ll control paint flow by loading the brush properly and using the roller to feather the edge without overlap.
Keep a steady hand with short, confident strokes and your elbow anchored to avoid wavering.
Proper Brush Selection
Picking the right brush makes cutting in at the ceiling far easier and more precise.
Choose brush types based on paint: angled sash brushes for control, flats for filling.
Match bristle materials to paint—synthetic for latex, natural for oil.
Pick 2–2.5-inch widths for ceilings, comfortable handles, and a tapered ferrule to maintain a sharp edge.
Clean and store brushes properly.
Roller Edge Control
1 simple trick for cleaner edges is to combine a narrow angled brush with a well-primed mini roller so you can feather the paint from the brush into the ceiling smoothly.
You’ll use roller techniques to press paint flat and achieve edge blending without tape.
- Load roller sparingly
- Brush toward ceiling
- Roll outward once
- Lightly overlap strokes
- Inspect and touch up
Steady Hand Technique
Steady your arm and work deliberately when cutting in at the ceiling: hold the angled brush at about a 30–45° angle, load just enough paint for a smooth ribbon, and use short, confident strokes to lay a crisp line.
Then immediately blend with a lightly loaded mini roller to feather the edge into the field paint.
Keep a steady hand, check paint consistency, and pause to correct mistakes.
How to Paint the Taped Cut-In Area Without Disturbing Tape
Once the tape’s firmly in place, paint the cut-in area in thin, even strokes so you don’t push paint under the edge; work from the ceiling line outward, load your brush sparingly, and use light pressure to maintain a clean barrier between paint and tape.
- Keep strokes short and controlled.
- Feather edges toward the wall.
- Check for drips often.
- Let paint set before tape removal.
- Avoid overloading the brush; proper paint application matters.
When to Do a Second Coat Along the Taped Edge
Wait to recoat the taped edge until the first coat is dry to the touch and feels tack-free—otherwise you’ll risk lifting the tape.
You’ll know you need a second coat if the coverage looks thin, streaky, or the old color shows through along the seam.
If the first coat is even but still absorbs into the surface, go ahead and apply a thin second pass for a crisp, uniform line.
When To Recoat
A good rule of thumb is to recoat the taped edge when the first layer is dry to the touch but still slightly tacky in the center — that balance helps the new paint bond without lifting the tape.
Use recoat timing and color matching to guide you.
- Wait 30–60 minutes for latex
- Test a tiny spot
- Keep temperature steady
- Avoid heavy coats
- Remove tape at slight angle
Signs You Need
How do you know it’s time for a second coat along the taped edge? Watch for uneven coverage, visible streaks, or substrate showing through—these are clear Signs Needed.
Also check Ceiling Conditions: high porosity, previous dark color, or glare from lights can reveal flaws.
If edges look thin or tape pull reveals gaps, apply a second coat for uniform, clean lines.
When to Remove Tape for Clean Lines
Remove the painter’s tape while the paint is still slightly tacky rather than waiting for it to cure completely. You’ll get sharper results when you mind tape removal timing and use clean line techniques.
Pull at a low angle, steady pace, and inspect edges as you go.
Pull the tape gently at a low angle, keeping a steady pace while checking edges as you go.
Tips:
- Pull tape before full cure
- Use a 45° angle
- Go slow and steady
- Keep a light touch
- Check for tackiness
How to Remove Tape to Avoid Peeling Paint
If you want to keep fresh paint from peeling when you pull tape, act before it fully hardens and use steady, gentle motions—this reduces the chance of lifting the new coat. You’ll score the tape, pull at a low angle, and warm stubborn edges. Use these tape removal techniques and paint adhesion tips to protect crisp lines.
| Step | Action |
|---|---|
| 1 | Score edge |
| 2 | Pull low |
| 3 | Warm edge |
| 4 | Go slow |
| 5 | Inspect edge |
Fixing Paint Lifts and Repairs After Tape Removal
1 simple fix can save a freshly painted wall: gently repair any lifted edges before they cure fully. You’ll prevent bigger damage by addressing paint lifting quickly.
Use gentle sanding, primer touch-ups, and thin paint layers. Try these repair techniques to restore a crisp line without redoing the whole ceiling:
- Light sand lifted spots
- Clean dust and debris
- Apply primer thinly
- Feather paint edges
- Inspect after drying
Troubleshooting Paint Bleed and Ragged Edges
Once you’ve fixed lifts and feathered the edges, you’ll want to tackle paint bleed and ragged lines before they set in.
Inspect seams, remove excess with a razor, and touch up with a fine brush.
Use paint bleed solutions like sealing clear caulk or thin primer, then apply edge smoothing techniques—light sanding and feathered repaint—to restore a crisp, professional line.
Alternatives When Tape Won’t Work (Tight or Textured Ceilings)
When tape won’t stick to a tight or heavily textured ceiling, don’t force it—switch to handheld cutting methods like an angled brush, a mini roller with an edger, or a steady steady-state freehand brush stroke to follow the seam; these tools let you control paint build-up and keep a clean line without relying on adhesive.
- Use angled brush for control
- Try mini roller for speed
- Feather edges to blend
- Practice steady freehand strokes
- Match brush size to ceiling textures and cutting techniques
Cutting In Around Crown Molding and Trim With Tape
Tape makes cutting in around crown molding and trim faster and cleaner if you apply it correctly; you’ll get a straight edge without fussing over every brushstroke.
Press tape firmly against contours, overlap joints, and seal edges to prevent bleed. Use angled sash brushes for touchups.
Follow crown molding techniques and trim painting tips: remove dust, paint in thin coats, and peel tape while paint’s tacky for crisp results.
Speed Techniques for Large Rooms and High Ceilings (Safely)
Having the trim and crown sealed with tape makes the rest of the ceiling work faster, especially in big rooms or up high.
But you’ll need different tactics to keep speed from sacrificing safety or quality.
- Use large room techniques: work in zones for steady rhythm.
- Prep scaffold for high ceiling safety.
- Keep extension poles handy.
- Use a roller with guard.
- Plan breaks to avoid fatigue.
Common Mistakes to Avoid When Cutting In at the Ceiling
Because cutting in at the ceiling demands steady hands and clear edges, avoid rushing or relying on tricks that sacrifice control—you’ll end up with drips, jagged lines, or wasted paint.
Watch for common misalignments, excessive pressure, and overloaded brushes. Don’t skip surface prep or tape removal timing.
Keep a steady wrist, feather your brush, and clean up small errors immediately to save time.
Frequently Asked Questions
Can I Reuse Painter’s Tape After Removing It?
You generally shouldn’t reuse painter’s tape after removing it. You’ll lose adhesion and risk bleed; instead, store unused rolls properly for tape storage. For future projects, note proper tape application to get clean edges without reusing old tape.
How Long Should Paint Cure Before Rehanging Fixtures?
Like a sunrise settling, wait 24–72 hours for paint curing time before rehanging fixtures. You’ll avoid smudges and guarantee adhesion; for fixture tips, tack-check the surface, use proper anchors, and tighten gently to prevent damage.
Will Tape Adhesive Discolor Fresh Paint Over Time?
Yes — certain tape types and adhesive properties can discolor fresh paint over time; you’ll avoid problems by using low-tack painter’s tape, testing first, removing tape within recommended time, and choosing tapes with non-staining adhesive formulations.
Can I Tape Over Textured Popcorn Ceilings Safely?
You can, but you’ll need careful tape application techniques because popcorn texture varies; test a small area first, choose low-tack painter’s tape, consider ceiling texture options (repairing or skim-coating) for smoother, safer adhesion before full taping.
How Does Humidity Affect Tape Adhesion and Paint Drying?
Sticky situations: sudden shifts start struggles. You’ll find tape types respond poorly to high humidity levels, losing hold, while paint dries slower; low humidity speeds curing but can cause cracking, so you’ll adjust timing and tape choice.
Conclusion
You’ve got the tape, the blade, and the ladder—now comes the deciding moment. Take a breath, press the tape tight to the ceiling, and trust your line; you’ll see whether careful prep really pays off. If a bead of paint sneaks past, don’t panic—you’ll fix it faster than you think. Keep moving with steady strokes, watch the edge, and when you peel the tape, hold on: the result might just be cleaner than you dared hope.