How to Repaint a Deck With Peeling Paint Step-By-Step
When repainting a deck with peeling paint, start by inspecting for cracking, rot, and loose boards, then remove all flaking paint with a scraper and sand to sound wood, feathering edges; clean with a deck cleaner or pressure washer, repair or replace damaged boards, fill gaps, and let dry. Prime bare wood, then apply quality exterior deck primer and paint using brush, roller, or sprayer on a dry, mild day; follow cure and recoating times—keep going for step-by-step prep and tips.
Quick Checklist : When to Repaint a Peeling Deck
If your deck’s paint is cracking, flaking, or showing bare wood in spots, it’s time to act.
Inspect boards for peeling indicators: loose edges, bubbling, and exposed wood grain.
Inspect boards for peeling signs — loose edges, bubbling, and exposed wood grain that reveal worn finish.
Check structural rot and fastener corrosion.
Note weathering patterns and prior repaint frequency to plan timing.
If more than 10–15% shows damage, schedule a full prep and repaint to protect the deck.
Tools and Materials for a Deck Repaint
Once you’ve assessed damage and decided to repaint, gather the right tools and materials so the job goes smoothly and lasts.
For proper deck preparation and smart paint selection, bring essentials that help clean, repair, and finish surfaces.
- Pressure washer or scrub brush and cleaner
- Sander, scraper, sandpaper and filler
- Exterior primer, quality deck paint, brushes and rollers
Assess Paint Peeling and Wood Damage
Before you start scraping, walk the deck slowly and inspect every board, railing, and stair for peeling paint, soft spots, cracks, and mildew so you can prioritize repairs and estimate material needs.
Note blistered areas, flaking edges, and loose boards. Use a probe and perform a moisture assessment to find rot.
Record issues for repair, replacement, and supplies during your deck inspection.
Protect Yourself and Contain Debris
Put on gloves, a dust mask or respirator, and safety glasses before you scrape or sand to keep dust and flakes out of your lungs and eyes.
Lay down drop cloths and tape plastic sheeting around nearby plants and furniture so paint chips and dust don’t spread.
Bag debris promptly and dispose of it according to local regulations to avoid contamination.
Wear Protective Gear
Because you’ll be scraping, sanding, and working with chemicals, wear proper protective gear to keep yourself safe and to contain dust and debris.
You should cover up, shield eyes, and filter inhaled particles.
- Wear protective clothing that you can wash or discard.
- Use safety goggles and a full-face shield for impact protection.
- Fit a respirator with appropriate cartridges for paint dust and fumes.
Contain Paint Debris
Now that you’re protected, focus on containing paint chips, dust, and runoff so they don’t spread around your yard or into waterways. Use tarps, plastic sheeting, and a HEPA vacuum; bag waste immediately. These deck maintenance tips and paint removal techniques keep cleanup safe and simple.
| Tool | Action | Tip |
|---|---|---|
| Tarp | Catch chips | Secure edges |
| Plastic | Block runoff | Overlap seams |
| HEPA | Vacuum dust | Slow passes |
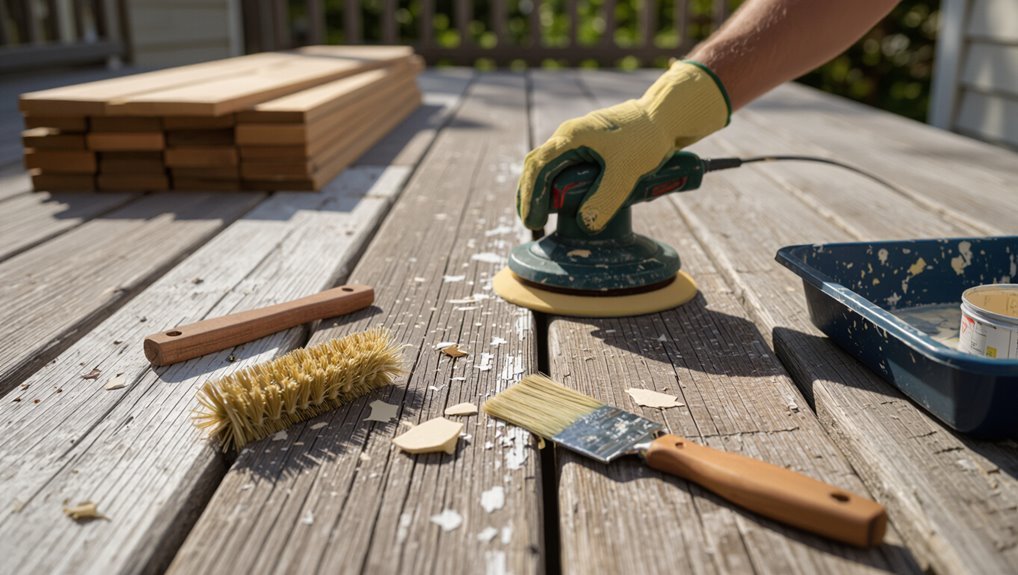
Remove Loose Paint: Scraping and Sanding
Start by identifying and removing all loose, flaking paint—this prevents future peeling and guarantees the new finish will stick.
You’ll focus on paint adhesion through proper surface preparation. Use a scraper, sanding block, and power sander as needed.
- Scrape to sound wood
- Sand feathered edges for smooth connections
- Vacuum and wipe dust before priming
Strip Stubborn Deck Paint: Chemical vs. Heat Methods
When paint won’t come off with sanding, you’ll choose between chemical strippers and heat guns.
Chemical options range from caustic to biodegradable formulas, each with different prep and cleanup needs.
Heat guns soften paint for scraping but require care to avoid burns or scorch marks.
Chemical Stripper Options
Although heat guns and sanding can remove old finish, chemical strippers often give you the cleanest, most controllable results on stubborn deck paint.
You’ll choose between solvent, caustic, or bio-based formulas. Consider eco friendly options and read product comparisons for toxicity, dwell time, and cleanup.
Follow label directions, wear PPE, and test a small area first.
- solvent-based
- caustic
- bio-based
Heat Gun Removal Methods
If you prefer a dry, nonchemical approach, a heat gun can soften old paint so you can scrape it away with minimal dust. You’ll hold the nozzle a few inches from the surface, work in small sections, and keep the gun moving to avoid scorching the wood.
Use proper heat gun safety: wear gloves, a respirator, and eye protection. Practice heat gun techniques to control heat and avoid burns.
Clean the Deck: Pressure Wash, Mildew Treatment, Rinse
Start by clearing the deck and sweeping away loose dirt and debris so your cleaning can reach the wood surface.
Use pressure washing carefully, treat mildew with a proper cleaner, then rinse thoroughly for deck maintenance and mildew prevention.
- Set pressure low to avoid gouging.
- Apply mildew treatment, scrub stubborn spots.
- Rinse until runoff is clear and dry before painting.
Repair or Replace Damaged Boards and Trim
Inspect the deck carefully for warped, cracked, or rotten boards and loose trim, then mark each problem area so you know what to repair or replace.
Remove damaged boards, pry loose trim, and assess fasteners. Choose board replacement options—matching pressure-treated lumber or composite—and secure with corrosion-resistant screws.
Follow deck maintenance tips: replace rotten joists, guarantee proper ventilation, and check for level alignment before finishing.
Sand Deck Boards for Better Paint Adhesion
Once you’ve repaired or replaced boards and secured loose trim, sand the deck to give paint a solid surface to grip.
After fixing boards and trim, sand thoroughly so paint has a solid surface to adhere to.
You’ll use proper deck preparation techniques and choose sanding equipment options that match wood type. Focus on even grit, clean dust, and smooth edges.
- Orbital sander for broad areas
- Detail sanding for corners
- Hand sanding for repairs
Pick Primer, Paint, or Stain (By Wood Type & Weather)
Because wood species and local weather determine how coatings behave, pick your primer, paint, or stain with both materials and climate in mind.
Match oil-based primers to resinous woods, use latex for treated lumber, and choose penetrating stains for porous hardwoods.
Factor weather considerations like humidity, freeze-thaw, and sun exposure; select UV-resistant, breathable products suited to your wood types and local conditions.
Application Techniques: Brush, Roller, or Spray
When you choose between brushing, rolling, or spraying, think about the surface texture, project size, and the finish you want.
You’ll select methods that match prep and paint type; use proper brush techniques, enjoy roller advantages for boards, or rely on spray efficiency for fast coverage.
Application tips:
- Brush: detail and edges
- Roller: even coverage on planks
- Spray: speed and thin coats
Timing, Weather, and How Long the Job Takes
If you plan the project around dry, mild days and give each coat the recommended curing time, you’ll save yourself rework and delays. You should check timing considerations and weather effects before starting; a typical small deck takes 1–3 days, larger projects 3–7. Track forecasts, avoid high humidity, and schedule prep, painting, and inspection efficiently.
| Stage | Duration | Notes |
|---|---|---|
| Prep | 0.5–1 day | Cleaning, sanding |
| Prime | 2–6 hrs | Depends on product |
| Coat 1 | 1–2 hrs | Dry time varies |
| Coat 2 | 1–2 hrs | May need longer |
| Total | 1–7 days | Varies with conditions |
Curing, Recoating Intervals, and Final Checks
After you’ve finished applying the final coat and waited the basic dry times noted earlier, give the deck proper curing time before heavy use—this is when the coating gains full hardness and adhesion.
You should monitor curing times, follow recoating intervals, and perform final inspections. Check these before traffic:
- Verify paint adhesion at edges.
- Confirm tack-free surface.
- Note manufacturer’s recoating intervals.
Maintain Your Refreshed Deck to Prevent Future Peeling
Keep a regular cleaning routine to remove dirt and mildew so the paint can stick and last.
Check your deck annually—look for lifting edges, blistering, or worn spots and note them on a simple inspection checklist.
Recoat at the first sign of wear instead of waiting for damage, and you’ll prevent peeling down the road.
Regular Cleaning Routine
Stick to a simple, regular cleaning routine to protect your fresh paint and stop peeling before it starts. You’ll extend finish life with basic deck maintenance tips and consistent cleaning frequency.
Do these weekly or monthly tasks:
- Sweep debris and rinse with a garden hose.
- Spot-clean stains with mild detergent and a soft brush.
- Remove mildew promptly with a diluted bleach solution.
Annual Inspection Checklist
Once you’ve kept up with regular cleaning, schedule an annual inspection to catch small issues before they cause paint failure.
Each year, walk the deck checking for loose boards, nail pops, rot, mildew, and flaking paint. Note areas needing sanding, spot repairs, or resealing.
Track findings for deck maintenance and perform seasonal inspections after winter and before humid months to prevent future peeling.
Recoat Before Damage
If you want that fresh finish to last, recoat your deck before small wear turns into peeling or rot. You’ll spot trouble early, follow deck longevity tips, and choose sealers with paint quality considerations in mind.
Maintain regularly and act fast when finish thins.
- Inspect annually and after storms
- Recoat thin or worn areas promptly
- Use high-quality paint and primer
Frequently Asked Questions
Can I Repaint a Deck Myself if It’s Over 20 Years Old?
Yes — you can repaint it yourself if you prep thoroughly. You’ll follow deck maintenance tips, strip loose paint, sand, repair rot, and use paint selection advice to choose a durable primer and exterior deck paint for long-lasting results.
Is It Safe to Repaint if My Deck Was Previously Lead-Painted?
Yes — you can repaint, but you’ll need strict safety precautions. If your deck had lead paint, test first, contain and minimize dust, use HEPA equipment or hire certified pros, and follow local lead-safe regulations.
How Do I Dispose of Paint Chips and Chemical Stripper Waste Legally?
You must treat paint disposal and chemical stripper waste as hazardous; follow local waste regulations, seal chips in heavy-duty bags, label containers, use approved hazardous waste facilities or collection events, and keep documentation to comply with waste regulations.
Can I Change Paint Color Drastically Without Multiple Coats?
You’ll rarely avoid multiple coats—it’s like trying to stop a hurricane with a sheet—yet you can minimize them by choosing high-quality color selection and paint types (high-hide primers, 100% acrylics) and prepping surfaces thoroughly.
Will Repainting Hide Structural Problems Like Rot or Insect Damage?
No — repainting won’t hide structural problems like rot or insect damage. You should perform a thorough deck inspection first, because paint adhesion fails on compromised wood; you’ll need repairs or replacements before repainting.
Conclusion
You’ve walked through every step to revive your peeling deck, so now step back and admire the work. Keep a small maintenance routine—clean, spot-sand, and touch up—to stop future peeling before it starts. Treat the wood kindly and check fasteners yearly. Like a knight polishing his armor in the age of smartphones, your careful upkeep keeps the deck strong and ready for gatherings. Stick to these habits, and your refreshed deck will last.