How to Use Homax Wall Texture Orange Peel for Perfect Finish
You’ll prep the wall by cleaning, patching, sanding, and masking trim, then mix Homax Orange Peel slowly into water to a 5–10% water ratio, strain it, and test-spray on scrap. Hold the sprayer 18–24 inches away, keep steady speed with overlapping passes, and adjust pressure and nozzle for the look you want. Let it dry between coats, feather repairs, prime, then paint with a thick-nap roller — keep going for tips on tools, storage, and troubleshooting.
Quick Overview: What This Homax Orange Peel Project Involves
This Homax orange peel project has you prepping a clean, patched wall, mixing the texture compound to the right consistency, and spraying or rolling a fine, dimpled finish that mimics traditional orange-peel drywall—then sanding and sealing any imperfections before painting.
You’ll follow application tips for even coverage, control spray distance, and experiment with texture variations to match existing walls or create subtle focal surfaces.
Why Choose Homax Wall Texture Orange Peel for DIY
You’ll find Homax Orange Peel easy to apply, even if you’re new to texture work.
It sprays on smoothly and dries to a consistent orange-peel finish that hides imperfections.
That simplicity and reliable result make it a smart choice for DIY projects.
Easy DIY Application
Get the job done faster and cleaner with Homax Orange Peel — it’s designed for DIYers who want professional-looking texture without specialty tools or a steep learning curve.
You’ll control spray patterns and texture variations easily.
Steps:
- Prep and protect.
- Thin if needed.
- Test spray.
- Apply even passes for consistent coverage and quick cleanup.
Consistent Texture Results
Because Homax Orange Peel is formulated for even spray and quick leveling, you’ll get consistent results even if you’re not a pro. You’ll notice texture consistency across walls, minimizing touch-ups. The product promotes application uniformity so seams and overlap blend smoothly. Follow simple technique: hold a steady distance, use overlapping passes, and adjust pressure. Expect predictable, professional-looking orange peel every time.
What Orange Peel Texture Looks Like and When to Use It
Orange peel gives your walls a subtle, slightly bumpy finish that hides minor imperfections without calling attention to itself.
You’ll find it works well in living rooms, hallways, and ceilings where you want texture but not heavy pattern.
Use it when you need an easy-to-maintain, forgiving surface that still looks clean and modern.
Subtle Dimensional Finish
When you want a subtle, low-profile texture that hides minor imperfections without calling attention to itself, orange peel delivers a gentle, dimpled finish that resembles the skin of a citrus fruit.
You’ll appreciate texture variations and finish durability. Use it when you want understated depth.
- Hides flaws
- Soft shadows
- Easy to paint
- Low maintenance
Ideal Application Scenarios
If you want a finish that hides minor surface flaws without drawing attention, orange peel gives a soft, dimpled texture that reads as subtle depth from a few feet away and disappears into a smooth look at arm’s length.
You’ll choose it for living rooms, hallways, and ceilings where application benefits matter: easy touch-ups, forgiving surface prep, and a tasteful texture comparison versus heavy knockdown or popcorn.
Tools and Materials to Gather Before You Start
Before you start, gather the right tools and materials so you won’t stop mid-job: a Homax texture mix (or patching compound compatible with Homax products), a drill with a mixing paddle, a hopper gun or roller and brush (depending on the pattern), drop cloths, painter’s tape, a putty knife, sanding block, drywall primer, and appropriate personal protective equipment like goggles and a N95 mask.
Before you start, gather Homax texture mix, mixing paddle, hopper gun or roller, drop cloths, tape, putty knife, primer, goggles, and an N95.
- Pre project checklist
- Essential tools list
- Texture application gear
- Safety and finishing supplies
Site Prep: Masking Trim, Protecting Floors, and Moving Furniture
Now that you’ve gathered your tools and materials, get the room ready so you can work cleanly and quickly: move furniture out or to the center and cover it with drop cloths, protect floors with taped-down plastic or canvas, and mask trim, outlets, and windows with painter’s tape and paper to prevent texture overspray or splatter.
Use masking techniques for trim coverage, prioritize floor protection, furniture relocation, wall preparation, and surface safety.
PPE and Ventilation Best Practices for Spraying Texture
You’ll want to wear a NIOSH-approved N95 or better respirator to protect your lungs from fine texture dust.
Make sure goggles and disposable coveralls are on hand to keep dust out of your eyes and off your clothes.
Set up cross-ventilation with fans and open windows or use an exhaust fan to pull dust out while you spray.
Respiratory Protection Essentials
When you’re spraying Homax wall texture, protect your lungs with the right respirator, proper fit, and good ventilation—dust and aerosolized particles can irritate or damage respiratory tissue even from short exposures.
Use appropriate respiratory masks and promote air circulation.
- Choose NIOSH-rated respirator
- Check seal and fit every session
- Replace filters per manufacturer
- Avoid spraying alone without monitoring
Ventilation Setup Tips
Anyone working with spray texture should set up ventilation before you start—proper airflow removes airborne particles, reduces drying time, and keeps respirators from clogging too fast.
You should position fans to create consistent air circulation, open windows and doors for cross-ventilation, and use exhaust fans or HEPA-filtered units when possible.
Monitor airflow and adjust to maintain ventilation importance throughout the job.
Sprayer Setup: Choosing the Right Nozzle for Homax Orange Peel
Picking the right nozzle for spraying Homax Orange Peel makes a big difference in coverage and texture quality.
You’ll want nozzle selection tips and spray pattern adjustments to match material thickness and desired pebble size. Choose between fine, medium, coarse, and specialty tips.
Test on scrap, tweak distance, and maintain consistent speed for uniform orange peel texture.
- Fine
- Medium
- Coarse
- Specialty
How Water Pressure Affects Your Orange Peel Finish
Because water pressure controls how much material leaves the nozzle and how far droplets travel, it’s one of the most important variables for dialing in your orange peel finish.
You’ll adjust pressure to manage water pressure effects: higher pressure throws finer droplets for smoother texture, lower pressure yields heavier splats.
Keep consistent pressure to maintain texture consistency across the wall for even coverage.
Diluting Homax: How Much Water to Add and Why
Before you start, check the can for the manufacturer’s recommended water ratio—most Homax orange peel textures need only a small amount of water to reach the right consistency.
You’ll mix gradually, adding a little at a time while stirring until the texture flows smoothly but still holds peaks for application.
Keeping the mix consistent lets you apply evenly and controls spray pressure and final finish.
Recommended Water Ratio
Start by adding small amounts of water—usually between 5% and 10% of the mix by volume—to reach a workable consistency; too little leaves the texture pasty and clumpy, too much makes it runny and hard to control.
You’ll balance water absorption and texture consistency.
Tips:
- Measure precisely.
- Add slowly.
- Stir thoroughly.
- Test a small patch.
Mixing And Application
When you dilute Homax Wall Texture, aim for about 5–10% water by volume and add it gradually so you can control the consistency; too little leaves the mix stiff and clumpy, while too much makes it runny and hard to work with. Use proper mixing techniques and test application methods on scrap drywall before full coats.
| Step | Tip |
|---|---|
| Mix | Slowly add water |
| Test | Sample spray |
| Adjust | Thicken or thin |
| Apply | Consistent passes |
Mixing and Straining Homax for a Lump-Free Spray
Get a smooth, sprayable mix by slowly adding Homax to clean water while stirring constantly so you avoid clumps.
Use proper mixing techniques and straining methods to keep your sprayer clear.
Then:
- Stir to uniform consistency.
- Let sit briefly to hydrate.
- Pour through a nylon strainer.
- Wipe edges and recheck for bits.
You’ll prevent jams and get even coverage.
Test Spraying: How to Set Patterns Before You Touch the Wall
Before you touch the wall, test-spray onto a large sheet of cardboard or scrap drywall to dial in pattern size, pressure, and distance; this lets you confirm settings and spot-adjust without risking the finish.
You’ll adjust nozzle, air pressure, and material flow until sprayer patterns match the orange peel look and texture consistency you want.
Mark successful settings for the actual wall.
Preparing and Repairing the Wall Surface First
After you’ve locked in the spray settings on scrap drywall, move on to preparing the actual wall so the texture bonds and looks uniform.
Check wall condition, remove loose paint, and identify surface imperfections. Use repair techniques like spackling, sanding, and priming.
Inspect the wall, remove loose paint, and repair imperfections with spackle, sand, and prime for best texture adhesion
Follow this quick checklist:
- Clean
- Patch
- Sand
- Prime
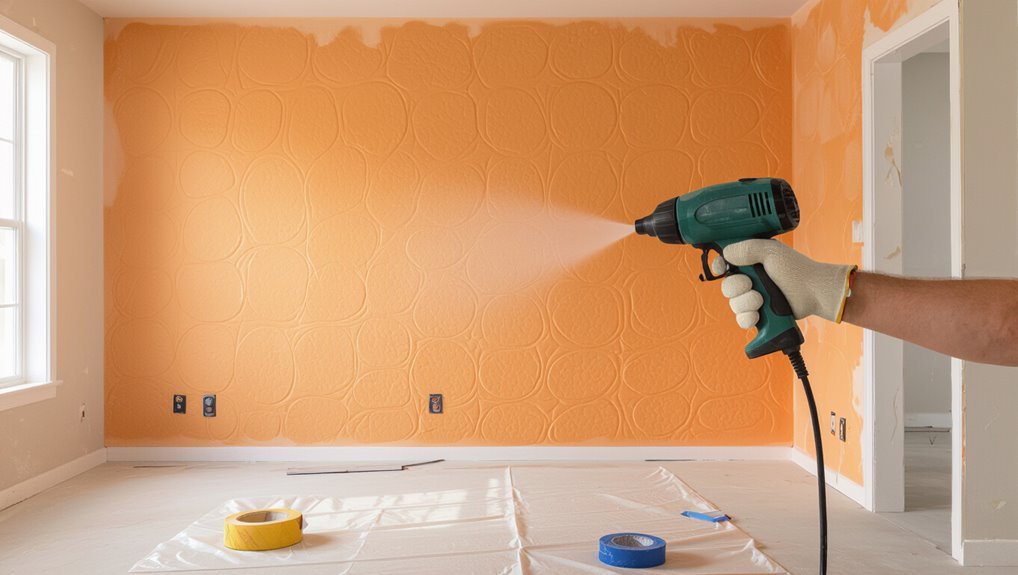
Sprayer Distance and Angle for Even Texture
1. You’ll hold the sprayer 18–24 inches from the wall and keep it perpendicular for even texture. Move in steady, overlapping passes, angling slightly for corners.
Maintain consistent speed and stroke length to preserve texture consistency. Check sprayer maintenance before starting—clean nozzles and test spray patterns.
Adjust distance or angle if texture looks heavy or sparse.
How to Apply the First Coat of Homax Orange Peel
Before you spray the first coat of Homax Orange Peel, make sure the wall is clean, patched, and primed so the texture adheres evenly.
Hold the sprayer at the recommended distance and maintain a steady, overlapping motion to build uniform coverage.
Start with a light pass to set the pattern, then follow with full passes to achieve the desired finish.
Surface Prep Essentials
Start by clearing the work area and inspecting the wall for holes, loose paint, or texture you’ll need to remove so the Homax Orange Peel adheres evenly.
Follow surface preparation steps and a focused wall inspection checklist:
- Patch holes and sand smooth.
- Remove dust and grease.
- Prime repaired areas.
- Mask trim and outlets.
You’ll be ready to apply the first coat.
Spray Technique Basics
Adjust your sprayer settings, get comfortable with your grip, and work methodically to lay down a consistent first coat of Homax Orange Peel.
Keep a steady distance, overlap each pass 50%, and move at a uniform speed.
Test spray patterns and try different nozzle types to match texture size.
Feather edges, avoid pooling, and let the coat dry before evaluating coverage.
Overlap Technique: Avoid Lines, Streaks, and Banding
Work in consistent, slightly overlapping passes so you won’t leave visible seams or streaks when the texture dries.
Use these steps to guarantee seamless blending and finish durability:
- Check surface preparation and texture variations.
- Match spraying methods to application timing.
- Employ repair techniques for edges.
- Maintain equipment maintenance and compare finish comparison for best texture application.
Adjusting Settings for Light Versus Heavy Orange Peel
When you need a lighter or heavier orange peel, tweak the sprayer’s pressure, nozzle size, and material mix so the texture matches your desired look; higher pressure and a larger tip give a heavier, more pronounced orange peel, while lower pressure and a finer tip produce a subtler effect. Use texture comparison and application techniques to test settings.
| Setting | Effect |
|---|---|
| Pressure | More = heavier |
| Nozzle | Larger = coarser |
Managing Edges, Corners, and Tight Spaces Cleanly
After you’ve dialed in pressure, nozzle size, and mix for the right orange peel, focus on keeping edges, corners, and tight spots clean to avoid blotches and overspray buildup.
- Mask precisely and feather tape for smooth edge blending.
- Use a brush first in corners; follow with light spray.
- Hold gun at consistent angle for uniform texture.
- Wipe nozzle often to prevent clogs and drips.
Texturing High Ceilings and Stairwells Safely
Before you start, assess how you’ll reach the ceiling or stairwell safely and plan your access points.
Use a stable, well-rated work platform or scaffolding and secure it before you climb.
When spraying, adjust your technique—angle, pressure, and nozzle distance—to maintain even coverage without overreaching.
Assess Ceiling Access
If you’re tackling high ceilings or stairwell areas, first evaluate how you’ll reach every section safely and comfortably.
Consider ceiling height and ladder safety before you start.
- Map access points.
- Note obstructions and lighting.
- Plan movement routes.
- Check ladder reach and angle.
Confirm you can work without overreaching or repositioning into unsafe spots.
Secure Work Platform
Scaffolding or a tall, stable platform gives you a safer, more controlled way to texture high ceilings and stairwells, so set one up that lets you work level and within easy reach.
Inspect components, lock wheels, and level before climbing.
Clear the work area, wear fall protection and eye gear, and follow safety precautions.
Keep tools secured to prevent drops and maintain steady footing.
Spray Technique Adjustments
Once your platform is secure and everything’s locked down, adjust your spray technique for high ceilings and stairwells to keep texture consistent while minimizing overspray.
You’ll manage spray distance, nozzle type, pressure settings, and application speed to maintain pattern consistency across surface variation.
Monitor drying time between passes and use texture layering for seamless blends.
- Test spray
- Adjust pressure
- Vary angle
- Blend edges
How Long to Wait Between Coats and How to Tell It’s Dry
Because drying time affects finish and recoating, you’ll want to wait the proper interval between coats—typically 1 to 4 hours for thin, water-based Homax textures and longer (up to 24 hours) for heavier applications or oil-based products—while considering temperature, humidity, and coat thickness.
Check tackiness, color uniformity, and firmness; touch a discreet spot. If no transfer and texture feels set, follow recommended coat intervals and proceed.
Feathering and Blending Patches to Match Surrounding Texture
After your patch has dried and feels firm, start feathering the new texture outward so it blends with the existing wall surface.
Use these feathering techniques and blending methods to match texture precisely:
- Thin edges with a damp sponge.
- Lightly stipple with the original tool.
- Work in small concentric circles.
- Step back and inspect from different angles.
Fixing Drips, Runs, and Heavy Spots After Spraying
After spraying, inspect the wall to assess the damage and mark drips, runs, or heavy spots.
Sand and feather the edges of each blemish so the repair will blend with the surrounding texture.
Reapply thin, even coats of Homax until the surface matches, letting each coat dry before adding the next.
Assess The Damage
Inspection’s the first step: look closely for drips, runs, and heavy spots once the texture starts to set.
You’ll perform a damage assessment and wall inspection to plan fixes. Then act quickly:
- Mark problem areas.
- Scrape excess texture.
- Reapply thin texture where needed.
- Blend surrounding texture to match.
Don’t overwork areas; let repairs dry before final touch-ups.
Feather And Sand Edges
Once you’ve marked and removed problem areas, you’ll want to feather and sand the edges to blend repairs into the surrounding texture. Use feathering techniques with a light touch, sanding progressively finer until the changeover disappears. Focus on edge blending rather than heavy removal. Keep dust low and inspect under good light, repeating light touch-ups if needed.
| Step | Tool | Result |
|---|---|---|
| 1 | Sandpaper | Smooth |
| 2 | Knife | Blend |
| 3 | Brush | Finish |
Reapply Light Coats
Address drips, runs, and heavy spots by misting on several light coats rather than trying to cover them in one pass; you’ll build texture more evenly and avoid new runs.
You should:
- Let each light coat dry briefly.
- Feather edges with a dry brush.
- Repeat thin layers for texture layering.
- Sand tiny peaks before final coat.
Use light coats to control build and blend.
Troubleshooting Sputtering, Clogs, and Nozzle Issues
If your sprayer starts sputtering or the nozzle spits unevenly, you’ll want to stop and troubleshoot before continuing—small clogs, dried texture, or air trapped in the hose are usually the culprits.
For sputtering solutions, relieve pressure, purge air, and flush with water or solvent.
Inspect and perform nozzle cleaning with a soft brush or pick; replace damaged tips to restore consistent spray.
Temperature and Humidity: Effects on Drying and Texture
Because temperature and humidity directly control how fast Homax texture dries, you’ll want to monitor both before you start spraying; high heat speeds drying but can cause premature skinning and poor adhesion, while high humidity slows drying and increases sagging or running.
You’ll manage temperature impact and humidity effects by adjusting timing and technique:
- Cool conditions: slower cure
- Hot conditions: fast skinning
- High RH: sag risk
- Low RH: brittle finish
How to Sand or Lightly Knock Down Mistakes
When a spray pattern lands unevenly or you get an over-spray ridge, grab a sanding block or soft sponge and work gently until the texture sits flush with the surrounding surface; use light, even strokes and check your progress frequently so you don’t sand through the texture base.
For small errors, employ targeted sanding techniques and minimal knockdown; follow simple repair methods, clean dust, and retexture only if needed.
Priming Textured Walls Before Painting
Before you paint, prime textured walls to seal the surface, improve paint adhesion, and guarantee even coverage over peaks and valleys.
Before painting, prime textured walls to seal the surface, improve adhesion, and ensure even coverage.
You’ll follow priming techniques that secure consistent results and proper surface preparation. Do this:
- Clean dust and debris.
- Patch and sand imperfections.
- Use a high-build primer.
- Apply even, thin coats and let dry before painting.
Choosing Paint and Roller Nap for Textured Surfaces
If you want durable, even coverage on textured walls, pick a high-quality acrylic latex paint in a satin or eggshell sheen and match it with a roller nap designed for the texture depth.
You’ll choose thicker naps (¾”–1″) for deep orange peel and ¼”–½” for light texture.
Consider paint finishes for durability and select roller types that hold ample paint and resist shedding.
Painting Technique for Textured Walls Without Clogging Rollers
Pick a high-quality, thick-nap roller designed for textured walls so the cover reaches into crevices without packing up.
Keep your paint at the right consistency—thin slightly if it’s too thick—to flow into the texture without forming globs that clog the nap.
Work in small sections, reload and clean the roller regularly, and use a light, even pressure to maintain coverage and prevent buildup.
Proper Roller Selection
Choose a roller designed for heavy texture so you’ll get full coverage without constant clogging; look for a 3/4″ to 1″ nap made from woven or synthetic fibers that hold paint but release it evenly into the crevices.
- Compare roller types for pile and durability.
- Pick woven or synthetic for orange peel.
- Use a thick nap for texture techniques.
- Test on scrap before starting.
Correct Paint Consistency
When you thin Homax wall texture just enough, it flows into crevices without piling up and clogging your roller; aim for a consistency like thick pancake batter so the material spreads evenly but still sticks to the wall. You’ll monitor paint viscosity to preserve texture uniformity and avoid over-thinning. Adjust slowly and test on scrap.
| Test | Result |
|---|---|
| Thin | Smooth |
| Thick | Clumpy |
| Medium | Ideal |
| Scrape | Check |
| Roll | Verify |
Application And Maintenance
Start by loading your roller lightly and rolling off excess texture onto a tray or scrap board so the roller carries enough material to fill crevices without gumming up; work in manageable sections, keeping a wet edge and reloading frequently rather than over-saturating the roller.
- Use short, even passes.
- Reload often.
- Clean rollers between sessions.
- Inspect for clogs.
Follow these application techniques and maintenance tips to prevent buildup.
Repairing and Touching Up Texture Patches Later
Because small patches can stand out once paint goes on, you’ll want to repair and blend texture carefully so the fix disappears.
Use texture blending techniques like feathering spray patterns and adjusting nozzle distance.
For patch repair methods, clean and prime the area, apply thin layers to match existing peaks, let dry, and sand lightly.
Test with primer and paint to confirm a seamless match.
Estimating How Much Homax Orange Peel You’ll Need
After you’ve blended and confirmed a seamless patch, you’ll want to figure out how much Homax Orange Peel to buy so you don’t run out mid-job or waste cans.
After blending a seamless patch, calculate how much Homax Orange Peel to buy to avoid running out.
Use this quick plan for estimating coverage and calculating square footage:
- Measure area.
- Multiply height × width.
- Check Homax coverage per can.
- Add 10% for overlap and waste.
Storing Leftover Homax Texture Safely
Save leftover Homax texture properly so it stays usable for touch-ups. You’ll pick container options that seal tightly, label mix date, and remove air to extend storage duration. Keep containers cool, dry, and off concrete. Check consistency before reuse; stir or thin per instructions.
| Container type | Tip |
|---|---|
| Plastic pail | Seal lid tightly |
| Glass jar | Label date |
Adapting Homax Technique for Exterior Stucco-Like Finishes (If Suitable)
If you’re considering Homax for exterior, know it’s designed for interior repairs and won’t always match true stucco durability or weather resistance; however, with careful prep, suitable substrates, and proper sealing, you can mimic a stucco-like appearance on sheltered or low-exposure areas.
- assess substrate and drainage
- choose breathable primer/sealer
- match spray pattern for texture comparison
- test small patch for exterior adaptation
Cleaning and Maintaining Your Sprayer After Use
Start by flushing your Homax sprayer immediately after use to prevent texture compound from drying inside the hose, nozzle, or gun; dried material clogs the system and shortens the tool’s life.
Disassemble parts, soak and scrub with recommended cleaning solutions, inspect seals and filters, and replace worn components.
Follow sprayer maintenance tips: store dry, run a quick water test before next job, and keep a maintenance log.
Pro Tips to Get a Professional-Looking Finish Without a Contractor
When you want a contractor-quality wall texture without hiring one, focus on prep, technique, and patience:
- Practice texture variations on scrap drywall to match room patterns.
- Tape and repair seams; clean surfaces to prevent application mistakes.
- Use consistent spray distance and motion for even coverage.
- Feather and blend edges, then sand lightly once dry for a seamless, professional finish.
Frequently Asked Questions
Can Homax Orange Peel Be Tinted Before Spraying?
Yes — you can tint Homax Orange Peel before spraying. You’ll use proper tinting techniques, mix thoroughly, and test color. For best results, follow application tips: thin as needed, strain, and adjust tint progressively to match.
Is Homax Orange Peel Safe for Bathrooms and High-Moisture Areas?
Yes — you can use Homax Orange Peel in bathrooms, but you’ll want good bathroom ventilation and proper prep. It’s moisture resistant to a degree, yet you shouldn’t rely on it alone against persistent damp or leaks.
Will Textured Walls Hide Large Surface Cracks or Structural Damage?
Like wallpaper hiding flaws, textured walls can mask minor cracks, but they won’t fix major structural damage. You should prioritize surface preparation and consider crack concealment as cosmetic only; repair underlying issues before texturing.
Can I Apply Orange Peel Over Existing Popcorn or Heavy Textures?
Yes — you can apply orange peel over popcorn or heavy textures, but you’ll assess texture compatibility first, use proper application techniques like skim-coating or knocking down high points, and guarantee adhesion for a uniform, durable finish.
How Long Does Unopened Homax Orange Peel Last in Storage?
You’ll find unopened Homax Orange Peel lasts about 1–2 years; don’t treat it like fine wine. For storage tips, keep containers sealed, cool, dry, and upright to maximize shelf life and avoid curing or thickening.
Conclusion
Think of your walls as a blank field and Homax Orange Peel as the seed you plant—gentle, even sprays will let a perfect texture grow. With the right prep and tools, you’ll tend that field like a careful gardener: mask the borders, store leftovers safely, and clean your sprayer as you go. Follow the steps, trust your touch, and in a few passes you’ll harvest a finish that looks like you hired an expert.