Is It Better to Stain or Paint Wood? Complete Comparison
Choose stain when you want to showcase and protect the wood grain with lower upkeep; choose paint when you need a uniform, changeable color and stronger surface barrier. Consider species—open-grain woods take stain well, tight-grain woods suit paint—and factor exposure, repairability, and desired texture. Stain penetrates and resists peeling; paint masks imperfections but can chip and needs more prep. Weigh upfront cost versus long-term maintenance, and keep reading to get practical project-by-project recommendations.
Stain or Paint : Quick Decision Framework
Wondering whether to stain or paint your wood? You’ll weigh durability, upkeep, and desired look: stain preserves grain, giving natural color depth with lower maintenance; paint masks grain, offering uniform color and selectable finish sheen for protection.
Consider exposure, repairability, and how often you’ll refresh the surface. Choose stain for subtlety, paint for bold, consistent coverage and easier color changes.
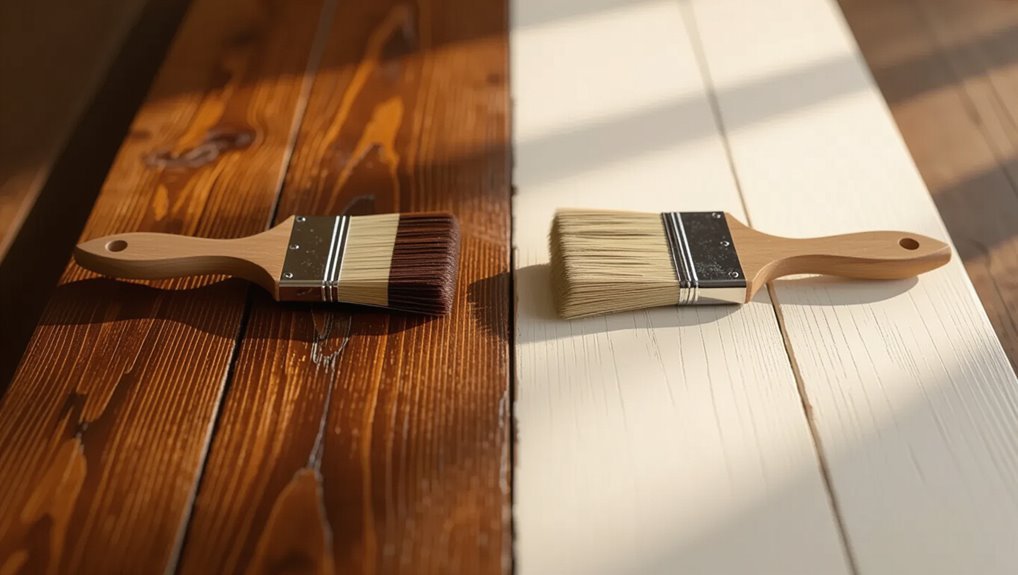
Stain vs Paint : At a Glance
You’ll quickly notice that stain highlights the wood’s natural grain while paint hides it and gives a uniform color.
Consider durability and maintenance too: paint often needs more prep and touch-ups, while stain can weather gracefully but may require reapplication to refresh protection.
Use these contrasts to decide which look and upkeep fit your project.
Appearance And Grain
Grain and finish determine how wood looks and feels, so deciding between stain and paint comes down to whether you want the natural pattern to show or prefer a uniform color.
If you value wood aesthetics and grain enhancement, stain reveals knots and texture.
If you want consistent, bold color that hides imperfections, paint delivers opaque coverage and simpler color-matching for your space.
Durability And Maintenance
Because stain soaks into wood while paint sits on the surface, they protect differently: stain resists cracking and peeling and lets the wood’s fibers breathe, while paint forms a thicker barrier that better hides wear but can chip or blister over time.
In your wood finish comparison, consider long term performance and maintenance:
- Stain: recoat, less scraping.
- Paint: hides blemishes, needs prep.
- Environment: dictates lifespan.
How Wood Species Shapes The Choice
Wood species play a big role in whether you should stain or paint a piece—different woods have distinct colors, grain patterns, and porosity that affect both appearance and finish performance. You’ll weigh wood characteristics and your aesthetic preferences: open-grain woods show grain with stain; tight-grain woods take paint smoothly.
| Wood | Best for | Note |
|---|---|---|
| Oak | Stain | Prominent grain |
| Pine | Paint | Knots show |
| Cedar | Stain | Natural tint |
| Maple | Paint | Smooth surface |
Durability: Weather, UV, and Wear
When exposed to sun, rain, or heavy use, finishes age differently, so you should match your choice to the conditions the piece will face.
When finishes face sun, rain, or heavy use, choose the one suited to those exact conditions.
You’ll weigh weather resistance, UV protection, and wear resistance when choosing stain or paint.
Consider priorities:
- Outdoor exposure — max weather resistance.
- Sun-heavy areas — strong UV protection.
- High-traffic items — superior wear resistance; note maintenance frequency.
Maintenance: How Often to Recoat and Why
Wondering how often you’ll need to recoat your finish? You’ll check recoating frequency based on exposure: exterior paint often needs 5–10 years, stain 2–5.
Inspect annually for peeling, fading, or water beading loss.
Follow maintenance tips: clean surfaces, touch up damaged areas promptly, and recoat when protection weakens to prevent wood decay and costly repairs.
Prep Work: Sanding, Cleaning, and Priming
Before you start sanding or applying finish, inspect the wood closely for damage, old coatings, and uneven grain so you know what repairs or sanding grades you’ll need.
Remove all dust and debris with a vacuum and tack cloth to guarantee a clean surface that will bond properly.
Finally, choose a primer (or wood conditioner for stains) that matches the wood species and the topcoat to improve adhesion and uniformity.
Surface Inspection
Anyone tackling a wood finish should start with a careful surface inspection: check for dents, raised grain, old finishes, glue lines, and any areas with moisture or mold, since these defects determine how you’ll sand, clean, and prime.
Use inspection techniques to assess surface condition and then:
- Note repairs needed
- Choose grit and cleaner
- Select appropriate primer
Dust Removal
With repairs noted and your grit, cleaner, and primer picked, focus next on thorough dust removal: sanding creates fine particles that will ruin adhesion and finish if you leave them behind.
Identify dust types — coarse grit, fine sanding haze, and sawdust — then use removal techniques like vacuuming with a brush attachment, tack cloths, and a damp microfiber wipe.
Work systematically, let surfaces dry.
Primer Selection
Why choose the right primer now? You’ll pick based on substrate and finish: oil based primers boost bonding characteristics and color retention, while water based primers shorten drying times and ease cleanup.
Consider application techniques for even coverage.
- Oil based primers: durability, stain blocking.
- Water based primers: faster dry, low odor.
- Match primer to topcoat.
Application Time and DIY Difficulty
Because stains soak into the wood rather than sitting on top, you’ll usually apply them faster and with fewer steps than paint.
You’ll use simpler application techniques—rags or brushes with no primer—and finish sooner.
Paint needs more prep, primer, multiple coats and careful brushing or spraying, so it lengthens project timelines and raises DIY difficulty, especially for large or detailed surfaces.
Cost: Upfront Materials vs Lifetime Expense
When you compare stain and paint, you’ll find stains usually cost less up front—fewer products, no primer, and less time—and that can make them appealing for tight budgets or quick projects.
You should weigh upfront costs against maintenance and replacement. Consider:
Weigh upfront savings against ongoing maintenance and replacement—consider materials, upkeep frequency, and long-term lifespan.
- Initial materials and labor
- Maintenance frequency and cost
- Expected lifespan and long term savings
How Stain Changes Wood Grain and Color
Although stain soaks into the wood rather than sitting on top like paint, it still alters both color and perceived grain by penetrating pores and highlighting contrasts between earlywood and latewood.
You’ll notice wood grain enhancement as pigments settle unevenly, increasing color depth and contrast. That reveals natural patterns, emphasizes knots, and lets you preserve texture while subtly enriching tone without masking the surface.
How Paint Hides Grain and Transforms Color
Stain lets the wood’s character show through; paint takes a different approach by covering those features and giving you a uniform surface and color.
You choose paint to change wood aesthetics and achieve bold color transformation.
Consider practical effects:
- Conceals grain for a smooth look.
- Masks imperfections and old finishes.
- Enables precise color matching across pieces.
Best Stains by Use: Decks, Siding, Furniture
Wondering which stain suits your project best?
You’ll choose deck stains for UV and slip resistance, siding stains for weatherproofing and breathability, and furniture stains for detail and grain.
Compare color options, finish types, and application techniques—brush, roller, or sprayer—while weighing longevity factors like maintenance and climate.
Match product specs to use for best results.
Best Paints by Use: Trim, Doors, Cabinets, Siding
Pick the right paint for each surface and you’ll get better durability, easier maintenance, and a cleaner finish.
You should choose paints to match trim aesthetics, door functionality, cabinet longevity, and siding protection.
Consider:
- Semi-gloss for trim and moisture-prone trim areas.
- Durable enamel for doors to resist wear.
- Acrylic or satin for cabinets and siding for UV and weather resistance.
Stain vs Paint in High‑Moisture Areas
When you’re dealing with bathrooms, basements, or coastal exteriors where moisture is constant, choosing between stain and paint comes down to breathability, water resistance, and maintenance needs.
You’ll favor paint where strong moisture barriers are essential; choose high‑quality exterior or marine paints.
Stain works if you prioritize wood grain and use proper application techniques plus periodic resealing to manage damp conditions.
VOCs, Cleanup, and Disposal (Health & Environment)
Moisture concerns also tie into how finishes affect indoor air and cleanup habits, so it’s worth comparing volatile organic compounds (VOCs), cleanup, and disposal between stain and paint.
You should weigh VOC emissions, health impacts, and environmental concerns.
Consider:
- Eco friendly options reduce VOCs.
- Follow safety precautions during cleanup.
- Use proper disposal methods to limit pollution.
Common Mistakes That Ruin a Project
Because small missteps compound quickly, you’ll want to know the common mistakes that most often ruin stain or paint projects before you start. Avoid preparation oversights, tool selection errors, and timing mistakes. Watch for drying issues, environmental factors, application errors, technique blunders, color mismatches, finish compatibility, and unrealistic project expectations.
| Cause | Effect | Fix |
|---|---|---|
| Prep | Fail | Sand/clean |
| Tools | Stripes | Use proper |
| Timing | Blush | Follow temps |
Strip & Refinish vs Recoat: When to Choose Each
Deciding whether to strip and refinish or simply recoat depends on the condition of the existing finish and how long you want the result to last.
You’ll choose strip options when finish is damaged or color must change; use recoat techniques for light wear or fast refresh.
Consider:
- Depth of damage
- Color change need
- Desired longevity
Hybrid Finishes: When to Stain Then Paint (Or Vice Versa)
If your project sits between a full refinish and a simple recoat, hybrid approaches—staining then painting or painting over stained areas—can give you the look and durability you want without excessive work.
You’ll use hybrid techniques to highlight grain, seal vulnerable spots, then apply paint for protection.
Plan finish layering: sand, test adhesion, and choose compatible stains, primers, and paints for lasting results.
7-Question Decision Checklist
Before you choose stain or paint, assess the wood’s condition—rot, previous coatings, and grain all matter.
Ask how much upkeep you want: do you want a low-maintenance finish or are you prepared for regular care? Those answers will narrow your options quickly.
Wood Condition Assessment
When you inspect the wood, focus on structural soundness, surface condition, and previous coatings so you can choose stain or paint that will last.
Assess wood type and rot, then evaluate surface adhesion and contaminants, and note existing finish for finish longevity.
- Structural integrity
- Surface prep needs
- Previous coating compatibility
Desired Maintenance Level
Decide how much upkeep you’re willing to commit to over the life of the finish, because that choice will steer you toward stain or paint: stains generally demand less frequent reapplication and let grain show through, while paints give stronger color and protection but usually need periodic scraping and repainting to stay the same.
Think about maintenance frequency and preferred maintenance methods, then pick the finish matching your schedule.
Quick Picks: Recommended Finish for 10 Common Projects
Although every project has its quirks, this quick guide gives you a straight recommendation for the best finish—stain or paint—for ten common wood projects, so you can pick the option that balances look, durability, and maintenance.
A quick guide giving clear stain-or-paint recommendations to balance appearance, durability, and upkeep for wood projects.
You’ll get stain longevity for decks, paint texture for trim.
- Decks: stain
- Trim: paint
- Cabinets: semi-gloss stain
Frequently Asked Questions
Can I Stain or Paint Over Previously Painted/Stained Wood Without Stripping?
Absolutely—you can, and it’s not the end of the world! You’ll use prep techniques to clean and scuff, consider adhesion factors, color choices, durability differences, and match surface textures so paint or stain bonds and lasts.
How Do Finishes Affect Indoor Allergens and Dust Accumulation?
Finishes can help: you’ll get better allergen reduction with smooth, non-porous finishes that resist dust; sealed paint or polyurethane makes dust control easier by preventing fibers and pollen from embedding, letting you clean surfaces more effectively.
Will Staining or Painting Change the Fire Resistance of Wood?
Staining or painting won’t considerably change wood’s fire resistance; you’ll need specific fire-retardant wood treatments or coatings to improve it. Standard stains and paints mainly affect appearance and weathering, not core fire performance.
Can I Mix Different Brands or Types of Stains and Paints Safely?
Think of it as a recipe: you can mix brands, but you shouldn’t guess. You’ll check brand compatibility, match stain types (oil vs. water), follow labels, test a small area, and avoid incompatible solvents or finish conflicts.
How Long After Finishing Can I Install Hardware or Use the Furniture?
You can usually install hardware or use furniture after recommended drying times: wait 24–48 hours for surface cure, 7–30 days for full cure depending on finish and humidity, and follow proper application techniques to avoid damage.
Conclusion
You’ve got options — and the right finish depends on the wood, exposure, and how much upkeep you want. Stain keeps grain and feels natural; paint hides flaws and gives bold color. Think of stain as honest clothing and paint as a costume. Pick stain for hardwoods and low-maintenance needs; choose paint for trim, high-traffic surfaces, or dramatic color. Use the checklist to decide, and remember: good prep beats any miracle finish.