How to Get LED Lights to Stick to Textured Walls (Without Them Falling Down)
You can get LED lights to stick to textured walls by prepping the surface, testing a small strip, and picking the right mount for the texture. Clean the wall, plan the run, and use heavy‑duty double‑sided tape or adhesive clips for mild texture, Command strips for removable installs, and screws, channels, or construction adhesive for rough stucco. Distribute weight with multiple fasteners or a slim PVC/wood raceway. Keep going to see specific methods, products, and safety tips.
How to Get LED Lights to Stick to Textured Walls (Quick Answer)
Start by cleaning the wall, planning the route, and testing a small strip to confirm adhesion.
For textured surfaces, you’ll usually want heavy-duty mounting tape, removable adhesive clips, or a construction adhesive for permanent installs.
Pick the adhesive based on texture severity and whether you need a damage-free removal.
Short, direct solution steps
Use a few reliable methods: clean the wall, choose the right adhesive (heavy-duty mounting tape, removable adhesive strips, or small command hooks), press firmly for 30 seconds, and let the adhesive cure for an hour before hanging the LED strip or clips.
You’ll learn how to get LED lights to stick to textured walls by following these short steps.
- Prep surface
- Apply adhesive
- Cure time
Best adhesive choices at a glance
Pick an adhesive based on texture, weight, and whether you want a permanent or removable fix. Choose repositionable clips or command strips for light strips and medium textures, mounting tape for smoother textured walls, and construction adhesive for heavy or permanent installs. Compare quickly:
| Type | Best use |
|---|---|
| Command strips | Removable, light LED |
| Mounting tape | Smooth/moderate texture, medium weight |
| Construction adhesive | Heavy/permanent installations |
Understanding the Problem: Why LED Lights Fall Off Textured Walls
You’ll find that wall texture changes how much surface area your adhesive can grip, with rough stucco or popcorn cutting contact and smooth plaster giving better hold.
Different textures like orange peel or heavy stucco create gaps that weaken tape or adhesive, and the heavier or bulkier your LED strips and string lights are, the more likely they’ll pull away.
Knowing both the wall type and the light’s weight and design helps you pick the right mounting method.
How texture affects adhesion
Textured walls change how adhesives contact the surface, so your strips and tapes often only touch the high points and leave air gaps beneath.
Those gaps reduce real contact area, lowering bond strength and making attachments prone to shear or peel.
Temperature shifts and humidity worsen this by flexing material and breaking microscopic seals, so you need methods that increase true surface contact for reliable adhesion.
Types of textured surfaces (stucco, orange peel, popcorn, plaster)
Because different textures change contact points and flexibility, knowing which surface you’re working with matters when mounting LED strips.
Stucco’s rough peaks limit adhesive contact; orange peel’s mild dimples give better hold; popcorn adds deep nubs that prevent full adhesion; plaster can be smooth or cracked, affecting tape grip.
Match mounting method to the specific texture for reliable attachment.
Weight and design factors of LED strips and string lights
Consider how the weight, width, and rigidity of your LED strips or string lights affect adhesion on textured walls: heavier, wider, or stiff strips struggle to conform, reducing contact area and weakening tape.
Flexible, lightweight strips or smaller bulbs press closer to peaks and valleys, improving grip.
Choose low-profile designs, segment longer runs, and add clips or anchors where texture prevents reliable adhesive contact.
Prep Work: What You Need Before Installing LED Lights
Before you start, gather the tools and materials you’ll need—LED strips, appropriate adhesive or mounting clips, cleaning supplies, a level, and any power adapters.
Check safety: turn off circuits when working near outlets, use a sturdy ladder, and choose products rated for indoor or outdoor use as needed.
Once you have everything and have planned safe access, you’ll be ready to install.
Tools and materials checklist
You’ll need a compact set of tools and a few specific materials to get LED lights to stick reliably to textured walls. Gather essentials to prepare, attach, and secure strips for long-term hold.
- Cleaner, primer (if needed), alcohol wipes
- Strong mounting tape or adhesive clips, zip ties
- Measuring tape, level, scissors, utility knife
Safety considerations (power, ladders, indoor vs outdoor)
When working with LED strips on textured walls, prioritize electrical and physical safety: turn off power at the breaker for hardwired connections, and use a sturdy ladder with someone spotting you for any height work.
Check waterproof ratings and outdoor-rated power supplies for exterior installs, avoid overloading circuits, use GFCI outlets where required, secure cords, and wear gloves and eye protection when cutting or soldering.
Step-by-Step Methods to Secure LED Lights on Textured Walls
You’ll start by cleaning and prepping the surface to guarantee any adhesive will grip properly.
Then you’ll try options like adhesive-backed mounting clips and channels, heavy-duty mounting tape or alternative adhesives, and removable Command-style strips or hooks for less permanent installs.
For the toughest textures, you’ll use mechanical fasteners—nails, screws, or plastic anchors—for a secure hold.
Method 1 Cleaning and surface prep
Preparation matters: before you try to stick LED lights to textured walls, clean and dry the surface so adhesives can bond properly.
You’ll remove dust, grease, and loose paint, then test adhesion. Follow these steps:
- Wipe with a damp cloth, then dry completely.
- Use isopropyl alcohol for oily spots.
- Sand loose texture lightly and remove debris.
Method 2 Using adhesive-backed mounting clips and channels
After cleaning and testing the wall, switch to mounting hardware that compensates for texture: adhesive-backed clips and channels give you a flat, secure surface to attach LED strips.
Peel liners, press clips or channels firmly into place for the recommended time, then snap or slide your LED strip inside.
Space mounting points every 6–12 inches, check alignment, and avoid forcing tight bends to prevent damage.
Method 3 Heavy-duty mounting tape and adhesive alternatives
When textured surfaces defeat standard adhesive, heavy-duty mounting tape and alternative glues give you stronger, longer-lasting bonds; choose products rated for uneven walls and outdoor use so they’ll grip grit, paint, and small gaps.
Clean and dry the wall, press tape firmly for 30 seconds, or apply construction adhesive sparingly. Allow full cure before testing, and trim excess for a neat finish.
Method 4 Command strips and specialized removable hooks
If you want a strong hold that’s still removable, try Command strips or specialized removable hooks designed for textured walls; they stick without drilling and peel away cleanly when you need them gone.
Clean the surface, match strip size to LED weight, press for full adhesion, and wait the recommended time.
Use hooks for heavier strands and replace strips periodically to maintain grip.
Method 5 Mechanical fastening: nails, screws, and plastic anchors
Command strips work great for many setups, but for permanent or heavier installations you’ll want mechanical fasteners like nails, screws, and plastic anchors.
Choose screws and anchors sized for your drywall or masonry, pre-drill pilot holes, and use anchors for textured or hollow sections.
Mount LED clips or channels with screws, space supports every 12–18 inches, and test stability before finishing.
Method 6 Using mounting tracks, raceways, and adhesive-backed channels
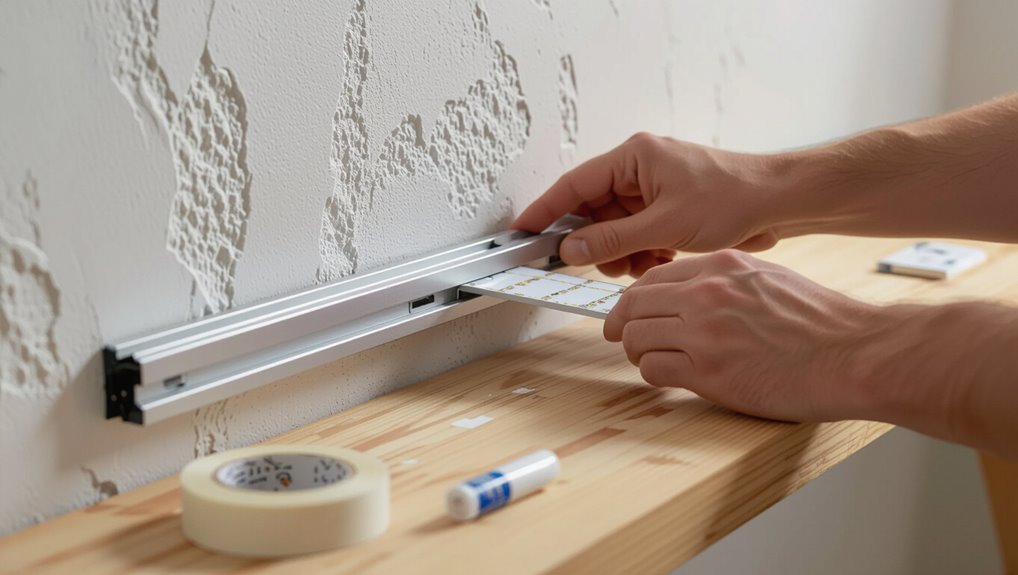
Although textured surfaces can make adhesive bonding tricky, mounting tracks, raceways, and adhesive-backed channels give you a tidy, durable way to secure LED strips and hide wiring.
You’ll measure and cut channels, clean the surface, use high-strength adhesive or screws where needed, snap the strip into the track, and route cables through the raceway for a finished, secure installation that resists peeling and sagging.
Comparison of Attachment Methods
You’ll want to weigh adhesive tape, Command strips, screws, and clips against factors like durability, removability, wall safety, and ease of installation to pick the best option for your textured walls. Below is a quick comparison to help you spot trade-offs at a glance. Use it to decide whether you need a temporary, damage-free solution or a long-term, secure mount.
| Method | Key trade-offs |
|---|---|
| Adhesive tape | Easy install, low durability on heavy texture |
| Command strips | Removable, moderate hold, gentle on paint |
| Screws | Very durable, permanent, may damage wall |
| Clips | Good for channels, depends on wall anchors |
| Summary | Choose based on how permanent and damage-tolerant you need the fix |
Adhesive tape vs Command strips vs Screws vs Clips
When you’re choosing how to attach LED lights to textured walls, weigh ease, holding strength, and wall impact—each method has clear trade-offs. You’ll pick tape for quick jobs, Command strips for damage-conscious installs, screws for maximum security, and clips when routing matters.
| Method | Best for | Notes |
|---|---|---|
| Tape | Temporary | Low strength |
| Command | Renters | Mid strength |
| Screws/Clips | Permanent | Highest hold |
Durability, removability, wall safety, ease of install
Compare durability, removability, wall safety, and ease of install side-by-side so you can pick the method that fits your situation:
- Tape: quick, low-damage, less durable on heavy or rough textures.
- Command strips: strong, removable cleanly if used correctly, may peel paint on fragile finishes.
- Screws/clips: most durable, permanent, highest wall impact, needs tools and patching when removed.
Tips and Best Practices for Long-Lasting Installation
Place strips where weight is evenly distributed and keep run lengths short so clips or adhesive don’t bear excessive load.
Check room temperature and humidity before sticking, and route or tuck wires so they’re hidden without pulling on the tape.
Inspect connections and adhesive periodically and clean or reapply as needed to keep everything secure.
Optimal placement and load distribution
Because textured surfaces create uneven contact points, you should plan LED placement to spread weight and minimize stress on any single fastener.
Position strips along studs or solid substrate when possible, use multiple attachment points, and stagger runs to share load.
- Anchor at regular intervals
- Distribute power supplies and transformers
- Avoid long unsupported spans
Temperature and humidity considerations
After planning anchor points and load distribution, think about the environment where you’ll install the LEDs: temperature swings and high humidity can weaken adhesives, corrode connectors, and shorten component life.
Choose adhesives rated for expected temperature range and moisture. Keep strips away from direct heat sources and condensation.
Use silicone sealant or waterproof channels in damp areas, and ventilate to reduce trapped humidity.
Concealing wires while preserving adhesion
When you want hidden wiring without sacrificing adhesive strength, plan cable routes that minimize bends and avoid stretching the tape’s contact area; run wires along seams, inside shallow channels, or under trim so the strip and adhesive sit flat against the wall.
Use low-profile cable clips or adhesive-backed cord channels rated for textured surfaces, press firmly, and stagger attachment points to distribute tension evenly.
Maintaining LEDs and checking adhesion over time
If you want your LED installation to last, check the strips and adhesive every few months and after any temperature or humidity swings.
Gently press edges, look for peeling, corrosion, or discoloration. Replace compromised adhesive with proper mounting tape or clips.
Clean contacts, trim damaged sections, and secure loose wires.
Test lights regularly; early fixes prevent bigger failures and maintain safe, reliable illumination.
Common Mistakes and How to Avoid Them
Don’t use the wrong adhesive for your wall texture — it won’t hold and can leave residue.
Don’t overload strips or concentrate weight in one spot, and don’t skip surface prep like cleaning and drying.
When removing lights, pull slowly and use proper removers to avoid ripping paint or plaster.
Using wrong adhesive for the texture
Because textured surfaces vary so much, choosing the wrong adhesive will cause strips to peel, sag, or fall off entirely.
You should match adhesive type to texture: heavy-duty mounting tape or construction adhesive for deep, coarse textures; strong double-sided foam or specialized LED clips for medium textures; lighter adhesives or original strips for smooth or lightly orange-peel walls.
Test a small area before committing.
Overloading strips or poor weight distribution
One common mistake is piling too many lights or heavy connectors onto a single strip, which makes the adhesive fail and causes sagging or detachment.
Spread the load across multiple strips or add support points so each adhesive segment only carries its designed weight.
Balance runs, use short runs between mounts, clip or anchor connectors, and avoid heavy diffusers so each adhesive point stays within its rated hold.
Skipping surface prep
If you skip prepping the wall, the strip’s adhesive won’t bond to dust, paint flakes, or textured residues and the lights will peel off sooner than you expect.
Clean with a mild degreaser, rinse, and let the surface fully dry.
Sand glossy patches lightly and remove loose paint.
Test a small adhesive piece before installing the full run to confirm secure contact.
Damaging walls when removing lights
Once you’ve cleaned and prepped the surface, think ahead to removal to avoid tearing paint or pulling drywall paper.
Use low-tack adhesive strips rated for your lights and textured surfaces. Warm adhesive with a hairdryer before peeling slowly at a low angle.
Patch tiny tears with spackling, sand smooth, and touch up paint. Test one strip first to confirm safe removal.
Product Recommendations and What to Look For
When choosing products for textured walls, you’ll want options that actually grip rough surfaces, plus hardware that keeps strips straight and secure.
Below are the key things to compare before you buy or call a pro:
- Best tapes and adhesives for textured walls
- Recommended clips, channels, and mounting hardware
- When to choose professional installation
Best tapes and adhesives for textured walls
Choose adhesives that grip uneven surfaces and resist peeling so your LED strips stay put on textured walls.
Use heavy-duty mounting tape (foam or thick acrylic) for deep textures, high-bond double-sided tape for medium textures, and construction-grade adhesive for permanent installs.
Clean and dry the surface first.
Avoid standard thin adhesive backing; it won’t bridge gaps or hold long-term on rough finishes.
Recommended clips, channels, and mounting hardware
1 practical way to secure LED strips on textured walls is to use purpose-made clips, aluminum channels, and robust mounting hardware that bridge gaps and provide mechanical support.
Choose closed or diffused aluminum channels with screw holes, spring clips for narrow profiles, and stainless or zinc-plated screws with anchors for plaster or brick.
Look for corrosion resistance, easy snap-in installation, and compatible widths.
When to choose professional installation
If your wall texture is especially rough, your layout is complex, or you’re not confident drilling into plaster, hiring a pro can save time and prevent damage.
Choose installers experienced with textured surfaces, ask for adhesive and anchor options, confirm they use level channels and concealed wiring, and get a written warranty.
Compare quotes, check reviews, and prioritize licensed electricians for any hardwiring.
Quick Fixes and Temporary Solutions
If you need a temporary way to hang LEDs without damaging walls, you can use renter-friendly products and simple reinforcement tricks.
Try removable hooks, adhesive strips applied to small backing pieces, or lightweight mounting tape that peels cleanly.
Below are three quick options to contemplate:
- Removable adhesive hooks for short runs and corners
- Command-style strips on small rigid backing (like craft sticks)
- Painter’s tape plus lightweight clips for ultra-temp setups
Removable options for renters
Because you can’t damage the walls, renters need removable, low-residue solutions that still grab textured surfaces — and there are several reliable quick fixes you can try.
Use removable adhesive hooks, Command strips rated for weight, or 3M poster strips on small light runs.
Try adhesive-backed Velcro tabs or temporary mounting putty for lightweight strips; test a hidden spot first to confirm no residue.
Low-damage reinforcement techniques
You’ll often need a little extra reinforcement when removable hooks or strips don’t fully grip textured paint.
Try short lengths of painter’s tape folded into small tabs behind clips to boost contact, or use clear mounting putty for lightweight runs.
For heavier strands, loop fishing line over a small nail in a grout line or door trim—easy to remove and barely visible.
FAQ
You’ve got practical questions about adhesives, indoor use, hiding hardware, mounting heavy bars, and safe removal—let’s answer the most common concerns so you can choose the right method.
Below are three key takeaways to guide your decisions. If you need specific steps, ask about the exact wall texture and light type.
- Test adhesive on a hidden spot first to check for paint or drywall damage.
- Use indoor-rated strips for interiors and heavier mounts or brackets for bulky bars.
- Remove slowly with heat and proper solvent to minimize surface damage.
Will adhesive ruin textured paint or drywall?
Yes—adhesives can damage textured paint or drywall if you use the wrong kind or remove them carelessly.
To prevent harm, pick low‑tack, removable mounting products rated for painted surfaces, test a hidden spot, and follow weight limits.
Remove adhesive slowly, backstopping with heat or a plastic scraper. If paint peels, you’ll need light sanding and touch‑up rather than full replastering.
Can I use outdoor LED strips indoors on textured walls?
Wondering if outdoor LED strips will work on your textured indoor walls? Yes — they’re tougher, with stronger adhesives and weatherproof coatings that handle uneven surfaces better.
You can use them indoors, but check adhesive type, voltage, and ventilation. Clean the wall, press firmly, and consider supplemental anchors if texture is extreme.
Avoid wet-location ratings if not needed to save cost.
How do I hide visible mounting hardware?
How can you hide visible mounting hardware without sacrificing a secure install?
Use low-profile clips and paintable covers that match wall texture and color.
Recess small brackets into shallow channels or behind trim, corner molding, or cable raceways.
For adhesive mounts, pick matching tape colors or wrap with textured paintable caulk.
Test on scrap to guarantee concealment without weakening the hold.
What’s the best way to attach heavy LED light bars?
If you want a clean look without exposed clips, heavier LED bars usually need more than tape or small adhesive mounts — they require mechanical support that matches the wall material and the fixture’s weight.
Use brackets or mounting plates screwed into studs or anchored with toggle bolts for hollow walls. Pre-drill, level carefully, and use corrosion-resistant hardware; consider a backer board for very textured surfaces.
How do I remove LEDs without damaging textured walls?
Want to pull LEDs off textured walls without tearing the finish? Heat adhesive with a hairdryer on low, warm for 30–60 seconds, then peel slowly at a shallow angle.
Use dental floss or fishing line to saw under stubborn strips. Remove residue with a citrus-based adhesive remover or rubbing alcohol, testing a hidden spot first.
Patch any tiny nicks with spackle and touch up paint.
Conclusion and Next Steps (CTA)
To recap, the most reliable options are command strips for light textures, adhesive mounting tape or liquid adhesive for heavier textures, and mounting channels for very rough surfaces.
Start with the method that matches your wall—try command strips first on lightly textured walls, or test adhesive tape on a small patch if your walls are rough.
If you’re unsure or want a permanent install, buy the recommended strips/tape or contact a pro for help.
Recap of easiest reliable methods
Here are the simplest, most reliable ways to get LED lights to stick to textured walls: use heavy-duty adhesive clips or mounting strips rated for textured surfaces, apply clear silicone or construction adhesive for permanent installs, or mount a slim wooden or PVC raceway to create a smooth backing before attaching the lights.
- Choose clips/strips rated for texture.
- Use silicone/adhesive for permanence.
- Install a raceway for stability.
Suggested first method to try based on wall type
If your walls are lightly textured, start with heavy-duty adhesive clips or mounting strips rated for textured surfaces— they’ll hold well and let you remove the lights later.
For medium or deep texture, try mounting a slim wooden or PVC raceway first so the strips or clips have a smooth, secure surface to grip.
Test one short section, wait the adhesive cure time, then proceed confidently.
Call to action: tools/products to buy or professional help contact
Grab the right tools and materials before you start so the job goes smoothly: pick heavy-duty adhesive clips or mounting strips rated for textured walls, a slim PVC or wooden raceway for deeper textures, a level, measuring tape, and a clean rubbing alcohol wipe for surface prep.
Buy rated clips, cable raceways, and extra strips; or hire a local handyman or electrician if you’re unsure.