How to Get Rid of Textured Plaster Walls Easily
You can smooth textured plaster walls by choosing removal, skim‑coating, sanding, or simply covering with new drywall based on budget, time, and dust tolerance. Inspect for cracks or moisture first, then test a small patch to pick the fastest method. Gather scrapers, joint compound, sanding tools, and a respirator, and decide whether to DIY or hire pros for a cleaner, quicker job. Keep tools, prep, and drying time in mind, and if you want more tips keep going.
Quick Decision: Remove, Skim‑Coat, Sand, or Cover?
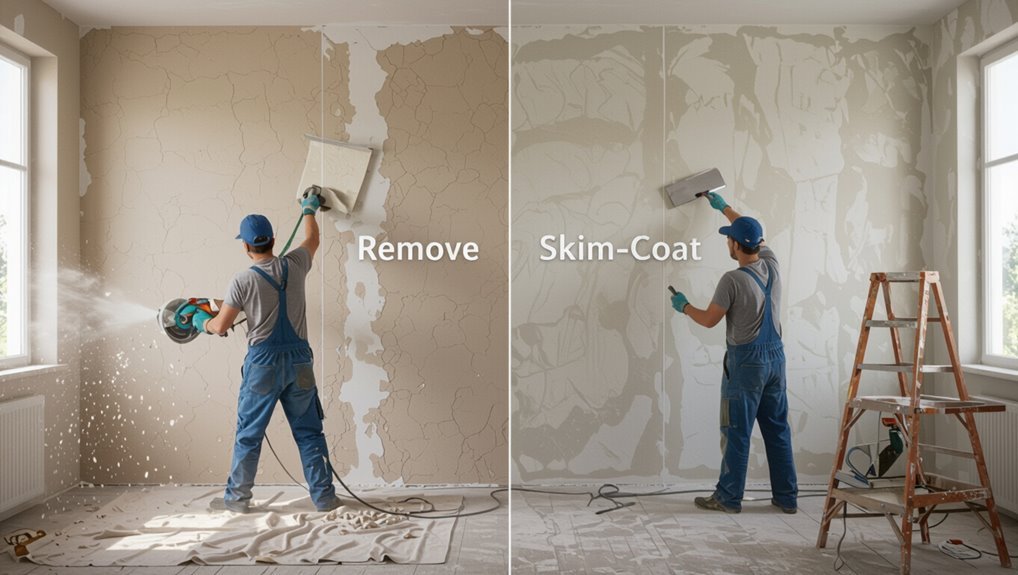
Wondering whether to remove textured plaster, skim-coat, sand, or cover it?
You’ll weigh effort, mess, and final look: full texture removal gives a smooth base but demands serious surface preparation and cleanup; skim-coating hides imperfections with moderate time and skill; sanding’s only for minor bumps; covering with drywall is fastest for flawed walls.
Choose based on budget, timeline, and tolerance for dust.
Should You DIY or Hire a Pro? Cost and Time Tradeoffs
How much time, money, and sweat do you want to invest?
You’ll weigh DIY Considerations like skill level, tools, mess, and repair time against Professional Costs including labor, speed, and warranty.
If you’re handy and patient, DIY saves money but costs hours; hire a pro for faster, cleaner results at higher expense.
Decide by budget, timeline, and risk tolerance.
Identify Common Texture Types: Popcorn, Knockdown, Swirls
Now that you’ve weighed DIY vs. pro options, the next step is recognizing the texture you’re dealing with—because removal method and effort depend on it.
Identify popcorn’s bumpy clusters, knockdown’s flattened peaks, and swirl’s circular patterns. For accurate textured wall identification, photograph samples and test a small patch.
Choose texture removal methods accordingly: scrape popcorn, damp-and-skim knockdown, sand or re-skim swirls.
Inspect Walls: Cracks, Moisture, and Structural Clues
Before you start scraping or skim-coating, walk the room and look closely for cracks, damp spots, and any signs that the substrate or framing may be compromised.
Use simple wall inspection techniques: tap for hollow sounds, note hairline vs. structural cracks, and follow stains to sources.
Apply moisture assessment methods like a moisture meter and visual checks to decide repairs before refinishing.
Essential Tools and Safety Gear Before You Start
Once you’ve checked for cracks and moisture, gather the right tools and safety gear so the work goes smoothly and stays safe.
You’ll need necessary tools like scrapers, sanding blocks, putty knives, a drill with mixer, and drop cloths.
For essential safety bring a respirator, safety goggles, gloves, and a dust mask; consider knee pads and proper ventilation to protect yourself.
Test a Small Area to Pick the Fastest Method
Pick a discreet corner or behind a piece of furniture for a test patch so you won’t notice mistakes.
Try scraping, sanding, and using a remover on that small area to compare speed and finish.
Choose the method that removes the texture fastest with acceptable damage and cleanup.
Test Patch Location
When you’re ready to remove textured plaster, test a small, inconspicuous area first to see which method works fastest and causes the least damage.
Choose test patch placement near trim, behind furniture, or in a closet to hide results.
Try different test patch techniques—scraping, dampening, or heat—so you can judge speed, cleanup, and any substrate damage before committing to a full removal.
Compare Removal Techniques
After you’ve checked a test patch, try several removal techniques on equally small areas so you can compare speed, effort, and damage before committing to a full wall.
You’ll time scraping, sanding, chemical softening, and water methods, note cleanup and waste, and assess substrate harm.
Choose the fastest, least damaging texture removal methods that suit your skill, then plan plaster finishing options accordingly.
Wet‑Scrape Popcorn and Light Stipple to Smooth Walls
Start by softening the texture with water so the hardened finish loosens and lifts easily.
Use wet scrape techniques with a wide blade, working in small sections to prevent gouging. Keep the surface damp, rinse your blade, and collect debris on a drop cloth.
Use a wide blade and wet-scrape in small sections—keep the surface damp, rinse the blade, and catch debris.
For light stipple, a gentle pass will smooth without deep sanding.
Clean, repair, and prime before repainting.
Manual Scraping and Dry‑Sanding for Firmer Textures
For firmer textures you’ll want the right tools and safety gear—think a sturdy scraper, sanding block or pole sander, respirator, and goggles.
Start by scraping loose peaks with firm, controlled strokes, then dry-sand remaining high spots with even pressure to avoid gouging.
Work methodically across the wall and pause to vacuum dust and check progress so you know when to switch grits or move to a finer finish.
Tools And Safety Gear
You’ll need the right tools and protective gear to remove firmer textured plaster by hand—think a wide putty knife or drywall scraper, a stiff-wire brush, medium-grit sanding blocks or an oscillating multi-tool with a sanding pad, and a manual rasp for stubborn high spots.
- Safety goggles and N95 mask
- Work gloves and knee pads
- Drop cloths and dust containment
- Adequate ventilation and lighting
Follow safety precautions and gather essential tools before starting.
Scraping And Sanding Technique
Grip your scraper firmly and work in short, controlled strokes to lift the firmer texture without gouging the underlying plaster. You’ll use proper scraping techniques first, then switch to dry sanding methods to feather edges and smooth. Wear a mask, collect dust, and test a small area.
| Step | Tool | Result |
|---|---|---|
| 1 | Scraper | Remove ridges |
| 2 | Putty knife | Detail |
| 3 | Sanding block | Smooth |
| 4 | Vacuum | Dust control |
| 5 | Primer | Ready surface |
Using a Power or Drywall Sander Safely and Fast
Start by setting up a dust containment system and wearing a proper respirator—an orbital or drywall sander will move dust fast, so control and protection are essential before you turn it on.
Set up dust containment and wear a proper respirator — sanders create dust fast, so protect and control before starting
Use Power Sander Techniques and follow Drywall Safety Tips:
- Test on scrap to choose grit and speed
- Move sander steadily, avoid gouging
- Keep hose and filters clear
- Take regular breaks to inspect progress
Skim‑Coat Heavy Swirls and Knockdown: Step‑By‑Step
Start by evaluating the surface for cracks, loose texture, and areas that need extra prep so you know what you’re working with.
Remove any loose or flaking texture with a scraper or sander, then vacuum and wipe the wall clean.
Finally, apply a smooth skim coat, feathering edges for a flat, uniform finish before sanding and priming.
Assess Surface Condition
Before you mix joint compound, take a careful look at the swirls or knockdown texture to determine how deep the peaks are and how much feathering you’ll need. This assessment tells you whether a single skim coat will do or if you’ll need multiple passes and extra sanding.
Use texture assessment and surface evaluation to plan tools and time:
- note peak depth
- check for cracks
- map uneven areas
- estimate coats needed
Remove Loose Texture
Put on goggles and a dust mask, then scrape away any loose texture so you’re working with a stable surface before applying compound.
Use a wide putty knife or scraper, working from top down. Collect debris and vacuum frequently.
Prioritize texture removal techniques that avoid gouging plaster. Clean, dust‑free walls are wall preparation essentials before you proceed with repairs or skim‑coating.
Apply Smooth Skimcoat
Mix a thin, even skimcoat over the repaired surface to hide swirls and knockdown texture before sanding—use a lightweight joint compound thinned to a mayonnaise consistency and apply with a 10–12 inch knife held at a low angle.
Use proper skimcoat techniques and surface preparation; then:
- Spread long, smooth strokes
- Feather edges thinly
- Let fully dry
- Sand lightly and clean
Feather Joint Compound at Corners and Seams
Start by feathering joint compound into the seams and corners with a clean, flexible knife so the changeover between patched areas and the surrounding wall disappears; you’ll want thin, overlapping passes that taper the compound out to a nearly invisible edge.
Use a consistent feathering technique, let each coat dry, sand lightly, and repeat as needed.
Match angles carefully so corners read seamless and straight.
When Should You Use a Plaster Veneer Instead of Removing Texture?
If removing the texture would damage the wall or take weeks to prep, a plaster veneer can be a smarter choice.
You’ll save time and often money because veneering skips the messy demo and extensive repairs. Use it when your budget or schedule won’t tolerate full removal but you still want a smooth, updated finish.
When Removal Is Impractical
When tearing off textured plaster would damage underlying wiring, lath, or fragile finishes—or when the texture is bonded too tightly to remove without creating major repairs—a plaster veneer is a smarter choice.
It lets you get a smooth, modern surface without the mess, expense, and structural risk of full removal.
- Assess textured wall challenges
- Choose effective removal alternatives
- Prep surfaces for veneer
- Hire experienced installers
Budget And Time Constraints
Because peeling off heavy texture can balloon costs and timelines, you should weigh budget and time before choosing removal over a plaster veneer.
If you’re on a tight schedule or limited budget, opt for a veneer: it uses affordable materials, reduces labor, and gets rooms usable faster.
With efficient planning, you’ll minimize disruption and still achieve a smooth, updated finish.
Covering Textured Walls With New Drywall: Pros and Cons
Although it adds an extra layer to the job, hanging new drywall over textured plaster can be the fastest way to get a smooth, paint-ready surface without ripping out the old wall.
You’ll weigh drywall installation benefits against cost and lost original thickness.
- Quicker finish
- Cleaner lines
- Adds insulation space
- Limits texture alternatives
Repairing Dents, Seams, and Gouges After Smoothing
Once you’ve smoothed the surface, inspect the wall to assess how deep and wide any dents, seams, or gouges are so you know what materials and layers you’ll need.
You’ll patch larger voids with joint compound or backing material, then feather the edges with successive thin coats to blend into the surrounding wall.
Take your time sanding between coats and check for low spots before priming and painting.
Assess Damage Extent
Start by closely inspecting the smoothed wall under good light to map every dent, seam, and gouge—run your hand across the surface to feel low spots and mark them with pencil or painter’s tape so you don’t miss any when you’re ready to repair.
Use damage assessment and texture evaluation to plan repairs:
- Note size and depth
- Identify seam locations
- Prioritize visible areas
- Photograph for reference
Patch And Feather
Now that you’ve smoothed the surface, you’ll patch dents, seams, and gouges by filling low spots with a thin, feathered skim coat so repairs blend seamlessly into the wall; use appropriate patching techniques, applying joint compound in thin layers, sanding between coats, and widening edges as needed.
Employ feathering methods to taper each layer into surrounding plaster, then prime before painting for a uniform finish.
Prime and Seal Smoothed Plaster for Paint or Wallpaper
Prime and seal the smoothed plaster before you paint or paper it to guarantee proper adhesion and a uniform finish.
Use appropriate priming techniques and sealing methods so paint or wallpaper won’t bubble or peel. Prepare and apply in thin, even coats.
Consider:
- Clean surface and sand lightly
- Use a PVA primer or bonding primer
- Apply sealer for porous spots
- Let dry fully before decorating
Choosing Paint Finish and Color for Smoothed Walls
When choosing paint finish and color for your smoothed walls, think about the room’s light, traffic, and how much texture you want visible.
Eggshell or satin hides minor imperfections and cleans easily in high‑traffic areas, while flat finishes minimize sheen and hide flaws in low‑traffic rooms.
Pick colors that complement natural and artificial light and test samples on the wall before committing.
Use color psychology to set mood, and balance aesthetic goals with finish durability for long‑lasting results.
Time Estimates: How Long by Room Size and Texture Type
How long the job takes depends mainly on room size and the type of texture you’re removing: a small bedroom with light orange‑peel can be skimmed and sanded in a day or two, while large living rooms or popcorn ceilings often require several days to a week because of prep, multiple coats, drying time, and cleanup.
- Small room, light texture: 1–2 days
- Medium room, knockdown: 2–4 days
- Large room, heavy texture: 4–7 days
- Ceiling popcorn: 3–7 days
Use these time estimates for planning room variations.
Common Mistakes That Slow the Smoothing Process
Because rushing or skipping prep makes the hardest work later, the biggest slowdowns come from avoidable mistakes—poor surface cleaning, wrong tools or compound, inadequate drying time, and skipping feathering and sanding steps.
You’ll slow yourself by misjudging texture, neglecting prep, using too-thick coats, or sanding prematurely. Follow sequence, wait for full cure, and correct mistakes before moving on to avoid rework and delays.
Pro Tips to Save Time and Reduce Mess
Want to speed things up and keep cleanup manageable? Use proven texture removal techniques and plan efficient cleanup methods before you start.
Prep the room, work in sections, and keep tools organized.
- Score small areas first
- Use wide blades for even sanding
- Keep wet sponges handy for spills
- Bag debris as you go
Control Dust and Dispose of Debris Safely
While you strip or sand textured plaster, keep dust containment your top priority to protect your lungs and keep the rest of the house clean. Seal vents, hang plastic, run a HEPA fan, and wear a respirator. Bag waste immediately and label for proper debris disposal.
| Action | Tool |
|---|---|
| Seal area | Plastic sheeting |
| Filter air | HEPA fan |
| Personal PPE | Respirator |
| Collect waste | Heavy bags |
| Dispose | Labeled bins |
Troubleshooting Stubborn Texture and Uneven Patches
With dust under control and debris removed, you’ll be able to spot stubborn texture and uneven patches more clearly; these trouble spots need different fixes than a simple skim or sanding.
Use targeted texture removal techniques and uneven surface solutions:
- Scrape high ridges with a hand tool
- Feather joint compound into low spots
- Use a bonding primer on repairs
- Sand lightly and inspect again
Frequently Asked Questions
Can Textured Plaster Contain Asbestos or Lead—How to Test and Handle Safely?
Yes — textured plaster can contain asbestos or lead. You should get asbestos testing and lead assessment by certified pros, avoid DIY disturbance, use containment and PPE, and follow local abatement and disposal rules.
Will Smoothing Affect Wall Insulation or Soundproofing Performance?
Smoothing can slightly reduce thermal and acoustic performance if you remove insulating layers; you’ll preserve insulation types by avoiding cavity disruption and maintain soundproofing materials like mass-loaded vinyl or resilient channels when you skim or overlay instead.
Can I Hang Heavy Items on Walls After Skim-Coating or Covering?
Start off on the right foot: yes, you can hang a heavy item after skim-coating or covering, but you’ll need proper wall support—anchor into studs or use rated anchors, and test load capacity before trusting it completely.
How Will Smoothing Impact Door/Window Trim Alignment and Reveal?
Smoothing will shift surface planes, so you’ll need trim adjustments to maintain consistent sightlines; measure and shim as needed. Reveal considerations include gap sizes and shadow lines, so plan offset corrections before finishing and painting.
Are There Building Code or Historic Preservation Rules to Consider?
Yes — you’ll need to follow building regulations and preservation guidelines: check local codes, permits, and historic district restrictions, consult preservation officers for landmarked properties, and document changes so you don’t violate rules or trigger fines.
Conclusion
You’ve got options: remove, skim, sand, or cover, and each has tradeoffs in time, cost, and mess. Pick based on texture, wall condition, and whether you hire pros. Inspect for cracks or moisture, use proper tools and PPE, and avoid common mistakes that create more work. Control dust, dispose safely, and tackle stubborn patches with targeted fixes. Think of the process like peeling an onion—work layer by layer for a smooth finish.