How to Clean Oil Based Stain Brushes Without Paint Thinner
You can clean oil‑based stain brushes without paint thinner by softening the stain with vegetable or peanut oil, massaging it through the bristles, and letting it sit 10–15 minutes. Work the ferrule and heel to loosen trapped residue, then wash under hot running water with dish soap until water runs clear. Reshape bristles and let them dry flat or hanging bristle‑down. Follow safety, disposal, and storage tips below if you want more guidance.
Quick Answer: Clean Oil-Based Stain Brushes Without Paint Thinner
Skip the paint thinner: you can clean oil-based stain brushes using household items like vegetable oil, dish soap, and hot water.
You rub vegetable oil through bristles to loosen stain, rinse with hot soapy water, repeat until clear, then reshape and dry.
This quick method supports brush maintenance and shows practical alternative solvents that avoid harsh chemicals while preserving brush life and performance.
Supplies You’ll Need to Clean Brushes Safely
Before you start cleaning, make sure you’ve got proper gloves and eye protection so solvents or residue don’t contact your skin or eyes.
Choose eco-friendly cleaning supplies—biodegradable brush cleaners or mild solvents—to reduce fumes and environmental harm.
With the right PPE and greener products, you’ll protect yourself and the planet while restoring your brushes.
Gloves And Eye Protection
You’ll want a good pair of chemical-resistant gloves and snug safety glasses before you touch solvent-soaked brushes.
Follow basic safety precautions: check glove integrity, choose splash-proof eyewear, and fit both properly. Protective gear prevents skin irritation and eye injury from splashes or fumes.
Keep a towel and access to running water nearby for quick decontamination, and never rub your eyes while working.
Eco-Friendly Cleaning Supplies
Although oil-based finishes need stronger solvents than water-based ones, you can clean brushes safely with eco-friendly supplies that cut hazards and waste.
Use natural alternatives and biodegradable options to protect you and the environment. Gather these essentials before starting:
- Citrus-based brush cleaner or soy solvent
- Biodegradable soap and warm water
- A scrub comb and jar for containment
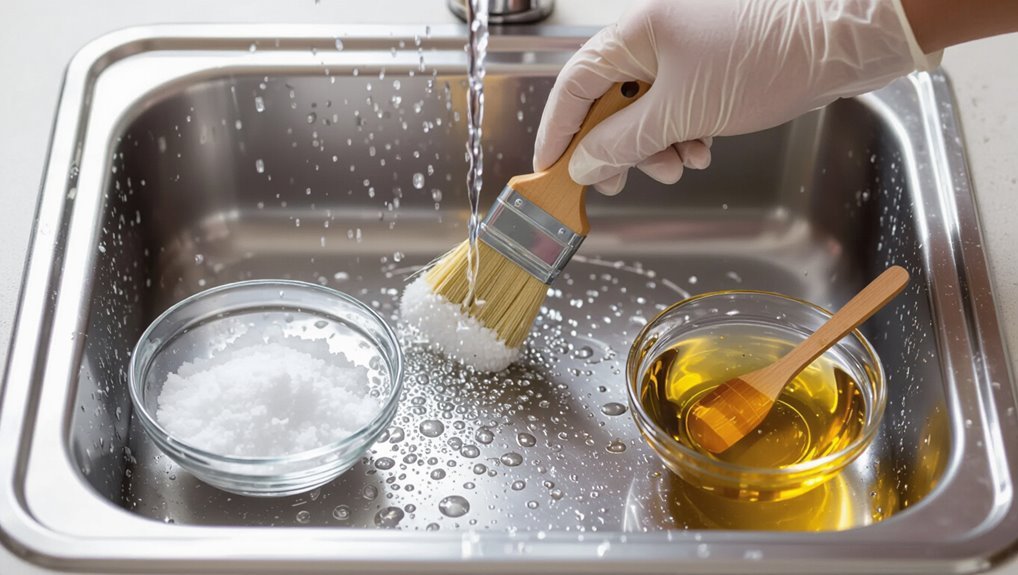
Step-by-Step: Loosen Stain With Vegetable or Peanut Oil
If your brush has dried oil-based stain, start by pouring a small amount of vegetable or peanut oil into a container and swishing the bristles to soften the finish.
Use your fingers or a brush comb to gently massage the oil through the bristles, working from the ferrule outward.
Repeat until the stain loosens and the bristles move freely.
Soften Dried Stain
When brushes have hardened with oil-based stain, soften the dried finish by working a small amount of vegetable or peanut oil into the bristles so the stain loosens without damaging the hairs.
Consider oil viscosity and bristle types as you proceed.
Then:
- Apply a few drops to the ferrule area.
- Let sit 10–15 minutes.
- Gently comb out softened residue with a wide-tooth brush.
Massage Oil Into Bristles
Start by holding the brush over a protected surface and work a few drops of vegetable or peanut oil into the ferrule and base of the bristles with your fingers, spreading it toward the tips to loosen the dried stain without tugging at the hairs.
Massage gently in small circles, promoting oil absorption and loosening residue. Rinse, repeat if needed, and practice proper bristle care to maintain shape.
Wash Brushes With Dish Soap and Hot Water
Scrub the brush under hot running water with a few drops of concentrated dish soap, working the bristles with your fingers or a brush comb to break up remaining stain and solvent residues.
Emphasize dish soap benefits and hot water effectiveness while rinsing until clear.
Then:
- Squeeze bristles to remove water
- Reshape and lay flat to dry
- Store upright when fully dry
Make a DIY Citrus Brush Cleaner
Choose a citrus-based solvent as your cleaner’s foundation, then mix it with a mild emulsifier to help lift and suspend the stain.
Swirl brushes in the solution until the finish breaks down, then rinse thoroughly with warm water and a little dish soap.
Finally, reshape the bristles, let them dry flat, and restore any lost softness with a few drops of linseed or brush conditioner.
Choose Citrus Solvent Base
If you want a DIY cleaner that’s effective and less harsh than mineral spirits, go with a citrus-based solvent: it breaks down oil stains and loosens finish residues while being biodegradable and easier on your nose.
You’ll use citrus benefits and consider solvent alternatives. Choose a purified d-limonene base, avoid additives, and follow safety labels.
- D-limonene purity
- Low odor
- Biodegradable formulation
Mix Cleaner And Emulsifier
Start by measuring one part citrus solvent to two parts warm water in a sturdy jar or plastic tub.
Then add a small squirt of biodegradable dish soap as an emulsifier to help lift oil from bristles.
Swirl gently to combine.
You’ll agitate bristles against the solution, using proven cleaning techniques that favor eco friendly alternatives, letting the mix break down residue before you proceed.
Rinse And Restore Bristles
Grab the jar and hold the brush under warm running water, gently flexing the bristles to flush out loosened stain and solvent; keep the ferrule tilted downward so water rinses away from the handle and you don’t force residue into the glue.
Then use a DIY citrus cleaner and massage bristles, follow with final rinse.
- Remove trapped debris
- Shape bristles gently
- Dry handle-down
Maintain bristle maintenance and set a cleaning frequency to extend brush life.
Household Solvent Options and Their Limits (Acetone, Alcohol, Vinegar)
While household solvents like acetone, rubbing alcohol, and vinegar might seem handy for cleaning oil‑based stain brushes, each has clear limits you should know before trying them.
You can use these household solvents as cleaning alternatives for light tack or surface residue, but they won’t dissolve true oil-based stains, can damage bristles or ferrules, and may pose fumes or flammability risks.
When to Use Mineral Spirits Substitutes : Safety Tips
Because mineral spirits are effective at dissolving oil‑based stains, you should choose substitutes only when the product label, ventilation limits, or storage rules make regular mineral spirits unsafe or impractical.
You’ll use mineral spirits alternatives with caution and follow safety precautions:
- Work outdoors or with strong ventilation.
- Wear gloves and eye protection.
- Store and dispose per local regulations.
Mechanically Clean: Comb, Scrape, and Spin Bristles
If you’ve finished using solvents or chose an alternative for safety, it’s time to tackle the bristles themselves by working them mechanically: combing out dried stain, scraping away gobs at the ferrule, and spinning the brush to loosen trapped residue.
Use a metal comb or old fork, a plastic scraper, and wrist spins. These brush care maintenance tips restore performance and extend brush life.
Rinse and Reshape Brushes After Cleaning Oil-Based Stains
Once the solvent is out, rinse the brush thoroughly with warm water until the runoff is clear.
While the bristles are still damp, use your fingers or a brush comb to reshape the tips into their original profile.
Let the brush dry flat or hanging with the bristles down to maintain that shape.
Rinse Thoroughly With Water
Flush the brush under warm running water until the water runs clear and no oily residue remains in the bristles.
Use proper water temperature and rinsing techniques to dislodge particles, working from ferrule to tip. Gently squeeze and repeat until spotless.
- Direct flow along bristles
- Rotate bristles under stream
- Check for trapped stain between hairs
Reshape Bristle Tips
After rinsing, reshape the bristle tips while they’re still damp so the brush dries in its original form and performs correctly next time.
Use your fingers or a comb to align hairs, removing stray strands and restoring the original edge. Proper brush maintenance prevents splaying and prolongs life.
Store brushes flat or hanging to support bristle care and keep tips crisp for future staining.
Dry and Store Brushes to Prevent Damage
Let the brush dry thoroughly before storing it: shake out excess solvent, reshape the bristles with your fingers or a brush comb, and stand it bristle-side up or hang it so air can circulate.
For proper brush maintenance use simple storage techniques to preserve shape and longevity.
- Store looser in a ventilated area
- Avoid bristle pressure or bending
- Keep away from direct heat
How to Tell If a Brush Is Beyond Saving : Damage Checklist
Knowing when a brush is beyond saving saves you time and prevents poor finishes; check for splayed, stiff, or permanently misshapen bristles, a loose or cracked ferrule, excessive paint buildup near the base, or a rancid solvent odor that won’t go away—any of these signs mean the brush won’t perform reliably and it’s time to replace it.
Don’t waste effort on hopeless tools; prioritize brush maintenance and sensible restoration techniques.
Avoid Contaminating Future Projects (Cleaning and Storage Best Practices)
Keep contamination out of future projects by rinsing and storing oil‑stain brushes properly: immediately flush bristles with the correct solvent, work the ferrule and heel to remove trapped residue, and reshape the brush before letting it dry.
Maintain bristle maintenance and cleaning frequency to guarantee stain prevention and safe handling.
Tips:
- Store in breathable brush storage
- Guarantee proper drying upright
- Label for next use
Eco-Friendly Disposal of Used Cleaners and Rags
One simple step you can take is to treat used solvents and stain‑soaked rags as hazardous waste: never pour solvents down drains or toss soaked rags in regular trash, since they can ignite or contaminate water.
Instead, you should air‑dry rags outside in a safe area, store them in metal containers, and take materials to a hazardous‑waste or eco friendly disposal site to support sustainable practices.
Tools and Supplies to Keep on Hand for Stain Brush Cleanup
A small kit of reliable tools and supplies makes stain‑brush cleanup faster and safer: you’ll want separate containers for solvent and rinse water, a metal can with a tight lid for soaking, quality natural‑bristle or synthetic brushes dedicated to oil‑based stains, a wire comb or brush picker for removing buildup, disposable nitrile gloves, lint‑free rags, and a supply of the correct solvent (mineral spirits or a manufacturer‑recommended alternative).
- Wire comb or brush picker
- Disposable nitrile gloves
- Lint‑free rags
Keep a maintenance log to track brush maintenance and cleaning frequency so you’ll replace or deep‑clean brushes before they degrade performance.
Frequently Asked Questions
Can I Use Peanut Oil if Someone Has Nut Allergies in the Household?
You shouldn’t use peanut oil if someone has nut allergy implications in the household; you could trigger a reaction. Instead, choose alternative oils like mineral oil or vegetable-derived, low-allergen substitutes, and always check specific allergy risks first.
Will These Methods Remove Dried, Years-Old Oil-Based Stain Completely?
“Where there’s a will, there’s a way.” You won’t always remove years-old buildup completely; aggressive stain removal and careful brush care can restore many bristles, but severely dried, long-aged stain often needs replacement despite thorough cleaning.
Can I Clean Synthetic Bristle Brushes the Same Way as Natural Hog Bristles?
Yes — you can clean synthetic bristle brushes similarly, but you’ll adjust solvents and agitation; you’ll protect brush maintenance and bristle care by avoiding high heat, using gentle cleaners, rinsing thoroughly, reshaping tips, and drying flat to prevent damage.
Do These Cleaners Affect Paint Adhesion if Trace Residue Remains?
Like a faint shadow, yes — residue impact can weaken paint adhesion if cleaners leave films behind. You’ll want to rinse thoroughly and test a small area, because leftover cleaners can reduce bond strength and cause peeling.
How Long Can Brushes Sit in Oil Before Bristle Damage Occurs?
You can’t let brushes soak in oil more than 24–48 hours; prolonged exposure harms bristle longevity. For proper brush maintenance, rinse and reshape after short soaks, store upright, and avoid leaving bristles submerged.
Conclusion
You don’t need paint thinner to revive stained brushes—just elbow grease, oil, hot soapy water, and patience. Think of one stubborn brush I rescued with peanut oil: like untying a knotted shoelace, the oil loosened dried fibers, dish soap rinsed residue, and the bristles sprang back. Ninety percent of brushes respond to this method, so clean, store, and reuse—saving money, reducing fumes, and keeping your next project streak-free.