Why Does Caulk Crack When Painted? Causes and Fixes
You’re seeing cracked painted caulk because the caulk, paint, or application didn’t match the job: cured too soon, wasn’t fully dry, or was the wrong type for movement and paint. Dirt, oil, or old paint can stop adhesion, and seasonal movement or old brittle caulk will split. Fixes include removing and cleaning old caulk, using a paintable, flexible product, tooling properly and allowing full cure before painting — keep going to learn the exact steps and tips.
Quick Answer: Fix Painted Caulk That’s Cracking Now
If your painted caulk is cracking, don’t panic—you can usually fix it yourself with a few tools and basic steps.
Start by removing loose or cracked caulk, clean and dry painted surfaces, then apply a compatible caulk and smooth the bead.
Let it cure fully before repainting. You’ll prevent further splits by choosing flexible, paintable caulk and following drying times.
Quick Diagnostic Checklist: Painted Caulk Problems
Start by checking paint adhesion to see if the coating lifted from the caulk or substrate.
Then test movement and flexibility by gently stretching the joint or tapping nearby surfaces to reveal stress points.
Those two quick checks tell you whether the issue is paint failure, caulk failure, or joint movement.
Paint Adhesion Check
Wondering whether the paint or the caulk is at fault when you see peeling or cracking? Check adhesion testing first: press a piece of painter’s tape over painted caulk, peel sharply—if paint lifts, adhesion failed.
Inspect surface preparation history: was the caulk clean, dry, and primed? Note edges, blistering, or powdery residue.
Record results before re-caulking or repainting.
Movement And Flexibility
Because caulk flexes differently than paint and the substrate, movement is the most common cause of painted caulk cracking or splitting.
You should check joint type, expected movement, and whether the caulk used matches that movement (low-modulus for high movement, high-modulus for minimal movement).
You’ll inspect caulk flexibility and joint movement, replace wrong-grade caulk, and allow proper curing before painting.
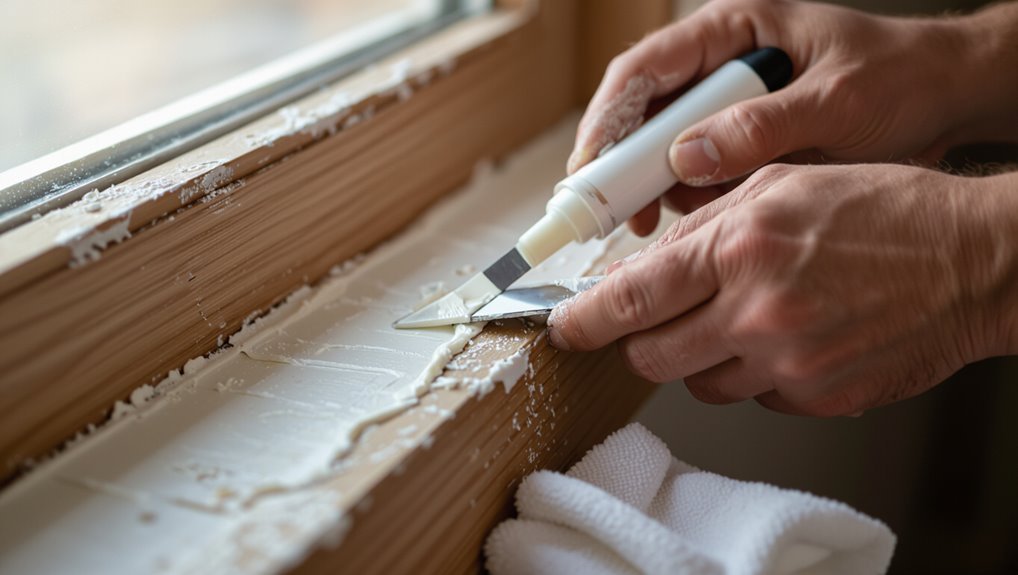
Step-by-Step Repair for Cracked Painted Caulk
Start by prepping the area and removing the old cracked caulk so you have a clean, dry surface.
Then recaulk carefully, filling the gap completely and keeping the bead consistent.
Finish by smoothing the new caulk for a neat seal and proper paint adhesion.
Prep And Remove Old
Before you apply new caulk, thoroughly prep the joint and remove the old painted caulk so the new seal will stick and look clean.
Score and peel painted caulk with a utility knife and scraper, then clean residue with rubbing alcohol.
Check substrate for damage, repair as needed, and choose appropriate caulk types.
Proper surface preparation guarantees adhesion and prevents future cracking.
Recaulk And Smooth
Now you’re ready to apply the new caulk: cut the nozzle to the recommended bead size, load the tube into a caulk gun, and hold the gun at a 45° angle to the joint for consistent pressure as you run a steady bead along the seam.
- Choose caulk types for flexibility.
- Apply steady pressure.
- Smooth with a wet finger or tool.
- Let cure per application techniques.
Why Caulk Cracks When Painted: The Short Answer
If you paint over caulk that hasn’t fully cured or that flexes differently than the surrounding material, it will crack.
You should pick caulk types suited for the job and confirm paint compatibility before finishing.
Improper curing, incompatible chemistry, or surface contamination cause adhesion loss and fissures.
Prep, cure time, and matching product specs prevent most failures so your paint stays smooth and intact.
How Caulk Elasticity and Paint Flexibility Interact
When you match a caulk’s elasticity to the paint’s flexibility, both materials move together and seams stay intact rather than tearing or cracking.
- You assess caulk elasticity for expected movement.
- You pick paint flexibility that accommodates that movement.
- You allow proper cure time so layers bond.
- You test a small area to confirm no cracking before full application.
Silicone vs Acrylic vs Polyurethane Caulks (Key Differences)
A few key differences make choosing between silicone, acrylic, and polyurethane caulks straightforward: silicone stays extremely flexible and water-resistant but won’t accept paint.
Acrylic is paintable and easy to tool but offers less movement capability.
Polyurethane combines strong adhesion and durability with good flexibility though it can be messier to apply and often needs longer cure times.
You’ll weigh silicone advantages, acrylic benefits, polyurethane characteristics in caulk comparisons.
Paint Choices and Compatible Primers for Caulk
Choosing the right caulk mattered for finish and flexibility; now you’ll match paint and primer to the caulk type so the joint stays sealed and looks right.
You’ll check paint compatibility and primer selection before painting. Quick guide:
- Acrylic latex: use water-based primer and paint.
- Silicone: use specialty primers, silicone-compatible paint.
- Polyurethane: use oil-based primer.
- Hybrid: follow manufacturer.
How Paint Film Thickness Causes Cracking
If you lay paint on too thickly, it can’t flex with the caulk and will crack as the joint moves.
Your paint application must control film thickness to match caulk types and guarantee paint compatibility.
Poor drying conditions—temperature impact and humidity levels—make thick film brittle.
Proper surface preparation and thin, even coats prevent tension, allow elasticity, and reduce cracking.
Substrate Movement: Wood, Drywall, and Metal Effects
Paint film behavior matters, but the materials behind the caulk drive how much movement the joint will see.
You’ll notice different causes of joint stress depending on substrate:
- Wood expansion causes gaps and squeezes caulk when humidity and moisture impact framing.
- Drywall settling and foundation shifts create cracks at seams.
- Metal warping from temperature changes stresses joints.
- Monitor structural integrity and use flexible caulk.
Temperature, Humidity, and Joint Movement
Because temperature and humidity change the size and stiffness of both caulk and substrates, joints can open, close, or shear as conditions cycle; you’ll see tighter seams in cold, dry weather and swollen, compressed joints in heat and humidity.
You should account for temperature fluctuations and humidity levels when selecting caulk and paint, since joint expansion from seasonal changes and moisture impact are key environmental factors causing cracks.
Poor Surface Prep and Adhesion Failures
Seasonal movement stresses caulk, but most failures start at the surface: old paint, dust, oil, or loose material keeps caulk from sticking and lets small gaps form into long cracks.
Seasonal movement stresses caulk, yet most failures begin with surface issues—paint, dust, oil, or loose material preventing adhesion.
You should remove surface contaminants and match caulk types to substrates.
Steps:
- Clean thoroughly.
- Strip loose paint.
- Choose correct caulk types.
- Prime porous surfaces.
Application Mistakes That Weaken Caulk Bonds
When you squeeze the bead too fast, skip tooling, or apply caulk in the wrong temperature, you compromise the seal before it even sets. You must follow proper application techniques and choose the right caulk selection for the job. Tool the joint, control bead speed, and work within temperature ranges to guarantee adhesion and flexibility.
| Mistake | Fix |
|---|---|
| Fast bead | Slow, steady squeeze |
| No tooling | Smooth within skin time |
| Wrong temp | Wait for proper range |
| Poor technique | Practice steady strokes |
When Old Caulk Hardens and Loses Flexibility
When caulk ages, it gradually loses elasticity so it won’t stretch like it used to.
That stiffening contributes to adhesion breakdown over time, making gaps and lifts more likely.
If the joint sees repeated movement, the brittle caulk will crack from fatigue and need replacement.
Age-Related Elasticity Loss
Although caulk can look fine on the surface, it stiffens and loses elasticity as the polymers break down over years.
So you’ll start seeing brittle, cracked beads that no longer flex with normal movement. You’ll notice age-related elasticity loss affecting caulk lifespan and causing visible elasticity changes.
Consider these signs:
- Small surface fissures
- Loss of stretch
- Paint cracking
- Repeated failure under movement
Adhesion Breakdown Over Time
As caulk ages, its grip to surfaces weakens and it hardens, so you’ll start seeing gaps, peeling edges, or sections that simply pull away from joints.
You’ll notice adhesion issues as the sealant loses tack and cohesion; paint then cracks along failing seams.
To address long term effects, remove compromised caulk, clean surfaces thoroughly, and apply fresh, compatible sealant for a durable bond.
Repeated Movement Fatigue
If joints keep shifting, old caulk will stiffen, lose elasticity, and crack under repeated movement.
You’ll notice material fatigue as paint splits and seals fail. Improve joint stability and prevent recurrence by addressing movement and replacing degraded caulk.
- Inspect shifting joints
- Remove hardened caulk
- Use flexible sealant
- Allow full cure before painting
Preventing Cracking: Prep and Application Checklist
When you want caulk to last, start with thorough prep and a careful application plan: clean joints, remove old sealant, dry surfaces completely, and choose the right caulk for the material and movement expected.
Inspect gaps, mask edges, and use proper application techniques—steady bead, correct nozzle angle, and consistent pressure.
Tool and smooth promptly, allow full cure, then paint compatible sealant.
Best Caulk Products for Paintability and Durability
Now that you’ve prepped and applied caulk correctly, pick a product that balances paintability with long-term flexibility and adhesion.
Choose based on caulk types and paint compatibility to avoid future cracks.
Pick caulk by type and paint compatibility to prevent future cracking and ensure lasting adhesion.
- Acrylic latex: best for indoor paint compatibility.
- Siliconized acrylic: adds durability, still paintable.
- Pure silicone: excellent flexibility, check primer needs.
- Polyurethane: superior adhesion and longevity, paint-ready with proper prep.
Maintenance: When to Re-Caulk vs. Touch Up Paint
Although small paint chips and surface stains can often be fixed with a quick touch-up, you’ll need to re-caulk when joints show gaps, hardening, or recurring cracks that let in moisture or allow movement.
Check caulk lifespan and paint compatibility: if sealant is brittle, separated, or incompatible with your finish, remove and replace.
Otherwise, clean and touch up paint for minor cosmetic issues.
Repair Cost and Time Estimates for Common Approaches
If you decide re-caulking is necessary, you’ll want a clear idea of how much time and money each repair method will take so you can plan work or hire a pro.
- DIY strip-and-recaulk: low cost, 1–3 hrs — common materials, minimal labor requirements.
- Paint touch-up: cheapest, 30–60 mins.
- Pro re-caulk: higher cost, 1–2 hrs plus labor.
- Specialty sealants: moderate cost, variable time.
Consider repair techniques, cost analysis, and time estimates.
Final Checklist: Keep Caulk Joints Smooth and Painted
1 simple checklist will keep your caulk joints smooth, sealed, and paint-ready: inspect for gaps or cracks, remove loose material, clean the surface, apply backing rod where needed, tool the bead for a flush finish, and prime or paint once cured.
Follow caulk maintenance tips: let cure fully, sand lightly if needed, and guarantee compatible painting techniques and primer for lasting adhesion.
Frequently Asked Questions
Can Caulk Mold or Mildew Under Paint?
Yes — caulk can mold or mildew under paint if moisture gets trapped. You’ll need regular caulk maintenance, inspect seals, and improve moisture prevention; otherwise hidden mold will grow, stain paint, and degrade the sealant.
Is Painted Caulk Safe for Food-Prep Areas?
Yes — you can use painted caulk in food-prep areas if you choose appropriate caulk types (silicone or NSF-listed kitchen products) and follow food safety practices; avoid porous, non-certified caulks that trap moisture or contaminants.
How Long After Painting Can Caulk Be Exposed to Water?
You can expose caulk to water after 24–72 hours depending on caulk types and paint compatibility; acrylics usually cure faster, silicones take longer, and paintable specialty caulks follow manufacturer cure times—always check product instructions.
Will Painted Caulk Yellow Over Time?
Yes — painted caulk can yellow over time, especially if it’s low-quality or solvent-based; you’ll improve caulk longevity and paint adhesion by using paintable, non-yellowing caulk and applying compatible primer and topcoat correctly.
Can You Paint Over Silicone Caulk Repeatedly?
You can’t reliably paint silicone caulk repeatedly; silicone durability resists adhesion, so you’ll need specialized primers and careful painting techniques to get paint to stick, or switch to paintable caulk for lasting, repeatable results.
Conclusion
You’ve got this — fix the worst spots now by cutting and re-caulking, and touch up paint once the caulk’s fully cured. Pick a high-flexibility, paintable caulk and prep surfaces so the new bead bonds; that’ll stop cracks from coming back like old habits. Keep an eye on joints seasonally and act fast when gaps appear. With a little upkeep, your caulk lines will stay smooth and paint-ready for years to come.