How to Paint a Distressed Wall for a Vintage Look
Start by prepping and priming the wall, sanding flaking areas and patching holes, then choose a base color and one or two accent tones. Layer a sturdy base coat, add midtones with thin glazes, and use ragging, stippling, or dry brushing to blend. Distress predictable wear areas—corners, edges, doorframes—by sanding selectively, then seal key spots. Test effects on a board first so you can tweak color and texture, and keep going to learn more techniques.
Quick Starter Plan for a Distressed Wall
Start by evaluating the wall’s condition and picking one base color and one or two accent tones.
You’ll prep surfaces, sand flaking paint, and patch holes.
Test vintage color schemes on a board, then layer base, glaze, and light sanding for worn texture.
Try distressing tools—rags, brushes, sandpaper—for varied effects.
These distressed wall ideas give authentic aged charm.
What People Search For About Distressed Walls
What do people actually look for when researching distressed walls? You want clear tips on techniques, tools, color combos, and maintenance to achieve distressed finishes and vintage aesthetics without guessing.
Searchers ask about durability, layering methods, restoration, and faux aging tricks.
- Techniques
- Tools
- Color choices
- Upkeep
Best Rooms & Surfaces for Distressed Paint
Although distressed paint can add instant character, choosing the right room and surface makes the effect both attractive and practical.
You’ll favor entryways, living rooms, and bedrooms for vintage decor accents, and kitchens for rustic charm if sealed properly.
Use drywall, reclaimed wood, or brick for best adhesion.
Try distressing furniture pieces to match walls, creating cohesive, intentional aged scenes.
Choosing a Vintage Look: Plaster, Peel, or Patina
Think about the mood you want: a soft plastered vintage texture gives a warm, lived-in feel, while peeling paint creates bold, weathered character.
You can also aim for a subtle patina that suggests age without heavy distressing.
Pick the approach that matches your room’s style and how much maintenance you’re willing to do.
Plastered Vintage Texture
When you want a wall that feels like it’s lived in for decades, choosing between plaster, peeled paint, or a patina determines the room’s whole mood and maintenance needs.
You’ll use careful plaster application to build depth, texture, and subtle imperfections that mimic age. Consider tools, drying time, sealers, and color mixing.
- Tools
- Layering
- Sealing
- Color blending
Peeling Paint Patina
If you want a wall that looks like its paint has naturally flaked away over time, a peeling paint patina gives you that effortless, weathered charm without the labor of real decay.
You’ll layer base and top colors, use peeling techniques like masking fluid or salt, then sand and glaze.
Focus on subtle patina effects, controlled randomness, and sealing to preserve the look.
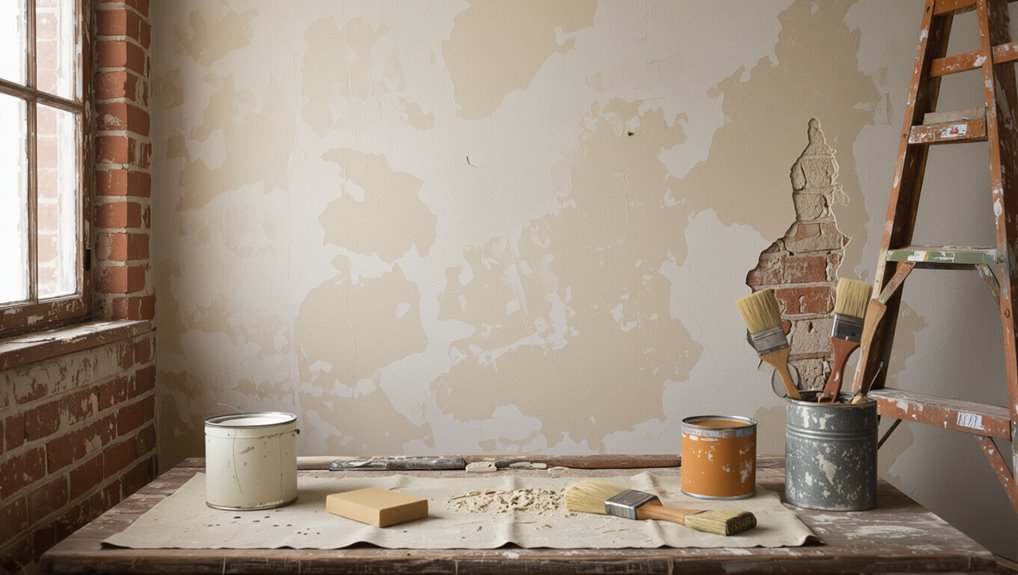
Tools for a Distressed Wall Project
You’ll need a compact set of painting basics—rollers, angled brushes, trays, and quality primer—to get clean, even coverage.
For the distressed look, gather supplies like sandpaper in varied grits, scrapers, rags, a putty knife, and optional glazing or antiquing mediums.
I’ll walk you through which tools matter most for each technique and how to use them efficiently.
Essential Painting Tools
1 essential kit will get you started: a quality angled brush, a couple of foam rollers, a tray, sandpaper, and a damp rag.
You’ll also want essential brushes and paint additives to control texture and drying. Carry gloves and drop cloths. Keep tools clean to reuse.
- Angled brush
- Foam roller
- Sandpaper
- Tray
Distressing Supplies List
Gathering the right tools makes distressing a wall faster and more consistent, and you’ll want a mix of standard painting gear plus a few specialty items for texture and wear.
You’ll need sandpaper (various grits), orbital sander, wire brush, tack cloths, glaze and wax applicators, assorted brushes, rags, putty knife, painters’ tape, and sample paints to test distressing techniques and paint finishes.
Paint Types That Create Authentic Distress (Chalk, Milk, Latex)
Three popular paint types—chalk, milk, and latex—each give distressing a distinct look and feel, so pick the one that matches the level of wear and the finish you want.
Choose chalk, milk, or latex paint to achieve the exact distressed look and finish you want.
You’ll weigh chalk paint benefits, milk paint applications, latex paint advantages, and texture variations to get authentic patina.
- Chalk: matte, sandable
- Milk: flaky, historical
- Latex: durable, flexible
- Blends: layered effects
Best Primers & Undercoats for Distressing
A thin coat of the right primer sets your distressed finish up to look convincingly aged and hold up over time.
For best primer types, choose bonding acrylic for slick surfaces, shellac for stubborn stains, or a water-based primer for easy sanding.
Undercoat recommendations: use a slightly contrasting neutral undercoat and sand lightly between layers to control how much base shows through.
Picking Colors That Mimic Age & Sun‑Fade
When you pick colors that mimic age and sun‑fade, focus on muted, warmed tones and subtle variations rather than exact copies of any single hue; this helps your wall read as naturally weathered from a distance and up close.
Use vintage color palettes and sun faded hues for believable results.
Consider:
- Warm grays
- Faded sage
- Dusty terracotta
- Muted ivory
Layering: Base, Midtones, and Topcoat Plan
Start with a sturdy base coat that’ll give your wall the aged color and adhesion you need.
Add one or two midtone layers to build depth, sanding or rubbing areas to reveal the base where natural wear would occur.
Finish with a thin topcoat and selective distressing to tie the look together while protecting the surface.
Base Coat Selection
Think of the base coat as the stage where your distressed finish earns its depth. You’ll choose base coat finishes and base coat colors that set mood and contrast with midtones.
Pick durable, matte formulas and test swatches. Consider undertones and light.
- Matte for authenticity
- Warm vs cool hues
- Test in natural light
- Durable primer-compatible paints
Layering And Distressing
Layer your paints in deliberate stages—base, midtones, and topcoat—so each layer contributes to the final worn effect rather than just hiding what came before.
You’ll apply a muted base, add midtone washes for depth, then a contrasting topcoat.
Use sanding, rubbing, and selective scraping distressing techniques to reveal layers and enhance vintage aesthetics, working sparingly until the look feels balanced and authentic.
Prepping the Wall: Clean, Patch, Profile
Before you pick up any paint, give the wall a thorough clean, fix holes and cracks, and sand or profile the surface so the new finish will adhere properly.
Before painting, clean, repair, and sand the wall so the new finish adheres smoothly.
You’ll prep for authentic wall textures and help vintage finishes sit evenly.
Follow these steps:
- Wash surface with mild detergent.
- Patch holes with spackling.
- Sand smooth or add profile where needed.
- Prime repaired areas.
When to Use Texture Additives
You’ll want to add texture when the wall needs more depth or to mask imperfections before distressing.
Pick an additive based on the grit and finish you want—light sand for subtle tooth, heavier aggregates for pronounced texture.
Apply it sparingly and test small areas so you can control the final effect.
When To Add Texture
Decide to add texture when the wall’s surface flaws or the look you’re after call for extra depth—texture additives give you control over grit, body, and drying time so you can match a subtle aged patina or a heavy, rustic finish.
Use texture techniques and texture materials sparingly; add texture when repairing, highlighting, aging, or unifying surfaces.
- Repair
- Highlight
- Age
- Unify
Choosing The Right Additive
When you pick a texture additive, match its grit, body, and drying time to the effect you want—fine silica for a subtle patina, coarse aggregates for heavy rustication, and slow-drying binders when you need working time.
Choose additive options based on your paint base and desired durability.
Consider compatible texture types, testing small samples so you can confirm adhesion, finish, and cleanability before committing.
Applying For Desired Effect
If you’re aiming for subtle age, bold texture, or somewhere between, additives let you control where and how the grit shows up—use fine silica for faint patina, medium aggregates for light relief, and coarse particles when you want pronounced rustication.
You’ll choose placement by testing swatches, balancing color combinations and texture contrasts, then seal selectively to keep highlights.
- Test small
- Layer thinly
- Blend edges
- Seal selectively
Sanding for Subtle Wear: Where to Focus
Start by targeting the places natural wear would hit: edges, corners, door frames, and around light switches and outlets.
Use light sanding techniques—medium grit for painted layers, fine for topcoat—to mimic authentic wear patterns.
Sand selectively, following traffic lines and hand reaches. Keep strokes parallel to surfaces, wipe dust, and step back often so your distress looks intentional, not accidental.
Dry‑Brushing Tips for Faded Streaks
Pick a stiff, flat brush for control and a soft-bristled one for feathering, and test them on scrap wood so you know the effect.
Load only a little paint, wipe most of it off on a rag, then skim the wall to create faint streaks.
Blend the marks with short cross-strokes until the fade looks natural.
Choose The Right Brush
Choose a brush that lets you control how much paint hits the wall: a flat, synthetic-bristle brush works best for dry-brushing because it holds little paint and creates thin, streaky marks you can feather out.
Use varied brush types and brush techniques to shape texture.
- Flat synthetic
- Angled sash
- Stiff natural bristle
- Small fan for blending
Load Paint Sparingly
Load only a thin sliver of paint on your brush—wipe most of it off on the tray or a rag so the bristles just hold a whisper of color.
Use a sparing application to catch raised grain and edges; test paint consistency on scrap wood.
Work in short pulls, lifting often to avoid buildup, and let subtle streaks form rather than heavy coverage for a vintage fade.
Blend With Cross‑Strokes
After you’ve wiped most paint off the brush, start blending with short cross‑strokes to soften edges and build that lived‑in look.
You’ll use a precise cross stroke technique, working light layers, blending colors subtly to suggest age without overdoing it.
- Work in small sections
- Vary pressure
- Feather edges
- Step back and adjust
Creating Realistic Peeling Paint Safely
When you want convincing peeling paint without damaging the wall, work methodically and prioritize safety: wear a respirator, goggles, and gloves, ventilate the room, and protect floors and furniture with heavy-duty drop cloths.
Use controlled peeling techniques—score small areas, lift edges with a putty knife, and sand lightly.
Follow safety measures for dust and debris disposal, and test on a scrap piece first.
Glazing Methods for Depth, Grime, and Shadow
Want your distressed wall to read as weathered and three-dimensional instead of flat? Use thin, translucent glazes to build grime and subtle shadow.
Apply glazing techniques sparingly, work from top edges into crevices, and blend with a soft brush so shadow effects feel natural.
- Thin glaze layers
- Directional brushing
- Controlled wiping
- Layered drying
Ragging & Stippling for Organic Patina
Get your rags, stipple brushes, and thinned paints ready so you’re not fumbling mid-layer.
Start by pressing and lifting a crumpled rag to build soft, irregular marks, then switch to a stipple brush to add speckled texture and tie the look together.
Work in thin layers, letting each dry so you can control depth and achieve a natural patina.
Preparing Tools And Paints
Start by laying out the few essential tools and mixing your paints to the right consistency for ragging and stippling—these techniques rely more on texture and touch than precise brushwork.
Focus on paint selection and tool organization: gather rags, stipple brushes, foam, and trays.
- Soft rags
- Stipple brush
- Foam pieces
- Mixing tray
Layering With Rag And Brush
With your tools and mixed paints at hand, move on to building layers with ragging and stippling to create that lived-in patina.
Start by dabbing a wrung rag for subtle texture, then switch to varied brush styles to add streaks and soft highlights.
Alternate translucent washes and dry stippling, step back often, and blend edges so the rag techniques and brushwork read naturally aged.
Faux Plaster & Limewash Techniques
Faux plaster and limewash offer two economical ways to give your wall aged depth and subtle texture without tearing out drywall; both rely on layering and varied application to create natural-looking imperfections.
You’ll use faux techniques and limewash effects to soften color, highlight highs and lows, and control sheen.
Follow basic steps:
- Prep and prime
- Mix thin layers
- Apply with trowel or rag
- Seal lightly
Making Hairline Cracks and Crazing
After you’ve built up limewash or faux plaster layers, you can introduce fine hairline cracks and crazing to age the surface naturally.
Work subtly: dry brush thin glaze, score tiny lines with a kraft knife, or gently heat spot areas to encourage crazing.
Work subtly — dry‑brush thin glaze, score faint hairlines with a kraft knife, or gently heat spots to encourage delicate crazing.
Test crack techniques on a sample board first.
Seal lightly to preserve aging effects without flattening texture.
Distressing Around Trim and Architectural Details
When you age a wall, pay special attention to trim and architectural details — those edges show wear first and make the finish look believable.
You’ll use gentle distressing techniques and careful paint layering to create trim contrast and enhance architectural highlights without overdoing it.
- Sand edges subtly
- Rub glaze on corners
- Strike through topcoat
- Feather shifts
Controlling Distress Intensity for a Natural Look
Because too much distress looks staged, dial back your technique so wear reads believable: scrub small test spots, step back often, and focus marks where real traffic or sun would hit. Vary pressure and layering to mix distress techniques and color variations subtly.
| Area | Intensity |
|---|---|
| Corners | Low |
| Baseboards | Medium |
| Center panels | Light |
| Door frames | Medium |
| Trim edges | Low |
When to Use Heat Guns, Putty Knives, and Blocks
Three tools—the heat gun, the putty knife, and sanding blocks—play distinct roles in controlled distressing:
Use a heat gun to soften and lift brittle paint for peeled areas.
A putty knife is used to scrape thin layers and create sharp chips or raised edges.
Sanding blocks help to blend, soften, and feather shifts for a natural finish.
- heat application techniques
- putty knife uses
- block distressing methods
- distressing safety tips
Layer‑Removal Tricks for Multi‑Color Finishes
Want to reveal hidden colors without ruining the layers beneath? Use gentle paint removal with fine grit sanding and targeted scraping to expose selective bands of vintage layering.
Combine multi color techniques: scumble translucent washes and dry brushing for controlled color blending. Work slowly, testing small areas, and alternate solvent lifts and mechanical abrasion to maintain integrity of distressed finishes while showcasing underlying hues.
Aging Fixtures & Hardware to Match the Wall
When you age fixtures and hardware to match a distressed wall, work in layers and think like a conservator: strip shiny finishes lightly, add controlled patina with chemical stains or paint glazes, then scuff and rub back where natural wear would occur.
You’ll balance vintage hardware charm with durable finishes through careful fixture aging:
- Clean
- Strip
- Stain/glaze
- Seal
Protecting Floors and Furniture During Work
Before you lay down drop cloths, clear the room and move smaller furniture out—then cover remaining pieces and the entire floor with durable, paint-proof protection so dust and drips don’t ruin finishes. Use proper Floor coverings and Furniture protection, plan Furniture removal, Prep surfaces, mark the Work area, follow Safety measures, and keep Cleanup tips handy.
| Item | Action |
|---|---|
| Drop cloths | Secure edges |
| Floor coverings | Tape seams |
Dry Times and When to Add the Next Layer
Let each coat dry fully before you move on—most water-based paints need about 1–2 hours to be touch-dry and 4–6 hours before recoating, while oils can take much longer.
Check the paint can’s guidelines and test a small area to be certain layers aren’t tacky.
Waiting the proper time between layers prevents smudging and guarantees the distressed finish sands and layers cleanly.
Drying Time Guidelines
A good rule of thumb is to wait until each coat feels dry to the touch and no longer tacky before applying the next layer; typically that’s 1–2 hours for latex paints and 4–6 hours for oil-based paints under normal room conditions.
Use proper drying techniques and moisture control to avoid trapping solvent.
- Check tackiness.
- Improve ventilation.
- Use fans/heat.
- Avoid humidity.
Timing Between Layers
When you’re ready to add the next layer, wait until the previous coat is dry to the touch and not tacky—typically 1–2 hours for latex and 4–6 hours for oil-based paints under normal room conditions.
Then test a small, inconspicuous spot before proceeding.
Plan drying intervals based on humidity and temperature, use layering techniques that build thin coats, and sand lightly between layers for controlled distressing.
Sealers That Preserve the Distressed Finish
Because a distressed wall depends on texture and subtle color variations, choosing the right sealer matters—you want protection without masking the aged look.
You’ll weigh sealer options for finish durability and appearance. Pick a low-sheen product and test first.
Consider:
- Matte acrylic
- Water-based satin
- Wax paste
- Breathable mineral sealer
Quick Fixes for Over‑Distressing or Harsh Transitions
If you overdid the distressing or your changes look too stark, don’t panic—you can soften and blend them quickly with a few targeted moves.
Lightly sand edges, feather paint with a damp rag, and apply thin glaze layers to mute stark spots.
Use gentle scumbling and small brushes to refine problem areas.
These over distressing fixes and harsh shifts solutions restore balance fast.
Scale Tips: Accent Wall vs Whole Room
Wondering whether to distress a single accent wall or the whole room? You’ll choose based on size, light, and desired impact.
An accent wall creates focal drama; a whole room feels cohesive and vintage-worn. Consider furniture, traffic, and upkeep.
Decide how bold you want the effect before sanding or glazing.
- Scale of space
- Natural light
- Furniture layout
- Maintenance
Budget Swaps That Still Look Authentic
You can get an authentic distressed look without spending a lot by using faux patina techniques like glazing or dry brushing to mimic aged finishes.
Swap pricey tools for affordable options—think foam brushes, sandpaper, and old rags—to achieve natural wear and texture.
And choose budget paint alternatives like matte or eggshell base coats topped with tinting glaze to stretch your dollars while keeping the finish believable.
Faux Patina Techniques
When you want the depth and character of aged metal or weathered plaster without breaking the bank, faux patina techniques give you big impact for little cost.
You’ll use simple paints, glazes, and household acids for faux aging and vintage finishes that read authentic.
Try these budget-friendly approaches:
- Layered glazing
- Dry brushing
- Salt or vinegar spotting
- Subtle sanding
Affordable Distressing Tools
Although pro-grade tools can be nice, you can get authentic-looking distress with everyday items that cost next to nothing.
Use sandpaper, steel wool, and a stiff brush for varied distressing techniques; an old rag and toothbrush add subtle texture.
Experiment with sponges and cardboard to control wear.
Test color combinations on scrap wood, so your budget swaps still read like intentional vintage finishes.
Budget Paint Alternatives
A few inexpensive paint options can give your distressed wall an authentic, weathered look without breaking the bank.
You can mix and match affordable paints to mimic layers, glaze, and worn edges for believable vintage finishes.
Try these budget swaps:
- Latex base with chalk paint accents
- Diluted acrylic glaze
- Sample-size colors for layering
- Matte enamel topcoat for durability
Low‑VOC and Eco‑Friendly Distressing Options
Because you’re doing this to minimize fumes and environmental impact, choose low‑VOC paints, natural finishes, and water‑based glazes for your distressed wall.
You’ll favor eco friendly paints and sustainable materials, use non toxic options like plant‑based waxes, milk paint, and clay plasters, and seal with breathable, natural finishes.
Work in ventilation, test finishes, and blend layers gently for authentic, safer distressing.
Photo References to Match a Specific Era
When you want a distressed wall to evoke a specific era, pick clear photo references that show texture, color palette, and wear patterns from that time.
Use vintage color palettes and study era specific techniques to copy authentic aging.
Compare close-ups, note brush marks, and record tones.
- Close-up textures
- Color swatches
- Tool marks
- Lighting/context
Weekend Mini‑Project: Faded Plaster Accent Wall
If you want a quick, impactful update, tackle a faded plaster accent wall over a weekend — you’ll prep, layer paint and glaze, and distress the surface in a few focused sessions.
You’ll choose vintage color combinations, sand edges, and apply thin glaze to reveal underlayers.
Use simple wall texture techniques—ragging, sponging, and gentle sanding—to create authentic age without overworking the finish.
Common Mistakes That Make Distressing Look Fake
1 common reason distressing looks fake is uneven wear that reads too deliberate—like you’ve stamped on the wall with a template.
You should aim for authentic texture and subtle color harmony. Avoid predictable patterns, harsh edges, overuse of sanding, and mismatched undertones.
- predictable patterns
- harsh edges
- over-sanding
- mismatched undertones
Maintaining and Refreshing a Distressed Wall Over Time
Routine touch-ups will keep a distressed wall looking authentic instead of tired, and you’ll want a small toolkit ready: matching paint glazes, fine sandpaper, a soft brush, and a clear matte sealer.
Inspect yearly for chips, dust gently, sand sparingly, and glaze to blend wear.
For distressed wall care and vintage wall maintenance, spot-seal high-traffic areas and store tools for quick refreshes.
Frequently Asked Questions
Can Distressed Paint Be Safely Removed Later Without Damaging Plaster?
Yes — you can usually remove distressed paint later without harming plaster if you use gentle distressed techniques, careful paint removal like hand scraping, chemical strippers suited for plaster, and test small areas first to avoid damage.
Will Distressing Affect My Home Insurance or Resale Value?
Distressing usually won’t affect home insurance if work’s cosmetic and safe, but it can influence resale value—some buyers’ll love the vintage look, others won’t—so you should document reversible methods and note condition professionally.
Can I Distress Over Wallpaper or Must It Be Removed First?
You can, but it’s like sanding bark off a tree: some wallpapers peel, others hold fast. Test adhesion; use priming and suitable distressed techniques for your wallpaper types, or remove stubborn paper before starting.
How Long Does a Distressed Finish Last in High‑Humidity Rooms?
It lasts less in high humidity—you’ll see faster peeling and wear. Humidity effects accelerate deterioration; follow maintenance tips like using moisture‑resistant primers, proper ventilation, dehumidifiers, and regular touch‑ups to extend the finish’s life.
Are There Health Risks From Old Lead Paint When Distressing?
Yes — you’ll face real health risks from old lead paint if you sand or disturb it; you should test, contain dust, wear a respirator, and follow abatement rules to protect yourself while pursuing vintage aesthetics.
Conclusion
You’ve practically turned your wall into a time machine — not just paint, but memory. Don’t worry if a patch looks like a century-old secret or a perfectly fake postcard; embrace the imperfection. Walk away, sip tea, and watch the room tell stories. Touch it up when it sulks, peel where it prefers, and brag that your wall survived eras. This isn’t decoration — it’s domestic archaeology with attitude.