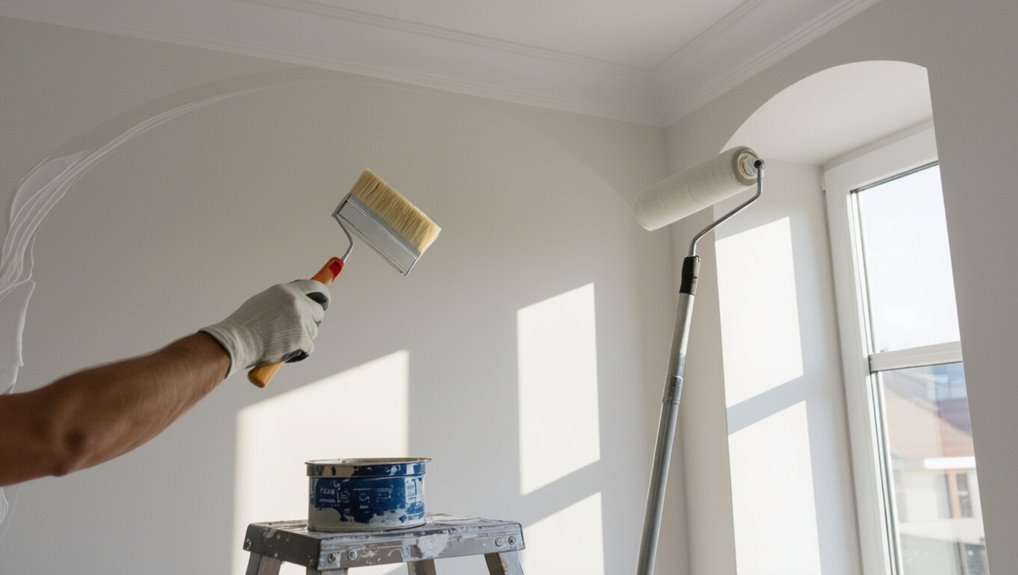
How to Paint a Coved Ceiling Without Mess or Streaks
Prep thoroughly: clear and cover the room, remove fixtures, and tape edges. Inspect and patch stains or cracks, then prime bare plaster or stubborn stains. Use a tapered brush to cut in along the cove seam, feathering edges, then roll with a small-diameter, low-nap foam roller in short overlapping strokes to avoid pooling and lap marks. Work wet edges, apply thin coats, and touch up drips while wet. Keep tools handy and follow technique tips below to learn more.
Quick Overview: 6 Essential Steps for Painting a Coved Ceiling
Painting a coved ceiling boils down to six clear steps you can follow: prepare the room and surface, protect edges and fixtures, prime if needed, cut in along coves, roll the main surface, and touch up for a seamless finish.
You’ll choose color selection that suits the space and account for lighting considerations so the finish reads uniform.
Tackle each step methodically for clean results.
Do You Need a Full Repaint or Just Touch-Ups?
First inspect the cove for cracks, stains, or peeling to judge how much work you’ll need.
If the finish and sheen match the surrounding ceiling, spot priming and touch-ups might be enough; if not, a full repaint will give the best, uniform result.
Factor in how visible the area is and whether you can match the paint before deciding.
Inspect Damage Extent
Start by standing in the center of the room and scanning the coved ceiling for stains, cracks, peeling, or uneven texture—you’ll quickly see whether the issues are isolated or widespread. Do a damage assessment: note spots needing surface preparation versus full repaint. Use this quick checklist:
| Issue | Action |
|---|---|
| Small stain | Touch-up |
| Minor crack | Patch |
| Peeling | Recoat |
| Widespread damage | Full repaint |
Match Existing Finish
Decide whether you’ll blend in small fixes or repaint the whole coved ceiling by comparing texture, sheen, and color under the same light.
If the existing finish is eggshell, satin, or flat and the sheen or texture differs even slightly, you’ll likely need a larger repaint to avoid visible patches.
Use matching techniques and assess finish types:
- Note existing sheen
- Match texture with samples
- Test small swatch
- Compare in daylight
- Evaluate edges for blending
Consider Spot Priming
If your texture, sheen, and color match well in the test swatch, you can often skip a full repaint and spot-prime the problem areas instead.
Inspect stains, repairs, and nail pops, then use appropriate primer types for adhesion and stain blocking.
Apply spot priming techniques with a brush or small roller, feathering edges to blend.
Touch up with matching topcoat once primer cures.
Choose Paint and Sheen for Residential Coved Ceilings
When selecting paint and sheen for a residential coved ceiling, consider both appearance and practicality: flat or matte finishes hide imperfections and reduce glare on curved surfaces, while eggshell or satin offers a slight durability boost for cleaning without emphasizing texture.
Choose paint types and sheen levels that suit room use.
Select paint types and sheens appropriate to each room’s use for lasting appearance and functionality
- Match room lighting
- Prioritize stain resistance
- Test samples
- Prefer low-VOC
- Coordinate trim
Pick Tools to Avoid Drips: Brushes, Mini-Rollers, Angled Pads
Pick a tapered, high-quality brush for tight cove edges so you can paint clean lines without excess paint buildup.
Use a low-nap mini-roller and load it sparingly, rolling slowly to smooth out lines and prevent drips.
An angled pad can help feather paint into corners where the brush or roller can’t reach.
Right Brush For Edges
Choose tools that give you control along the cove so paint stays on the ceiling and out of your eyes.
Pick the right brush for edges: consider bristle firmness and width, and practice edge techniques for clean lines.
Use these tools:
- angled sash brush
- thin trim brush
- small cutting-in pad
- short-handled brush
- disposable trim brush
Smooth Mini-Roller Technique
Start by assembling the right tools so you can roll smoothly along the cove without drips—use a short-nap mini-roller for tight curves, a small angled pad for changes, and a firm, narrow brush for any touch-ups.
Load the smooth roller lightly, test pressure, and roll with steady strokes. Control paint application by overlapping passes and feathering edges to prevent drips and streaks.
Prepare the Room for Painting a Coved Ceiling
Before you bring out the paint, clear the room and protect every surface: move furniture to the center and cover it with drop cloths, remove light fixtures or switch plates as needed, and tape plastic or paper over floors, windowsills, and trim to catch drips and dust.
Follow these coved ceiling preparation and room protection steps:
- Cover HVAC vents
- Protect walls with tape
- Lay non-slip drop cloths
- Remove fragile decor
- Set up good lighting
Clean and Repair Seams, Cracks, and Loose Plaster
Start by closely inspecting every seam and crack along the coving for gaps, hairline splits, or loose edges.
You’ll need to clean out dust and debris, then press or pry away any unstable plaster so you can see the full extent of the damage.
Patch loose or damaged plaster with appropriate filler, let it cure, and sand smooth before priming.
Inspect Seams And Cracks
When you’re ready to paint a coved ceiling, carefully inspect all seams, cracks, and any loose plaster so you know exactly what needs repair.
Use seam assessment and crack evaluation to prioritize fixes, then mark areas to address.
- Look for gaps along coves
- Tap for hollow spots
- Note hairline fractures
- Check paint adhesion
- Measure crack lengths
Repair Loose Or Damaged Plaster
Tackle loose or damaged plaster by removing any crumbling material, cleaning dust from seams and cracks, and evaluating how deep repairs must go; you’ll want a clean, solid surface before applying filler or compound. You’ll sand, apply bonding primer, and use joint compound for plaster repair, focusing on surface preparation to prevent future movement.
| Task | Tool | Time |
|---|---|---|
| Remove loose | Scraper | 10m |
| Clean dust | Brush | 5m |
| Fill cracks | Compound | 20m |
| Sand smooth | Sandpaper | 10m |
Primer for Coves: When to Use It and Which Type
If your coved ceiling has bare plaster, patched areas, or stains, you’ll want to prime those surfaces before painting to guarantee even adhesion and coverage.
Choose primer types based on porosity and stain-blocking needs, and follow proper application techniques.
Consider:
- Acrylic primer for general use
- Shellac for stubborn stains
- Oil-based for glossy surfaces
- Bonding primer for slick areas
- Spot-prime patches only
Masking Technique for Crisp Lines Without Tape Bleed
After priming and letting patched areas dry, you’ll want crisp paint lines where the coves meet walls and ceilings—so masking matters.
Use low-tack painter’s tape applied smoothly, press the edge with a plastic card, and seal with a thin coat of base color to prevent bleed.
Consider masking alternatives like liquid caulk or adhesive films for tight curves; they boost edge precision.
How to Cut In by Hand With a Steady-Angle Brush
Grab your steady-angle brush and position yourself so the bristles meet the cove at the same angle as the curve, then pull a smooth, controlled stroke to lay down paint without overloading the brush.
Use steady angle techniques and strict brush control to follow the curve.
- Load sparingly
- Anchor your hand
- Keep steady pace
- Feather edges
- Inspect for gaps
How to Cut In With an Edging Tool or Mini-Roller
When cutting in a coved ceiling with an edging tool or mini-roller, pick the size and tip that fit your cove profile so you get even coverage.
Keep your hand steady and use short, controlled strokes to guide the tool along the curve.
Finish by lightly feathering the wet edge to blend the new paint into the ceiling for a seamless shift.
Choose The Right Tool
You’ll want to pick the edging tool or mini-roller that matches your cove size and steady hand: edging tools give crisp lines on tight curves, while mini-rollers cover small flat bands faster with less risk of drips.
Choose by tool materials and tool types, considering grip, nap, and angle.
- Blade width
- Roller nap
- Handle comfort
- Material durability
- Replaceable parts
Steady Hand Techniques
Steady your arm and focus on the seam between the wall and the cove—cutting in cleanly is about a controlled, consistent motion more than speed.
You’ll use steady hand painting techniques: maintain brush control and hand stability, align visually with cove angles, modulate pressure application for even paint flow, and practice stroke consistency for sharp edge finishing with an edging tool or mini-roller.
Blend Edges Seamlessly
1 simple trick to get crisp, invisible changes is to feather your paint as you cut in with an edging tool or mini-roller: apply a thin, even bead of paint along the cove seam, then roll or glide outward slightly to taper the paint into the adjacent surface so the overlap blends with the main coat.
- Use light pressure
- Work wet edges
- Match roller nap
- Check lighting
- Smooth overlap
Practice edge blending for seamless changes.
Rolling Curved Coves to Avoid Streaks
Start by loading a small-diameter, high-density foam roller evenly and work in short, overlapping strokes along the curve so paint lays down smoothly without pooling; this keeps the finish uniform and minimizes the light-catching ridges that cause streaks.
Use the curved technique with steady pressure and consistent speed, and select roller choice that matches paint sheen to avoid lap marks while keeping motion continuous.
How to Manage Paint Load and Prevent Drips on Concave Coves
When painting a concave cove, load your roller sparingly so it holds only a thin, even coat that won’t run.
Keep the brush tip controlled and angled into the curve to catch drips before they form.
Work in short sections and lightly feather any excess paint away from the edge.
Load Roller Sparingly
Load your roller lightly so you don’t overload the concave curve and trigger drips. Keep paint consistency thin enough to flow but not run; adjust roller technique to roll and offload.
Work in short sections, inspect edges, and catch drips immediately.
- Dip roller quarter-depth
- Roll off excess on tray
- Use slow, even strokes
- Pause to smooth edges
- Wipe drips promptly
Control Brush Tip
After loading the roller sparingly, switch to your brush for the tight curve and keep the tip tidy to prevent drips on the concave cove.
Hold the brush at a low angle, wipe excess paint on the tray, and use short, controlled strokes.
Focus on brush control and edge precision, feathering toward the ceiling to avoid ridges and wipe the tip between passes.
Work in Sections: Order, Overlap, and Hide Seams
Start by dividing the ceiling into manageable sections so you can follow a clear painting sequence. Overlap wet edges slightly and hide seams where the cove meets the wall or ceiling.
You’ll use overlap technique and seam blending to keep lines invisible. Work methodically, finishing each section before moving on.
- Plan section order
- Maintain wet edge
- Overlap minimally
- Feather seams
- Inspect changes
Blend the Cove Into the Ceiling and Wall Without Lap Marks
When you blend the cove into the ceiling and wall, work with a damp brush and a light touch so the paint feathering eliminates lap marks and creates a seamless shift.
Tip your wrist, lightly stroke from ceiling to wall, and keep the brush slightly loaded.
Focus on cove blending and edge smoothing, matching sheen and drying direction to hide joins for a uniform finish.
Fix Common Problems: Drips, Roller Lines, and Thin Spots
Catch drips, roller lines, and thin spots early by inspecting sections as they dry so you can correct them before the finish sets.
You’ll fix problems fast with proper drip prevention and consistent roller technique.
Check and correct:
- Smooth drips with a loaded brush
- Re-roll wet roller lines lightly
- Add thin coats, not heavy ones
- Keep foam trimers handy
- Maintain even pressure
Speed Tips for Working Solo and Ladder Safety
You’ve got the hang of spotting and fixing drips and roller lines quickly, so now focus on moving faster without risking a fall when you’re working solo.
Use a lightweight platform or stabilized ladder with ladder stability checks before each shift.
Prep tools on a waist pouch, plan your strokes, take short breaks to reassess, and use solo strategies like tethered tools and non-slip shoes.
When to Call a Pro: Complex Coving, Plaster Damage, or Textured Ceilings
If your coving has intricate profiles, widespread plaster cracks, or a textured ceiling that hides damage, don’t hesitate to call a pro—these issues can quickly turn a weekend paint job into an expensive repair.
You’ll want expert complex coving solutions and textured ceiling techniques when:
- Extensive plaster repair
- Delicate moulding restoration
- Hidden water damage
- Pattern-matching texture
- Safety with high access
Final Inspection Checklist Before You Call It Done
Before you call it done, walk the room once more with a focused checklist so nothing slips through the cracks: inspect edges for clean lines, touch up thin spots, remove stray drips, and verify even sheen.
Check masking removed, fixtures replaced, and ventilation cleared.
Confirm final touches are complete and assess project satisfaction—photos and notes help if you need future touchups.
Frequently Asked Questions
Can I Paint Coves With Wallpaper Still Attached?
You can, but you shouldn’t: proper cove preparation matters. You’ll get better results by doing wallpaper removal first; paint adheres more evenly, you’ll avoid peeling, and you’ll prevent seams or texture showing through the finish.
How Do I Paint Coves Around Recessed Lighting Fixtures?
Like a surgeon prepping an operating theater, you’ll mask and shut power, using cove painting techniques and recessed lighting preparation: remove trim, cover fixtures, use angled brush and steady strokes, and touch up edges for a flawless finish.
Will Paint Color Change Appear Under Different Lighting Angles?
Yes — you’ll notice color perception shifts with lighting effects and angles; different fixtures, intensity, and shadows change how paint reads, so test samples under varied lighting to verify the hue looks right throughout the room.
Can I Use Spray Paint or an Airless Sprayer on Coves?
Absolutely — you can use spray paint or an airless sprayer on coves; like painting with a breeze, employ spray paint techniques and airless sprayer tips, control overlap, maintain distance, and mask thoroughly to avoid overspray and streaks.
How Long Before Furniture Can Return Under Freshly Painted Coves?
You can return furniture placement after paint’s dry to the touch in 1–2 hours, but wait 24–48 hours for full drying time before moving items back to avoid sticking, marks, or fumes affecting finishes.
Conclusion
You’ve got this—paint smart and you’ll avoid drips, streaks, and redo headaches. Did you know homeowners save about 20% on labor by tackling small painting jobs themselves? With the right prep, tools, and technique for your coved ceiling—mini-rollers, angled brushes, steady ladder work—you’ll finish cleaner and faster. Check for thin spots, smooth edges, and even sheen before you stop. If it’s tricky plaster or high coving, call a pro.