How to Clean Brush After Painting Wall Properly
Clean your brush right after painting to keep it like new: wipe off excess paint with a rag or the can edge, then use the correct solvent—water for latex, mineral spirits or a citrus cleaner for oil-based—work it into the bristles and rinse until clear. Comb and reshape the tips, shake out excess liquid, and dry flat or hanging with bristles down. Store protected and dispose of solvents properly. Keep going to learn step-by-step tricks and troubleshooting.
Who This Guide Is For and What You’ll Learn
This guide is for anyone who uses paint brushes—DIYers, hobbyists, and pro painters—who want to keep brushes performing well and save money by extending their life.
You’ll learn practical Cleaning Techniques for water- and oil-based paints, how to rinse and store bristles properly, spot-treat stubborn buildup, and follow simple Maintenance Tips that prevent damage and preserve brush shape for consistent, reliable results.
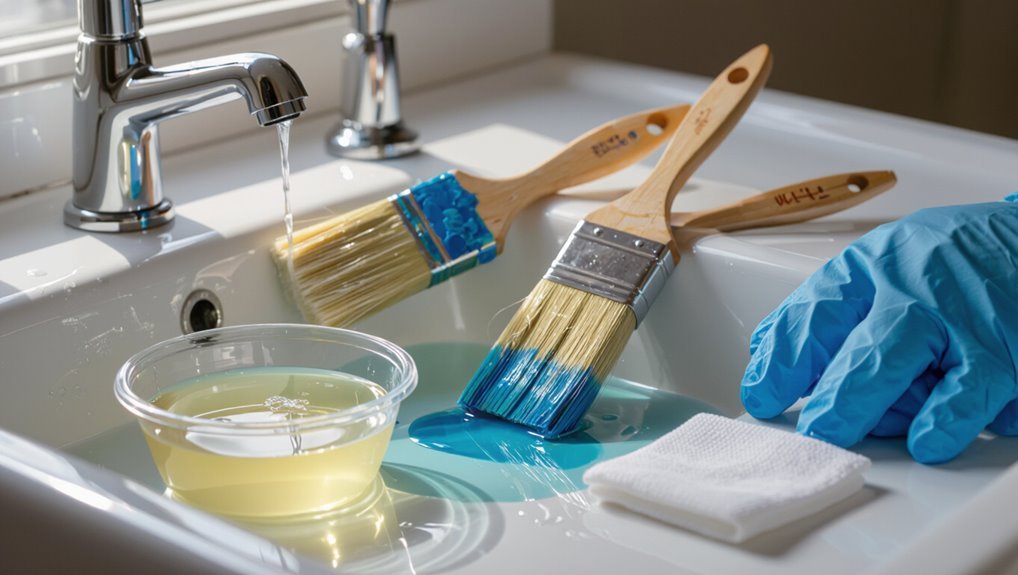
Quick Answer: Clean a Paintbrush in 7 Steps
Start by rinsing the brush thoroughly until the water runs clear, using a gentle combing motion with your fingers or a brush comb.
Shake out excess water, reshape the bristles, and let the brush air-dry flat or hanging with the bristles down to prevent damage.
Once dry, store it in a protective sleeve or upright in a jar to keep the shape and dust-free.
Brush Rinsing Technique
Rinse your brush promptly after use to prevent paint from drying in the bristles; quick action makes cleaning far easier and preserves brush shape.
You’ll protect bristles and speed recovery by rinsing under running water or the appropriate solvent, using gentle combing to remove residue.
Focus on brush care and basic painting techniques.
- Flush with water/solvent
- Comb bristles gently
- Repeat until clear
Drying And Storage
1 simple routine will keep your brush’s shape and lifespan intact: shake or tap out excess water/solvent, reshape the bristles with your fingers or a comb, and let the brush dry flat or hanging bristles-down in a well-ventilated area to prevent moisture buildup and ferrule rust.
After drying, store brushes in breathable storage solutions upright or suspended.
Regular brush care prevents mildew, bent bristles, and wasted tools.
When to Clean a Brush Immediately
You should clean your brush right after finishing a paint session to prevent paint from hardening in the bristles.
If you plan to switch colors, rinse the brush between hues so you don’t contaminate the next paint.
Prompt cleaning saves you time and keeps the brush performing like new.
Right After Painting
Finish your stroke and tackle the brush right away if you plan to reuse or store it; drying paint hardens bristles and makes cleanup far harder.
You’ll consider paint types and brush types when choosing solvent and technique. Fast action preserves shape and performance.
- Rinse water-based paint immediately.
- Use solvent for oil-based paints.
- Comb bristles, reshape, and hang to dry.
Between Color Changes
When switching between colors, clean the brush immediately so you don’t contaminate the new shade or force extra work later—wet paint transfers quickly, dulls vibrancy, and can ruin delicate hues.
Rinse excess, use appropriate solvent, and blot before dipping into the next tin. These color shift techniques save time and guarantee crisp lines.
Follow simple brush care tips to keep bristles responsive and accurate.
7-Step Paintbrush Cleaning Walkthrough
Seven clear steps will get your paintbrush clean and ready for the next job.
You’ll follow a simple routine focused on Brush care and Paint preservation: rinse, wash, reshape.
- Rinse under appropriate solvent or water
- Use mild soap and comb bristles
- Reshape and hang to dry
You’ll protect bristles, extend brush life, and store it properly for future use.
Remove Excess Paint Fast and Safe
Before you start rinsing, wipe off drips with a rag or paper towel to keep your work area cleaner.
Use a brush comb or the edge of a putty knife to scrape away stubborn paint from the ferrule and bristles.
If paint still clings, blot the tips with a cloth dampened in the appropriate solvent to lift residue quickly and safely.
Wipe Off Drips
Scrape off drips right away to keep paint from hardening on the ferrule and bristles; use the edge of the paint can, a putty knife, or a folded rag to lift excess gently and avoid splaying the hairs.
For drip prevention and to limit paint splatter, do this before rinsing:
- Wipe toward the ferrule, not away.
- Dab with a clean rag.
- Rotate the brush to clear edges.
Scrape Excess Paint
Now that you’ve wiped off drips, remove the remaining bulk of paint quickly so it won’t harden on the bristles or ferrule.
Use a putty knife or edge of the can to scrape along the ferrule and bristles, working toward the tip. These paint removal techniques save time and protect shape.
Follow simple brush care tips: scrape gently, tap out clumps, and discard excess safely.
Blot With Solvent
Grab a lint-free rag or paper towel and dab the brush into a small amount of the appropriate solvent to lift remaining paint quickly and safely. You’ll protect bristles and practice solvent safety while keeping paintbrush care simple.
- Use minimal solvent; blot, don’t soak.
- Work from ferrule to tip to avoid splaying.
- Dispose rags per local rules to prevent fire hazards.
Choose the Right Solvent for Your Paint
Because different paints dissolve in different liquids, you should match your solvent to the paint type before you begin cleaning. For solvent selection, pick water for latex, mineral spirits for oil, and lacquer thinner for shellac. Use gloves and ventilate. Choose gently to protect bristles and finish.
| Heart | Choice | Relief |
|---|---|---|
| Water | Latex | Clean |
| Spirit | Oil | Calm |
| Thin | Shellac | Safe |
Wipe and Comb Out Paint Debris (Step 1)
Start by wiping off as much excess paint as you can on a rag or newspaper so the solvent has less work to do.
Then run a brush comb or an old fork through the bristles from ferrule to tip to pull out trapped paint and soften any clumps.
You’ll save solvent and extend the brush’s life by removing debris before you rinse.
Remove Excess Paint
Brush off the bulk of the paint by wiping the bristles on the rim of the can or a clean rag, then comb through the hairs with a brush comb or an old fork to dislodge trapped debris.
You’ll then remove excess paint efficiently depending on paint types and brush types.
- Tap gently to shed droplets
- Wipe toward the ferrule
- Rotate while wiping to protect bristles
Comb Bristles Thoroughly
Comb the bristles thoroughly by wiping from tip to ferrule with a clean rag. Then run a brush comb or old fork through the hairs to pull out trapped paint and debris.
You’ll lift dried specks, restore shape, and prevent clogging. For proper bristle care and brush maintenance, repeat until the rag comes away clean.
Then reshape the head before rinsing and drying.
Rinse Brushes With Water-Based Paint (Step 2)
Hold the brush under warm running water and let the flow loosen excess water-based paint from the bristles.
Work with different brush types gently, adjusting for paint consistency so bristles don’t splay. Rinse until water runs clear, then shake out excess and reshape the tip.
- Use moderate pressure
- Point bristles down
- Repeat for thoroughness
Clean Brushes With Oil-Based Paint (Step 3)
If your brush has oil-based paint, first wipe off as much excess paint as you can using a rag or paper towel.
Then choose the right solvent—mineral spirits or paint thinner for most oil paints, or a manufacturer-recommended cleaner—and work it through the bristles.
Rinse and repeat until the solvent runs clear and the brush feels clean.
Remove Excess Paint
Wipe off as much paint as you can with a clean rag or paper towel before you reach for solvents; this cuts down on drying time and reduces the amount of thinner you’ll need.
Use efficient paint removal techniques and follow brush care tips to prolong bristle life.
- Squeeze excess paint toward the ferrule
- Tap bristles to dislodge drips
- Wrap and store between sessions
Use Appropriate Solvent
3 solvents will handle most oil-based paints: mineral spirits, acetone, and paint thinner (sometimes labeled turpentine or white spirit). You’ll choose based on solvent types and paint compatibility, work outdoors or near ventilation, and wear gloves. Rinse until clear, reshape bristles, then store or dispose properly.
| Solvent | Best for |
|---|---|
| Mineral spirits | Alkyds |
| Acetone | Fast solvents |
| Paint thinner | General use |
| Turpentine | Traditional oils |
Use Brush Cleaner and Mild Detergent Safely
Start by choosing a brush cleaner or mild detergent that’s compatible with your paint type, then work it into the bristles to loosen paint and grime; you’ll want a product labeled safe for synthetic or natural bristles as appropriate.
When using stronger solvents, work in a well-ventilated area and wear gloves to protect your skin.
- Rinse until water runs clear
- Squeeze excess liquid gently
- Store brushes for brush maintenance using safe solvents only
Work Bristles Without Damaging Them
Once the brush is rinsed and excess liquid squeezed out, treat the bristles gently to avoid bending or fraying them. Work from heel to tip with light strokes, using appropriate cleaning techniques to remove paint without splaying. Focus on bristle care: reshape with your fingers and let the brush dry flat or hanging.
| Tip | Action |
|---|---|
| Rinse | Use warm water |
| Reshape | Fingers only |
Clean the Ferrule and Handle to Prevent Rust
Because the ferrule and handle can trap moisture and paint, you should clean them thoroughly to prevent rust and decay.
Because ferrules and handles can trap moisture and paint, clean them thoroughly to prevent rust and decay.
Focus on ferrule care and handle maintenance so the brush lasts.
- Wipe metal ferrule with a damp cloth, then dry immediately.
- Scrape paint from handle crevices and sand rough spots.
- Apply light oil to ferrule and a wood conditioner for handle maintenance to protect.
How Long to Soak a Brush : Guidelines
When you’re soaking a paint brush, match the soak time to the paint type and solvent: water-based needs minutes, oil-based may need hours with mineral spirits.
Check bristles periodically; don’t leave overnight unless recommended. Ideal soaking duration prevents damage and aids brush maintenance.
Rinse, reshape, and dry promptly to keep bristles aligned and the ferrule rust-free for longer life.
When You Should Not Soak a Brush
Although soaking can save a brush in many situations, you shouldn’t leave brushes submerged if the paint has hardened, if the brush has natural bristles that can swell or warp, or if the solvent will damage the ferrule or handle.
You should avoid brush soaking when:
- bristles are natural and sensitive to swelling
- paint is already hardened and irreversible
- solvent corrodes ferrule or handle
Practice prompt brush care.
Restore Partially Dried or Stiff Paintbrushes
If your brush has stiff or partially dried paint, you can often soften the bristles and remove the residue without tossing it.
Start by soaking the tips briefly in the appropriate solvent or warm, soapy water depending on the paint type.
Then gently work out softened paint with your fingers or a comb.
With patience and the right cleaner, you’ll restore most brushes to usable condition.
Soften Stiff Bristles
1 simple trick can bring a stiff brush back to life: loosen the dried paint and recondition the bristles so they regain flexibility and shape.
You’ll focus on bristle care to get flexible bristles without aggressive stripping. Try these steps:
- Warm soapy water soak to soften paint
- Gentle combing with a brush comb
- Condition with fabric softener or brush restorer before reshaping
Remove Partial Dry Paint
Rescue a brush with partially dried paint by loosening and removing the hardened bits without damaging the bristles—work quickly while the paint’s not fully cured.
Use a stiff comb, solvent or warm soapy water depending on paint type, and gently tease out clumps.
Rinse thoroughly, reshape bristles, and let dry.
These paint removal techniques are essential brush maintenance tips to extend tool life.
Ventilate and Use Solvents Responsibly
Because solvents can release strong fumes, make sure you work where air can move freely—open windows, run a fan to exhaust to the outdoors, or set up near a door.
Then limit your exposure by using only the amount of solvent needed and choosing low‑odor or water‑based cleaners when possible.
Use ventilation techniques and practice solvent safety:
- Open cross‑ventilation and position fans.
- Wear gloves and eye protection.
- Keep lids closed between uses.
Dispose of Solvent and Paint Waste Legally
Check your local hazardous waste guidelines before you pour or toss leftover solvent and paint.
Use only approved disposal methods — drop-off centers or hazardous waste collection events — to avoid fines and environmental harm.
If you’re unsure, contact your local waste authority for specific instructions.
Local Hazardous Waste
When you finish cleaning brushes with solvents, don’t pour leftover solvent or paint down the drain or into the trash; most communities treat them as hazardous waste and have specific rules for safe disposal.
You should learn local hazardous waste rules to minimize environmental impact and follow hazardous waste disposal guidance.
- Check municipal programs
- Store waste safely
- Ask about collection events
Approved Disposal Methods
1 clear, practical rule: don’t dump leftover solvent or paint in drains, storm sewers, or regular trash — instead, use approved disposal options like municipal household hazardous waste programs, licensed waste haulers, or designated drop-off and collection events.
You should pack containers tightly, label contents, and contact local services for eco friendly disposal.
Treat all solvent and paint as hazardous waste and follow local regulations.
Short-Term Storage for Paintbrushes Between Coats
Short-term storage keeps your brush ready between coats without drying out the bristles or ruining the shape.
Use quick short term solutions so you can pause without full cleaning.
Try these simple options:
- Wrap bristles in plastic or foil for quick protection — DIY paintbrush covers.
- Keep in airtight container with damp cloth.
- Suspend bristles off surface to preserve shape.
Long-Term Storage to Keep Bristles Flexible
Before you stash brushes long-term, make sure you’ve cleaned them thoroughly of all paint and reshaped the bristles while damp.
Condition the fibers with a light brush oil or conditioner to keep them supple.
Store brushes horizontally or hanging by the handle so the bristles keep their shape and stay flexible.
Proper Cleaning Before Storage
Start by removing all excess paint: wipe the brush on the can’s rim, then work solvent or water through the bristles until the flow runs clear, making sure you get deep into the ferrule where residue hides.
You’ll finish proper brush care and choose storage solutions by:
- Rinsing until no color appears
- Spinning out moisture
- Storing flat or hanging bristles-down
Conditioning With Brush Oil
When you’re putting brushes into long-term storage, treat them to a light conditioning with brush oil to keep the bristles supple and prevent stiffness.
Apply a few drops along the bristles, work it in toward the ferrule with your fingers or a comb, then wipe off any excess so the hairs stay flexible without becoming greasy.
For proper brush maintenance, perform this oil application sparingly and regularly.
Store Horizontally Or Hanging
Store your brushes horizontally or hanging to keep the bristles from bending or developing a flat spot; laying them on their side lets air circulate and maintains their shape, while hanging by the handle prevents the ferrule from resting on the bristles and avoids moisture buildup at the base.
- Use horizontal storage on a rack for even drying.
- Try hanging techniques with clips.
- Keep caps off for airflow.
When to Use a Brush Comb, Wire Brush, or Pick
One quick rule will help you choose: use a brush comb for routine detangling and reshaping, a wire brush for stubborn dried-on paint, and a pick for clearing clogged ferrules and separating tightly packed bristles.
For proper brush maintenance, you’ll use these cleaning techniques selectively: comb for everyday upkeep, wire brush for heavy buildup, and pick for precision removal without damaging bristles.
Best Drying Positions to Keep Brush Shape
After you’ve untangled, scraped, or picked away dried paint, how you let the brush dry will determine whether those bristles hold their shape.
Position matters for proper brush handling and bristle care:
- Hang the brush bristles-down to keep shape and prevent water pooling.
- Lay flat with ferrule slightly elevated for even drying.
- Stand upright on handle only if bristles are perfectly reshaped.
Prevent Ferrule Corrosion and Loose Handles
Because moisture and paint residue corrode metal and loosen glue, protect the ferrule and handle by drying and cleaning them thoroughly after each use.
Because moisture and paint corrode metal and loosen glue, always dry and clean the ferrule and handle after use.
After rinsing bristles, wipe the ferrule and the joint area, removing trapped paint.
Apply light oil for ferrule maintenance and let it dry.
Inspect and tighten or re-glue loose handles for reliable handle protection before storing.
Quick Test to Check a Brush Before Reuse
Wondering if that brush’s still good to use? Do a quick brush testing and bristle inspection:
- Splay test: press bristles; they should spring back.
- Clean stroke: swipe on scrap—no flakes or clumps.
- Ferrule check: wiggle handle; no looseness or rust.
If any fail, deep-clean or replace the brush to guarantee even finish and prevent issues.
Fast Cleanup Hacks for Small Jobs and Job Sites
For small jobs or on a busy job site, you can get paint brushes ready for reuse in minutes with a few compact tricks—wipe excess paint with a rag, spin out water or solvent against a board, and store bristles upright in a jar to keep their shape while you move between tasks.
Use quick cleanup tips: scrape, blot, and shake; label jars; stash a travel bucket.
Products That Speed Cleanup: Solvents and Soaps
Those quick tricks get you through the day, but the right products make cleanup faster and protect your brushes long-term.
Choose solvent types for oil-based paints, then rinse with recommended soap choices. Follow steps and you’ll preserve bristles.
- Mineral-spirit or brush cleaner for heavy residue
- Dish soap for water-based paints
- Conditioning soap to soften bristles and remove buildup
Eco-Friendly Alternatives to Mineral Spirits
If you want to skip harsh mineral spirits, several eco-friendly alternatives clean oil-based paint effectively without strong fumes or hazardous disposal.
You can use citrus-based cleaners, soy-based emulsifiers, or low-toxicity bio-solvents that break down paint residue.
These biodegradable options and natural solvents rinse brushes safely; follow product directions, work outdoors or ventilate, and dispose of wash water per local regulations.
Clean Specialty Brushes: Synthetic, Natural, Angled
1 simple routine lets you care for any specialty brush—synthetic, natural-hair, or angled—so it keeps shape and performance.
Rinse, condition, reshape, and dry properly for all brush types.
Rinse, condition, reshape, and dry—simple steps to keep any brush performing and holding its shape.
- Rinse synthetic brushes with warm water and mild soap.
- Use conditioner for natural brushes, rinse gently.
- Comb and hang angled brushes to dry, bristles down to retain shape.
Remove Stubborn Dried Paint From Bristles
When paint has hardened in the bristles, you can revive the brush by softening and working out the dried material with the right solvents and tools.
Start by identifying the paint type, then choose a compatible remover (water for latex, mineral spirits for oil, or a dedicated brush cleaner) and protect your hands and work surface before you proceed.
Soak briefly, comb bristles with a brush comb, rinse, repeat.
Common Mistakes That Ruin Paintbrushes (And Fixes)
Softening and combing dried paint helps save brushes, but other common mistakes can wreck them fast if you don’t spot and correct them.
Softening and combing dried paint can rescue brushes — but avoid common mistakes that can ruin them quickly.
You should follow basic brush care and quick maintenance tips to keep bristles aligned and solvent-free.
- Leaving brushes standing in water — reshape and dry flat.
- Using wrong solvent — match paint type.
- Neglecting storage — cover ferrule.
When Replacement Is Cheaper Than Repair
If you’ve tried cleaning and reshaping a brush but the bristles stay frayed, misshapen, or won’t hold paint smoothly, it’s often cheaper to replace it than keep repairing it.
Evaluate replacement strategies: compare brush quality, frequency of use, and purchase price.
Do a quick cost analysis—if repair time, materials, and poor finish exceed replacement cost, buy a new brush.
Maintenance Checklist to Extend Brush Lifespan
Keep a simple routine and your brushes will outlast most projects. You’ll save time and money with basic brush care and practical longevity tips.
Follow this maintenance checklist every time:
- Rinse thoroughly until water runs clear; reshape bristles and dry flat.
- Store in a dust-free sleeve, bristles up or hanging.
- Inspect for loose ferrules; tighten or replace promptly.
Frequently Asked Questions
Can I Clean Paintbrushes in a Dishwasher?
No, you shouldn’t clean paintbrushes in a dishwasher; it risks dishwasher safety and can ruin paintbrush materials. You’ll contaminate dishes, damage bristles, and void warranties—clean brushes by type with proper solvents and hand washing instead.
Will Paint Thinner Damage Synthetic Bristles Over Time?
Remember the rubber band that stretched out after years of use—that’s what harsh solvents can do. You’ll see gradual wear from paint thinner; try paint thinner alternatives and follow brush maintenance tips to prolong synthetic bristle life.
How Do I Clean Brushes Used With Textured or Masonry Paint?
You rinse textured or masonry paint out immediately, scrubbing with a stiff comb or brush and solvent as needed; you’ll follow brush cleaning techniques, use textured paint tips like extra soaking, repeated rinses, and reshaping bristles before drying.
Can I Use Vinegar to Dissolve Oil-Based Paint?
No — vinegar effectiveness is limited; it won’t dissolve oil-based paint. For paint removal tips, you should use mineral spirits or commercial paint strippers, wear gloves and ventilation, and test a small area before full application.
How Long After Painting Can I Safely Use the Cleaned Brush Again?
Quickly, cautiously: you can reuse a cleaned brush after 24–48 hours once it’s fully dry. You’ll preserve performance by prioritizing brush maintenance and proper paint storage, so solvents and lids stay sealed and labeled.
Conclusion
Cleaning your brush properly keeps it usable and saves money: studies show people who clean tools after each use extend brush life by up to 70%. Follow the 7 steps, tackle excess and dried paint quickly, and avoid common mistakes like soaking handles or using hot water on water-based paints. If bristles are beyond repair, replace them—cheaper long-term. With routine maintenance and the checklist, your brushes will stay reliable for many projects ahead.