Paint vs. Solid Stain: What’s the Difference and Which One Should You Use?
You’ll pick paint when you want opaque, uniform color that hides flaws and offers a tough film finish; choose solid stain when you want the wood’s texture to show, a breathable finish that soaks in, and easier spot repairs. Paint gives longer bold color and needs more prep and periodic full repaints, while solid stain lasts well, needs less prep and lower labor, but may recoat sooner. Keep going to see side-by-side pros, costs, and best-use scenarios.
Quick Answer Which Is Better: Paint or Solid Stain?
If you want a quick takeaway: paint gives opaque, long-lasting color while solid stain soaks in better and shows less peeling.
You’ll get stronger color and easier touch-ups with paint, but solid stain resists cracking and keeps more natural texture.
Consider your priorities—durability and coverage versus maintenance and wood character—when choosing.
One-sentence summary
While both protect wood, paint wins for durability and color change on trim and siding, whereas solid stain’s thinner, penetrating finish suits aging decks and surfaces where you want a more natural, lower-maintenance look.
You’ll choose based on desired appearance, upkeep, and substrate; ask what’s the difference between paint and solid stain for specifics.
- Appearance
- Maintenance
- Substrate
Short pros/cons snapshot
Because your priorities—appearance, upkeep, and substrate—determine the best choice, here’s a quick snapshot:
| Paint | Solid Stain |
|---|---|
| Pros: crisp color, full coverage | Pros: hides grain, durable on wood |
| Cons: peels, needs prep | Cons: fewer color options |
| Best if: you want uniform look | Best if: you want low maintenance |
How Paint and Solid Stain Differ Basic Understanding
You’ll start by defining exterior paint as a film-forming coating that sits on the surface and solid stain as a heavily pigmented formula that soaks into wood without creating a thick film.
Compare their technical differences—paint’s composition creates a protective layer, while solid stain’s penetrating binders bond with the substrate.
Then note the visual contrast: paint gives an opaque, uniform finish and solid stain preserves more texture and a more natural look.
What is exterior paint?
Exterior paint is a pigmented coating you apply to siding, trim, and other outdoor surfaces to protect them from weather and give your home a finished look.
You’ll choose formulas for durability, sheen, and adhesion. It forms an opaque film that hides grain and provides UV and moisture resistance.
- Hides surface imperfections
- Offers strong protection
- Requires proper surface prep
What is solid stain?
Think of solid stain as a finish that soaks into wood rather than forming a thick surface film like paint.
You’ll get opaque color that highlights grain subtly, resists peeling, and requires less aggressive prep. It’s ideal when you want durable coverage without the heavy look of paint.
- Long-lasting color
- Easier maintenance
- Natural wood emphasis
Key technical differences (composition, film-forming vs. penetrating)
Because they’re built differently, paint and solid stain behave very differently on wood: you’ll notice paint forms a surface film using higher solids and binders, while solid stain penetrates fibers with pigments suspended in binders. Choose based on durability needs and maintenance.
| Paint | Solid stain |
|---|---|
| Film-forming | Penetrating |
| Higher solids | Lower solids |
| Hides grain | Shows texture |
| Peels over time | Fades, won’t peel |
Visual and aesthetic differences
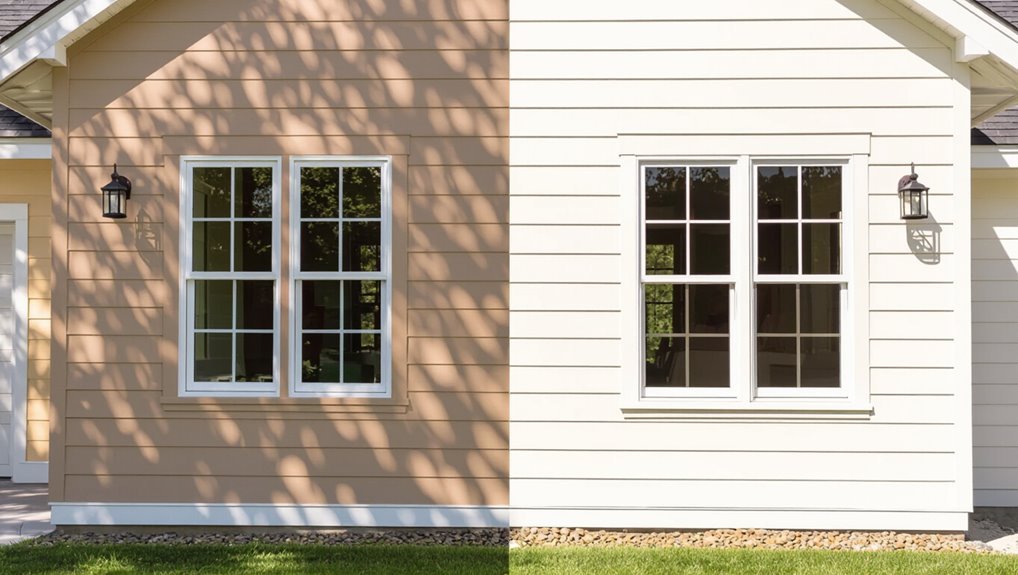
When you pick between paint and solid stain, you’re choosing more than color—you’re choosing how the wood’s character shows through.
You’ll notice paint offers opaque, uniform coverage that hides grain and imperfections for bold, consistent color.
Solid stain still hides grain but lets subtle texture peek through, giving a more natural, less manufactured look while offering softer, layered color depth over time.
When to Choose Paint vs When to Choose Solid Stain Direct Guidance
You’ll want paint when you need opaque coverage, long-lasting color, and a smooth finish for trim, siding, or high-traffic areas.
Choose solid stain if you prefer a durable, wood-friendly option that hides imperfections while keeping some texture and requires less prep.
Use a quick checklist—surface type, exposure, desired look, and maintenance commitment—to guide your final choice.
Best scenarios for paint
If your priority is long-lasting color and the ability to completely change a surface’s look, choose paint: it offers the fullest opacity, widest color range, and easier color-matching for trim, doors, and accents.
You’ll want paint when you need strong protection, predictable coverage, or a smooth, uniform finish.
- High-traffic walls and trim
- Bold color changes
- Surfaces needing impermeable coating
Best scenarios for solid stain
1 clear choice for porous, natural surfaces is solid stain — it soaks into wood or masonry and highlights texture while giving durable UV and moisture protection.
- When you want low-maintenance, long-lasting coverage for decks, fences, or siding.
- When preserving grain or stone character matters more than opaque color.
- When you need mildew resistance and fewer recoat cycles than paint.
Decision flowchart for homeowners (quick checklist)
Wondering which finish fits your project best?
Ask: Is the surface wood or previously painted?
Want full coverage or wood grain visible?
Need high durability and frequent repainting tolerance?
Prefer easier touch-ups and color flexibility?
Choose paint for opaque coverage, color change, and smoother finish.
Choose solid stain for durable, wood-textured protection with less peeling and more breathable maintenance.
Performance Comparison Durability, Maintenance, and Weather Resistance
You’ll want to weigh how each finish handles adhesion and peeling risk, UV color retention, moisture and mildew resistance, plus repairability and repainting cycles.
| Paint | Solid Stain |
|---|---|
| Strong initial adhesion but can peel over time | Better wood penetration, less peeling on sound surfaces |
| Often needs more frequent repainting; pigments can fade | Generally easier spot repairs and longer color retention |
Consider how those trade-offs match your climate and maintenance willingness.
Adhesion and peeling risk
Because adhesion determines how long a finish stays put, peeling is the single biggest visible failure you’ll face on exterior wood — and paint and solid stain behave quite differently.
You’ll find paint forms a thick film that can peel in large sheets if moisture or poor prep undermines it.
Solid stain soaks in, reducing large-scale peeling but may flake subtly over time.
UV and color retention
When sun exposure is constant, pigments and binders break down at different rates, so your choice between paint and solid stain shapes how long a color stays true.
Paint’s thicker film can block UV better initially but may chalk and fade unevenly.
Solid stain penetrates and fades more evenly; its color loss is gradual.
Choose based on desired longevity and maintenance frequency.
Moisture management and mildew resistance
Although both paint and solid stain shed water, they handle moisture and mildew differently, so your choice affects how the siding breathes and how often you’ll need to clean or recoat.
Paint forms a barrier that can trap moisture under failures, promoting mildew on damp surfaces, while solid stain soaks in and lets wood breathe, reducing persistent mildew but requiring good surface prep and occasional cleaning.
Repairability and repainting cycles
If you want a finish that’s easy to touch up, solid stain generally beats paint—its penetrative, thin layers hide small repairs and blend well with fresh applications—while paint often shows seams where new coats overlap and demands more prep to match texture and sheen.
You’ll repaint painted surfaces more often; solid stain needs less frequent recoating, simplifying maintenance and lowering long‑term labor.
Cost Comparison and Lifecycle Value
You’ll weigh upfront material and labor costs for paint versus solid stain to see which fits your budget.
Then consider long-term expenses like maintenance and how often you’ll need to reapply each option.
Finally, factor in return on investment by comparing lifespan and resale impact so you can choose the most cost-effective solution.
Upfront material and labor costs
Cost matters up front: paint usually costs less per gallon than solid stain, but you’ll often pay more in labor because paint needs multiple coats, more prep, and longer dry times. You’ll weigh product price, time, and tool needs.
| Item | Paint | Solid Stain |
|---|---|---|
| Material | Lower | Higher |
| Labor | Higher | Lower |
| Tools | More | Fewer |
Long-term costs (maintenance, frequency of reapplication)
Because paint sits on the surface while solid stain soaks in, you’ll face different long-term bills: paint tends to need more frequent repainting, touch-ups, and occasional stripping, whereas solid stain usually requires less frequent reapplication and simpler spot maintenance.
- Paint: higher upkeep, full repaints every 5–10 years.
- Solid stain: refresh every 7–15 years, easy spot fixes.
- Budget: factor labor, prep, and weather-related wear.
Return on investment considerations
When you weigh paint against solid stain for long-term value, look beyond upfront price to include maintenance cycles, labor, and resale impact.
Calculate total cost over expected lifespan: materials, prep, recoat frequency, and repairs.
Consider durability—fewer recoats boost ROI—and curb appeal—fresh, well-maintained finishes can raise sale price.
Choose the option that minimizes lifetime spend while maximizing property value.
Surface Preparation and Application Differences (How-To)
Before you start, check and repair wood, siding, and trim—scrape loose material, sand rough spots, and clean away dirt and mildew so paint or solid stain will adhere.
You’ll prep and prime differently for paint than for solid stain (which often needs less priming), then choose brushes, rollers, or sprayers matched to each product.
Pay attention to drying times and temperature/humidity limits—paint usually needs longer curing and more stable conditions than many solid stains.
Preparing wood, siding, and trim for paint
Start by inspecting every surface for loose paint, rot, mildew, cracks, and nail pops so you know exactly what needs fixing before you touch a brush or roller.
Remove loose paint, sand glossy areas, and repair or replace rotten trim.
Clean with a mild detergent, rinse thoroughly, and allow to dry.
Prime bare wood and patched spots before painting for durable, even coverage.
Preparing wood, siding, and trim for solid stain
Inspect each wood surface carefully for loose stain, rot, mildew, cracks, and raised grain so you know what to fix before you apply solid stain.
Remove loose material, treat mildew with a suitable cleaner, and replace rotten boards.
Sand rough spots and feather edges for even penetration.
Fill gaps with a compatible exterior caulk, then clean dust and debris so the stain bonds uniformly.
Application methods and tools for paint vs solid stain
Choose tools that match the finish you want: paint and solid stain both need brushes, rollers, and sprayers, but their ideal types and techniques differ.
You’ll pick synthetic brushes for latex paint, natural-bristle for oil, and angled sash brushes for trim.
Rollers need nap suited to surface texture; sprayers speed large areas but require skill.
- Brushes
- Rollers
- Sprayers
Drying time and environmental constraints
Once you’ve picked the right brushes, rollers, or a sprayer for paint or solid stain, you need to factor drying time and environmental limits because they affect how you’ll sequence coats and whether your tools will perform as expected.
- Keep temp and humidity in range: high humidity slows drying, low temps stall curing.
- Allow full flash time between coats.
- Protect from rain and direct sun during application and drying.
Common Mistakes and Problems to Avoid
Don’t paint over incompatible surfaces without checking adhesion first, because you’ll get peeling and blistering.
With solid stain, don’t over-apply or leave visible brush marks — thin, even coats perform best.
Also make sure you prep properly and watch the weather, since contamination, moisture, or temperature swings will cause premature failure.
Painting over incompatible surfaces
Although it might seem faster, painting over incompatible surfaces almost always leads to peeling, blistering, or poor adhesion; you’ll waste time and materials if you skip proper preparation or the right primer.
- Identify surface type—metal, glossy paint, or certain plastics—before choosing coatings.
- Remove contaminants, sand glossy finishes, and use adhesion-promoting primers.
- Test a small area; if it fails, strip and apply a compatible system to avoid rework.
Over-application and brush marks for solid stain
When you apply solid stain too thickly or keep going over the same area, the finish can look blotchy and you’ll see obvious brush marks once it dries.
You should work in thin, even coats, maintain a wet edge, and stop reworking areas.
Follow these steps:
- Thin coats, quick smooth strokes
- Keep a wet edge, blend outward
- Stop overbrushing; let dry
Poor preparation leading to premature failure
If you skip cleaning, sanding, or fixing surface defects, your paint or stain won’t bond properly and you’ll get peeling, flaking, or uneven wear far sooner than expected.
- Inspect and repair cracks, rot, or loose boards before finishing.
- Clean thoroughly—remove dirt, mildew, and old loose coating.
- Sand or scuff glossy surfaces and use primer where needed for adhesion.
Weather-related application errors
Surface prep sets the stage, but the weather often writes the final act—applying paint or stain in the wrong conditions can undo careful work almost immediately.
You should avoid rain, extreme heat, and high humidity that interfere with adhesion and drying. Time your project, check forecasts, and control conditions when possible.
- Pick dry, mild days.
- Skip windy, dusty times.
- Resist painting before storms.
Best Practices and Expert Tips
Now you’ll learn the key practices pros use to get long-lasting results, from picking colors and sheens that resist UV and wear to scheduling maintenance for paint versus solid stain.
You’ll also match products to your climate and substrate so coatings perform as planned.
Finally, you’ll get tool recommendations, techniques, and pro tricks to achieve a durable, attractive finish.
Choosing colors and sheens for longevity
When you pick colors and sheens with longevity in mind, consider how light, climate, and maintenance will interact with your choices.
Lighter hues and satin or semi-gloss sheens reflect heat and hide wear better, while darker, flat finishes can show fading and surface imperfections sooner.
- Choose lighter colors for hot, sunny exposures.
- Prefer satin/semi-gloss for trim and high-traffic areas.
- Test samples in different light before committing.
Proper maintenance schedule for each option
Although both paint and solid stain protect wood, they require different maintenance rhythms, so you should schedule inspections and upkeep tailored to each finish.
Check annually for paint cracking or peeling; touch up and repaint every 7–10 years.
For solid stain, inspect every 2–3 years; recoat every 3–5 years.
Clean surfaces yearly to remove dirt and mildew.
- Paint: annual inspection
- Solid stain: biennial checks
- Clean: yearly maintenance
Matching product selection to climate and substrate
Because climate and substrate determine how a finish will perform, you should choose products that match both the weather exposure and the type of wood or composite you’re coating.
Pick formulations rated for humidity, UV, or freeze–thaw cycles. Match penetration vs. film products to porous or sealed substrates. Test adhesion on composites.
- High-UV/hot climates: UV-stable solid stains
- Wet/cold: breathable, mildew-resistant paints
- Porous wood: penetrating oils or stains
Tools, techniques, and pro tricks for a durable finish
Gather the right tools and follow proven techniques to make your finish last: quality brushes and rollers, a good sprayer for large areas, proper grit sandpaper, and tack cloths will save time and prevent failures.
You’ll prep, apply thin coats, and control drying conditions. Use these pro tips:
- Sand, clean, and prime thoroughly.
- Apply multiple thin coats; sand between.
- Avoid humidity and direct sun.
Case Examples and Scenarios
Now let’s look at three real-world scenarios so you can pick the right finish and steps for your project. You’ll get clear recommendations and concise steps for an old weathered wood deck, new fiber cement siding, and a historic home with original wood trim.
Use these examples to match materials, prep, and application to your situation.
- Scenario A: Old weathered wood deck — recommend solid stain or paint removal, clean and repair, prime (if painting), then apply appropriate finish in recommended coats.
- Scenario B: New fiber cement siding — recommend paint with high-quality acrylic latex, apply primer if required, and finish with two topcoats for durability.
- Scenario C: Historic home with original wood trim — recommend breathable paint system, careful prep and repair, and match historic color and finish while preserving wood.
Scenario A: Old weathered wood deck recommendation and steps
If your deck’s wood is gray, splintered, and worn from years of sun and rain, you’ll want a restoration plan that prioritizes cleaning, repair, and protection before you choose paint or solid stain.
Start by power-washing and using a brightener, replace damaged boards, sand rough areas, apply a wood preservative, then pick solid stain for penetration or exterior paint for a durable opaque finish.
Scenario B: New fiber cement siding recommendation and steps
When you’re installing new fiber cement siding, plan for a finish that matches the material’s durability and low maintenance—solid stain won’t adhere well, so choose a premium exterior acrylic latex paint formulated for fiber cement or a manufacturer-recommended color-coating system.
Prep includes ensuring boards are dry, primed where required, and fastened per spacing and flashing guidelines so the finish performs as expected.
After painting, caulk joints, follow cure times, and inspect periodically.
Scenario C: Historic home with original wood trim recommendation and steps
Because historic wood trim often carries the character and craftsmanship that define an older home, you’ll want a restoration approach that prioritizes preservation, moisture management, and compatible finishes.
Assess rot, strip incompatible coatings, repair with epoxy or matching wood, and prime exposed areas.
Choose breathable, high-quality paint or a compatible solid stain if you want grain visibility.
Finish with proper flashing and regular maintenance inspections.
Quick Comparison Cheatsheet
You want fast guidance, so here are one-line verdicts by use-case to help you pick paint or solid stain.
| Use-case | Verdict |
|---|---|
| High-traffic trim | Paint — best for crisp color and easy touch-ups |
| Faded siding | Solid stain — hides flaws and lasts longer |
| Historic restoration | Paint — matches traditional appearance |
| Decks and railings | Solid stain — better for wear and moisture |
Scan these quick lines and you’ll know which finish usually fits each situation.
One-line verdicts by use-case
If you need a quick pick for a specific job, here’s a straight-to-the-point cheat sheet that tells you whether paint or solid stain is the better choice.
- Exterior trim and bright colors: choose paint for crisp coverage and easy color matching.
- Weathered siding and longevity: pick solid stain for seep-in protection and lower maintenance.
- Decks and foot traffic: go with solid stain for traction and fade resistance.
Frequently Asked Questions (FAQ)
You probably have a few practical questions about switching between paint and solid stain, longevity, environmental impact, repairs, and compatible substrates.
Below are three key FAQs to kick things off so you can get quick, actionable answers. If you want more detail on any item, ask and I’ll expand.
- Can you switch from paint to solid stain (or vice versa) and what prep’s required?
- How long does each finish typically last and can you spot-repair instead of refinishing?
- Is one option more eco-friendly, and are there substrate limits like plywood or pressure-treated wood?
Can I switch from paint to solid stain or vice versa?
Wondering whether you can switch between paint and solid stain? You can, but prep matters.
To go from paint to solid stain, remove loose paint, sand glossy surfaces, and use a bonding primer or stripper for best absorption.
To switch from stain to paint, clean, sand, and apply a quality primer.
Always test a small area to confirm adhesion and appearance.
How long does each finish typically last?
Once you’ve confirmed adhesion and appearance with a test area, it’s useful to contemplate how long each finish will hold up so you can plan maintenance.
Paint typically lasts 5–10 years on exterior wood before peeling or chalking, depending on prep and climate.
Solid stain generally endures 3–7 years, fading rather than peeling; recoat schedules depend on exposure, quality, and surface condition.
Is one option more eco-friendly than the other?
Which is greener: paint or solid stain?
You’ll find solid stains often use fewer VOCs and require less frequent stripping, reducing chemical waste.
Low‑VOC and water‑based paints can be eco-friendly too, but heavy pigments and peelable layers mean more prep and disposal.
Choose products labeled low‑VOC, water‑based, or certified by eco‑labels, and maintain surfaces to extend lifespan and lower impact.
Can I spot-repair vs full refinishing?
How much damage is localized versus widespread?
You can often spot-repair solid stain—blend fresh coat into the surrounding finish after light sanding.
Paint is trickier: matching sheen and color may reveal edges, so feathering and priming help.
For peeling, severe fading, or many small spots, full refinishing guarantees uniform adhesion and appearance.
Choose based on extent and visual priority.
Are there substrate limits (e.g., plywood, pressure-treated wood)?
Although both paint and solid stain can be used on many wood types, some substrates need special prep or aren’t ideal: exterior plywood and non-ventilated or very dense engineered woods can resist penetration and hold moisture.
Pressure-treated lumber often has high moisture or chemical residues that interfere with adhesion, and oily or heavily weathered surfaces may repel finishes.
You should test adhesion, dry kiln or acclimate PT wood, clean or sand slick boards, and use primers or breathable coatings suited to each substrate.
Conclusion and Recommendation + Next Steps
Now that you’ve weighed the pros and cons, use a final decision checklist to confirm your priorities—look at durability, maintenance, budget, and appearance.
If you’re unsure or the job’s large, consider hiring a pro; if you’re comfortable with prep and time, follow the DIY steps for surface prep, application, and curing.
Decide based on your checklist and schedule the next action: call a contractor or gather tools and start.
Final decision checklist
Ready to decide? Use this checklist to pick paint or solid stain based on your goals, surface, and maintenance willingness.
- Assess surface and desired opacity: paint for full coverage, solid stain for texture retention.
- Compare longevity and upkeep: choose stain for easier long-term maintenance, paint for easier color changes.
- Consider budget and prep time: pick the option that fits your schedule and wallet.
Call to action: hire a pro vs DIY decision steps
Wondering whether to hire a pro or tackle the job yourself? Decide by time, budget, and skill: pros save time and guarantee finish; DIY saves money and gives control.
Choose based on risk and desired outcome, then book or plan.
- Assess scope, timeline, and budget.
- Compare quotes and reviews or list materials.
- Schedule prep, safety, and cleanup.