Can You Limewash a Textured Wall? What to Expect Before You Start
Yes — you can limewash a textured wall, but expect extra prep and some visual variation. Limewash bonds best to porous masonry like stucco or plaster; it may sit unevenly on heavy textures, painted surfaces, or popcorn finishes. You’ll need to clean, remove flaky paint, patch cracks, test porosity, and thin the mix for better penetration. Use stiff brushes and work in mild, dry weather. Keep realistic expectations about touch-ups and longevity, and continue for detailed steps and tips.
Can You Limewash a Textured Wall? Quick Answer
Yes—you can limewash a textured wall, but it works best on stable, porous surfaces and not on heavily flaking or sealed textures.
It’ll soften color and highlight texture, but can be uneven and may need sealing or touch-ups.
Weigh longevity and maintenance against the unique, breathable finish you’ll get.
Direct verdict when it works and when it doesn’t
Although textured walls can take limewash well in many cases, whether it’ll work for you depends on the texture type, substrate, and the finish you want.
If the texture is porous (stucco, cement) and sound, you can limewash a textured wall for breathable, aged looks.
Avoid limewash on flaking paint, heavily sealed surfaces, or delicate popcorn textures lacking adhesion.
One-sentence summary of pros and cons
If your textured wall is porous and sound, limewash gives a breathable, aged look, hides imperfections, and’s eco-friendly.
However, it won’t adhere to flaking paint, heavily sealed surfaces, or fragile popcorn textures and may require multiple coats and careful prep.
You’ll enjoy a matte, natural finish and improved breathability, but expect prep work, potential unevenness, and limited stain resistance compared to modern paints.
What Is Limewash and How Does It Work on Walls
Limewash is a simple mineral paint made from slaked lime and water, and it gives a matte, breathable finish that lets masonry expel moisture.
When you apply it to bare masonry it chemically bonds and carbonates into the surface, while on painted or sealed walls it mostly sits on top and may not cure as well.
You’ll notice a chalky, soft look and improved breathability with proper adhesion, which affects durability and appearance.
Composition and properties of limewash
Understanding how limewash works starts with its simple, natural chemistry: it’s mainly made of slaked lime (calcium hydroxide) mixed with water, sometimes with natural pigments or additives to adjust color and performance.
You’ll find it breathable, slightly alkaline, and matt; it’s thin, so it soaks into textured surfaces rather than sitting on top, and it fades gently over time.
How limewash bonds and cures on masonry vs. painted surfaces
Think of limewash as a chemical handshake with the substrate: on bare masonry it soaks in and reacts to form a hard, breathable calcium carbonate layer, while on painted surfaces it mainly sits on top and relies on mechanical keying or the paint’s porosity to adhere.
You’ll get stronger, longer-lasting bonding on unpainted masonry; painted walls may need stripping, scuffing, or a breathable primer to improve adhesion and curing.
Visual and functional characteristics (matte finish, breathability)
Breathability and texture define limewash’s appeal: it gives walls a soft, ultra-matte look that mutes imperfections and scatters light instead of reflecting it, while still letting moisture pass through the substrate so walls can dry naturally.
You’ll notice a chalky, layered patina that ages gracefully, resists peeling on permeable substrates, and requires reapplication rather than aggressive stripping when repair or color refresh is needed.
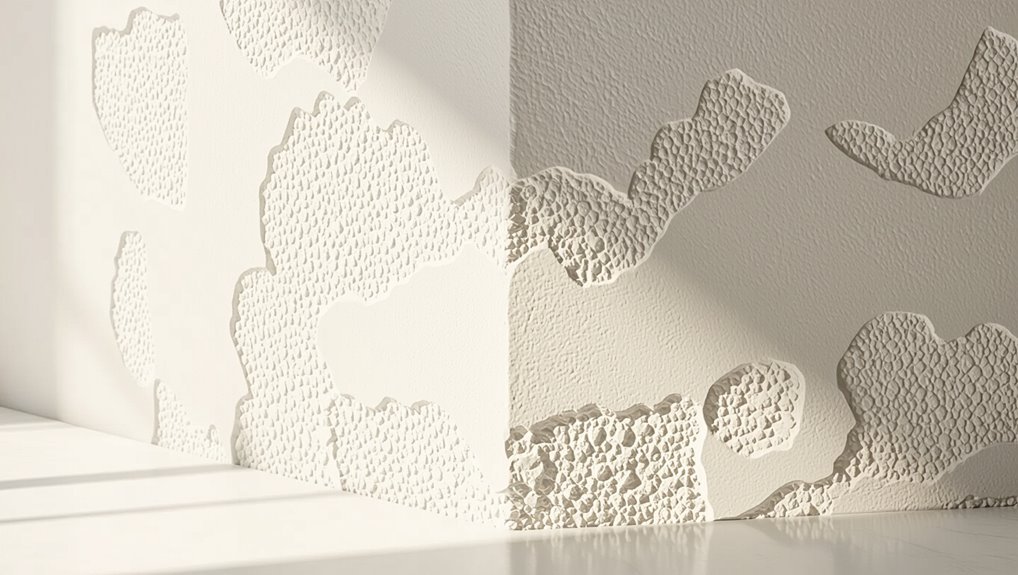
Types of Textured Walls and How They Affect Limewashing
You’ll encounter common textured surfaces like stucco, rough plaster, skip trowel, popcorn, and textured paint, and each one accepts limewash differently.
Pay attention to porosity and absorbency—more porous surfaces soak up limewash faster and may need dilution or extra coats.
Also factor in adhesion challenges: smooth or flaky textures often require cleaning and a primer, while rough, keyed surfaces usually hold limewash better.
Common textured surfaces (stucco, rough plaster, skip trowel, popcorn, textured paint)
Textures shape how limewash looks and bonds, so knowing your wall type matters.
On stucco and rough plaster, limewash emphasizes peaks and valleys, giving rustic depth.
Skip trowel yields varied absorption and a mottled finish.
Popcorn’s heavy texture traps limewash unevenly and may need thinning.
Textured paint can resist adhesion; you might sand or remove it before limewashing.
Surface porosity and absorbency considerations
Now that you’ve considered how different textures change limewash appearance, you also need to think about surface porosity and absorbency because they determine how the limewash soaks in, bonds, and ages.
Test small areas: highly porous stucco soaks quickly and may need diluted coats; dense painted textures absorb less and need more buildup.
Adjust mix, dilution, and drying time accordingly.
Adhesion challenges by texture type
Although different textures can look similar at a glance, each presents distinct adhesion challenges you should plan for:
You’ll prep differently for smooth plaster, rough stucco, or popcorn finishes. Smooth holds limewash evenly; rough soaks more and needs thicker coats; popcorn traps debris and resists bonding. Choose primers, brushes, and application thickness to match texture and avoid peeling, blotches, or wasted effort.
| Texture | Feeling |
|---|---|
| Smooth | Calm |
| Rough | Grit |
Assessing Your Textured Wall: Pre-Limewash Checklist
Before you limewash, inspect the surface for cracks, old coatings, and signs of moisture so you know what needs repair.
Try simple tests like a water bead test for porosity and a tape or scrape test for adhesion to see if the limewash will stick.
If you find structural cracks, persistent damp, or mold, call a professional before proceeding.
Surface inspection: cracks, previous coatings, moisture issues
When you inspect a textured wall for limewashing, focus on three things: cracks, existing coatings, and moisture—each can change how the limewash bonds and performs.
Check cracks for depth and movement; hairline fractures need filling, structural ones need repair.
Identify paints or sealers that block absorption.
Look for damp spots, efflorescence, or staining—address sources of moisture before limewashing to guarantee adhesion and longevity.
Simple water and adhesion tests to perform
Since limewash needs a porous, stable surface to adhere, do a couple quick water and adhesion tests to confirm your textured wall will accept the finish.
Sprinkle water on small areas: if it beads, the surface is sealed and needs stripping or etching.
Press tape onto the texture and peel—if paint lifts, adhesion is poor.
Repeat in several spots before starting.
When to call a professional for structural or moisture problems
If you spot cracks running through the texture, persistent damp patches, mold growth, or any signs of structural shifting, call a professional before you limewash—these issues can undermine the finish and hide deeper problems that quick fixes won’t solve.
A pro will assess moisture sources, structural integrity, and ventilation, recommend repairs or remediation, and guarantee surfaces are safe and stable for limewash application.
How to Prepare a Textured Wall for Limewashing
Before you limewash, you’ll need to clean the surface and remove any loose material so the finish adheres properly.
Patch cracks and deep voids, then decide whether to etch, scuff, or strip existing coatings and apply a primer or bonding coat if required.
Finally, follow recommended mix ratios and thin the limewash appropriately for textured surfaces to guarantee even coverage.
Step 1 Cleaning and removing loose material
Once you’ve cleared the area, start by loosening and removing any flaking paint, dirt, and debris from the textured surface so the limewash can bond properly.
Use gentle scrubbing, a stiff-bristled brush, and low-pressure washing where safe. Wear protection and test a small patch first.
- Brush loose material
- Vacuum dust
- Rinse gently
- Let dry fully
Step 2 Repairing cracks and filling deep voids
With the surface clean and dry, you’re ready to repair cracks and fill deep voids so the limewash sits evenly.
Use a compatible cement or lime-based filler for structural gaps; apply in layers for deep holes, letting each cure.
Smooth or texture the patch to match surrounding finish, then prime or mist lightly so the limewash bonds uniformly across repaired areas.
Step 3 Choosing between etching, scuffing or stripping existing coatings
Because existing paints and sealers vary so much in adhesion and porosity, you’ll need to decide whether etching, scuffing, or fully stripping is best for your textured wall; each method affects limewash bonding and the final look.
Test small areas: scuff glossy finishes with abrasive pads, etch smooth masonry chemically, or strip peeling, incompatible coatings.
Choose the least invasive option that yields reliable adhesion.
Step 4 Applying a suitable primer or bonding coat (when needed)
If your adhesion tests showed weak bonding or you stripped back to a non-porous surface, apply a primer or bonding coat to help the limewash stick and look even.
Choose a breathable primer compatible with lime (silicate or lime-based bonding agent).
Work in thin, even coats, follow manufacturer drying times, and spot-test before full application to guarantee proper adhesion and finish.
Step 5 Mix ratios and thinning for textured applications
1 part limewash to 3–5 parts water is a common starting point, but textured surfaces usually need a slightly thinner mix so the wash can penetrate crevices and lay down evenly.
You should test small areas, adjust dilution, and aim for flow without runoff.
- Test on scrap surface
- Thin gradually
- Check coverage after drying
- Note temperature effects
How to Limewash a Textured Wall (Application Steps)
Gather your tools and materials, then pick an application method—brushing, spraying, or ragging—based on the texture and finish you want.
Follow a step-by-step technique for deep textures, apply multiple thin layers with proper drying times between coats, and know when to recoat.
Finish with the right touches and optional sealing to protect the limewash.
Tools and materials needed
You’ll need a handful of specific tools and materials to limewash a textured wall correctly: hydrated lime or pre-mixed limewash, clean water, a pH-neutral primer (if the wall is very porous or dusty), stiff-bristled brushes or a masonry brush, a roller with a thick nap for texture, mixing buckets, a drill with a paddle mixer, drop cloths and masking tape, and protective gear (gloves, goggles, respirator).
- Measure and mix ingredients accurately.
- Test a small patch for adhesion and color.
- Keep surfaces clean and dust-free before coating.
- Have cleanup supplies and neutralizing agents ready.
Application methods: brushing, sprayer, and ragging pros and cons
When deciding how to apply limewash to a textured wall, pick the method that matches your texture, desired finish, and patience—brushing gives control and depth, spraying speeds coverage but can oversaturate, and ragging creates soft, variegated effects. Choose brushing for control, sprayer for speed, ragging for subtlety.
| Method | Strength | Trade-off |
|---|---|---|
| Brushing | Precision | Time |
| Spraying | Speed | Overspray |
| Ragging | Texture | Consistency |
Step-by-step application technique for deep textures
Start by evaluating the depth and pattern of your texture so you know how much limewash and how many passes you’ll need; deep crevices will require more product and deliberate application to coat evenly without pooling.
Work top-down, load a stiff brush or sprayer, push limewash into recesses, remove excess with a dry brush or rag, and maintain consistent strokes for uniform coverage.
Layering, drying times, and when to recoat
After you’ve pushed limewash into the deepest crevices and wiped away excess, think about how layers build both coverage and texture: thin, controlled passes dry faster and let you judge opacity before committing to heavier coats.
Wait 4–24 hours between coats depending on humidity and temperature; touch dry doesn’t equal cure.
Recoat only when previous layer feels dry to the touch and resists slight pressure.
Finishing touches and sealing options
Once the limewash layers look balanced and feel dry, focus on your finishing touches and decide if you’ll seal the surface; these steps lock in the look and protect the texture without masking its character.
Lightly sand any rough high points, remove dust, and test a breathable matte sealer on a small area.
Choose breathable products formulated for lime to prevent trapping moisture.
Expected Results: Appearance, Durability, and Maintenance
You’ll notice limewash brings out different effects depending on the texture—smooth surfaces look soft and chalky while rough textures catch more pigment and shadow.
Expect natural weathering over years that gently fades color and may require touch-ups, with longevity influenced by climate and substrate.
For upkeep, you’ll mostly need gentle cleaning and occasional reapplication in high-exposure areas to maintain uniform appearance.
Typical visual outcomes on different textures
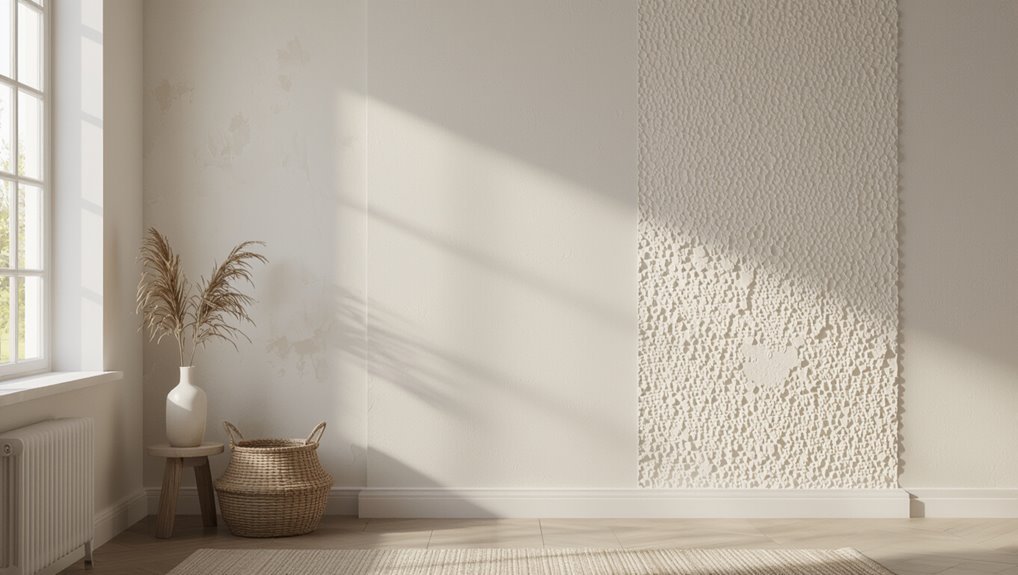
Because texture controls how limewash adheres and wears, you’ll see very different looks and performance on smooth plaster, rough stucco, or pronounced masonry joints.
On smooth surfaces you’ll get an even, matte veil; rough stucco yields variegated, rustic depth as limewash pools in crevices; pronounced joints create strong highlights and shadows.
Touch-ups are easier on smooth than textured areas.
Longevity and weathering characteristics
While limewash cushions a wall in breathable, mineral-rich pigment, its look and lifespan change as it weathers—expect gradual softening of color, subtle chalking, and natural surface patination rather than a hard film finish.
You’ll notice texture influences wear: protruding ridges fade faster, sheltered recesses retain pigment.
Durability depends on substrate, application coats, and exposure; occasional recoat restores vibrancy without stripping the breathable layer.
Cleaning and periodic maintenance recommendations
After weathering softens color and reveals texture-dependent wear, you’ll want a simple maintenance routine to keep limewash looking its best and lasting longer.
Gently rinse with a soft brush and low-pressure water to remove dirt and pollen.
Spot-treat stains with diluted mild soap, avoid harsh chemicals, and reapply a thin limewash coat every 3–7 years or sooner in exposed areas.
Common Problems and How to Avoid Them
You’ll run into a few common issues when limewashing textured walls, so you’ll want to know how to prevent and fix them.
Watch for peeling or flaking from poor adhesion, uneven coverage or blotching, efflorescence and other moisture-related staining, and special challenges on previously painted textures.
In the following section, you’ll get clear causes and straightforward remedies for each problem.
Peeling or flaking root causes and fixes
If paint or limewash starts peeling or flaking, it usually points to surface or moisture problems you can fix before reapplying.
First, remove loose material, sand edges, and clean with a mild detergent.
Check for leaks, rising damp, or poor ventilation and repair them.
Prime affected areas with a breathable masonry primer.
Allow full drying before limewashing to guarantee adhesion and longevity.
Uneven coverage and blotching prevention and correction
When limewash looks patchy or blotchy, uneven suction, inconsistent application, or varying wall texture usually causes it.
To prevent this, pre-wet porous areas, prime smooth spots, and test a small section.
Use thin, even coats with a masonry brush or sprayer, work wet edges into each other, and let each coat dry fully.
Touch up missed spots promptly for a uniform finish.
Efflorescence, staining, and moisture-related failures
Even with proper application you can still run into moisture-driven problems like efflorescence, rusting, or organic staining.
So it’s important to spot and address the root causes quickly. Check for leaks, poor drainage, or rising damp before limewashing.
Remove salts, clean rust stains, and let masonry dry fully.
Improve ventilation and fix water entry to prevent recurring failures and preserve the finish.
Problems specific to previously painted textured walls
Because painted textured walls often hold old coatings and trapped contaminants, you’ll face adhesion failures, patchy coverage, and texture telegraphing when limewashing them unless you prep carefully.
Strip loose paint, degrease, and scuff glossy surfaces. Fill deep crevices and prime with a breathable, alkali-tolerant primer.
Test a small area first; multiple thin limewash coats work better than one heavy application.
Tips and Best Practices for Successful Limewashing
You can save time with smart surface-prep shortcuts—like spot-priming and using a stiff brush to remove loose material—without cutting corners on adhesion.
Pick mild, dry weather for application and avoid extremes of heat or humidity so the limewash cures evenly.
Consider tint strength and application technique to get consistent color on textured surfaces.
Finally, choose limewash when you want a breathable, matte, aged look and pick alternatives if you need high durability or stain resistance.
Surface prep shortcuts that save time without sacrificing quality
When time’s tight but quality matters, focus on targeted prep that addresses trouble spots instead of stripping every inch—clean loose dirt and efflorescence, scrape peeling paint, and fill deep cracks so the limewash bonds and looks even.
Spot-prime metal or bare patches, sand rough edges, and mask trim. Use a stiff brush and quick patching compound to save hours while ensuring a uniform, durable finish.
Ideal environmental conditions and timing
After addressing trouble spots, pick the right weather window for limewashing: aim for mild, dry days with temperatures between about 50–85°F (10–30°C) and low wind so the limewash can adhere, carbonate, and dry evenly.
Work in morning or late afternoon to avoid intense sun or overnight frost.
Plan several consecutive dry days, and pause if rain or high humidity is forecast.
Color and tinting tips for textured surfaces
1 key consideration for textured surfaces is that texture affects perceived color—rough or deeply profiled walls will show more shadow and variation, so expect any tint to read darker and more muted than a flat sample.
Test small areas, apply multiple thin coats, and view at different times of day.
Choose slightly lighter or warmer tints to preserve brightness and harmony with shadows.
When to choose limewash versus alternative finishes
Because limewash soaks into textured surfaces and creates a breathable, matte patina, you’ll choose it when you want a soft, aged look, enhanced mortar lines, and moisture management that paints can’t match;
pick alternatives—acrylic paints, mineral silicate coatings, or oil-based finishes—when you need faster application, higher durability, stain resistance, or a wider color range.
Assess substrate, exposure, maintenance, and lifespan needs before deciding.
Cost, Time, and When to Hire a Pro
You’ll want a quick cost snapshot—materials are usually modest, while labor can be the biggest expense if you hire help.
Plan on a few hours for a small, smooth wall but a day or more for large or heavily textured surfaces, and factor extra time for prep and drying.
Consider calling a pro if the texture is intricate, the wall needs repairs, or you don’t have the time or confidence to get an even finish.
Rough cost breakdown (materials vs. labor)
When weighing limewashing for a textured wall, you’ll find materials usually cost a fraction of the total—lime putty or powder, pigments, brushes, and sealers run low compared with skilled labor—so estimate roughly 20–35% materials and 65–80% labor for a typical job, though rates vary by region, surface condition, and complexity.
| Item | Typical share |
|---|---|
| Materials | 20–35% |
| Labor | 65–80% |
| Extras | 0–10% |
| Contingency | 5–10% |
Time estimates by wall size and texture complexity
Estimate time by pairing wall size with texture complexity: small, smooth walls often take a few hours to prep and two to four hours to limewash;
medium rooms or mildly textured surfaces usually need a day (prep, multiple thin coats, and drying);
heavily textured or large exterior walls can run two to three days or more, especially if you’re repairing, masking, or applying pigments between coats.
Factor humidity, coat count, and cure time into your plan.
Signs it’s better to hire a professional
Deciding whether to DIY or hire a pro often comes down to cost, time, and the job’s complexity—if the wall’s texture is deep, the surface needs repairs, or the space is large and high-up, hiring a professional usually saves you headaches and money in the long run.
You should hire a pro when access is difficult, timelines are tight, or you lack tools and experience; they guarantee consistent finish, safety, and warranty.
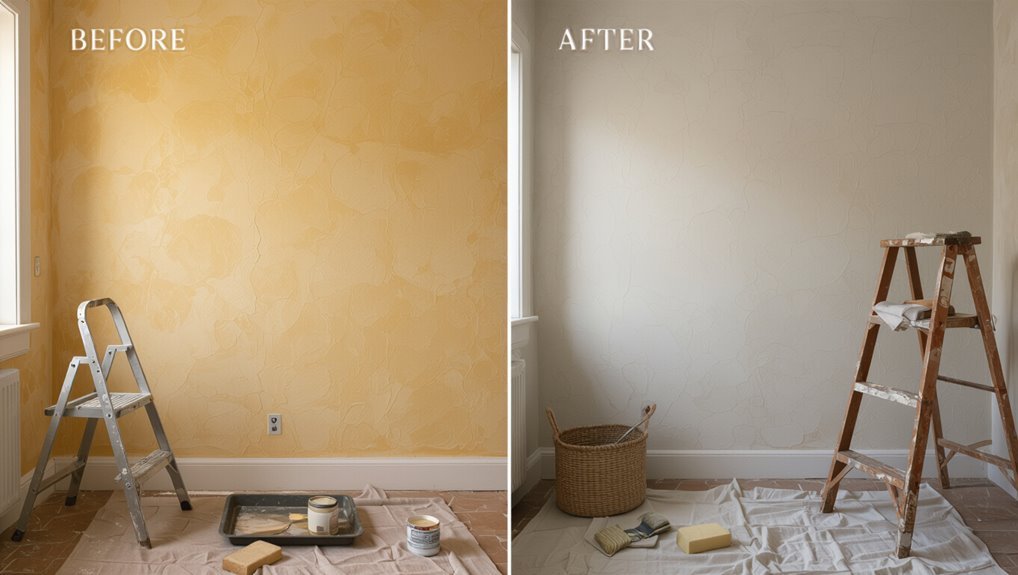
Before-and-After Case Examples and Scenarios
You’ll see three clear scenarios to guide your choices: a small interior textured wall DIY walkthrough showing step-by-step prep and finishing, an exterior stucco project handled by pros with the right tools and timing, and a renovation that documents where limewash failed and what was learned.
Each case highlights practical tips, expected results, and common pitfalls so you can compare approaches. Use these examples to decide whether to try it yourself or hire a pro and to avoid mistakes others made.
Small interior textured wall DIY walkthrough
Start by surveying the small textured wall you want to limewash—look for high-traffic touches, existing paint adhesion, and surface irregularities—so you can tailor the prep and technique to that specific case.
Patch chips, sand rough spots, clean dust, and prime glossy areas.
Mix thin limewash, test a corner, apply with a brush or roller in thin layers, letting each dry before evaluating coverage.
Exterior stucco wall professional approach
Assess the exterior stucco surface thoroughly before limewashing—check for hairline cracks, efflorescence, previous paint adhesion, and areas with heavy soiling—so you can plan repairs, choose appropriate primers or breathable sealers, and select the limewash dilution and application method that will deliver durable, even coverage in the field examples that follow.
You’ll see case examples showing prep, patching techniques, mixing ratios, application tools, and drying outcomes.
Renovation where limewash failed lessons learned
When limewash doesn’t hold up, look closely at what went wrong so you can fix it right the next time: examine substrate moisture, bond failures, incompatible primers, and application mistakes that caused peeling, uneven coverage, or rapid washout.
You’ll document causes, strip failed layers, correct substrate issues, choose compatible breathable products, and test small areas.
Learn from each failure to prevent repeats.
FAQ
You’ll find quick answers here to common concerns like applying limewash over existing paint, how many coats deep textures need, and whether it hides imperfections.
You’ll also get guidance on using limewash in bathrooms or humid areas and how long it takes to fully cure and reach its final look.
If you have a specific wall or moisture situation, mention it and you’ll get tailored advice.
Can limewash be applied over existing paint on textured walls?
Curious if limewash will stick to the painted, textured surface you’ve got? Yes, but adhesion depends on paint type and surface prep.
Remove loose paint, degrease, scuff glossy finishes, and repair uneven areas.
Porous, mineral paints accept limewash best; modern acrylics may resist. Test a small patch first.
Use a bonding primer if needed to improve adhesion and longevity.
How many coats of limewash are needed for deep textures?
How many coats you’ll need depends on the depth of the texture and the look you want: for shallow textures one to two thin coats usually suffice, while deep or heavily pitted surfaces often require three or more applications to fully fill and visually even out the profile.
You’ll let each coat dry, assess coverage, and add coats until color and depth read consistently across the wall.
Will limewash hide imperfections in a textured wall?
Can limewash hide imperfections on a textured wall? You’ll find limewash softens and slightly masks minor flaws by creating a matte, breathable finish and subtle color variations.
It won’t erase deep gouges, uneven trowel marks, or large cracks.
Prep matters: fill major defects, sand sharp ridges, then apply multiple thin coats to achieve the most even, forgiving appearance.
Is limewash suitable for bathrooms and high-humidity areas?
Wondering whether limewash will hold up in a steamy bathroom? You can use limewash, but it’s best on well-ventilated spaces and away from constant water spray.
Limewash is breathable and resists mold, yet prolonged direct moisture can erode finish.
Seal nearby wet zones with proper waterproofing, improve ventilation, and consider a sacrificial topcoat in shower-adjacent areas for added protection.
How long before limewash fully cures and develops its final look?
Because limewash cures through a chemical reaction with carbon dioxide in the air, you’ll start to see a stable surface in about 2–4 weeks.
However, the full carbonation and final appearance can take up to 6–8 weeks (and sometimes longer in cool or poorly ventilated conditions).
Expect subtle color shifts, increased hardness, and reduced powderiness; avoid washing or heavy wear until curing completes.