How to Get Wood Stain Off Painted Walls Without Ruining the Surface
You can remove wood stain from painted walls without ruining the finish by acting carefully and testing first. Start by blotting excess stain, then try warm soapy water or diluted rubbing alcohol on a hidden spot. Work gently with a microfiber cloth, rinse, and repeat sparingly. For stubborn marks, use baking soda paste, white vinegar, or a commercial remover after spot-testing, and sand, prime, and touch up only if necessary. Keep going to learn step-by-step options and precautions.
How to Get Wood Stain Off Painted Walls Without Ruining the Surface
If you want a quick answer: start gentle and work up only if needed.
Use safe, paint-friendly cleaners and test a hidden spot first so you don’t ruin the finish.
Follow step-by-step, effective methods to remove stain without over-scrubbing or using harsh solvents.
Quick Answer Safe, Effective First Steps
When you spot wood stain on painted walls, act quickly but gently to avoid spreading it or damaging the paint.
Start by blotting excess stain with a clean, dry cloth. Then test a mild cleaner on an inconspicuous area.
For how to get wood stain off painted walls, dab with diluted dish soap or rubbing alcohol, rinse, and repeat sparingly until the stain lifts.
Understanding the Problem
You’ll want to know what wood stain actually is and how its pigments and solvents can soak into painted surfaces.
Removal difficulty depends on the paint type, how long the stain’s been there, and how porous the wall or finish is.
If the stain’s old, widespread, or the paint is delicate, call a professional to avoid causing more damage.
What Is Wood Stain and Why It Stains Painted Walls
Wood stain is a pigmented, solvent-based finish meant to soak into wood fibers and highlight grain, but its dyes and solvents also let it penetrate porous painted surfaces and leave visible discoloration.
When stain contacts paint, pigments can migrate and bind to the binder, and solvents may soften finishes, causing spread. You’ll often see tinted blotches or halos that contrast with the surrounding paint.
Factors That Affect Removal Difficulty (paint type, stain age, porosity)
Because several variables change how stain bonds to painted surfaces, removing it can range from quick to tricky.
You’ll find oil-based paints repel some stains better than porous latex. Older stains soak and set, so they’re harder to lift.
High-porosity primers or unsealed drywall absorb more pigment. Temperature and humidity also affect penetration, so assess paint type, stain age, and surface porosity before treating.
When to Call a Professional
If a stain spreads beyond a small spot, sets into the primer, or keeps returning after your best attempts, call a professional—these are signs the problem’s more than a simple surface cleanup.
You should also call one if the paint’s oil-based, the wall has extensive damage, or DIY methods risk stripping finish.
They’ll assess, use proper solvents, and restore paint with minimal harm.
Assess the Situation Before You Start
Before you begin, check whether your paint is latex or oil-based since that affects which cleaners and solvents are safe to use.
Test a hidden spot or a scrap of paint to make sure your chosen remover won’t damage the finish.
Gather safety gear (gloves, goggles, mask) and the right tools so you can work efficiently and safely.
Inspect Paint Type (latex vs. oil-based)
To start, determine whether your wall paint is latex or oil-based, since each reacts differently to cleaners and solvents.
You’ll choose gentler, water-based methods for latex and milder solvents for oil-based finishes to avoid softening or removing paint.
- Check paint sheen and age
- Smell test (oil smells stronger)
- Use rubbing alcohol on a corner
- Review previous paint records
- Note surface hardness
Test a Hidden Spot or Scrap of Paint
Because stains and cleaners can react unpredictably, test a hidden spot or loose paint scrap so you know exactly how your wall will respond.
Choose an inconspicuous area, apply the cleaner or remover briefly, and blot.
Wait for full dry time and inspect for discoloration, softening, or sheen loss.
If you see damage, stop and try a milder method or consult a pro.
Gather Safety Gear and Tools

Now that you’ve confirmed how the paint reacts, gather the right safety gear and tools so you can work quickly and safely.
Put on gloves and eye protection, ventilate the area, and set up drop cloths. Have gentle cleaners, soft cloths, a plastic scraper, and cotton swabs ready.
Work methodically from least to more aggressive options.
- Nitrile gloves
- Safety glasses
- Drop cloths
- Plastic scraper
- Soft cloths
Step-by-Step Removal Methods (From Least to Most Aggressive)
Start with the least aggressive options and work up only as needed so you don’t damage the paint.
Try a gentle wipe with soapy water first, then move to isopropyl rubbing alcohol, a baking soda paste with light abrasion, or white vinegar before considering commercial stain removers.
Test each method in an inconspicuous spot and stop if the paint shows signs of wear.
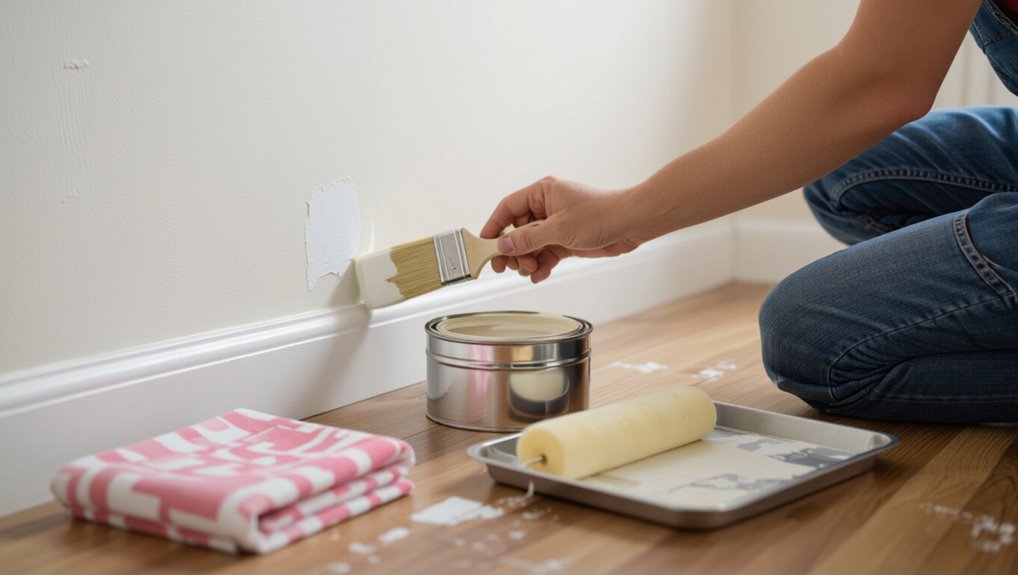
Step 1 Gentle Wipe and Soap Method
Step 1 focuses on the gentlest approach: grab a soft cloth, warm water, and mild dish soap to see if the stain lifts without damaging the paint.
Dampen the cloth, wring well, and gently blot or rub the stain in small circles. Rinse the cloth frequently, switch to a clean area as the stain fades, and dry the spot to check results.
Step 2 Rubbing Alcohol or Isopropyl Alcohol Technique
If mild soap didn’t fully remove the stain, try rubbing alcohol (isopropyl) next — it dissolves many finishes without stripping most paints when used carefully.
So dampen a soft cloth, test an inconspicuous spot first, and then gently blot the stain working outward until you see lift.
Use short dabs, replace the cloth as it soils, and stop if paint softens; rinse and dry.
Step 3 Baking Soda Paste and Gentle Abrasion
Mix a thick paste of baking soda and water, apply it to the stain, and gently rub with a damp soft cloth or a melamine sponge to lift wood stain without damaging the paint.
Work in small circles, check progress frequently, and avoid scrubbing hard.
Wipe residue with a damp cloth, dry, and repeat once if needed.
Test hidden areas first.
Step 4 White Vinegar Application
After the baking soda paste, try white vinegar for slightly tougher stains; its mild acidity helps break down pigment without harming most paints.
Dampen a soft cloth with equal parts white vinegar and water, blot the stain gently, and rinse frequently.
Test an inconspicuous spot first. If paint softens or color fades, stop immediately and dry the area; otherwise repeat until the stain lifts.
Step 5 Commercial Stain Removers and Paint-Safe Cleaners
Step 5 moves you to commercial stain removers and paint-safe cleaners when household solutions don’t do the job — these products are formulated to break down wood stain pigments while minimizing paint damage.
You’ll test a small area, follow label directions, and work gently with a soft cloth until the stain lifts.
- Patch-test first
- Use paint-safe formula
- Follow contact time
- Blot, don’t rub
- Rinse thoroughly
Step 6 Mild Solvents (Mineral Spirits) When and How to Use Safely
When gentler cleaners and commercial stain removers haven’t lifted the wood stain, reach for a mild solvent like mineral spirits—but only after testing a hidden spot and preparing for ventilation and skin protection.
Dampen a soft cloth, blot gently, avoid scrubbing paint, and change cloths as they pick up pigment.
Rinse with mild soap and water, then air-dry and inspect for finish damage.
Step 7 Touch-Up and Repaint as Last Resort
If the stain won’t budge without damaging the paint, you’ll need to touch up or repaint as a last resort—pick this only after you’ve tried all gentler methods and confirmed the finish is compromised.
Match paint sheen and color, feather edges when touching up, sand lightly if needed, prime stained areas, and repaint in thin coats.
Let each coat dry fully before evaluating.
Materials, Tools, and Safe Alternatives
Before you start scrubbing, gather recommended cleaners and solvents that are safe for painted surfaces and know which to try first.
Choose soft cloths, sponges, soft brushes, and fine sanding pads as needed, and have gloves and eye protection on hand.
Make sure the room is well-ventilated or use a respirator if you’ll be using stronger solvents.
Recommended Cleaning Products and Solvents
You’ll want a short list of reliable cleaners and solvents that match your paint type and the stain’s age and finish. Use mild dish soap solution first, then isopropyl alcohol for fresh stains, mineral spirits for oil-based stains, and a paint-safe citrus cleaner for stubborn marks. Test hidden areas before full use.
| Product | Best for |
|---|---|
| Dish soap | Fresh, water-based |
| Isopropyl alcohol | Dye transfer |
| Mineral spirits | Oil-based stain |
| Citrus cleaner | Stubborn residue |
Tools: Cloths, Sponges, Soft Brushes, Sanding Pads
Tools like soft cloths, sponges, gentle-bristled brushes, and fine sanding pads give you the control to remove wood stain without damaging paint; choose lint-free microfiber or cotton rags for wiping, non-abrasive sponges for scrubbing, soft nylon brushes for textured surfaces, and very fine sanding pads only for localized, cautious abrasion.
- Microfiber cloths
- Cotton rags
- Non-abrasive sponges
- Soft nylon brushes
- Ultra-fine sanding pads
Safety Equipment and Ventilation Tips
After gathering your cloths, sponges, and sanding pads, make sure you’re set up with proper safety gear and fresh air to protect yourself from fumes and dust.
Wear nitrile gloves, safety goggles, and an N95 or cartridge respirator for solvents.
Open windows, run a box fan toward outdoors, and seal off adjacent rooms.
Keep a fire extinguisher nearby and use low-VOC cleaners.
How to Protect Different Paint Finishes
Different paint finishes react to stain-removal methods in distinct ways, so you’ll want to tailor your approach for matte and flat, eggshell and satin, and semi-gloss and gloss surfaces.
For matte and flat paints, you’ll need gentler cleaners to avoid removing pigment; eggshell and satin tolerate mild scrubbing; and semi-gloss and gloss can handle stronger solutions and more abrasion.
Next, we’ll cover specific techniques and precautions for each finish so you protect the underlying paint while removing the stain.
Removing Stain from Matte and Flat Paint
Because matte and flat paints absorb more than they reflect, you’ll need a gentler, more careful approach to lift wood stain without damaging the finish.
Blot tests first. Use a mild detergent or diluted white vinegar, applied sparingly with a soft cloth. Avoid scrubbing or harsh solvents.
Rinse lightly, pat dry, and repeat cautiously. If stain persists, consult a pro before aggressive methods.
Removing Stain from Eggshell and Satin Paint
Want to protect your eggshell or satin finish while removing wood stain?
Work gently: blot excess stain, test cleaners in an inconspicuous spot, and use a mild detergent or diluted white vinegar with a soft cloth.
Avoid scrubbing hard or abrasive pads that dull sheen.
Rinse with clean water, pat dry, and consider a light touch-up with matching paint for any faded spots.
Removing Stain from Semi-Gloss and Gloss Paint
If you’ve got semi-gloss or gloss paint, treat stains with extra care since these finishes show marks and damage more readily.
Use a soft microfiber cloth, mild dish soap solution, and gentle circular motions. Test a hidden spot first.
Avoid abrasive scrubbers or strong solvents that dull sheen. Rinse, blot dry, and touch up with matching paint if needed to restore uniform gloss.
Common Mistakes That Damage Painted Walls
When you’re removing wood stain, don’t over-scrub or grab abrasive tools that can strip the paint.
Don’t use strong solvents without testing a small, hidden spot and rinsing immediately if you do.
And always seal or touch up the area after removal to prevent lasting damage.
Over-Scrubbing and Abrasive Tools
Scrub gently—overdoing it or reaching for abrasive tools can do more harm than the stain itself.
You’ll remove paint, dull finishes, and create rough patches that show under light. Use soft cloths, light pressure, and circular motions.
If the stain won’t budge, stop and reassess—don’t escalate with scrapers, steel wool, or harsh scrubbing pads that permanently damage the surface.
Using Strong Solvents Without Testing
Because solvents can strip paint fast, you should never skip a spot test before applying anything strong to a wall.
Test in an inconspicuous area, wait for full drying, and inspect for softening, discoloration, or gloss loss.
Strong solvents can dissolve primers or finish coats; if damage appears, stop.
Use milder cleaners or consult a pro before proceeding.
Skipping Spot Tests and Immediate Rinsing
If a spot test shows the paint holds up, don’t ruin that success by skipping tests elsewhere or by failing to rinse immediately after using a cleaner.
You should test multiple inconspicuous areas, use the mildest cleaner first, and rinse promptly to stop solvent dwell time.
Leaving residue or assuming one pass works can soften or discolor paint—prevent that by testing and immediate rinsing.
Failing to Seal or Touch Up After Removal
When you remove wood stain, don’t assume the job’s done — the cleaned area can be more porous or slightly lighter than the surrounding paint, leaving it vulnerable to moisture, dirt, and visible patchiness; seal or touch up promptly to restore protection and blend the finish.
After cleaning, let the wall fully dry, sand lightly if needed, apply primer, then match paint and feather edges for an invisible repair.
Prevention and Best Practices
When you spot a fresh wood stain, act fast with the right solvents and gentle blotting to prevent it from setting.
Use drop cloths, painter’s tape, and proper ventilation whenever you’re staining near painted walls to avoid accidental splashes and fumes.
And keep a regular wall-cleaning routine and quick touch-up plan so small marks never turn into stubborn stains.
Immediate Response Protocol for Fresh Stains
Act quickly: blot fresh wood stain with a clean, lint-free cloth to lift excess pigment before it sets into the paint.
Then gently dab with a damp sponge and mild dish soap, testing an inconspicuous spot first.
If needed, use a cotton swab with diluted rubbing alcohol.
- Blot, don’t rub
- Test first
- Work outward
- Use minimal moisture
- Repeat cautiously
Protective Measures When Working with Wood Stain Near Walls
You’ve already learned how to respond to fresh stains; now focus on preventing them in the first place by setting up a controlled workspace and using physical barriers.
Lay drop cloths, tape plastic sheeting to trim, and position tarps or cardboard against walls. Keep stain cans capped, mix over a tray, and use brushes with drip guards.
Wear gloves and work methodically to avoid splatter.
Routine Wall Maintenance to Reduce Long-Term Stain Risks
Although routine care might seem minor compared to blocking fresh drips, maintaining painted walls on a schedule greatly lowers long-term stain risk by catching spills, dirt, and surface breakdown before they set in.
You should dust weekly, spot-clean with mild soap as soon as stains appear, reseal high-traffic areas annually, and inspect trim and caulk for gaps.
Consistent upkeep prevents stubborn wood-stain penetration.
Quick Troubleshooting Guide
If the stain faded but’s still visible, you’ll want to try a gentler cleaner or a targeted spot treatment before repainting.
If the paint discolored after cleaning, test a small area and consider light sanding and touch-up with matching paint.
If the stain reappears after drying, it’s likely bleeding from the wood—seal it with a stain-blocking primer before refinishing.
Stain Faded but Still Visible Next Steps
Seeing a faded but still visible wood stain can be frustrating, but don’t panic—you’ve got options that can finish the job.
Gently reapply a mild cleaner or diluted hydrogen peroxide on a microfiber cloth, blotting—don’t rub. If residue persists, try a light sanding with fine-grit paper, then spot-prime and repaint only the affected area.
Test first in an inconspicuous spot.
Paint Discoloration After Cleaning How to Fix
Why did the cleaned spot look different from the rest of the wall? You likely removed surface grime or finish layers, altering sheen or thinning paint.
Fix by gently scuffing the area with fine sandpaper, cleaning, then applying a matching primer before touch-up paint. Blend edges feathering outward.
For glossy finishes, use a gloss-restoring product sparingly to match sheen.
Stain Reappears After Drying Why and What to Do
You may think the job’s done after cleaning, but some stains resurface as the wall dries.
Oil or tannin bleed can wick back through paint; moisture can reactivate residue.
Reclean using a solvent recommended for your paint, blot dry, then seal with a stain-blocking primer.
If stain persists, lightly sand and repaint.
Test on a small area first to avoid damage.
Cost and Time Estimates
You’ll want to know how long each stain-removal method takes and what it’ll cost before you start.
DIY options usually take more time but cost less in materials, while hiring a pro speeds things up at a higher price.
Below we’ll compare typical timeframes and estimated costs for DIY versus professional repair so you can pick the best option.
Typical Timeframes for Each Method
Most stain-removal methods take from a few minutes to a few hours per spot, with full-room jobs stretching into a day; plan accordingly so you know whether you’re doing a quick touch-up between errands or scheduling an afternoon for more intensive work. You’ll spend minutes for spot cleaners, 30–90 minutes for gentle scrubbing, and several hours for sanding/priming.
| Method | Typical Time |
|---|---|
| Spot cleaner | Minutes |
| Scrub | 30–90 min |
| Sand/prime | Several hours |
Estimated Costs for DIY vs. Professional Repair
Comparing DIY and professional repair costs helps you decide how much time and money to invest.
DIY supplies—cleaners, sandpaper, touch-up paint—typically run $15–$60 and take a few hours.
Pros charge $100–$400+ depending on stain size and wall prep, but they guarantee results and save your time.
Choose DIY for small spots; hire pros for large or delicate jobs.
FAQ
You probably have a few quick questions about stain removal — like whether bleach or rubbing alcohol will work, or if eco-friendly cleaners can help.
You’ll also want to know how to tell if the paint needs repainting after treatment and whether textured or popcorn walls can be cleaned without damage.
Read on for concise answers to these common concerns.
Can I use bleach to remove wood stain from painted walls?
Wondering if bleach will lift wood stain from painted walls? You can use diluted household bleach for water-based stains, but test a hidden spot first—bleach can fade paint or damage finishes.
Ventilate, wear gloves, and apply gently with a sponge. Rinse thoroughly and neutralize with water.
For oil-based stains or stubborn marks, consider safer alternatives or consult a pro to avoid ruining the surface.
Will rubbing alcohol remove old, set-in wood stain?
If bleach didn’t do the trick, rubbing alcohol can help on some older, set-in wood stains—but it isn’t a guaranteed fix.
Test a hidden spot first, apply 70% isopropyl with a soft cloth, blot rather than rub aggressively, and rinse with water.
If the stain lifts, repeat gently; if paint softens or color fades, stop and consider professional options.
How do I know if my paint needs repainting after stain removal?
How can you tell whether the wall needs repainting after removing a wood stain? Inspect for discoloration, peeling, bubbling, or dull patches where finish lifted.
Run your hand to feel texture changes or roughness. If stain removal removed primer or left translucent stains that show through, spot-prime and test a small painted patch.
Repaint if repairs remain visible or surface integrity is compromised.
Are there eco-friendly cleaners that work on wood stain?
Looking for greener options? Yes—several eco-friendly cleaners can lift wood stain from painted walls without harsh chemicals.
Try a paste of baking soda and water, white vinegar diluted with water, or a mild castile soap solution.
Test a small, hidden area first, apply gently with a soft cloth, rinse, and pat dry to prevent paint damage or discoloration.
Can I remove stain from textured or popcorn walls without damage?
Eco-friendly cleaners can work on textured or popcorn walls, but you’ll need to be more careful because the uneven surface traps stain and scrubbing too hard can rip or flatten the texture.
Test cleaner in an inconspicuous spot, dab gently with a soft-bristle brush or sponge, work outward from the stain, and blot—don’t rub.
If texture loosens, stop and consult a pro.