Can You Stain a Fence With a Paint Sprayer? Tips That Actually Work
Yes—you can stain a fence with a paint sprayer, and it’s a fast, professional method if you prep and choose the right gear. Clean, repair, and dry the wood first, thin and strain compatible stain per manufacturer directions, then test on scrap wood. Use an airless sprayer for heavy stains or HVLP for lighter control, keep steady strokes with overlap, and avoid wind or direct sun. Keep going for step-by-step tips and troubleshooting.
Can You Stain a Fence with a Paint Sprayer? Quick Answer
Yes — you can stain a fence with a paint sprayer, and it makes the most sense for large, flat sections or when you want a fast, even coat.
You’ll get speed, uniform coverage, and the ability to reach tight spots, but you’ll also need to mask nearby areas, thin some stains, and handle overspray.
With the right prep and settings, a sprayer can save time while producing professional results.
Direct short answer (yes/no and when it makes sense)
You can stain a fence with a paint sprayer, and it makes sense when you want to cover large areas quickly, get an even coat on slats and pickets, or reduce brush marks.
Choose spraying for speed and uniformity, but not if you need precise control around trim or want to minimize overspray.
Yes — use a sprayer when speed, consistency, and tight gaps matter most.
Summary of benefits and drawbacks
If speed, uniformity, and coverage won you over, here’s a concise look at the trade-offs: a sprayer gives fast, even coats that reach tight gaps and textured wood with minimal brush marks, but it also increases overspray, wastes more stain, and makes precise edging harder.
You’ll save time and get a consistent finish, yet need masking, thinning, and patience for touch-ups and cleanup.
Basics of Fence Staining and Spray Equipment
Before you start, understand that a stain soaks into wood to tint and protect it—unlike paint, which forms an opaque film—and comes in transparent, semi‑transparent, and solid options that change the look and protection level.
Pick a sprayer that matches the job: airless and handheld sprayers handle thicker stains and large fences, while HVLP gives finer control for thin or finish coats.
Finally, check stain viscosity and formulation—oil vs. water-based and any additives affect atomization, thinning needs, and tip choice for a clean, even spray.
What “stain” means vs paint and types of stains (transparent, semi-transparent, solid)
Stain is a thin, pigment- or dye-laden finish that soaks into wood instead of sitting on top like paint. Knowing the difference will help you choose the right product and sprayer settings.
You’ll pick transparent for clear grain enhancement, semi-transparent for color with visible texture, or solid for full coverage like paint.
Stains penetrate, protect, and require different maintenance schedules.
Types of sprayers suitable for stain (airless, HVLP, handheld)
When you’re tackling a fence, choosing the right sprayer makes the job faster and gives a more even finish. There are three common types to evaluate: airless, HVLP, and handheld sprayers.
You’ll pick airless for speed and thick stains, HVLP for control and fine atomization on trim, and handheld for small jobs or touchups.
Match sprayer to fence size and access.
How stain viscosity and formulation affect spraying
Because viscosity and formulation determine how a stain flows and atomizes, you’ll need to match the product to your sprayer and technique. Thicker oil-based stains suit slower airless settings; thin water-based stains work with HVLP. Test and thin per manufacturer instructions to avoid clogging or heavy runs.
| Thick (oil) | Slow airless, fewer passes |
|---|---|
| Thin (water) | HVLP, fine misting |
| Gel/solid | Brush touch-ups, low pressure |
When to Use a Paint Sprayer for a Fence
You’ll get the best results spraying newer, smooth-grain wood or composite boards, while heavily weathered or split boards might need prep or a brush for touch-ups.
Choose a sprayer for large projects or a full perimeter to save time, and stick to a brush or roller for small sections where control matters.
Work only in mild, dry weather with low wind to prevent drips and overspray.
Ideal fence materials and conditions (new vs weathered wood, composite)
If your fence is relatively new or has been well-maintained, a paint sprayer will give you fast, even coverage with minimal prep; however, heavily weathered or spongy wood and some composites need extra attention before spraying.
You’ll want clean, dry, and sanded wood; remove loose fibers, apply primer or sealer on bare or gray wood, and test spray settings on composite to guarantee adhesion and avoid blotching.
Project scale considerations (small sections vs full perimeter)
Having prepped your boards or checked composite compatibility, next decide how much of the fence you’ll spray in one go.
For small sections, you’ll manage touch-ups, control overspray, and avoid fatigue.
For a full perimeter, plan equipment capacity, refill points, and staging to maintain uniform coverage.
Larger jobs benefit from consistent technique and possibly a helper to speed setup and finish.
Weather and environmental factors that impact spraying
Because temperature, humidity, wind, and sun directly affect how stain atomizes, dries, and adheres, you should only spray when conditions favor even coverage and proper curing.
Aim for 50–85°F, relative humidity under 70%, and wind below 10 mph. Avoid direct midday sun that causes flash drying.
Check the forecast for no rain within 24–48 hours and protect nearby plants and surfaces from overspray.
Preparation Steps Before Spraying
Before you start spraying, walk the fence to check for loose boards, rot, popped nails, and other repairs that need fixing.
Wash and treat any mildew, rinse thoroughly, and let the wood dry completely before sanding to promote even stain absorption.
Finally, mask off nearby plants and surfaces and put on proper safety gear so you can work cleanly and safely.
Inspecting and repairing the fence (loose boards, rot, nails)
Walk the length of your fence and inspect every board, post, and rail so you catch loose boards, rusted nails, and soft spots from rot before you spray.
Tighten or replace loose boards, sink or remove rusted nails and use galvanized screws.
Cut out and replace rotten sections, treat minor decay with wood hardener, and verify posts are stable so staining is effective and long-lasting.
Cleaning: washing, mildew removal, and drying time
Now that you’ve tightened boards and replaced rotten pieces, you’ll need to clean the wood so the stain sticks and looks even.
Rinse loose dirt, then apply a deck cleaner or diluted bleach solution to remove mildew.
Scrub stubborn spots with a stiff brush, rinse thoroughly, and let the fence dry 24–48 hours (longer in cool or humid conditions) before staining.
Sanding and surface prep for even absorption
Once the fence is dry and repaired, sand rough spots and raised grain so the stain soaks in evenly; use a 60–80 grit for very rough areas, then finish with 100–120 grit for a smooth, consistent surface.
Remove dust with a brush or leaf blower, then tack cloth. Check for splinters and loose fibers, and spot-sand after a test stain to guarantee uniform absorption before spraying.
Masking, protecting nearby surfaces, and safety gear
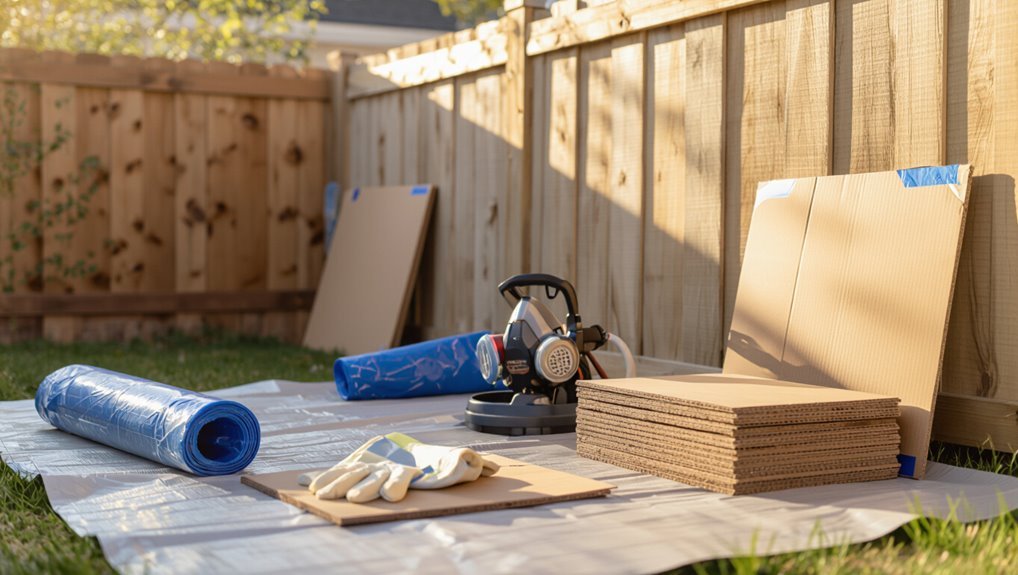
Before you start spraying, protect everything you don’t want stained by masking off nearby plants, walkways, siding, and hardware; use plastic sheeting, painter’s tape, and drop cloths to create secure barriers and prevent overspray from settling where it shouldn’t.
Wear goggles, a respirator, and disposable coveralls. Seal gaps and ground tarps to avoid wind lift.
- Protect surfaces
- Use proper PPE
- Secure coverings
How to Spray-Apply Stain to a Fence Step-by-Step
Now you’ll learn the exact spray process, starting with choosing and thinning the stain to the right ratio.
You’ll adjust your sprayer (nozzle, pressure, fan), test on scrap wood, and fine-tune until the spray’s even.
Then follow a consistent technique—proper distance, overlap, and speed—working rails first, then pickets and ends, with quick touch-ups as needed.
Step 1: Selecting and thinning the stain (if needed) with ratios
Choosing the right stain and getting its viscosity correct are the two decisions that most affect how evenly your sprayer will cover the fence; pick a product labeled for sprayer application or exterior wood, and check the manufacturer’s thinning recommendations first.
Test viscosity with a viscosity cup or straw: oil-based stains often need 5–10% mineral spirits, water-based 5–15% water.
Stir thoroughly and strain before loading.
Step 2: Adjusting sprayer settings (nozzle, pressure, fan width)
1. Set the nozzle size for stain—usually 0.015–0.017″—so particles pass without clogging.
Lower pressure for thin stains and raise slightly for thicker ones; avoid overspray.
Adjust fan width to cover one fence board per pass, overlapping 25%.
Lock settings once you have a consistent spray pattern.
Keep filter clean and check hose fittings to maintain steady flow and pressure.
Step 3: Test spray and tuning on scrap wood
Before you tackle the fence, test the sprayer on scrap wood to dial in settings and get a feel for coverage and flow.
Spray a few panels, note atomization, run patterns, and stain thickness.
Adjust pressure, tip, and viscosity until you get even films without drips or pooling.
Mark the best setting and record it for consistent application.
Step 4: Best spraying technique (distance, overlap, speed)
Start by holding the sprayer 8–12 inches from the board, keeping the nozzle level and moving at a steady pace so you lay down an even coat without runs.
Maintain 50% overlap on each pass, use smooth horizontal strokes for pickets and vertical for rails, and move at a steady speed—not too fast to miss spots, not too slow to cause drips.
Step 5: Working order rails first, pickets, ends, and touch-ups
Work rails first, then pickets, then ends, and finish with touch-ups so you keep edges neat and avoid over-spraying wet stain onto fresh surfaces.
Start by spraying rails horizontally, wipe drips, then move to pickets with vertical passes.
Do ends last to prevent runoff.
Finish by inspecting for thin spots and feathering edges with light passes or a brush for seamless coverage.
Step 6: Drying times and applying additional coats
Allow 24 to 48 hours for most semi-transparent stains to dry to the touch, but always check the manufacturer’s recommendations and local humidity—if it’s humid or cool, plan on the longer end before recoating.
Inspect the surface for tackiness, then apply thin, even additional coats with your sprayer. Wait between coats as directed, avoid overapplication, and let final cure before heavy use or rain exposure.
Troubleshooting Common Problems While Spraying
As you spray, you’ll want to watch for runs, drips, and sags and stop to smooth or thin the coat before it sets.
If color looks uneven or blotchy, adjust your overlap, spray distance, or thin the stain for better penetration.
Keep the tip and filter clean and check atomization frequently to prevent clogs and maintain a consistent spray.
Runs, drips and sags causes and fixes
If your stain is running, dripping, or sagging, you’ve likely sprayed too much in one spot or held the gun too close for too long; fix it by feathering your passes, keeping the nozzle 8–12 inches from the wood, and moving at a steady pace.
Lightly back-brush any fresh sags with a soft brush, thin overly thick coats next session, and reduce flow or speed to prevent repeats.
Uneven color or blotching causes and remedies
After fixing runs and sags, you may still see uneven color or blotchy patches—those usually come from inconsistent coverage, absorption differences in the wood, or spraying too fast or too slow.
To fix it, back-roll thin, even coats with a brush or roller, sand rough spots between coats, pre-wet or use a conditioner on very dry boards, and adjust your overlap and speed for uniform application.
Clogging and atomization issues cleaning and maintenance during work
When your sprayer starts spitting, sputtering, or spraying coarse droplets, it’s usually a sign of clogged nozzles, thickened stain, or poor atomization—tackle it immediately to keep your finish consistent.
Stop spraying, relieve pressure, and clean the tip and filter with solvent.
Thin stain per manufacturer guidelines, check spray pattern, and adjust pressure.
Perform quick maintenance breaks to prevent buildup and maintain even coverage.
Comparison: Spraying vs Brushing and Rolling
When you choose between spraying and brushing/rolling, think about speed and how evenly the stain covers the fence.
Spraying is faster and covers large areas well but can waste more material, while brushing or rolling gives better penetration and control for a tighter finish.
Also weigh cost, cleanup, and environmental runoff so you pick the method that fits your budget and site.
Speed and coverage differences
Although spraying can coat large surfaces far faster than brushing or rolling, its coverage patterns and setup time make the overall speed advantage depend on the job size and prep. You’ll move quickly on open panels but spend time masking, adjusting pressure, and back-spraying to avoid runs. Compare options:
| Method | Speed | Typical Coverage |
|---|---|---|
| Spraying | Fast | Even, wide |
| Brushing | Slow | Controlled, narrow |
Finish quality and penetration into wood
Speed and coverage matter, but you also want a finish that looks good and soaks into the wood.
Spraying gives a thin, even coat that highlights grain but may sit on surface; you’ll need proper technique and multiple passes for penetration.
Brushing or rolling forces stain into pores, improving absorption and durability.
Combine methods: spray for speed, back-brush to work stain into the wood.
Cost, material waste, and environmental considerations
Because spraying covers large areas quickly, you’ll often spend less time but use more stain than brushing or rolling, which affects both cost and waste.
Spraying needs extra stain for overspray and setup, raising material costs.
Brushing or rolling conserves product and cuts runoff, lowering expense and environmental impact.
Choose masking and low-VOC stains to minimize waste and pollution.
Best Practices and Professional Tips
Choose a dry, mild stretch of weather so the stain soaks in and dries properly, and plan your work in sections to keep a consistent wet edge and avoid overlap marks.
Decide up front how many coats your stain requires and what lifespan to expect, then schedule touch-ups accordingly.
When you finish, clean and store your sprayer per the manufacturer’s steps to protect performance and make the next job easier.
Timing your project for best absorption and drying
When you plan staining around weather and sunlight, you’ll get better absorption and faster drying while avoiding streaks and tacky spots.
Pick a stretch of dry weather with temperatures between 50–85°F and low humidity. Stain in the morning to let sunlight assist drying but avoid midday heat that speeds drying too fast.
Test a small panel to confirm drying times before proceeding.
Work patterns for consistent color and minimal overlap marks
If you work in consistent, overlapping passes and keep a wet edge, you’ll avoid lap marks and get even color across the fence.
Move steadily, spraying vertical panels first, then horizontal rails. Keep gun distance and speed uniform, slightly feathering edges.
Backtrack only while stain is wet. Blend end joints by brushing or tipping immediately for seamless shifts and professional results.
How many coats and expected longevity
Most fences do best with two thin coats of stain applied with a sprayer: a light first coat so the wood absorbs evenly, followed by a second coat for uniform color and protection.
You’ll rarely need more unless wood is weathered or new cedar is highly porous.
Expect 2–5 years of protection depending on product, exposure, and maintenance; inspect annually.
Cleaning and storing equipment after staining
After you finish the final coat and let it tack up, don’t leave your sprayer, tips, or hoses sitting with stain inside—proper cleaning prevents clogs, prolongs pump life, and keeps future jobs fast and predictable.
- Flush with appropriate solvent, then water, until runs clear.
- Remove and soak tips; brush passages clean.
- Dry components, relubricate seals, coil hoses, and store in a dust‑free case.
Common Mistakes to Avoid
Don’t spray in windy, rainy, or extremely hot conditions, because the finish won’t apply evenly.
Don’t over-thin the stain or use the wrong nozzle, and always test your settings first.
Don’t skip surface prep or fail to protect nearby plants and structures.
Spraying in inappropriate weather
If you spray in hot, windy, or humid conditions, you’ll likely end up with uneven coverage, runs, or slow drying that attracts dirt and insects.
Check forecast and avoid direct sun, gusts, or morning dew. Wait for mild, dry days with low wind and moderate temps.
Protect nearby plants and surfaces, and test a small area first to confirm proper drying and adhesion.
Over-thinning or using wrong nozzle
When you thin stain too much or pick the wrong nozzle, you’ll lose control over spray pattern, coverage, and finish—leading to drips, visible streaks, or wasted material.
You should follow manufacturer thinning guidelines, match nozzle size to stain viscosity, and test on scrap wood.
Adjust pressure and distance rather than over-thinning, and recoat thin spots instead of forcing a single heavy pass.
Skipping surface prep or testing
Because a paint sprayer lays down material fast, skipping surface prep or testing will let dirt, old finish, and moisture defects show through and ruin the final look.
You should clean, sand, and repair boards, remove loose finish, and test stain on a hidden section.
That trial verifies coverage, penetration, and spray settings so you don’t waste product or create blotchy, uneven color.
Not protecting surrounding plants and structures
Although you’re focused on covering the fence, don’t forget to shield nearby plants, furniture, and siding from overspray and drips.
Lay down tarps, use painter’s plastic and clamps, and wrap delicate shrubs.
Create windbreaks or spray with a low-pressure, directed tip to minimize drift.
Remove movable items, mask windows and vents, and inspect for stray droplets before they cure.
Cost and Time Estimates
Before you start, you’ll want a quick rundown of typical costs—buying a sprayer and supplies for a DIY job versus renting equipment for a weekend.
I’ll also break down how long staining usually takes based on fence length and whether you’re working solo or with a small crew.
That way you can budget time and money more accurately before you commit.
Typical material and equipment costs for DIY vs rental
If you’re weighing whether to buy a sprayer or rent one, start by listing the core expenses: the sprayer, stain, hoses and filters, protective gear, and any cleanup supplies.
Buying typically costs more up front but pays off if you’ll stain multiple projects, while renting keeps your immediate outlay low for a one-off job.
Expect DIY purchase totals of $200–$600 plus stain per gallon; rentals often run $40–$100/day.
Time breakdown by fence size and crew
When you plan the job, break time down by fence length, gate count, and crew size so you can estimate hours realistically.
For one person, expect 100–200 ft per day including prep and drying; two people double coverage but add setup time.
Account for gates, corners, and weather delays.
Add 10–20% buffer for breaks, touch-ups, and equipment cleaning.
FAQs
You’ll have common questions about sprayer compatibility, drying times, and whether spraying wastes more stain than brushing.
You’ll also want to know if it’s safe to spray in wind and how to match a new spray coat to existing stain.
I’ll answer each so you can plan and avoid costly mistakes.
Can I spray any stain with an airless sprayer?
Curious whether any stain will work with an airless sprayer? You can spray most oil- and water-based stains, but check viscosity and manufacturer guidance.
Thick, heavy-bodied or gel stains often need thinning or a different applicator. Test spray on scrap wood, adjust tip size and pressure, and use proper filters.
When in doubt, follow product specs to avoid clogging or poor coverage.
How long before I can reapply or seal after spraying?
After the stain feels dry to the touch—usually within 1–4 hours for water-based stains and 24–48 hours for oil-based—you can evaluate whether to recoat or seal.
Check adhesion and uniformity; do a small tape test if unsure.
Lightly sand raised grain or drips, wait additional 24 hours if humidity’s high, then apply the sealer or next coat per product instructions.
Will spraying lead to more waste than brushing?
While spraying can feel messier at first, it doesn’t have to waste more stain than brushing if you set up and technique correctly.
You control overspray with the right tip, pressure, overlap, and consistent distance. Mask nearby plants and surfaces, catch drips, and thin stain per sprayer specs.
With practice you’ll use stain more efficiently and finish faster than brushing.
Can I spray in windy conditions?
How windy is too windy to spray? You shouldn’t spray if wind gusts exceed about 10–15 mph.
Wind ruins atomized stain, causes overspray, and wastes product while risking nearby surfaces.
Wait for calm mornings or evenings, or use windbreaks and lower pressure/nozzle sizes to reduce drift.
Monitor forecasts and test a small area before committing to a full fence session.
How do I match a previously stained fence with a sprayer?
Wind and timing can affect a fresh coat, but matching an existing stain brings its own challenges.
Test a small, inconspicuous board first using the same sprayer tip and thinned stain. Clean the fence, compare sheen and opacity, and adjust dilution or overlap technique.
Blend edges by feathering sprays and multiple light passes until the repaired area visually matches surrounding panels.