How to Paint Foam Ceiling Tiles Without Losing the Detail
You can paint foam ceiling tiles without losing their crisp patterns by using foam-safe, water-based primer and paint, applying thin, even coats, and favoring spray or dry-brush techniques over heavy rolling. Clean and repair tiles first, test a scrap piece, and let each layer dry fully before adding another to avoid pooling in recesses. Use a soft brush for details and a light sealer for durability. Keep going to learn step-by-step tips and fixes for common problems.
Quick Answer Can You Paint Foam Ceiling Tiles Without Losing Detail?
Yes — you can paint foam ceiling tiles without losing detail if you use a light-touch approach and the right products.
Start with a gentle primer and thin coats of paint, testing on a scrap tile to check for clogging of the pattern.
Also consider spray application or acrylics formulated for foam to preserve texture and crisp edges.
Short verdict and key considerations
Although foam ceiling tiles take paint well, you’ll lose fine sculpted detail if you pile on heavy coats or use a thick, textured finish; light, even misting or a couple thin brushed or sprayed coats of flexible acrylic will preserve most relief while changing color.
For how to paint foam ceiling tiles, prep with gentle cleaning, use compatible primers, test finish, and apply thin, even layers for best results.
Basic Understanding What Foam Ceiling Tiles Are and Why Detail Matters
Foam ceiling tiles come in different materials—expanded polystyrene, polyurethane, and EVA—each with different porosity and surface feel you should know before painting.
Many tiles have raised patterns and textures that give a room character, and paint choices or heavy coats can quickly fill in those reliefs.
To keep details crisp, you’ll need to match your paint type and application method to the tile’s porosity and the intricacy of its ornamentation.
Types of foam tiles (expanded polystyrene, polyurethane, EVA)
When you’re choosing ceiling tiles, knowing the differences between expanded polystyrene (EPS), polyurethane, and EVA will help you pick the right material for paint adhesion, durability, and fire safety.
EPS is lightweight and porous, so it needs sealing.
Polyurethane is durable, holds detail well, and accepts most paints.
EVA is flexible, water-resistant, and tougher to prime but offers good impact resistance.
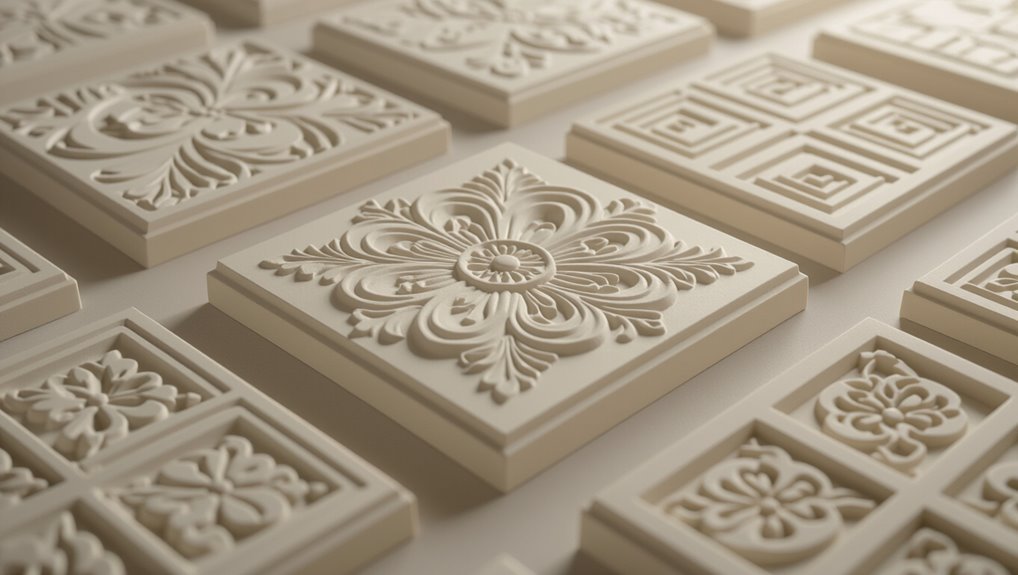
Common decorative details and textures on tiles
Knowing the material helps you pick the right primer and paint, but the visual impact comes from the tile’s decorative details and textures.
You’ll encounter raised medallions, beadboard grooves, ornate cornices, floral reliefs, and geometric repeats. Some tiles mimic tin embossing or plaster moldings; others use subtle stipple or pebbled surfaces.
Identifying patterns helps you plan painting techniques that preserve contrast and crisp edges.
Why paint can obscure reliefs: porosity, paint thickness, application methods
Because these tiles draw attention through raised patterns, you’ll want to be careful: foam soaks primer and paint unevenly, filling crevices and flattening relief.
Thick coats hide shadow and edge definition, while heavy brushing or spray buildup blurs detail. Use thin, even coats, low-viscosity paint, and gentle application—light spraying or stippling—to preserve textures and crisp relief.
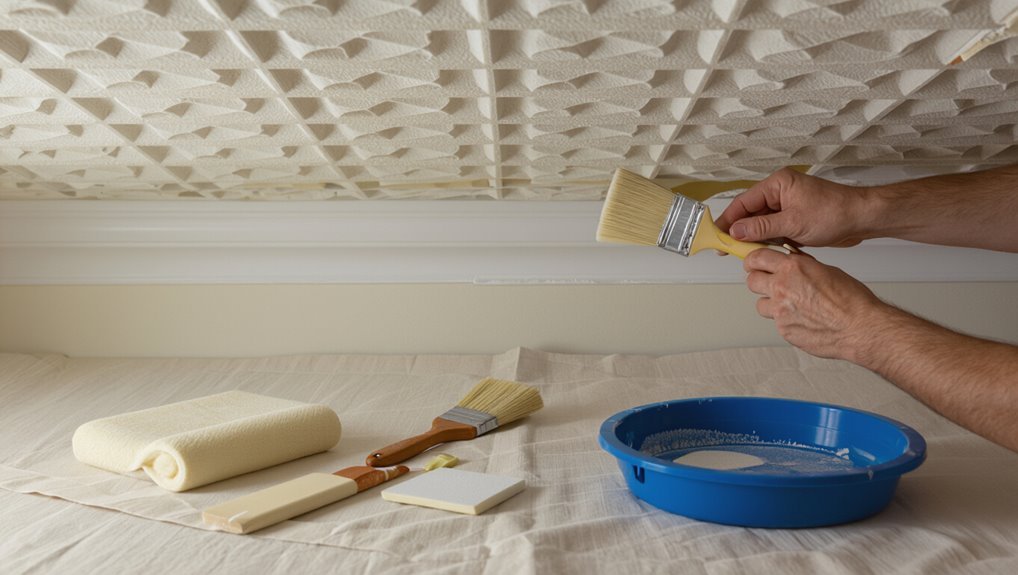
Materials and Tools You’ll Need
You’ll want foam-safe paints—spray, acrylic, latex, or specialty formulas—plus compatible primers and sealers to guarantee adhesion and durability.
Gather the right tools: sprayers or brushes and rollers, a respirator, and masking supplies for clean edges.
Avoid solvent- or oil-based paints and high-solvent pressurized sprays that can melt or damage the tiles.
Recommended paints (spray paint, acrylic, latex, specialty foam-safe)
Pick paints that won’t dissolve or over-saturate the foam: water-based acrylics and latex paints are the safest everyday choices.
Spray paints labeled “foam-safe” give smooth, even coverage, and specialty foam-safe products exist for high-detail or outdoor tiles.
You’ll choose based on finish, durability, and application method.
Consider these examples:
- Matte acrylic for subtle texture
- Satin latex for easy cleaning
- Foam-safe aerosol for crisp highlights
Primers and sealers suitable for foam tiles
After choosing a foam-safe paint, prep the tiles with the right primer or sealer to protect the foam and guarantee even coverage.
Use water-based acrylic primers or shellac alternatives labeled foam-safe; avoid solvent-heavy products. Apply thin, even coats and let dry fully to preserve detail.
- Water-based acrylic primer
- Shellac alternative sealer
- Clear PVA or primer-sealer blend
Tools and accessories: sprayers, brushes, rollers, respirator, masking supplies
Gather the right tools before you spray or brush—sprayers, brushes, and rollers each suit different tile textures and project sizes, while a good respirator and masking supplies keep you safe and your work tidy.
Choose a HVLP sprayer for fine detail, foam-appropriate brushes for crevices, and a short-nap roller for flat areas.
- Sprayer
- Brush
- Roller
What to avoid (solvent-based, oil-based paints, pressurized high-solvent sprays)
Because foam ceiling tiles soak up solvents and can crumble or warp, don’t use solvent-based or oil-based paints—or any pressurized spray with high solvent content.
Instead, choose water-based acrylics or latex and low-pressure HVLP sprayers. Avoid paint strippers, strong thinners, lacquer, and enamel coatings.
Test a small scrap first, wear a respirator for aerosols, and discard damaged tiles.
Preparation Steps Before Painting
Before you start painting, inspect a spare tile and test your primer and paint to make sure they adhere and look right.
Clean each tile thoroughly to remove dust, grease, and residue, then repair dents and open seams with a compatible filler or foam-safe adhesive.
Finally, mask and protect nearby surfaces and fixtures so paint doesn’t splash where it shouldn’t.
Inspecting and testing a sample tile
Start by selecting one tile from an inconspicuous area and give it a close visual and tactile inspection for cracks, loose edges, or surface contaminants like dust, grease, or previous paint layers that could affect adhesion.
Next, apply your chosen primer and paint to a small area, let it dry, then check for bubbling, peeling, texture loss, or color change before proceeding.
Cleaning tiles: dust, grease, and residue removal
1 key step in prepping foam ceiling tiles is removing dust, grease, and any leftover residue so paint can stick properly.
You’ll work gently to avoid crushing details. Use soft tools and mild cleaners, rinse, and let dry fully.
- Soft brush or microfiber wipe
- Mild detergent solution and sponge
- Rinse with clean water and air-dry
Repairing dents and seams: filler and adhesive options
Once the tiles are clean and dry, inspect them closely for dents, crushed patterns, and gaps along seams so you can decide which filler or adhesive will work best.
Use lightweight spackle or acrylic caulk for small dents and seams; for deeper crushing, apply a thin layer of vinyl-based filler, sand gently when cured, and press foam-safe adhesive into larger gaps to restore shape before priming and painting.
Masking and protecting surrounding areas
Before you lay a drop cloth or tape the first edge, walk the room and decide which surfaces need protection—walls, light fixtures, vents, trim, and floors—and gather breathable drop cloths, low-tack painter’s tape, plastic sheeting, and a ladder.
Cover fixtures and trim tightly, tape edges without stretching, suspend plastic over furniture, and secure drop cloths to prevent trips.
Work from center outward.
Priming for Detail Preservation (Step 1)
Start with a foam-safe primer because regular primers can dissolve or clog delicate reliefs.
Choose a thin, sprayable formula or apply very light brush coats to preserve the texture, and allow full drying between thin layers.
If needed, do a light sanding between coats to knock down any raised fibers without flattening the detail.
Why primer matters for foam
Because foam soaks up paint unevenly, applying a primer evens the surface and preserves all the molded details you’ll want to show off.
You’ll get better coverage with less paint, avoid blotchy color, and prevent the foam from absorbing solvents that can soften or deform patterns.
Primer also gives paint something consistent to adhere to, so your finish stays crisp and long-lasting.
Choosing the right primer (foam-safe, thin application)
Now that you know why primer matters for foam, pick one formulated specifically for polystyrene or foam products so you won’t risk melting or softening the tiles.
Choose a water-based, low-VOC primer labeled “foam-safe.” Look for thin, high-adhesion formulas that seal without obscuring relief.
Test a small area to confirm compatibility and coverage before priming the entire ceiling tile.
How to apply primer to avoid filling reliefs: spray vs brush vs thin coats
When you’re priming to preserve the tile’s detail, go for methods that lay down a thin, even film so the crests and grooves stay sharp.
Use light spray passes for uniform coverage, or thin the primer and apply with a soft-bristle brush in gentle strokes along reliefs.
Multiple thin coats beat one heavy coat; avoid pooling in recesses to keep textures crisp.
Drying times and light sanding between coats
Allow adequate drying between thin primer passes so each layer bonds without obscuring detail—most water-based primers need 30–60 minutes to dry to the touch and 2–4 hours before sanding or recoating, while oil-based primers can take several hours to overnight.
Lightly sand with fine grit (220–320) to knock down raised fibers and dust, then wipe clean; repeat thin coats only as needed for coverage.
Painting Techniques That Preserve Detail (Step 2)
You’ll want to pick application methods that build, not bury, detail—light spray-coating or dry brushing are usually better than heavy, wet techniques.
Apply thin, multiple coats and work with the tile’s contours using directional sprays or brush strokes to preserve shadowing and depth.
Finish with glazes, washes, or antiquing to enhance the relief without hiding the original pattern.
Best application methods: light spray-coating vs dry brushing
Although both light spray-coating and dry brushing can give good results, you’ll choose between them based on the tile’s texture, the level of detail you want to preserve, and how durable the finish must be.
Use light spray for even, thin coverage and recessed detail protection; use dry brushing to highlight raised patterns without clogging crevices.
Test first on a scrap tile.
Layering: thin multiple coats vs one thick coat
When preserving the tile’s embossed detail, opt for several thin coats rather than one thick swipe; thin layers dry faster, build color more evenly, and cut the risk of drips or pooled paint that can fill recesses.
Apply light, even passes, let each coat dry fully, and sand very lightly between coats only if needed. You’ll maintain texture and control coverage.
Directional spraying and brush strokes to maintain shadowing and depth
After building color with thin coats, think about how light naturally hits the tile’s raised and recessed areas and aim your spray or brush strokes to mimic that flow.
Work from highlights toward shadows with long, consistent passes. Keep nozzle distance steady and brush strokes aligned with relief direction.
Use lighter pressure on raised edges, feathering into recesses to preserve crisp contours and natural depth.
Using glazes, washes, and antiquing to enhance not hide details
If you want the tiles’ relief to sing instead of getting lost under paint, use glazes, washes, and antiquing strategically to accentuate edges and recesses without building opaque layers.
You’ll thin paint, apply lightly, then wipe or brush back to leave pigment in crevices. Practice on scraps, control intensity, and seal lightly when satisfied.
- Thin glaze for shadows
- Wipe excess for highlights
- Seal with satin varnish
Finishing and Sealing (Step 3)
Now you’ll pick a clear coat—matte, satin, or gloss—and consider how each sheen will affect the visibility of texture and detail.
Use a foam-safe sealer applied in thin, even coats with a soft brush or low-pressure sprayer to avoid melting the tiles.
After sealing, inspect closely and do small touch-ups on raised areas to keep patterns crisp.
Choosing a clear coat: matte vs satin vs gloss implications on detail
Which clear coat should you pick to best preserve your foam tile’s texture and painted detail?
You’ll choose based on reflectivity: matte minimizes sheen and hides minor imperfections, preserving depth; satin adds subtle luster, slightly enhancing highlights without flattening texture; gloss boosts contrast and makes patterns pop but risks washing out fine relief.
Match finish to desired visual impact.
Foam-safe sealers and application method
When you’re ready to lock in your paint and protect the foam, pick a sealer labeled “foam-safe” and apply it lightly in thin, even coats so you don’t melt or saturate the tile.
Use a soft-bristle brush or low-pressure HVLP sprayer, wait recommended dry time between coats, and sand very lightly if needed.
Work in a dust-free area for best adhesion.
Final inspection and touch-ups for raised areas
Before sealing, give each tile a careful final inspection to spot raised edges, brush marks, or areas where paint pooled; you’ll catch imperfections more easily with good lighting and a hand-held magnifier.
Gently sand raised spots with fine grit, remove dust, and feather paint boundaries.
Reapply thin coats only where needed, let dry fully, then seal with a foam-safe finish to protect details.
Comparison Painting Methods Side-by-Side
Now compare spray paint and brush-applied acrylic to see which suits your foam tiles.
Spray gives even coverage and speeds the job, but can soften fine relief and waste paint on overhead work.
Brush-applied acrylic holds detail better and often lasts longer, though it takes more time and careful brushing.
Spray paint vs brush-applied acrylic
Choosing between spray paint and brush-applied acrylic comes down to how much control, finish, and prep you want—spray gives fast, even coverage and smooth texture, while a brush gives precise edges and easier touch-ups. Decide by tile detail, workspace, and cleanup. Compare key factors below:
| Method | Speed | Control |
|---|---|---|
| Spray | Fast | Moderate |
| Brush | Slower | High |
| Hybrid | Moderate | Balanced |
Pros and cons for detail retention and durability
While spray paint can quickly cover foam tiles and smooth out fine textures, it tends to soften or obscure very fine detail unless you use light, controlled passes.
Brush-applied acrylic preserves raised patterns and crisp edges better but can leave visible brushstrokes and takes longer to build even coverage.
You’ll weigh detail retention, drying time, and longevity.
- Spray: fast, risks detail loss
- Brush: preserves detail, slower
- Sealant: boosts durability, minimizes wear
Common Mistakes That Cause Loss of Detail
Watch what you do with paint and tools, because thick paint or heavy brush strokes can fill in fine embossing and kill the pattern.
Don’t use solvent-based products that can melt the foam, and don’t skip primer or over-sand embossed areas.
Also, avoid rushing drying times between coats since wet layers can smear detail or attract dust.
Using thick paint or heavy brush strokes
Don’t slather paint on or press hard with your brush—thick paint and heavy strokes will fill the tile’s crevices and wipe out crisp patterns.
Work thin, using diluted acrylic or latex and multiple light coats. Tap or feather with a soft brush or foam brush, following relief lines.
Let each coat dry fully before adding the next to preserve texture and sharp detail.
Applying solvent-based products that melt foam
If you use solvent-based cleaners, primers, or paints on foam tiles, they’ll eat into the material and blur or erase the molded details.
Always choose water-based, latex, or acrylic products labeled safe for foam. Test a small scrap first.
Apply thin coats with a soft brush or sprayer, letting each coat dry fully to preserve crisp edges and intricate patterns.
Skipping primer or over-sanding embossed areas
When you skip primer or sand embossed areas too aggressively, the paint soaks unevenly and shallow details get dulled or lost.
Always prime with a low-build, water-based sealer to stabilize foam and guarantee even absorption.
Use fine, light sanding only to remove gloss—never flatten textures.
Mask high-relief edges and feather any sanding to preserve crisp patterns and depth.
Rushing drying times between coats
After you’ve primed and lightly sanded, resist the urge to stack coats quickly—painting before the previous layer has fully dried can trap solvents and soften the primer, causing brushstrokes, sagging, and loss of fine embossed detail.
Wait recommended times, work in thin, even layers, and touch only dry surfaces. Use low-humidity conditions or a fan to speed safe curing without sacrificing texture.
Best Practices and Tips for Long-Lasting Results
Before you start, test your paint and technique on a spare tile and note the exact mixes that worked so you can repeat them.
Work when temperature and humidity are stable to guarantee proper adhesion and drying.
Once installed, clean gently and inspect periodically to catch and touch up any wear before it worsens.
Test on a spare tile and keep a record of successful mixes
Because foam tiles can react unpredictably to paints and additives, always test your chosen primer, paint, and any thinners or fillers on a spare tile first and note the exact mix ratios, drying times, and surface feel.
Record brand, color, batch, applicator, and ambient notes. Keep samples and photos of successful mixes so you can replicate results and troubleshoot failures consistently.
Work in controlled temperature and humidity
If you want paint to adhere evenly and dry predictably, work in a space where temperature stays around 65–75°F (18–24°C) and relative humidity sits between 40–60%.
Monitor conditions with a thermometer and hygrometer, and pause when readings fall outside that range. Controlled conditions prevent bubbling, uneven sheen, and extended tack time, so coats cure reliably and embossed details remain crisp.
Maintenance and cleaning of painted foam ceilings
Regular upkeep will keep your painted foam ceiling looking fresh and prevent small issues from becoming bigger repairs.
Dust monthly with a soft brush or vacuum on low. Spot-clean stains with a damp microfiber and mild detergent, testing first. Avoid abrasive cleaners and excessive water.
Touch up chips with matching paint, and inspect seams yearly to reattach loose tiles or re-caulk gaps promptly.
Troubleshooting Problems and Solutions
If you run into issues like paint pooling in recesses, flaking or poor adhesion, or uneven color and sheen, you’ll want to diagnose the cause quickly.
Check for application problems (too much paint, wrong primer, or dirty surface) and address each with the right fix—recoat thinly, sand and re-prime, or use a compatible topcoat.
Follow simple corrective steps and you’ll restore an even, durable finish.
Paint pooling in recesses: cause and fix
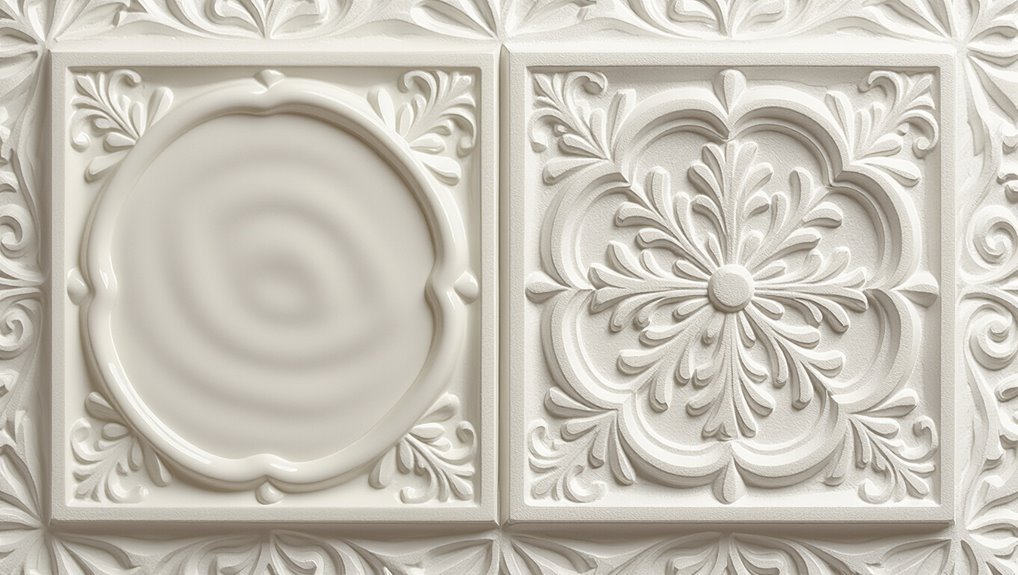
When paint pools in the recessed grooves of foam ceiling tiles, it’s usually because too much paint or too-thick paint was applied and surface tension draws it into low spots; you’ll notice glossy, uneven patches once the paint dries.
To fix it, thin the paint, use a light spray or thin roller, apply multiple thin coats, and blot excess with a soft brush while still wet.
Flaking or poor adhesion: diagnosis and repair
Paint that beads or pools can lead to adhesion failures later, so check those areas first when diagnosing flaking.
Scrape loose paint, sand edges lightly, and clean with a mild detergent to remove dust, oils, or residual primers.
Prime exposed foam with a compatible, low-VOC primer.
Repaint using thin, even coats and allow full drying between layers to prevent repeat failures.
Discoloration or uneven sheen: corrective steps
Although uneven color or sheen often looks like a finish problem, you’ll usually trace it to surface contamination, inconsistent priming, or improper drying between coats; clean tiles with mild detergent, rinse, and let fully dry.
Lightly scuff glossy areas, re-prime with an even, foam-compatible primer, then apply thin, uniform topcoats, allowing full cure between layers to restore consistent appearance.
Project Checklist and Estimated Timeframe
Before you start, check that you have clean, dry tiles, the right primer and paint for foam, painter’s tape, drop cloths, and proper ventilation.
Plan roughly 1–2 hours for prep per room, 1–3 hours for painting depending on tile area and coats, and 24–48 hours for curing between coats and before full use.
With that checklist and timeframe in mind, you can schedule the job and avoid surprises.
Pre-paint checklist
A quick checklist will help you gather materials, clear the work area, and set a realistic schedule so the job goes smoothly; plan for 2–4 hours for a small room or up to a full day for larger spaces, plus overnight drying between coats.
- Tape, drop cloths, ladder, and good lighting.
- Primer, sheeny paint, small brushes, and low-pressure sprayer.
- Ventilation, dust-free tiles, and wipe-down supplies.
Typical time estimates for prep, painting, curing
Plan on blocks of time rather than a single nonstop session: for a small room you’ll spend about 2–4 hours prepping (clearing, taping, priming), 1–3 hours painting including touch-ups, and then at least 24 hours between coats for proper curing; larger rooms or textured tiles can push prep and painting to a full day and add another 24–48 hours for final cure.
Then, factor drying conditions: warmth and low humidity speed curing, while cool or damp environments lengthen it.
Schedule touch-ups after final cure and avoid heavy handling for several days to preserve detail.
FAQ Frequently Asked Questions
You probably have a few quick questions before you start: can you use spray paint on foam, will primer hide the texture, and how many coats are safe before details disappear?
You’ll also want to know whether you can paint tiles already on the ceiling and how to spot-touch damage later without repainting the whole tile.
Below are concise answers to each question to help you finish the job right.
Can I use spray paint on foam ceiling tiles?
Wondering if spray paint will work on foam ceiling tiles? Yes—if you choose the right type and prep properly.
Use water-based acrylic or latex spray paints labeled safe for foam; solvent-based sprays can melt the surface.
Test a small scrap first, clean and dry tiles, spray light even coats from 8–12 inches, and let each coat cure fully to avoid drips or texture loss.
Will primer hide the tile’s texture?
How much texture a primer will hide depends on the primer type and how you apply it.
You’ll preserve detail by using a thin, high-adhesion primer and applying light, even coats with a brush or low-nap roller. Thick, heavy primers or sprayed-on globs can fill crevices.
Test on a scrap tile first to confirm the finish before priming your whole ceiling.
How many coats of paint are safe before details disappear?
When should you stop adding coats before the tile’s embossed details start to blur?
Stop after two thin topcoats if you’ve used a primer and a base coat.
Test on a scrap tile: apply thin, even layers, let each dry fully, and inspect.
If relief softens, don’t add more; thin coats preserve edges.
Heavy, opaque layers will fill and flatten details.
Can I paint tiles already installed on the ceiling?
Can you paint foam ceiling tiles after they’re installed? Yes — you can.
Work carefully: use a light-touch sprayer or thin roller to avoid filling recesses. Clean dust first, mask surrounding areas, and use a light primer if needed.
Apply thin, even coats, letting each dry fully. Avoid heavy brushwork or drips that can obscure fine molded details.
How do I touch up damage later without repainting the whole tile?
If a small nick or scuff appears later, you don’t have to repaint the whole tile.
Clean the area, lightly sand any frayed foam, and apply a tiny amount of matching acrylic latex or flexible foam-safe paint with a fine brush.
Feather the edges, let it dry, then add a second thin coat if needed.
Seal with matte spray if your finish requires it.