
Can You Paint Over Fence Stain? What Actually Works and What Doesn’t
Yes — you can paint over fence stain, but only if the stain’s fully cured, not peeling or chalking, and you prep it right. You’ll need to clean mildew and dirt, sand glossy or loose areas, fix rot, and use a bonding primer suited to the stain type before applying two thin coats of exterior acrylic paint. Skip these steps and you’ll get peeling and short life. Keep going to see which products and techniques actually work.
Quick Answer Can You Paint Over Fence Stain?
Yes — you can paint over fence stain in many cases, but the existing stain’s type and condition determine if you’ll need prep first.
It’s feasible when the stain is oil-based and well-adhered or when you strip/clean and prime a water-based finish.
Pros: longer-lasting color and protection;
cons: extra prep, possible adhesion issues, and lost natural wood grain.
Short direct answer and when it’s feasible
If the stain has fully cured and isn’t peeling or chalking, you can paint over it; otherwise you’ll need to strip or recoat first.
You can paint over fence stain in many cases, but it depends on stain type, adhesion, and surface prep.
Test a small area, sand rough spots, clean thoroughly, and use a primer made for stained wood to guarantee lasting coverage.
One-sentence summary of pros and cons
While you can often paint over a fully cured, non-peeling stain to refresh or change the look, you’ll face extra prep, potential adhesion problems with oil-based or penetrating stains, and a shorter-lived finish unless you clean, sand, and prime properly.
- Pro: faster cosmetic update.
- Pro: color change without full refinish.
- Con: extra labor and cost.
- Con: higher risk of peeling and maintenance.
Understanding Fence Stain vs. Paint
Before you decide whether to paint over a stained fence, you should know what stain and exterior paint are: stains penetrate and protect wood in oil- or water-based formulas, while paints form a colored film on the surface and come in latex or alkyd varieties.
Each product has different adhesion and durability characteristics — stains soak into the grain, paints bond to the surface and can hide imperfections. Understanding those differences will help you choose the right prep and product for a lasting finish.
What is fence stain? Types and properties
Think of fence stain as a wood conditioner with color: it penetrates and protects rather than sitting on top like paint, so you get grain visibility, UV and moisture resistance, and varying levels of pigment and sealant depending on the formula.
You’ll choose by durability, opacity, drying time, and maintenance:
- Transparent
- Semi-transparent
- Semi-solid
- Solid
What is exterior paint? Types and properties
Exterior paint is a pigmented coating that forms a protective, often opaque film on wood and other outdoor surfaces. You’ll pick it for coverage, durability, and color uniformity rather than grain show-through.
You’ll choose between water- or oil-based types with differing flexibility, drying, and cleanup. Consider these properties:
- Durability
- Opacity
- Flexibility
- UV/resistance
How stain and paint adhere differently to wood
While both protect wood, stain soaks into the fibers and bonds within the grain while paint sits on the surface as a film.
So you’ll notice different adhesion behaviors, durability, and maintenance needs.
You’ll find stain penetrates, flexes with wood, and resists peeling but fades.
Paint forms a protective coat, hides imperfections, and can chip or blister if moisture’s trapped or adhesion is poor.
Factors That Determine If You Can Paint Over Stain
Before you paint, consider several key factors that affect adhesion and durability: the stain type (oil- or water-based, semi-transparent or solid), how old and worn the finish is, the wood’s porosity and species, any prior sealants or preservatives, and your local climate and exposure.
These elements determine whether you can paint directly, need a primer, or should strip the stain first. Evaluating them will save time and prevent paint failure.
Type of stain (oil-based, water-based, semi-transparent, solid)
Not all stains behave the same, so the type—oil-based, water-based, semi-transparent, or solid—directly affects whether you can paint over it and what prep you’ll need.
Oil-based stains may repel paint unless cleaned and scuff-sanded; water-based stains usually accept paint after drying.
Semi-transparent soaks in, needing primer; solid stains act like paint and often only need light sanding and a bonding primer.
Age and condition of the stained surface
If the stain’s only a few months old and the wood’s sound, you can usually paint over it after cleaning and priming; however, old or failing stains—those that are peeling, flaking, or deeply weathered—need more aggressive prep like stripping, sanding, or replacement of damaged boards.
Check for adhesion, rot, and raised grain; restore or remove compromised areas before priming to guarantee paint bonds and lasts.
Porosity and species of wood
Once you’ve addressed surface damage and old finish, look at the wood itself: its porosity and species will shape how well paint will stick and how much prep you’ll need.
Softwoods like pine absorb stain deeply and may need sealing or primer.
Dense hardwoods shed finish and often require roughening or bonding primer.
Test a small area to confirm adhesion before painting the whole fence.
Previous treatments (sealants, preservatives)
Because previous sealants and preservatives change the surface chemistry, you’ll need to identify what was applied before you paint and how long ago it was done.
Oil-based treatments, water repellents, and creosote resist adhesion differently. Test adhesion with a small patch.
If treatments are recent or oily, strip or sand until bare wood or use a compatible primer. Clean thoroughly before painting.
Climate and exposure considerations
When you’re deciding whether to paint over a stained fence, consider the local climate and how much sun, rain, wind, and freeze-thaw it faces—these factors affect adhesion, durability, and how quickly paint will fail.
In hot sun, pick UV-resistant paint; in wet or windy areas, use breathable, mold-resistant coatings.
Frequent freeze-thaw cycles demand flexible paint and thorough surface prep for lasting results.
Step-by-Step: How to Prepare a Stained Fence for Paint
Before you paint, you’ll want to inspect the fence for damage or loose boards and clean the surface thoroughly with a pressure washer and appropriate cleaners to remove dirt and mildew.
Then test a small patch to check adhesion, sand away glossy or flaking stain using the right grit and tools, and spot-treat any rot or gaps with filler or epoxy.
Doing these steps in order will give paint the best chance to stick and last.
Step 1 Inspect the fence for damage, rot, and loose boards
Start by walking the length of the fence and looking closely for cracked, soft, or warped boards, loose nails, and any obvious rot—these issues will sabotage paint adhesion and longevity if you skip them.
Then take action:
- Mark rotten or split boards for replacement.
- Tighten or replace loose nails/screws.
- Pry and reset warped boards.
- Note areas needing primer or filler before painting.
Step 2 Clean the surface (pressure wash, detergents, mildew removal)
Clear away dirt, mildew, and old finish so paint can stick properly: use a stiff brush or pressure washer to remove loose debris, apply a wood-safe detergent or dedicated fence cleaner for grime, and treat mildew spots with a bleach or oxygen-based solution (wear gloves and rinse thoroughly).
- Sweep loose dirt
- Pressure wash 500–1200 PSI
- Apply cleaner per label
- Rinse and dry 24–48 hrs
Step 3 Test adhesion with a small patch/pull test
With the fence clean and dry, you’ll want to check whether paint will bond to the stained wood by doing a small adhesion test.
Pick an inconspicuous area, apply primer and paint or use adhesive tape, let it cure, then pull sharply.
If paint lifts or flakes, the stain repels coating and you’ll need to remove or tighten adhesion strategies before painting.
Step 4 Sanding and removing gloss or loose stain (tools and grit recommendations)
Grab your sandpaper and power sander and focus on knocking down any glossy finish or loose stain so the new primer and paint can bond properly; aim to remove sheen rather than the entire stain, sanding until the surface feels dull and any flaking bits come free.
Use 80–120 grit for rough boards, 120–180 grit for smoothing.
Hand-sand corners, vacuum, and wipe with a damp cloth.
Step 5 Spot-treat problem areas (rot repair, filler, epoxy)
Inspect the boards closely and tackle any problem spots before you prime—rot, cracks, holes, and loose boards need fixing so paint won’t peel or hide defects.
Remove soft wood, cut out rotten sections, and secure loose boards.
Fill small gaps with exterior wood filler; for larger voids use epoxy wood repair.
Sand repairs smooth and recheck stability before moving to primer.
Step 6 Apply primer: when to use a bonding primer and types to choose
Before you paint, prime—it’s the layer that bonds new paint to old stain and prevents tannin bleed, peeling, and uneven coverage.
Choose a bonding primer if stain is oil-based or adhesion is poor. For porous wood, use an acrylic latex primer. For heavy tannins, use an oil-based or shellac-based primer. For mildew-prone areas, pick a primer with mildewcide.
- Bonding primer
- Acrylic latex
- Oil/shellac
- Mildewcide
Step 7 Painting: recommended paint types, coats, and application methods
With primer dry and bonded, you’re ready to paint the fence; pick a durable exterior paint formulated for wood—100% acrylic latex is the most forgiving, offering good adhesion, UV resistance, and flexibility, while alkyd (oil) paints give a harder finish but can yellow and take longer to cure.
- Apply two thin coats for even coverage.
- Use a brush for edges, roller for panels.
- Back-brush to work into grain.
- Thin coats prevent drips and peeling.
Step 8 Drying times and post-paint sealing if needed
Although paint can feel dry to the touch within an hour or two, you should wait longer before exposing the fence to stress: allow at least 24 hours between coats and 48–72 hours before reattaching hardware, leaning items against the fence, or allowing heavy rain to hit it.
After full cure (often 7–30 days), consider a clear sealer for UV and moisture protection, applied per product directions.
What Actually Works Best Methods and Products
Now you’ll compare proven combos—what stain types pair with which primers and paints for best adhesion.
I’ll point out professional-grade primers and adhesion promoters, plus paint formulas that resist UV and last longest.
You’ll also learn when re-staining makes more sense than painting so you pick the right route.
Proven product combinations (stain types + primer + paint)
When you want reliable results, match the stain type to compatible primers and topcoats: oil-based stains take oil-based or alkyd primers and enamels best, water-based stains pair with acrylic primers and latex paints, and gel stains usually need a bonding primer before any topcoat. Use this quick guide to choose combinations that stick and last.
| Stain type | Recommended combo |
|---|---|
| Oil-based | Alkyd primer + oil enamel |
| Water-based | Acrylic primer + latex paint |
Professional-grade primers and adhesion promoters
If you want paint to truly stick to a stained fence, start with pro-grade primers and adhesion promoters designed for tough bonding—these products chemically bridge slick or oil-rich surfaces to that topcoat you’ll apply.
You’ll pick based on substrate and stain type:
- Oil-blocking primer
- High-solids adhesion promoter
- Shellac-based bonding primer
- Universal stain-blocking primer
Follow manufacturer cure times before painting.
Paint recommendations for longevity and UV resistance
Having prepped the surface with the right primer or adhesion promoter, pick paints formulated for long-term outdoor performance and UV protection so your finish lasts rather than flakes.
You should:
- Choose high-quality exterior acrylic latex with UV inhibitors.
- Consider elastomeric coatings for hairline crack resistance.
- Use light-reflective pigments to reduce heat absorption.
- Apply two thin coats and a clear UV-resistant topcoat for extra durability.
When re-staining instead of painting is the better choice
Because paint can trap moisture and hide the wood’s natural grain, you should pick re-staining when you want to preserve texture, renew weather protection, and keep maintenance simple.
Stain soaks in, lets wood breathe, and is easier to reapply without full stripping.
Choose stain if boards show good structural condition, you want a natural look, and you prefer faster touch-ups — pick oil-penetrating or water-repellent formulas.
What Doesn’t Work Common Myths and Failing Approaches
Don’t paint directly over fresh or glossy stain without scuffing and proper prep, because the paint won’t adhere.
Don’t use interior paint or the wrong sheen for an exterior fence, and don’t skip primer or proper cleaning.
Finally, don’t rely on thin topcoats over oil-based stains — that combo almost always peels.
Painting directly over fresh or glossy stain without prep
If you try to slap paint straight onto fresh or glossy stain, you’ll likely end up with peeling, blistering, or uneven coverage—because the paint can’t properly bond to a slick, still-tacky surface.
You need to wait for full cure, sand glossy sheen, and clean contaminants. Skipping prep creates adhesion failures and shortens finish life, forcing costly rework sooner than expected.
Using interior paint or wrong sheens for exterior fence
One big mistake people make is grabbing leftover interior paint for an exterior fence — it may look fine at first, but interior formulas and shiny or wrong sheens won’t stand up to sun, rain, and temperature swings, leading to peeling, chalking, and color failure.
Use exterior-grade paint or stain with appropriate sheen; they include UV inhibitors, flexible binders, and weather resistance for lasting results.
Skipping primer or inadequate cleaning
While it might be tempting to skip primer or rush into painting a fence without a good cleaning, doing so usually causes the finish to fail sooner rather than later.
You’ll face peeling, poor adhesion, and trapped dirt or oils that bleed through.
Always clean, degrease, and allow wood to dry, then apply a compatible primer to guarantee the paint bonds and lasts.
Relying solely on thin topcoats over oil-based stains
Because oil-based stains can bleed through thin water-based topcoats, you can’t just slap on a single thin layer and expect it to hold up; the solvent and pigments in the stain often migrate, causing discoloration, tackiness, and poor adhesion.
You should strip or block the stain, use an oil-compatible primer, then apply proper coats of paint for durability and even coverage.
Cost, Time, and Longevity Comparison
You’ll want to compare the upfront cost and time for prepping and painting versus re-staining, since painting usually takes more prep and materials but can be done in a weekend for a typical yard.
Consider expected lifespan and maintenance: paint can last 7–10 years with touch-ups, while stain typically needs reapplying every 2–4 years but costs less per coat.
We’ll weigh those trade-offs so you can choose the option that fits your budget and maintenance tolerance.
Estimated cost and time for prepping and painting vs. re-staining
Anyone weighing paint versus stain will want clear numbers on cost, time, and how long each job lasts. Painting usually costs more up front (primer, paint) and takes longer to prep and apply; re-staining is cheaper and quicker. Consider DIY versus pro rates and drying windows.
| Task | Typical range |
|---|---|
| Paint | $200–$800, 2–4 days |
| Stain | $100–$400, 1–2 days |
Expected lifespan and maintenance frequency for each approach
While paint and stain both protect wood, they differ a lot in how long that protection lasts and how often you’ll need to reapply it.
You’ll choose based on looks and upkeep tolerance.
- Paint: 7–15 years, touch up every 3–7 years.
- Solid stain: 5–8 years, refresh every 3–5 years.
- Semi-transparent: 2–4 years, reapply every 2–3 years.
- Clear seal: 1–2 years, annual maintenance.
Mistakes to Avoid
Before you rush into painting over a stained fence, watch for the top eight practical mistakes—I’ll list each one with a short fix so you can avoid costly retries.
Pay special attention to seasonal and weather timing errors, since humidity, temperature, and recent rain wreck adhesion and drying.
If you follow the simple fixes and schedule your project for stable, dry days, your paint will last much longer.
Top 8 practical mistakes (with short fixes)
1 common reason DIY jobs stall is simple mistakes that could’ve been avoided—like painting over tacky stain or skipping proper prep—and they often lead to peeling, blotches, or extra work.
Avoid these top 8 practical errors and use quick fixes:
- Painting over wet stain — wait until dry.
- Skipping sanding — scuff and clean.
- Ignoring primer — use bonded primer.
- Using wrong paint — pick exterior acrylic.
Seasonal and weather timing errors to avoid
If you paint when humidity’s high, temperatures swing wildly, or rain’s in the forecast, you’ll invite blistering, slow curing, or washout—so check the long-range forecast and pick a stretch of stable, dry days with temperatures in the paint manufacturer’s recommended range.
Don’t paint in spring freeze-thaw cycles or mid-summer heat; avoid overnight dew. Plan for curing time and seasonal humidity trends.
Best Practices and Maintenance After Painting
After you finish painting, you should set a schedule for routine inspections and have touch-up materials on hand to fix chips and wear quickly.
Clean the fence seasonally and treat or pressure-wash mildew spots promptly to keep the finish healthy.
When paint starts failing across large areas, strip and refinish properly so new coatings will adhere and last.
Routine inspections and touch-up strategies
When you finish painting, set a simple inspection schedule so you’ll catch wear early and keep the fence looking its best; check for peeling, mildew, flaking stain, nail pops, and water damage at least twice a year and after severe weather.
Follow a quick touch-up routine to extend life and avoid big repairs:
- Sand rough spots
- Prime bare wood
- Use matching paint
- Seal edges and posts
Cleaning and mildew prevention
Because moisture and organic debris invite mildew, you should keep painted fences clean and dry to preserve the finish and prevent staining.
Wipe or brush off leaves, dirt, and pollen regularly. Rinse with a hose and use a mild detergent or commercial mildew cleaner for spots.
Guarantee good airflow, trim nearby plants, and fix leaks or pooling to stop recurrence and extend paint life.
When and how to strip paint for future refinishing
Plan ahead for refinishing by knowing exactly when to strip paint: strip if the finish is peeling, flaking, blistered, or has multiple incompatible coats, and whenever you see bare wood or widespread mildew that won’t clean off.
Use a chemical stripper for thick or oil-based layers, sanding or a heat gun for small areas, then clean, dry, and prime before recoating.
Quick Decision Guide Should You Paint Over Your Fence?
Use this quick checklist to decide now: check the wood condition, identify the stain type, and match the outcome to your goals so you can answer yes or no fast.
If the fence has old oil-based stain or peeling finish, you’ll likely need stripping or sanding before painting; semi-transparent recent stains may accept primer and paint with less prep.
For new, untreated wood, you can either stain for a natural look or prime and paint for full color and longer protection.
Checklist to decide now (yes/no flow based on condition, stain type, goals)
If you’re unsure whether to paint over your fence stain, run through this quick yes/no checklist to make a clear call based on fence condition, stain type, and your goals.
1. Is the wood sound and dry?
Yes → proceed;
No → repair/replace.
2. Is the stain oil-based or heavily penetrating?
Yes → likely strip.
3. Do you want color uniformity and longer durability?
Yes → paint.
4. Prefer natural grain show-through?
Yes → stain, don’t paint.
Short scenario-based recommendations (e.g., old oil stain, semi-transparent recent stain, new wood)
That checklist gives you a clear yes/no framework, but real-life fences usually fit a few common scenarios—so here’s a quick, scenario-based guide to help you decide whether to paint, strip, or leave the stain.
Old oil stain: strip or sand, prime with oil-blocking primer, then paint.
Semi-transparent recent stain: test adhesion; often strip or use stain-blocking primer.
New wood: you can paint after weathering or stain instead.
FAQ
You probably have a few specific questions about painting over a stained fence, like whether you can paint over oil-based stain without sanding and how long to wait after staining.
You’ll also want to know if paint will peel, whether exterior latex works over water-based stain, and how many coats you’ll need.
Read on for concise answers to each of these common concerns.
Can you paint over oil-based stain without sanding?
Curious whether you can paint over oil-based stain without sanding? You generally shouldn’t.
Oil-based stains resist paint adhesion, so skipping sanding risks peeling and uneven finish. If sanding isn’t possible, degloss with a chemical stripper or liquid sandpaper (TSP alternative) and use a high-adhesion primer rated for oil surfaces.
Test a small area first to confirm proper bonding before painting the whole fence.
How long should you wait after staining before painting?
How long should you wait after staining before painting?
You should wait until the stain’s fully cured, not just dry to the touch. That typically means 24–72 hours for water-based stains and up to 7 days for oil-based stains, depending on temperature and humidity.
Test a small area: if solvent won’t lift stain and wood feels fully dry, it’s safe to paint.
Will paint peel off a stained fence?
Wondering if paint will peel off a stained fence? It can—especially if the stain repels adhesion, hasn’t cured, or the surface is dirty.
You’ll reduce risk by cleaning, sanding glossy or uneven spots, and using a proper primer compatible with the stain type.
If you skip prep, expect flaking; if you prepare correctly, paint should adhere and last.
Can I use exterior latex paint over a water-based stain?
Yes—you can usually apply exterior latex paint over a water-based stain, but success depends on a few prep steps: verify the stain is fully cured, clean the surface of dirt and mildew, and scuff-sand glossy areas to promote adhesion.
Use a quality exterior primer if the stain is penetrating or uneven.
Test a small area first to confirm compatibility and coverage.
How many coats of paint are needed on a fence previously stained?
Curious about coverage?
If the stain was oil-based and properly prepped, plan on two coats of exterior paint: a primer coat (or stain-blocking primer) plus one finish coat.
For water-based stains or well-sealed surfaces, one coat over a primer might suffice.
Always test a small area first, verify adhesion, and add a second finish coat if coverage or durability seems insufficient.
Visuals and Quick Reference Charts
You’ll find a photo guide showing common surface conditions and the exact prep steps for each.
Use the quick-reference table to match stain type with the recommended primer/paint and the expected outcome.
These visuals make it easy to pick the right approach and avoid guesswork.
Photo guide for surface conditions and prep steps
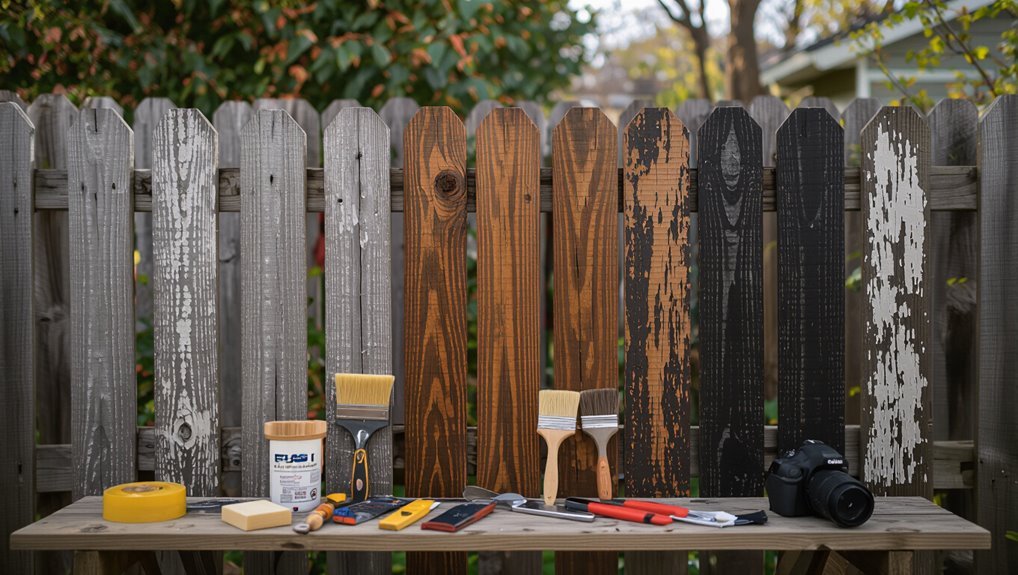
Start by comparing your fence to the photo guide so you can quickly identify the surface condition—fresh stain, weathered but sound, peeling, or mildew-covered—and then follow the matching prep checklist for that scenario.
For each photo you’ll see: key visual cues, required tools, cleaning steps, sanding/grinding intensity, patching tips, and recommended drying times before priming or painting.
Quick-reference table: stain type → recommended primer/paint → expected outcome
Use this quick-reference table to match your fence’s stain type with the right primer and paint so you can predict finish, durability, and maintenance needs at a glance. Pick the row matching your stain, follow the primer/paint recommendation, and expect the noted result.
| Stain type → Primer/paint → Expected outcome | Notes |
|---|---|
| Oil-based → Oil primer + acrylic latex | Good adhesion, long wear |
| Water-based → Bonding primer + acrylic | Smooth finish, moderate maintenance |
| Tannin-rich → Stain-blocking primer + alkyd | Prevent bleed-through, durable |
| Faded/peeling → Strip/sand + exterior paint | Best longevity with full prep |
