Why Is My Chalk Paint Cracking and How to Fix It Fast
Your chalk paint’s cracking because the top layer can’t bond or flex with what’s underneath—usually from poor prep, greasy or glossy surfaces, thick coats, wrong primer or sealer, or big temperature and humidity swings. To fix it fast, scrape or sand loose paint, clean well, feather edges, prime bare spots with a compatible primer, then apply thin, even coats and seal with a flexible topcoat. Keep drying conditions stable, and keep going for full repair and prevention tips.
Quick Answer Why Your Chalk Paint Is Cracking and a Fast Fix
Your chalk paint is probably cracking because the surface wasn’t prepped, the paint was applied too thick or too quickly, or it’s drying unevenly.
To stop more damage, lightly sand the loose flakes and apply a thin, even touch-up coat.
For a quick temporary fix today, scrape off any flaky bits, sand smooth, wipe clean, and feather in a thin layer of paint or clear sealer.
That’ll stabilize the area until you can properly repair and refinish.
One-sentence summary of causes and immediate remedial action
If chalk paint cracks, it’s usually from poor surface prep, incompatible topcoats, or applying layers too thick or too quickly.
You’re asking why is my chalk paint cracking: sand, clean, and remove loose finish, then strip or sand back to a stable surface; let it dry fully, use a compatible primer/topcoat, and repaint thin, even coats to prevent further cracking and adhesion failure.
Fast temporary fixes you can do today
One quick thing you can do today is remove any loose flakes with a plastic scraper or stiff brush, then smooth rough edges with fine sandpaper so new paint can adhere.
Next, wipe dust, apply a light primer to bare spots, and use a small brush for touch-ups.
- Stabilize by removing loose paint
- Clean and prime bare areas
- Spot-paint and seal swiftly
How Chalk Paint Works Basics You Need to Know
Chalk paint is a mineral- or calcium carbonate–based paint that cures as water evaporates and binders crosslink. Knowing its composition helps you understand its strengths and limits.
Typical dry times are quick to the touch, but full cure can take days to weeks depending on humidity and coat thickness.
Proper surface prep—cleaning, sanding, and removing wax or silicone—directly affects adhesion and the paint’s ability to flex without cracking.
What chalk paint is made of and how it cures
Paintmakers blend pigments, binders, and fillers so you get the matte, velvety finish chalk paint is known for. Understanding those ingredients helps explain how it cures and why it sometimes cracks.
You’ll find calcium carbonate or chalk for body, acrylic or latex binders for film formation, and additives for flow.
Curing means binders coalesce, solvents evaporate, and a fragile, porous skin forms that can split under stress.
Typical drying and curing times
Because the surface solvent evaporates quickly but the binder needs time to coalesce, your chalk-style paint will feel dry to the touch within 20–60 minutes yet still take days to fully cure.
Expect light handling after 24 hours, moderate use after 3–7 days, and full hardness in 2–4 weeks depending on humidity, temperature, and coat thickness.
How surface preparation affects adhesion and flexibility
If you skip proper surface prep, your finish won’t adhere or flex with changes in temperature and moisture, so chips, cracking, and delamination become likely.
You should clean, degloss, sand, and remove contaminants so paint bonds uniformly. Use primer on slick or tannin-rich woods to improve flexibility and adhesion.
Proper prep reduces stress at the paint–substrate interface, preventing premature failure.
Common Causes of Chalk Paint Cracking
Before you blame the paint, check the basics: dust, grease, or an old finish left on the surface can stop chalk paint from adhering properly.
You’ll also see cracking if you apply coats too thickly or too many layers, use incompatible primers or topcoats, or work with paint that’s old or poorly mixed.
Environmental factors like extreme temperature, high humidity, or very rapid drying can finish the job by stressing the film and causing cracks.
Poor surface preparation (dust, grease, old finish)
When you skip proper surface prep, contaminants like dust, grease, or an old finish keep chalk paint from adhering evenly. This leads to cracking as the paint dries and moves.
You should degrease, sand glossy or flaking finishes, and wipe away dust before painting.
Proper prep guarantees a stable bond, preventing stress points and premature cracking that come from poor adhesion.
Applying paint too thick or too many coats
After you’ve cleaned and sanded, think about how much paint you’re putting on; laying on thick coats or piling up too many layers causes chalk paint to dry unevenly and crack.
Apply thin, even coats, allow full drying between layers, and sand light between coats if needed.
Thin with water or follow manufacturer guidelines to maintain flexibility and prevent surface tension that leads to fissures.
Incompatible primers or topcoats
Mixing the wrong primer or topcoat with chalk paint can cause cracking because their differing flexibilities and drying chemistries fight each other—stiff oil-based primers, for example, won’t flex with a water-based chalk finish, so the paint layer splits as it expands and contracts.
Always match systems: use compatible water-based primers and sealers, test a small area, and let each coat fully cure before applying a different chemistry.
Environmental factors: temperature, humidity, rapid drying
If your workspace gets too hot, cold, or damp, the paint won’t cure evenly and you’re more likely to see cracking or crazing.
Temperature swings, high humidity, or overly fast drying from heat or fans stress the film. Work in stable, moderate conditions, avoid direct sun or heaters, and control airflow.
Allow proper dry times between coats to prevent surface tension failure.
Old or expired paint and improper mixing
Environmental conditions can stress the paint film, but the product itself matters just as much: old, expired chalk paint or paint that hasn’t been mixed properly won’t form a stable film and is far more likely to crack.
Check expiration, texture, and separation; discard lumpy or foul-smelling cans. Stir thoroughly, strain if needed, and follow manufacturer pot life and thinning guidelines to guarantee proper adhesion and flexibility.
Structural movement of the substrate (wood expansion/contraction)
When wood expands and contracts with humidity and temperature changes, it can pull the paint film apart and cause cracking; you’ll often see this where boards meet, across grain changes, or around joints and veneers.
You should stabilize moisture levels, allow proper acclimation before painting, use flexible primers or caulk gaps, and avoid rigid topcoats that can’t move with the substrate.
Diagnose the Type of Crack Quick Checklist
Start by identifying the crack type—hairline, alligatoring, or flaking—so you know what you’re dealing with.
Note where the cracks appear (joints, edges, or flat panels) because location points to different causes.
Then run quick tests for adhesion, flexibility, and a solvent spot test to confirm the diagnosis.
Hairline vs. alligatoring vs. flaking how to tell
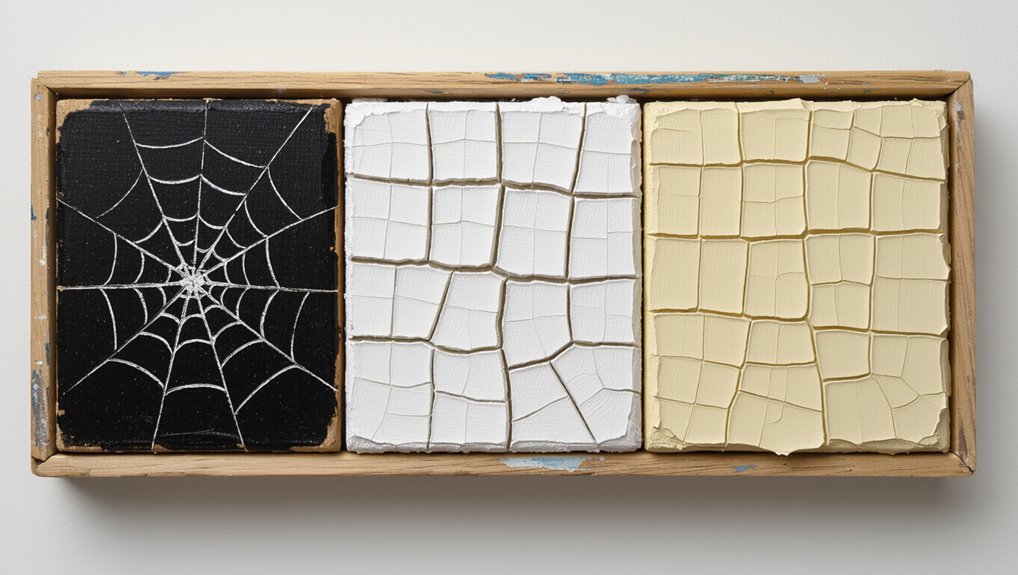
Wondering whether those cracks are hairline, alligatoring, or actual flaking? You’ll check three things: size, pattern, and lift.
Hairline shows thin, shallow lines; alligatoring looks like reptile scales with interconnected cracks; flaking lifts or flakes off in chips.
Lightly run your fingernail—no lift = hairline/alligatoring, raised edges or chips = flaking.
Where cracks appear (joints, edges, flat panels) and what that indicates
Because where the cracks show up tells you almost everything, check joints, edges, and flat panels first to narrow the cause.
Cracks at joints usually mean movement or poor adhesion between layers.
Edge cracking points to thin coverage, wear, or stress.
Wide cracks across flat panels suggest rigid topcoats over flexible substrates or underlying warping.
Note location to choose the right fix.
Tests to perform: adhesion, flexibility, solvent test
Now that you’ve noted where the cracks show up, run a few quick tests to pin down what’s causing them: an adhesion check to see if layers are sticking, a flexibility test to judge how the paint and substrate move, and a solvent test to identify whether the finish is water- or solvent-sensitive.
Do each in small areas, record results, then plan targeted fixes.
- Adhesion: tape or scrape
- Flexibility: bend or press
- Solvent: cotton swab test
Fast Fixes for Cracked Chalk Paint Step-by-Step Emergency Repair
Grab a few basic supplies — scraper, sandpaper, filler, primer and a clean cloth — and you’ll be ready to patch most chalk paint cracks.
Start by removing loose paint and cleaning the area, then sand and feather the edges for a smooth shift.
For deep cracks, fill and let dry completely before priming with a compatible primer if the surface needs it.
Supplies you’ll need
If your chalk paint has started to crack and you want to fix it fast, gather a few key supplies so you can move straight to repair without second-guessing what you need. You’ll want tools that let you prep, fill, and protect the finish quickly and cleanly.
- Sandpaper (fine and medium grit)
- Lightweight filler or spackle
- Quality brush and water-based sealer
Step 1: Remove loose paint and clean the area
Start by scraping away any loose, flaking paint with a putty knife or stiff scraper.
Then wipe the area with a damp cloth to remove dust and chalky residue so your repair materials will bond properly.
Let it dry fully, then degrease with a mild cleaner or rubbing alcohol.
Remove all crumbs and lint so patching and repainting will adhere and look smooth.
Step 2: Sand and feather edges for a smooth transition
2. You’ll sand the cracked edges gently with fine-grit paper, blending the loose paint into the surrounding surface.
Keep strokes light and follow the grain or contours. Feathering creates a gradual slope so new paint won’t show ridges.
Wipe dust with a damp cloth, let it dry, and inspect for any uneven spots before moving to the next repair step.
Step 3: Fill deep cracks and allow proper drying
When you’ve removed loose paint and smoothed the edges, it’s time to fill any deep cracks so they won’t telegraph through your repair.
Use a fine grain filler or lightweight spackling, press it into gaps, then level with a putty knife.
Let it dry fully per manufacturer instructions, sand smooth, and clean dust away before proceeding so the repair stays invisible and stable.
Step 4: Prime (if needed) with compatible primer
If the filler’s dry and sanded smooth, you may need to prime those repairs before repainting to guarantee the new chalk paint bonds and the patch doesn’t show through.
Choose a water-based or shellac-based primer compatible with both filler and chalk paint.
Apply thin, even coats, let each coat fully dry, and sand lightly between coats for a seamless, stable surface ready for topcoat.
Step 5: Repaint using correct technique (thin coats, dry time)
Although you’ve prepped the surface, you’ll still want to apply your chalk paint in thin, controlled coats and allow full dry time between layers to prevent new cracks; thin coats flex better and cure more evenly than heavy glops.
Use a light brush or foam roller, wipe drips, and wait manufacturer-recommended drying before recoating.
Multiple thin layers give smoother, stronger results than one thick sloppy pass.
Step 6: Recoat with compatible topcoat or sealer for durability
Now that your coats are thin and fully cured, seal the surface with a topcoat compatible with chalk paint to stop further cracking and add durability.
You’ll protect edges, ease cleaning, and prevent moisture issues.
Choose finish level and product for use (wax, poly, or clearcoat), apply thin even coats, and cure per directions.
- Match product to paint
- Apply thin, even layers
- Allow full cure
Long-Term Solutions and Best Practices to Prevent Cracking
To prevent future cracking, you’ll want to start with proper surface prep—clean, sand, and degloss so paint bonds well.
Choose primers and sealers suited to your substrate, use the right tools and thin, even coats with adequate drying time, and control temperature and humidity while painting.
For pieces that move or flex, consider flexible additives or flexible topcoats to accommodate movement.
Proper surface prep: cleaning, sanding, and deglossing
1 essential step before you paint is prepping the surface: clean it thoroughly, sand to dull glossy finishes, and degloss where needed so the chalk paint can bond properly.
Remove grease, dirt, and loose finish with a degreaser and tack cloth. Sand with fine-grit paper, wipe dust, and guarantee a uniform dullness.
Proper prep prevents adhesion failures and future cracking.
Choosing the right primer and sealer for your substrate
Because different surfaces absorb and flex differently, choosing the right primer and sealer is essential to prevent chalk paint from cracking over time. You should match primer type to substrate (wood, metal, laminate) and pick a sealer with compatible flexibility and sheen. Test adhesion and flexibility small-scale before full application.
| Substrate | Recommended primer |
|---|---|
| Wood | Oil/alkyd or shellac |
| Laminate/Metal | Bonding primer |
Correct application technique: tools, coat thickness, and drying time
After you’ve matched primer and sealer to the surface, focus on how you apply the chalk paint—tools, coat thickness, and drying time all affect flexibility and adhesion.
Use high-quality brushes or foam rollers for even laydown, apply thin, uniform coats, and wait full dry times between layers.
Avoid heavy buildup that cracks; sand lightly between coats for better bonding and smoother finish.
Environmental control: ideal temperature and humidity ranges
Wondering how room conditions affect your chalk paint? Aim for 60–75°F (15–24°C) and 40–55% relative humidity while painting and curing.
Stable conditions prevent rapid moisture loss or absorption that cause cracking. Avoid painting near heaters, open windows, or in damp basements.
Use a hygrometer and thermostat to monitor and maintain steady temperature and humidity throughout drying to guarantee durable, crack-free finishes.
When to use flexible additives or topcoats for movement-prone surfaces
When a piece is likely to flex, expand, or contract—like cabinet doors, exterior furniture, or plywood panels—you should switch from rigid chalk paint recipes to flexible additives or topcoats to prevent future cracking.
Choose acrylic-based flexible varnishes, elastomeric primers, or mixable textile/flexible mediums.
Test adhesion and flexibility on scrap, apply thin even coats, and allow full cure before regular use to avoid future failures.
Comparison: Chalk Paint vs. Other Finishes for Durability
When you’re weighing durability, chalk paint offers easy adhesion and a matte finish but isn’t as flexible or washable as quality latex paints.
Milk paint and chalk-style blends can give similar vintage looks with varying durability—milk paint often flakes for that aged effect unless bonded, while blends try to balance look and performance.
Consider chalk paint for quick makeovers and textured finishes, latex for high-traffic or washable surfaces, and blends when you want vintage character with more reliability.
Chalk paint vs. latex paint pros and cons
If durability’s your top concern, comparing chalk paint and latex helps you pick the right finish for the job. Chalk gives matte charm and easy distressing but chips more without sealant. Latex offers tougher, flexible protection and less cracking with movement, though it lacks chalky texture. Choose latex for high-use surfaces; use chalk with a strong topcoat for durability.
| Feature | Chalk vs Latex |
|---|---|
| Finish | Matte vs variable |
| Durability | Lower raw, needs topcoat |
| Flexibility | Less vs more |
| Repairability | Easier touch-ups |
Chalk paint vs. milk paint and chalk-style blends
How do chalk paint, milk paint, and chalk-style blends stack up on durability?
You’ll find chalk paint offers flexible, forgiving coverage but can crack if applied thickly or over unstable surfaces.
Milk paint bonds harder when mixed to expose grain, often chipping rather than cracking.
Chalk-style blends vary—formulations may mimic either behavior—so inspect ingredients and test adhesion before committing.
Best scenarios to choose chalk paint vs. alternatives
Curious which finish will stand up to daily wear in your space?
You’ll pick chalk paint for quick updates, matte charm, and light-duty furniture, especially if you’ll seal it.
Choose lacquer, polyurethane, or enamel for high-traffic surfaces, kitchens, or kids’ rooms because they resist moisture and scratches.
Use oil or conversion varnish for antiques needing durable, long-lasting protection and smooth finish.
Common Mistakes That Cause Cracking (and How to Avoid Them)
You’ll often find cracking comes from avoidable mistakes like over- or under-sanding, slapping on coats that are too thick, or rushing recoats.
Skipping or using the wrong primer, using expired or poorly mixed paint, and ignoring movement or humidity in the substrate also set you up for failure.
I’ll show how to spot each issue and the simple fixes to prevent cracking.
Over-sanding or under-sanding
If the surface isn’t prepped right—either stripped too aggressively or left too slick—you’ll see chalk paint crack or lift as it cures.
Sanding too hard removes the bite; too little leaves glaze or sealer that blocks adhesion. Lightly scuff with fine-grit sandpaper, clean dust, and test a small patch.
Proper prep guarantees paint bonds evenly and stays flexible.
Applying too-thick coats or rushing recoat times
When you slather on chalk paint too thickly or recoat before the previous layer dries, the surface can wrinkle, sag, or crack as solvents try to escape.
To prevent this, apply thin, even coats, wipe excess with a brush or roller, and follow manufacturer recoat times.
If cracking appears, sand smooth, remove loose paint, then rebuild with thinner layers and proper drying between coats.
Skipping primer or using incompatible primers
Because chalk paint relies on surface adhesion more than traditional paints do, skipping primer or using the wrong primer can lead to poor bonding and eventual cracking.
You should always prep surfaces and choose a primer compatible with chalk paint—shellac or bonding primers work well on glossy or oily surfaces.
Proper priming guarantees even adhesion, prevents peeling, and keeps your finish intact.
Using expired paint or not stirring properly
Although chalk paint seems forgiving, using expired cans or failing to stir thoroughly can wreck the finish and cause cracking.
Old paint separates, loses binder strength, and won’t form a cohesive film. If you spot clumps, foul odor, or uneven consistency, discard it.
Always mix fresh paint well—scrape sides, stir bottom, and strain if needed—to guarantee uniform pigments and binders for a stable, crack-free coat.
Ignoring substrate movement and environmental conditions
If you let surfaces shift or paint in the wrong conditions, the finish will crack as the coating can’t flex with the substrate.
Don’t paint on damp wood, newly glued joints, or over expanding trim. Temperature swings, high humidity, or direct sun cause movement and poor adhesion.
Wait for stable conditions, secure loose parts, and acclimate wood before painting to prevent cracking.
Troubleshooting Guide Problem, Likely Cause, and Fix
If your chalk paint is cracking only at joints or corners, all-over crazing, flaking in patches, or staying soft after drying, you can troubleshoot each issue with a simple problem—likely cause—fix approach.
I’ll list each problem, explain the most common reasons, and give practical fixes you can try.
Follow these steps and you’ll quickly identify whether you need surface prep, a different primer, thinner coats, or a longer cure time.
Paint cracking only at joints or corners
When your chalk paint cracks only along joints or corners, it’s usually because those areas move or flex differently than flat surfaces, stressing the finish until it fails. You can fix it by sanding loose paint, applying flexible primer, and using caulk on seams before repainting. Monitor humidity and allow full cure time.
| Problem | Likely Cause | Fix |
|---|---|---|
| Corner cracks | Movement/expansion | Sand, caulk, prime |
| Joint gaps | Poor bonding | Flexible primer |
| Recurrent splits | Structural shift | Reinforce seam |
Allover crazing or fine hairlines
Why does your chalk paint show a network of tiny cracks across the whole surface? You likely applied thin layers too quickly or topcoat cured unevenly. Fix by sanding lightly, cleaning, and reapplying thinner, well-cured coats; allow full dry time and stable humidity.
| Problem | Likely Cause | Fix |
|---|---|---|
| Crazing | Fast drying/temperature | Sand, slow coats |
| Fine lines | Incompatible topcoat | Use compatible sealer |
| Widespread | Humidity swings | Control environment |
Flaking or peeling in patches
Allover crazing points to drying and curing problems, but flaking or peeling in patches usually signals poor adhesion between the chalk paint and the substrate or a contaminated surface. You should clean, sand, and prime problem areas, then recoat. Test adhesion before finishing to avoid repeats.
| Problem | Fix |
|---|---|
| Contamination | Clean with degreaser |
| Smooth finish | Sand and prime |
Paint soft or tacky after drying
Ever wonder why your chalk paint feels soft or tacky even after it seems dry? You probably applied too-thick coats, painted in high humidity, or didn’t wait long enough between layers. Fix it by thinning coats, improving airflow, and allowing 24–48 hours to cure. If still tacky, gently recoat with a compatible sealer.
| Problem | Fix |
|---|---|
| Thick coats | Thin paint |
| Humidity | Improve ventilation |
| Insufficient cure | Wait 24–48h |
| Wrong sealer | Use compatible sealer |
Tools, Products, and Materials Recommended
Before you start fixing cracked chalk paint, gather the right sandpapers, scrapers, and cleaning agents to prep the surface properly.
You’ll also want recommended primers, fillers, and sealers to guarantee adhesion and prevent future cracking.
Finally, choose the best application method—quality brushes, rollers, or a spray setup—based on the piece and finish you want.
Sandpapers, scrapers, and cleaning agents
When you prep a piece for chalk paint, pick sandpapers and scrapers that match the job: coarse grits (60–100) for stripping flaking paint, medium (120–150) for smoothing rough spots, and fine (220–320) for feathering edges and final smoothing.
Use metal or plastic scrapers for stubborn layers and a tack cloth or mild degreaser (like diluted dish soap or denatured alcohol) to remove dust and oils before painting.
- Match grit to damage: faster removal vs finer finish
- Scrape gently to avoid gouges; sand after scraping
- Clean thoroughly so paint adheres and cracking risk drops
Recommended primers, fillers, and sealers for chalk paint
After you’ve removed old paint, smoothed edges, and wiped the surface clean, pick primers, fillers, and sealers that match both the substrate and the finish you want.
Use a shellac or bonding primer for tannin bleed, a lightweight wood filler for cracks and gouges, and a clear water-based sealer to prevent moisture-driven cracking.
Choose compatibility with chalk paint.
- Shellac or bonding primer
- Lightweight wood filler
- Clear water-based sealer
Brushes, rollers, and spray options for best finish
If you want a smooth, consistent chalk-paint finish, pick tools that match your project: a high-quality synthetic brush for detail and edges, a dense foam roller for large flat areas, and a HVLP or turbine sprayer when you need the fastest, most even coverage.
Use proper thinning, overlap passes, and maintain wet edges to prevent cracking and texture issues.
- Match tool to surface
- Control paint viscosity
- Maintain consistent pressure
Step-by-Step Project Plan: Repair and Refinish a Cracked Painted Piece
Before you start, check your prep list—tasks, materials, and realistic time estimates—to make certain the job fits your weekend.
Follow clear repair steps with timeframes for sanding, filling, and priming so you don’t rush critical stages.
Finish with a curing schedule and protective topcoat recommendations to guarantee long-term durability.
Preparation checklist (time estimate and materials)
You’ll want a clear checklist so you know exactly what to gather and how long each step will take; this saves time and prevents surprises once you start the repair.
List materials: sandpaper (120–220), putty, primer, chalk paint, sealer, brushes, drop cloth, gloves, mask.
Estimate prep time: 30–60 minutes for cleaning/sanding, 15 minutes to mix, 10 minutes to set up workspace.
Repair steps with realistic timeframes
Once you’ve got your workspace set and materials at hand, follow this step-by-step plan to fix cracks, fill gaps, and refinish the piece efficiently—each task includes a realistic time estimate so you can schedule the job and avoid rushing.
Inspect and mark damage (10–15 min).
Sand loose paint (20–30 min).
Apply wood filler (15 min) and dry (30–60 min).
Sand smooth (15–20 min).
Prime and repaint (45–90 min).
Finishing and curing schedule for long-term durability
Because the way you finish and let each layer cure will determine how long the repair lasts, follow a paced schedule that balances drying times with practical work windows.
You’ll let primer, paint, and sealer cure fully between steps, avoid heavy handling, and build protection gradually for lasting durability.
- Wait 24–48 hours between coats.
- Lightly sand before sealing.
- Cure sealed piece 7 days before regular use.
FAQ Quick Answers to the Most Common Questions
You’ve probably got a few quick questions about fixing cracked chalk paint, so let’s answer the key points you’re wondering about.
You’ll learn whether you can spot-repair without stripping, if sanding will harm the original finish, the proper wait time between coats, which topcoat to choose, and whether chalk paint mixes safely with latex or oil-based products.
Read on for short, practical answers you can use on your next repair.
Can I fix cracked chalk paint without stripping the whole piece?
Yes — you can often fix cracked chalk paint without stripping the whole piece, and the best approach depends on how deep and widespread the damage is.
For hairline cracks, clean, sand lightly, fill gaps with a compatible filler, prime bare spots, and repaint.
For larger areas, remove loose paint, feather edges, use a flexible primer, then repaint and seal with a clear topcoat for durability.
Will sanding out cracks damage the original finish underneath?
If you sand out cracks gently and stop as soon as you reach stable paint or bare wood, you won’t usually harm the original finish underneath; aggressive sanding or using too coarse a grit, however, can remove original layers, soften edges, and create visible differences in sheen or texture.
Test a small area first, use fine grit, work lightly, and clean dust to assess damage before proceeding.
How long should I wait between coats to prevent cracking?
When you let each coat dry fully before applying the next—typically 2–4 hours for chalk paint or up to 24 hours for denser formulas—you cut the risk of cracking by allowing solvents and binders to set and form a stable film.
Check paint tackiness before recoating, follow manufacturer times, avoid humid or cold conditions, and thin heavy coats.
Proper drying prevents tension buildup and reduces cracks.
Is it better to use a wax or polycrylic topcoat over chalk paint?
Which is better depends on your project: wax gives a soft, velvety finish and easy touch-ups, while polycrylic provides tougher, water-resistant protection and is easier to clean.
Choose wax for low-traffic pieces and a matte, hand-rubbed look; choose polycrylic for tabletops, kitchens, or bathrooms where durability and moisture resistance matter.
Test first on a scrap.
Can I mix chalk paint with latex or oil-based products?
Curious whether you can blend chalk paint with latex or oil-based products? You shouldn’t mix them directly—chalk paint is water-based and compatible with latex, but adding oil-based paint causes adhesion and curing problems.
If you need a different finish, layer instead: fully cure the chalk paint, sand lightly, then prime with a suitable bonding primer before applying oil-based or latex topcoats to avoid cracking and peeling.
Final Checklist Before You Start Repainting
Before you grab your brush, run a quick readiness checklist to catch loose paint, sanding needs, or surface contamination so you don’t have to redo work later.
If the damage is widespread, the substrate is compromised, or repairs keep failing, consider calling a professional or opting for a complete refinish.
That way you’ll know whether you can tackle the job yourself or need expert help.
Quick readiness checklist to avoid rework
Ready to avoid redo work? Check surface dryness, adhesion, and temp/humidity before you paint so cracking won’t start later.
Confirm your tools and paint are compatible and mixed.
- Surface clean, sanded, dry
- Primer or adhesion promoter applied if needed
- Room and paint at recommended temperature and humidity
When to call a professional or refinish completely
If the cracking is widespread, deep, recurring after fixes, or the piece has structural damage you can’t safely repair, call a professional or plan a full refinish—doing so will save time and money compared with repeated patch jobs.
Assess cost vs. value, consider safety, and avoid wasted effort. Decide quickly to prevent further deterioration.
- Costlier than DIY but longer-lasting
- Preserves structural integrity
- Saves time and stress