What Causes Paint on Walls to Crack and How to Stop It for Good
Paint cracks when the surface moves, gets damp, or wasn’t prepped or primed correctly, and age, rapid drying or wrong paint combos make it worse. You should inspect crack patterns, test adhesion, and check for moisture to find the cause. Fix leaks or movement, remove loose paint, sand, prime with a compatible primer, then apply thin even coats in suitable temperature and humidity. Follow these steps now and you’ll learn how to stop it for good as you go further.
Quick Answer Why Paint on Walls Cracks and the Fast Fixes
Paint cracks because the surface or underlying substrate moves, was poorly prepped, or the wrong paint was used.
You can do quick temporary fixes today like filling hairline cracks with flexible filler or caulk and repainting small patches after sanding.
These stop further damage short-term while you plan a proper repair.
One-sentence summary of causes
When paint starts to crack on your walls, it’s usually because the surface moved, moisture invaded, or the wrong products were used.
You’ll find that what causes paint on walls to crack is typically substrate movement, trapped or recurring damp, poor adhesion from wrong primers or incompatible topcoats, or age-related brittleness.
Fix by addressing movement, moisture sources, and proper product choice before repainting.
Immediate temporary fixes you can do today
If you need a fast, temporary fix today, start by cleaning loose flakes, sanding sharp edges, and applying a flexible patch or acrylic caulk to bridged cracks so the surface stays stable until you can make permanent repairs.
- Remove loose paint and dust.
- Sand edges smooth.
- Fill with acrylic caulk or flexible filler.
- Prime and touch up with matching paint.
Basic Understanding What Is Paint Cracking?
Paint cracking shows up in a few distinct ways—crazing looks like fine networked lines, flaking peels away in chips, alligatoring forms scaly patterns, and hairline cracks are thin, isolated splits.
You’ll usually see small defects first that grow wider and more frequent as the paint loses adhesion and flexibility.
Knowing these types helps you spot early failure and decide whether a simple touch-up will do or if a full repair’s needed.
Definition of different cracking types (crazing, flaking, alligatoring, hairline)
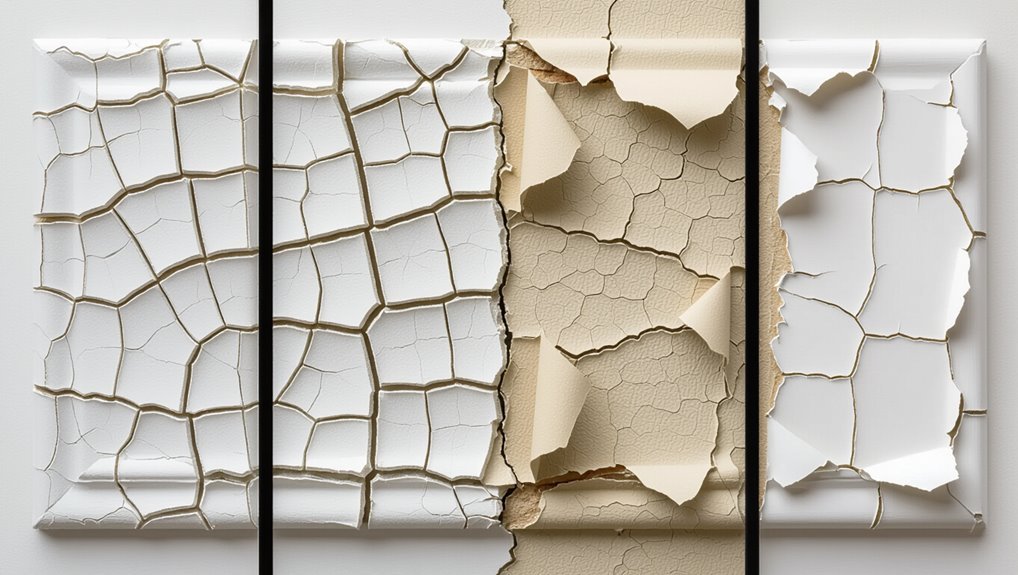
Cracking shows up in a few recognizable patterns, and knowing them helps you diagnose the problem quickly.
Crazing looks like fine, spiderweb hairlines across the surface.
Flaking peels off in larger chips, showing substrate beneath.
Alligatoring forms interconnected scales resembling reptile skin from incompatible coats.
Hairline cracks are single, thin fractures caused by minor movement or shrinkage.
How paint failure progresses over time
When coatings fail, they don’t usually give warning all at once—you’ll see small changes that grow worse over weeks or years as stress, moisture, UV, and adhesion issues compound; understanding that progression lets you spot early signs and intervene before peeling or structural damage occurs.
You’ll first notice hairline cracks, then widening, flaking, and eventual alligatoring or peeling as layers separate and substrate damage advances.
Primary Causes of Paint Cracking
When you’re troubleshooting cracked paint, start by checking the substrate—plaster, drywall, or wood can shift or absorb moisture and trigger cracks.
Look for moisture issues like leaks or condensation, poor surface prep or adhesion, and mismatched paint layers or missing primer that weaken the system.
Also consider temperature swings and rapid drying, which can stress and fracture the coating.
Substrate issues: plaster, drywall, wood movement
Although paint often looks like it’s failing on its own, the surface beneath it usually calls the shots: plaster that settles, drywall joints that weren’t taped or mudded correctly, and wood that expands or contracts with humidity all create stresses the paint can’t follow.
Inspect substrate for cracks, loose plaster, unfinished seams, or nail pops.
Repair, reinforce, and prime properly before repainting to prevent future cracking.
Moisture and humidity problems (condensation, leaks)
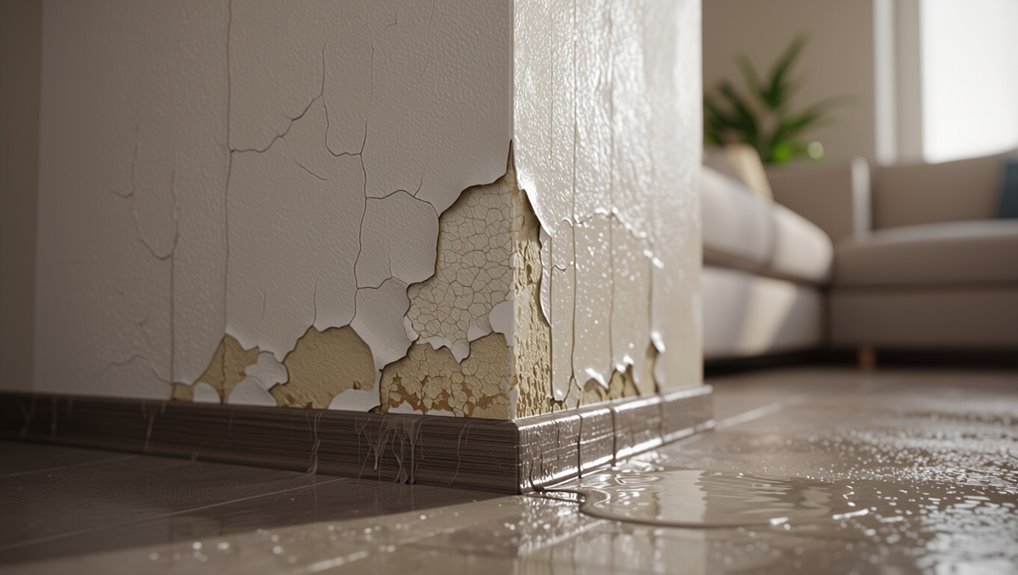
Because moisture moves through and sits on surfaces, it’s one of the most common causes of paint cracking you’ll see indoors.
When humidity, condensation, or hidden leaks wet the wall, paint softens, blisters, then loses cohesion.
You’ll notice cracking, flaking, or bubbling near windows, bathrooms, or plumbing.
Fix leaks, improve ventilation, and dry affected areas before repainting to prevent recurrence.
Poor surface preparation and adhesion
If you skip sanding, cleaning, or priming, paint won’t bond properly to the wall and it’ll crack or peel sooner than you expect.
You should remove loose material, dust, grease, and old flaking paint, repair surface defects, and sand for keying.
Use the right primer for porous or repaired areas so paint adheres evenly; otherwise stress and movement will cause premature failure.
Incompatible paint layers and improper priming
When different paint types or an inadequate primer meet, they don’t lock together and you’ll start seeing cracks along the interfaces. You should strip incompatible layers, sand glossy surfaces, and always use a primer suited to both substrate and topcoat. Proper priming bonds layers, prevents peeling, and evens absorption.
| Problem | Cause | Fix |
|---|---|---|
| Cracking | Poor bond | Compatible primer |
| Peeling | Incompatible coats | Strip/sand |
| Blistering | Uneven adhesion | Recoat properly |
Temperature and environmental stresses (heat, cold, rapid drying)
Although paint can look fine right after application, rapid temperature swings and harsh environmental conditions will make it crack sooner than you expect.
You’ll see heat soften films, causing sagging and loss of adhesion, while cold makes coatings brittle and prone to fissures.
Rapid drying from sun or heaters traps stress, so control ambient temperature and humidity during curing to prevent cracking.
Structural movement and settling
Because buildings shift over time, you’ll often see paint crack along seams, corners, and over joints where the substrate moves independently.
You should inspect for hairline fissures near doorframes, window trim, and drywall joints. Small movements fatigue the coating, causing crazing or stair-step cracks.
Addressing structural settling, reinforcing joints, and using flexible caulk or acrylic primers lets your paint accommodate movement and last longer.
Low-quality or expired paint and incorrect application
If you skimp on paint quality or use cans that are past their prime, the finish won’t bond or flex properly and will crack sooner than you’d expect.
Use fresh, reputable paint and follow label instructions: stir thoroughly, check viscosity, apply recommended coats and drying times, and maintain proper temperature and humidity.
Poor prep or thinning causes adhesion failure—do it right to prevent cracking.
Diagnosing the Root Cause How to Identify Why Your Paint Cracked
Start with a visual inspection checklist: note crack patterns, location, and any nearby moisture or structural issues.
Then run simple tests—tape test for flaking, a moisture meter, and a basic adhesion check—to narrow the cause.
If tests suggest widespread moisture, structural movement, or you’re unsure of results, call a professional; otherwise you can often proceed with a DIY fix.
Visual inspection checklist
When you inspect cracked paint, work methodically from room to room and note the crack patterns, locations, and nearby conditions; these details quickly narrow down likely causes.
Use this checklist to record observations:
- Crack type: hairline, alligatoring, or flaking.
- Location: ceiling, corner, near windows or plumbing.
- Surface: plaster, drywall, previously painted oil or latex.
- Environmental clues: humidity, leaks, vibration, or poor ventilation.
Tests to perform: tape test, moisture meter, adhesion test
Although visual clues narrow possibilities, you’ll need a few simple tests to confirm the cause: a tape test to check adhesion, a moisture meter to detect dampness, and a basic pull test to evaluate paint bond strength.
Do a cross-hatch tape test, note any blistering or powdering. Use a moisture meter across suspect areas.
Compare results to decide if surface prep, moisture control, or full removal is needed.
When to call a professional vs DIY evaluation
You’ve already run the tape, moisture, and adhesion checks, so now decide whether you can finish diagnosing and repairing the problem yourself or need a pro.
Call a pro if cracks are widespread, recurring, tied to structural movement, persistent moisture, or mold.
DIY when damage is localized, surface-only, and you’re comfortable with patching, priming, and repainting.
Cost, safety, and warranty matter.
How to Stop Paint from Cracking Step-by-Step Repair and Prevention
Start by evaluating and documenting the damaged areas so you know the scope of work.
Then fix any underlying problems like moisture, leaks, or structural issues before removing failing paint safely with scraping, sanding, or chemical removers.
Finally, repair the substrate and complete proper surface preparation—patch plaster or replace drywall, fill cracks, clean, sand, and remove dust—so new paint will adhere.
Step 1 Assess and document the damage
Before you pick up a scraper or brush, take a close look and record what you see: note the location, size, pattern, and depth of cracks, any peeling or blistering, and whether moisture, mold, or efflorescence appears nearby.
Use photos and notes, then list observations:
- Crack locations
- Crack width/depth
- Peeling/blisters
- Nearby stains or growth
Step 2 Fix underlying problems (moisture, leaks, structural)
With your inspection notes and photos in hand, address whatever’s causing the paint to crack rather than just repairing the surface—moisture, leaks, and structural movement will make any patch job fail.
Identify and fix sources quickly:
- Repair roof/gutter leaks.
- Fix plumbing and seal wet areas.
- Improve ventilation and drying.
- Stabilize framing or stucco movement before repainting.
Step 3 Remove failing paint safely (scraping, sanding, chemical removers)
Strip away all loose, flaking paint so repairs will bond to a sound surface: use a sturdy scraper or wire brush for large areas, sand feathered edges smooth, and apply chemical strippers only where scraping won’t reach.
Wear PPE, ventilate, and protect floors. Work from top down, remove residue with a damp cloth, and avoid aggressive methods that damage the substrate.
Step 4 Repair substrate (patch plaster, replace drywall, fill cracks)
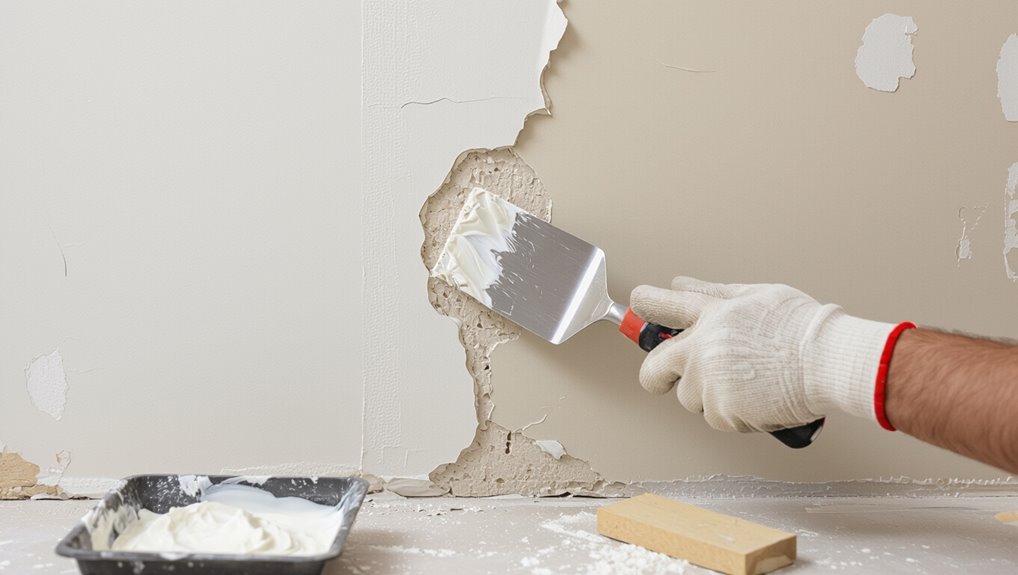
Assess the wall and repair the underlying material so paint has a stable substrate to adhere to: patch small plaster cracks with a flexible filler, replace sections of damaged drywall, and reinforce or skim-coat areas where bonding is poor.
You should remove loose material, press filler into voids, sand flush after curing, and guarantee repaired areas are firm and structurally sound before repainting.
Step 5 Proper surface preparation (cleaning, sanding, dust removal)
1 essential step before repainting is thorough surface preparation: cleaning, sanding, and removing dust so new paint can bond evenly.
You should wash grease, mildew, and loose particles with appropriate cleaners, sand glossy or uneven areas to feather edges, and vacuum or tack cloth to eliminate residue.
Proper prep prevents adhesion failures and future cracking, saving time and repeated repairs.
Step 6 Priming: choosing the right primer for substrate and paint
Because primers bridge the gap between old surfaces and new paint, picking the right type for your substrate and topcoat is essential to prevent cracking and guarantee long-term adhesion.
Choose a bonding primer for glossy or chalky surfaces, a stain-blocking primer for tannin or water stains, and a moisture-resistant primer for damp areas.
Apply per manufacturer instructions and allow full cure before topcoat.
Step 7 Selecting compatible paint and correct sheen level
Choosing paint that’s chemically and mechanically compatible with your primer and substrate is essential to prevent future cracking, so match binder types (oil vs. latex), flexibility, and recommended topcoat sheens before you start. Pick a sheen suited to traffic and movement: higher sheen resists scuffs but is less forgiving on imperfections.
| Substrate | Binder | Recommended Sheen |
|---|---|---|
| Drywall | Latex | Eggshell |
| Wood trim | Oil/Alkyd | Semi-gloss |
| High-movement | Flexible acrylic | Satin |
Step 8 Correct application techniques (temperature, humidity, coat thickness, drying time)
Control the environment and your technique to prevent cracking: paint when temperature and humidity fall within the manufacturer’s recommended range, apply thin, even coats, and allow each layer to dry fully before recoating.
Use proper tools for uniform film thickness, avoid heavy impasto, and follow manufacturer drying times between coats.
Monitor conditions while painting and postpone work if extremes threaten adhesion or solvent escape.
Step 9 Allowing proper cure and post-paint inspections
Once coats are applied correctly, you still can’t just walk away—proper curing and a careful post-paint inspection are what lock in a durable finish.
Let paint fully cure per manufacturer times before moving furniture or changing humidity.
Inspect for hairline cracks, missed spots, or delamination. Address issues immediately: sand, spot-prime, and recoat.
Document cure times and conditions to prevent future failures.
Best Practices and Long-Term Prevention Strategies
To prevent future cracking, you’ll want to control indoor humidity and ventilation and use environmental controls seasonally.
Set a simple maintenance schedule to inspect high-stress areas and choose durable finishes where wear and movement are common.
With regular checks and the right materials, you’ll keep painted surfaces intact longer.
Controlling indoor humidity and ventilation
If your indoor humidity stays high or ventilation’s poor, paint can blister, peel, or crack as moisture cycles through walls. You should aim to keep humidity within recommended ranges and guarantee steady air exchange to prevent recurring damage.
- Use dehumidifiers in damp rooms.
- Run exhaust fans when cooking or showering.
- Open windows daily for cross-ventilation.
- Seal exterior leaks and insulate to reduce condensation.
Maintenance schedule for painted surfaces
A simple, regular maintenance schedule will keep your painted walls looking fresh and stop small problems from becoming costly repairs.
Inspect every 3–6 months for chips, bubbling, mildew, or moisture stains. Clean gently with mild detergent as needed, touch up small imperfections promptly, and reseal trims annually.
Document issues and repairs so you spot patterns and act before cracks form.
Choosing durable finishes for high-stress areas
Regular inspections and timely touch-ups set you up to choose the right finishes for high-stress areas: walls near doors, stairways, kitchens, and busy hallways need paints and coatings that resist abrasion, stains, and repeated cleaning.
Pick durable sheens like satin or semi-gloss, use high-quality acrylic or epoxy-modified formulations, prime properly, and consider washable, scuff-resistant additives to extend longevity.
Seasonal considerations and environmental controls
When temperatures and humidity swing with the seasons, you should control indoor conditions to prevent paint from cracking, peeling, or blistering.
Maintaining consistent humidity (ideally 30–50%) and avoiding rapid temperature changes during and after painting helps coatings cure properly and stay flexible.
Use humidifiers, dehumidifiers, and HVAC scheduling, ventilate during drying, and delay exterior painting in extreme heat, cold, or wet weather to guarantee lasting results.
Common Mistakes That Make Cracking Worse
If you paint over damp or unprepared surfaces, the new coat won’t adhere and will crack sooner.
Don’t skip primer or mix incompatible products, and avoid applying paint too thickly or working in extreme temperatures.
Using low-quality materials to save money usually just costs you more in repairs.
Painting over damp or unprepared surfaces
Because moisture and loose debris stop paint from bonding properly, painting over damp or unprepared surfaces almost guarantees cracking and peeling soon after.
You should always dry, clean, and repair walls before painting. Remove mold, salt deposits, loose flakes, and dust; patch gaps and sand rough spots.
Skip painting until surfaces are sound, or your finish will fail prematurely.
Skipping primer or using incompatible products
Although it might seem like an extra step, skipping primer or mixing incompatible products almost always weakens paint adhesion and speeds cracking.
You’ll notice poor coverage, peeling, and hairline fractures sooner when oil-based and water-based products meet or when bare drywall isn’t primed.
Always match product types and use a recommended primer for the surface to guarantee a durable, crack-resistant finish.
Applying paint too thickly or in extreme temperatures
When you load on paint too thickly or work in temperatures outside the product’s recommended range, the coating can skin over while the underlying layers stay wet and later crack as they dry and shrink.
You should apply thin, even coats and follow manufacturer temperature and humidity guidelines.
Wait proper drying times between coats to prevent trapped moisture and subsequent cracking.
Using low-quality materials to cut costs
If you skimp on primers, cheap paints, or low-grade brushes and rollers, you’re inviting premature cracking.
You’ll save upfront but lose longevity: inferior paint films lack flexibility, adhesion, and UV resistance.
Poor primers won’t seal substrates, and bad tools create uneven film thickness.
Invest in quality primer, paint, and applicators to guarantee proper bonding, uniform coverage, and reduced risk of hairline and alligator cracks.
Comparative Guide Products and Materials That Reduce Cracking
You’ll want to pick primers carefully—oil-based for stain blocking, latex for ease and breathability, or bonding primers for slick surfaces.
Compare paint formulations too: acrylics resist cracking and UV, alkyds level well but can yellow, and elastomeric coatings bridge hairline cracks.
For joints and flexible areas, use flexible sealants and fillers to absorb movement before painting.
Primers compared: oil-based vs latex vs bonding primers
Although primers all aim to promote adhesion and block stains, they do very different jobs depending on their chemistry: oil-based primers excel at sealing porous surfaces and tannin bleed, latex primers dry faster and flex with substrates, and bonding primers are formulated to stick to slick or glossy materials where ordinary primers fail. Choose based on substrate, drying time, flexibility, and stain blocking.
| Primer type | Best use |
|---|---|
| Oil-based | Wood, tannin |
| Latex | Drywall, flexible |
| Bonding | Glossy, slick surfaces |
| Notes | Match to substrate characteristics |
Paint formulations: acrylic vs alkyd vs elastomeric coatings
Having picked a primer that suits your substrate, look next at the paint itself—its base chemistry dictates flexibility, adhesion, and resistance to cracking.
Acrylics cure flexible, resist UV and moisture, and suit most interiors/exteriors.
Alkyds level well and harden tougher but can become brittle and yellow over time.
Elastomeric coatings stretch across hairline movement, ideal for masonry and exterior surfaces prone to substrate movement.
Sealants and flexible fillers for crack-prone areas
When you’re dealing with recurring hairline cracks or wider gaps, choosing the right sealant or flexible filler can make the difference between a temporary patch and a lasting repair.
Use silicone or polyurethane for movement-prone joints, acrylic-latex for paintable interior repairs, and elastomeric caulk where substrate movement is heavy.
Prep surfaces, follow cure times, and match flexibility ratings to expected expansion and contraction.
Case Scenarios and Solutions
You’ll see different cracking patterns depending on the room and material, and you’ll want specific fixes for each.
For high-moisture areas like bathrooms and kitchens, I’ll give a clear step-by-step repair and moisture-control checklist; for exterior walls, we’ll cover materials and methods that handle temperature cycles; and for historic plaster, I’ll outline conservation-friendly approaches.
Use these scenario-based solutions to pick the right repair and prevent recurrence.
Cracking in high-moisture rooms (bathroom, kitchen): step-by-step fix
Because moisture and steam repeatedly hit paint in bathrooms and kitchens, cracks often start along seams, corners, and near fixtures.
You can fix them reliably by diagnosing the cause, reducing humidity, and using appropriate materials in a step-by-step repair.
Identify leaks, run ventilation, remove loose paint, dry surfaces, apply mold-resistant primer, fill with flexible caulk or patching compound, sand, and repaint with mildew-resistant paint.
Exterior wall cracking due to temperature cycles: materials and methods
If exterior paint keeps cracking as temperatures swing, diagnose whether thermal expansion, substrate movement, or incompatible materials are to blame before you start repairs; each cause calls for different materials and methods.
Use flexible acrylic elastomeric coatings for large temperature swings, high-quality exterior primers for unstable substrates, and compatible paint systems to prevent delamination.
Seal joints with backer rod and silicone to accommodate movement.
Historic plaster walls: conservation-friendly approaches
When you’re dealing with historic plaster, start by evaluating original materials, previous repairs, and the building’s moisture and structural history so your interventions respect the fabric and are reversible where possible.
Then use breathable lime-based mortars and compatible paints. Stabilize loose sections with discreet mechanical fixes, and address moisture sources first.
Document all work, and consult a conservator for significant structural or decorative finishes to avoid irreversible damage.
Tools, Materials, and Cost Estimates
You’ll want a compact kit—putty knife, sandpaper, primer, paint, brushes/rollers, and patching compound—ready before you start.
Estimate materials and time: small touch-ups take an hour and under $20, medium repairs a few hours and $50–$150, and large jobs may take days and several hundred dollars.
Consider hiring a pro when repairs need structural fixes, extensive prep, or you value guaranteed results and faster turnaround.
Essential tools list for DIY repair
Before you start scraping or patching, gather a compact kit of reliable tools and materials so the job goes smoothly and costs stay predictable.
You’ll need basics to prep, repair, and finish. Prioritize quality over quantity and keep extras for touchups.
- Sandpaper (various grits), putty knife
- Joint compound or spackling, patching mesh
- Primer, matching paint
- Brushes, rollers, drop cloths, tape
Typical material costs and time estimates for small, medium, large jobs
Now that you’ve gathered the basic kit, estimate what the repair will cost and how long it’ll take based on the job size.
Small: patching a single wall—$15–$50, 1–3 hours.
Medium: one room—$50–$150, half to full day.
Large: multiple rooms or ceilings—$150–$500+, one to several days.
Include primer, paint, sandpaper, filler, and drying time.
When professional services are cost-effective
If the crack runs across several walls, up on the ceiling, or through plaster and lath, hiring a pro often saves you time and prevents costly mistakes.
You should hire professionals when structural damage, mold, or hidden moisture exists, or when job scale demands scaffolding and specialty tools.
Expect labor, removal, and patching costs; get multiple quotes and a clear warranty before committing.
FAQ Quick Answers to Common Questions
You’ll get quick, practical answers to whether repainting stops cracks for good and how long to wait between primer and topcoat.
You’ll learn if humidity alone can cause cracking, how alligatoring differs from flaking, and how to tell cosmetic cracks from structural problems.
If you have a specific example or photo, mention it so we can give a more precise recommendation.
Will repainting over cracked paint fix the problem permanently?
Because repainting only covers symptoms, it won’t permanently fix cracked paint unless you address the underlying cause first.
You can temporarily improve appearance, but cracks will reappear if moisture, poor adhesion, structural movement, or improper prep remain.
Diagnose and repair the source, remove loose paint, sand, prime appropriately, then repaint.
That sequence delivers a durable finish rather than a short-term cosmetic fix.
How long should I wait between primer and topcoat?
After you’ve fixed the root cause and applied primer, wait for the primer to fully dry and cure before putting on the topcoat.
Check the primer label for recommended dry and recoat times—typically 2–24 hours for touch-dry, 24–48 hours to cure. Longer waits help adhesion.
If in doubt, do a light sanding and wipe before painting to guarantee a smooth, bonded finish.
Can humidity alone cause paint to crack?
Could humidity by itself make paint crack? Yes, high or fluctuating humidity can stress drying paint, trapping moisture and weakening adhesion so cracking can occur—especially with slow-drying oil or latex in poorly ventilated rooms.
Humidity alone helps, but it’s usually one factor among others like surface prep, incompatible layers, or temperature swings.
Control moisture, ventilate, and use appropriate products to prevent problems.
Is alligatoring the same as flaking?
Wondering if alligatoring and flaking are the same?
They’re related but different: alligatoring shows a network of cracks resembling reptile skin caused by incompatible or aging paint layers, while flaking is loose paint peeling off surfaces.
You’ll treat them differently—fix alligatoring by removing unstable layers and priming, and address flaking by scraping, sanding, and ensuring proper adhesion before repainting.
How can I tell if cracking is a cosmetic issue or a structural concern?
How do you know whether a crack is just cosmetic or a sign of a structural problem?
Look at size, pattern, and movement: hairline or crazing is usually cosmetic; wide, stair-step, or horizontal cracks, especially near doors, windows, or foundation, suggest structure.
Measure changes over weeks, tap for hollow sounds, and consult a structural engineer if cracks widen, leak, or accompany sagging floors or misaligned doors.