How to Stop Floor Paint From Peeling Before It Gets Worse
If your floor paint’s peeling, act fast: clear the area, scrape and vacuum up all loose flakes, then degrease and dry the surface thoroughly. Press down any lifting edges, sand feathered areas, fill cracks, and prime bare spots before spot-painting with thin, even coats. Control moisture and avoid heavy traffic until paint cures. Use proper tools and PPE to prevent further damage, and keep following this guide for step-by-step fixes and long-term prevention.
How to Stop Floor Paint from Peeling Before It Gets Worse
If you spot peeling, act fast: remove loose flakes, clean the area, and apply a temporary seal to stop further lift.
Check whether the damage is surface-only or widespread so you can decide if it’s a quick DIY fix or needs a pro.
If moisture, structural issues, or large sections are involved, call a professional before it gets worse.
Quick Answer Immediate Actions to Stop Peeling Now
Act fast: clear the area, remove loose flakes with a stiff broom or putty knife, and sweep or vacuum up dust so the surface won’t grit underfoot or interfere with any quick fixes.
Spot-prime bare wood or concrete, press down edges, and apply a quick-dry patch or floor paint touch-up. Keep traffic off until cured.
This is how to stop floor paint from peeling now.
When to Call a Professional vs. DIY
Wondering whether you can fix peeling floor paint yourself or should call a pro?
If damage is minor—small chips, flaking in isolated areas—you can sand, clean, prime, and repaint.
Call a professional when peeling is widespread, underlying moisture or structural issues exist, or you lack tools/experience for proper surface prep.
Pros diagnose hidden causes and guarantee durable, code-compliant repairs.
Understanding Floor Paint Peeling
You’ll spot peeling as flaking, bubbling, or large sheets of paint lifting from the surface. It usually happens because of moisture, poor adhesion, heavy wear, or improper prep, and each problem needs a different fix.
Also note that concrete, wood, vinyl, and laminate all react differently to paint, so the cause and solution can vary by floor type.
What Floor Paint Peeling Looks Like
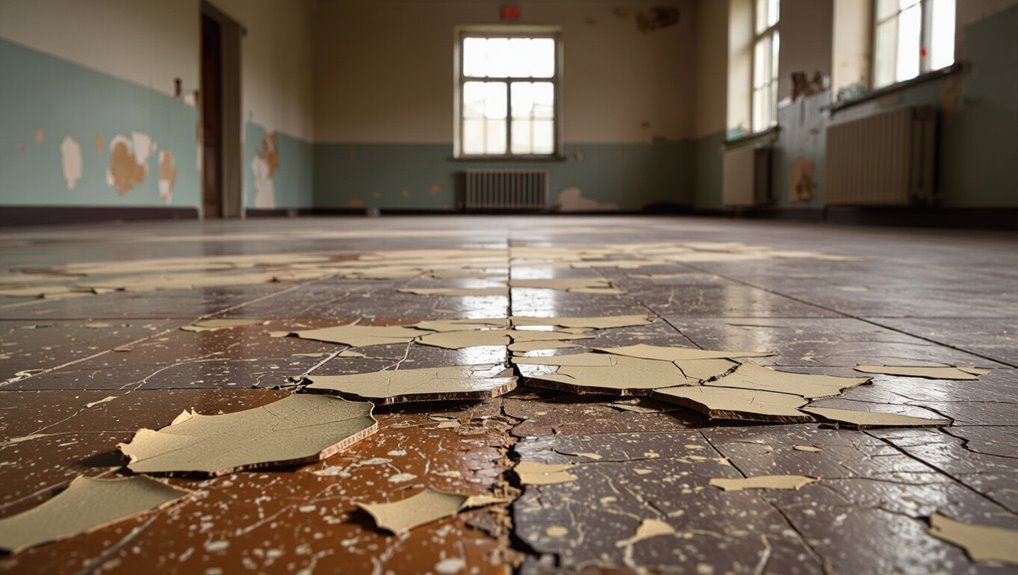
Peeling floor paint shows up in a few clear ways that you’ll notice quickly: flaking chips, brittle cracks, or large sheets lifting away from the substrate.
You’ll also spot bubbling or blistering where paint separates from the surface, rough edges that catch your shoe, and exposed bare spots revealing the original floor.
Colors may fade unevenly and texture will feel inconsistent underfoot.
Common Causes of Peeling (Moisture, Adhesion, Wear, Wrong Prep)
Those visual clues usually point to underlying problems, and understanding the common causes will help you fix them for good.
- Moisture: damp floors or leaks lift paint and cause bubbling.
- Adhesion: incompatible paint or glossy surfaces prevent bonding.
- Wear: heavy traffic abrades thin coats over time.
- Wrong prep: poor cleaning, no primer, or inadequate sanding lead to failure.
How Different Floor Types Affect Peeling (Concrete, Wood, Vinyl, Laminate)
Because floor materials vary so much in porosity, texture, and flexibility, the way paint fails on them also differs.
On concrete, moisture and alkali push paint up; you’ll need etching and moisture barriers.
Wood expands and contracts, so flexible primers and proper sealing matter.
Vinyl and laminate resist adhesion—use specialty primers or avoid painting, or expect rapid peeling without proper surface prep.
Assessing the Damage Inspect Before You Fix
Before you start repairs, you’ll want to inspect the floor with basic tools—a scraper, putty knife, wire brush, flashlight, and a simple checklist to note loose paint, bubbles, and bare spots.
Decide whether the problem is a small spot, a patchable area, or needs a full repaint based on how widespread and deep the peeling is.
Also check safety: test for lead if the paint is old, guarantee good ventilation, and address slip hazards before you work.
How to Inspect: Tools and Checklist
A quick, systematic inspection lets you judge peeling severity and decide what fixes you’ll need.
You’ll want basic tools and a focused checklist to evaluate adhesion, moisture, and surface condition before repairs.
- Scraper, wire brush, sandpaper
- Moisture meter or simple damp test
- Cleaning supplies (degreaser, rags)
- Safety gear (gloves, mask, knee pads)
Determining the Extent: Spot, Patch, or Full Repaint
When you’ve finished your inspection, decide whether you need a spot, patch, or full repaint by matching the repair scope to the damage: treat isolated chips or small flakes with spot fixes, handle larger affected areas with patching that blends into surrounding paint, and reserve a full repaint for widespread peeling, soft substrate, or recurring moisture problems.
| Scope | When to choose |
|---|---|
| Spot | Small chips, isolated flakes |
| Patch | Multiple adjacent areas |
Safety Considerations (Lead, Ventilation, Slip Hazards)
Someone on your crew—or you—should confirm safety risks before touching any peeling floor paint.
Test for lead if the home predates 1978; hire a pro if positive.
Guarantee fresh-air ventilation and use respirators when sanding or stripping.
Keep the area dry and mark slippery spots; wear non-slip shoes and slip-resistant mats.
Dispose of debris per local hazardous-waste rules.
Step-by-Step Repair Plan
Now you’ll follow a clear repair plan that walks you through preparing the area, removing loose paint, and fixing any underlying causes like moisture or subfloor damage.
Next you’ll prep the surface—degrease, etch concrete, fill cracks, and prime—so new coatings will stick.
Finally, pick the right primer and floor paint for your floor type and apply per the product instructions.
Step 1 Prepare the Area (Clear, Clean, Protect)
Start by clearing the area so you can see and reach every painted surface that needs attention.
Remove furniture and sweep debris.
Degrease with a mild cleaner, rinse, and let dry.
Protect adjacent surfaces and vents with tape and drop cloths.
Wear gloves and a mask.
- Remove items
- Sweep and vacuum
- Degrease and dry
- Tape and cover
Step 2 Remove Loose and Flaking Paint (Methods: Scraping, Sanding, Chemical Strippers)
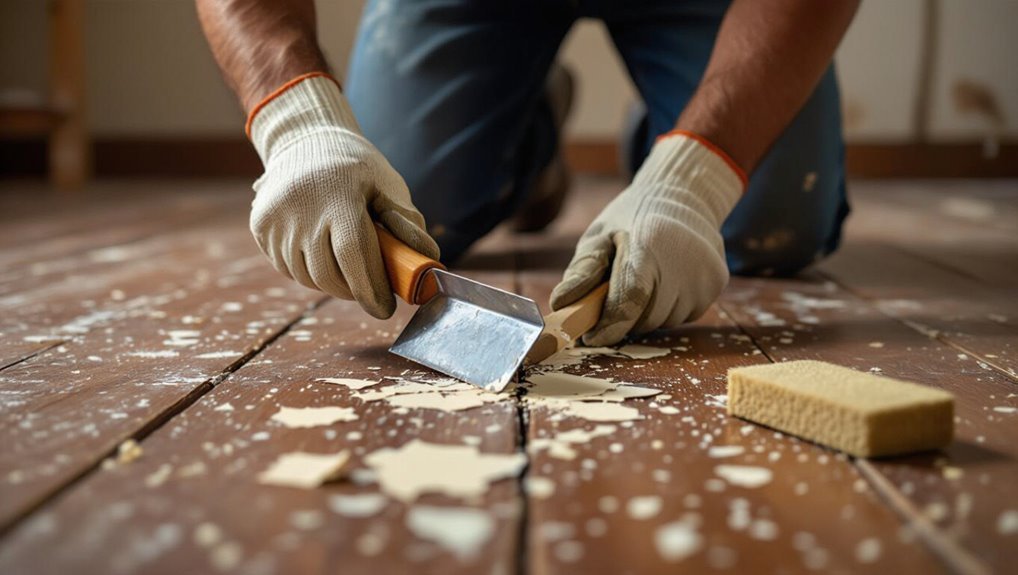
Scrape and sand away all loose, flaking paint so you’re left with a solid, feathered edge where old paint meets sound substrate.
Use the method suited to the surface and paint type, protect yourself, and remove dust before priming.
- Scraping: sharp blade, steady angle.
- Sanding: start coarse, finish fine.
- Chemical stripper: follow instructions, ventilate.
- Clean up debris thoroughly.
Step 3 Address Underlying Causes (Fix Moisture, Repair Subfloor, Improve Drainage)
With loose paint removed and the surface clean, you’ll need to fix whatever caused the failure so new paint can hold: identify moisture sources, repair any damaged subflooring, and improve drainage or ventilation as needed.
Check for leaks, rising damp, or condensation.
Replace rotted joists or plywood, add vapor barriers where appropriate, slope exterior grading away from foundation, and install or unclog gutters and vents.
Step 4 Surface Preparation (Degrease, Etch Concrete, Fill Cracks, Prime)
Prepare the floor by removing grease, etching the concrete, filling cracks, and priming so the new paint can bond properly.
You’ll clean thoroughly, use a concrete etcher or grinder, patch hairline and wider cracks with appropriate filler, then apply a compatible primer.
Follow cure times and keep dust-free before painting.
- Degrease
- Etch or grind
- Fill cracks
- Prime
Step 5 Choose the Right Paint and Primer for Your Floor Type
Paint selection matters: choose a primer and paint system formulated for your specific floor material—concrete, wood, metal, or epoxy-overlay—so the coatings will bond, resist wear, and handle the traffic and conditions the surface will face. Pick durable, solvent- or water-based products matched to substrate and exposure. Check adhesion ratings and abrasion resistance.
| Floor | Primer | Topcoat |
|---|---|---|
| Concrete | Masonry primer | Acrylic or epoxy |
| Wood | Oil-based | Polyurethane |
Step 6 Proper Application Techniques (Thin Coats, Drying Time, Temperature, RPM for Rollers)
Although proper surface prep matters, how you apply the coatings—thin, even coats, correct dry times, suitable temperature, and controlled roller speed—determines whether the paint will stick and last.
- Apply multiple thin coats, not one thick.
- Respect manufacturer dry times between coats.
- Work when temperature and humidity are within recommended ranges.
- Use slow, steady roller strokes (high RPM causes bubbles).
Step 7 Cure Time and Reintroducing Traffic
Once your final coat is applied correctly, let it cure fully before putting any weight or traffic back on the floor—this is when the coating gains its strength.
Follow manufacturer cure times (often 24–72 hours for light use, 7 days for full chemical and abrasion resistance).
Reintroduce foot traffic gradually, defer heavy equipment for the full cure, and keep humidity and temperature stable.
Quick Fixes and Temporary Stabilizers
If the damage is small or you need a fast solution, you can patch or spot-repair the peeling area instead of refinishing the whole floor.
Use quick-setting fillers, epoxy patch kits, or peel-stop primers to stabilize loose paint and prevent further lifting.
I’ll cover when a temporary fix is appropriate and which products and methods work best.
When a Patch or Spot Repair Is Acceptable
When you don’t have the time or budget for a full resurfacing, patching a small area or using a temporary stabilizer can buy you more life from your floor and prevent further peeling.
Use spot repairs when peeling is isolated, substrate is sound, and traffic is light.
Document affected areas, monitor regularly, and plan full repairs before deterioration spreads beyond the patched zone.
Products and Methods for Temporary Stabilization
Stabilize peeling floor paint quickly with the right temporary products and methods so you can slow deterioration until a full repair is practical.
Clean loose flakes, sand edges, then apply a clear acrylic sealer or epoxy patch to lock fragments.
Use painter’s tape and lightweight patching compound for edges.
For high-traffic areas, place anti-slip mats or temporary floor tape until permanent resurfacing.
Common Mistakes That Make Peeling Worse
Don’t skip proper surface prep or a primer, because paint won’t bond to dirt, grease, or loose flakes.
Don’t use the wrong floor paint or lay on coats too thick, and never paint over damp or contaminated surfaces.
Also don’t ignore the manufacturer’s drying and cure times, or your finish will fail sooner.
Skipping Surface Prep or Primer
If you skip prepping the floor or using a proper primer, the paint won’t bond and will start to lift or flake far sooner than you expect.
You’ll face adhesion failures from dust, grease, or old coatings. Clean, sand, etch, and apply the right primer for your surface so the paint adheres.
Skipping these steps guarantees premature peeling and extra repair work.
Using Wrong Paint or Applying Too Thick Coats
After prepping and priming properly, the next big mistakes are choosing the wrong paint or slathering on coats that are too thick—both cause poor bonding and trap solvents, which leads to bubbling and peeling.
Use floor-specific, oil- or epoxy-based formulas for durability, follow manufacturer thinning and drying times, and apply thin, even coats with adequate cure time between layers to guarantee adhesion.
Painting Over Moisture or Contaminants
When you paint over damp concrete, oil, grease, or other contaminants, the new finish won’t bond and will lift or bubble as it cures.
You should clean surfaces thoroughly, use degreasers, etching solutions, or pressure washing, and allow moisture to fully evaporate.
Test for dampness with plastic sheets, and only apply primer and paint when the substrate is completely clean and dry.
Ignoring Manufacturer Drying and Cure Times
Because paint needs time to develop adhesion and hardness, rushing recoat or foot traffic schedules almost always leads to poor bonding and premature peeling.
Follow the manufacturer’s specified drying and cure times before recoating, sealing, or walking on the surface.
Temperatures, humidity, and ventilation affect cure; ignoring them voids warranties and shortens lifespan.
Wait fully, and you’ll prevent avoidable failure.
Prevention and Long-Term Best Practices
To keep paint from coming back up, you’ll need a simple routine of cleaning, touch-ups, and inspections.
Control moisture and maintain the subfloor, pick tougher coatings for high-traffic zones, and account for seasonal changes that affect adhesion.
Do these things consistently and you’ll extend the life of your floor finish.
Routine Maintenance to Prevent Repeeling
If you want your floor paint to last, stick to a simple maintenance routine that keeps surfaces clean, dry, and inspected for early damage.
You should remove grit, address spills quickly, and touch up chips before they spread. Follow these steps:
- Sweep or vacuum daily to prevent abrasion.
- Mop with mild cleaner weekly.
- Inspect monthly for chips or lifting.
- Spot-paint small damaged areas promptly.
Moisture Control and Subfloor Maintenance
Alongside daily cleaning and timely touch-ups, controlling moisture and caring for the subfloor will prevent many causes of paint failure.
You should inspect for leaks, improve ventilation, and use dehumidifiers where needed.
Fix plumbing and roof issues promptly, seal gaps to stop groundwater wicking, and replace or dry damaged subflooring.
Proper moisture management and structural repairs keep paint adhered and lasting.
Choosing Durable Coatings for High-Traffic Areas
When you expect heavy foot traffic, pick floor coatings rated for durability and abrasion resistance so paint won’t wear through quickly.
Look for high-solids epoxy or polyurethane floor paints, commercial-grade acrylics, or epoxy-polyaspartic hybrids, and check wear ratings, chemical resistance, and recommended traffic levels to match the room’s use.
Choose slip-resistant finishes, follow manufacturer prep and cure times, and favor warranties.
Seasonal and Environmental Considerations
Because temperature, humidity, and seasonal cycles all affect adhesion and cure, you should plan prep, application, and curing around your local climate to keep floor paint from peeling.
Work during moderate temperatures, avoid high humidity or freezing conditions, and allow extra drying time in damp seasons.
Use moisture barriers, dehumidifiers, and timed maintenance to prevent blisters, delamination, and premature wear.
Comparison: DIY vs. Professional Floor Painting
You’ll weigh cost, time, durability, and warranty when deciding between doing your own floor paint job or hiring a pro. Below is a quick comparison to help you spot the trade-offs at a glance:
| Factor | DIY | Professional |
|---|---|---|
| Cost | Lower upfront | Higher upfront |
| Time | Slower (on weekends) | Faster (contracted) |
Consider which trade-offs matter most so you can prevent peeling without wasting money or time.
Cost, Time, Durability, and Warranty Differences
If you’re weighing DIY against hiring pros, the differences in cost, time, durability, and warranty are what usually tip the scale.
DIY saves money upfront and fits your schedule, but takes longer and risks poorer adhesion.
Pros charge more, finish faster, use higher-grade products, and back work with warranties—reducing future peeling and repair costs.
Choose based on budget and risk tolerance.
Materials, Tools, and Product Recommendations
Before you start, make sure you’ve got the essential tools—scrapers, grinders or sanders, degreasers, brushes/rollers, and proper PPE—so prep and application go smoothly.
I’ll recommend primers, paints, and sealers suited to concrete, wood, and metal, and explain when epoxy, acrylic, or oil-based coatings are best. That way you can pick the right products and avoid common causes of peeling.
Essential Tools Checklist
A few right tools make preventing floor paint from peeling far easier, so gather quality materials and products before you begin.
You’ll need durable, compatible items to prep, repair, and finish surfaces correctly.
- Heavy-duty scraper and wire brush for loose paint and rust
- Orbital sander with dust collection
- Patch compound and putty knife
- High-grit sanding pads and tack cloth
Recommended Primers, Paints, and Sealers by Floor Type
When you choose primers, paints, and sealers that match your floor material—concrete, wood, or metal—you cut the risk of peeling and extend the finish’s life; pick products formulated for the substrate, the traffic level, and the environment (indoors vs. outdoors). Use moisture-blocking primer for concrete, oil-tolerant primer for wood, and rust-inhibiting primer for metal.
| Floor Type | Recommended Product |
|---|---|
| Concrete | Masonry primer + acrylic sealer |
| Wood | Oil-tolerant primer + polyurethane |
| Metal | Rust primer + enamel sealer |
When to Use Epoxy, Acrylic, or Oil-Based Coatings
Now that you’ve matched primers and sealers to your floor type, pick a topcoat that fits the substrate, traffic, and environment—epoxy, acrylic, and oil-based coatings each have clear strengths.
Use epoxy for high-traffic, chemical-prone garages and basements; acrylic for UV-exposed patios and quick recoats; oil-based for wood floors needing penetration and old enamel compatibility.
Follow manufacturer cure times and ventilation.
Troubleshooting Guide Problems After Repair
If new peeling appears after your repair, check likely causes like moisture, poor surface prep, or incompatible products and fix them promptly.
Look for blistering, bubbling, or discoloration to help diagnose whether the issue is trapped moisture, solvent reaction, or adhesion failure.
You can run simple adhesion tests—tape pulls, cross-hatch cuts, or small spot repairs—to confirm whether the paint is bonding properly.
New Peeling Appears Causes and Fixes
Although you followed the repair steps, new peeling can still show up — and usually for predictable reasons.
Check for trapped moisture, poor adhesion from insufficient sanding or wrong primer, and traffic before full cure.
Remove loose paint, dry the substrate, sand feathered edges, apply correct primer and paint, and allow proper cure time.
Monitor humidity and limit traffic until fully set.
Blistering, Bubbling, or Discoloration Diagnosis
After you’ve fixed peeling, watch for blistering, bubbling, or discoloration—these symptoms point to trapped moisture, chemical reactions, or heat issues that require a different approach.
Inspect for dampness beneath the coating, recent solvent spills, or high sun/heat exposure.
Pinpoint the cause before redoing the finish: dry thoroughly, neutralize contaminants, or reduce heat sources to prevent recurrence.
Adhesion Tests You Can Perform
When you’re ready to confirm the repair, run a few simple adhesion tests so you know the new coating’s bonding strength and whether further prep is needed.
Try a tape pull: press strong tape, pull sharply, check for lifting.
Do a cross-hatch cut with a utility blade, tape, then inspect squares for detachment.
For stubborn spots, perform a small weighted shear test.
FAQs Stopping Floor Paint from Peeling
You probably have a few quick questions before you start or after a repair, like how long to wait before walking on a new coat and whether you can paint over peeling areas.
You’ll also want to know if moisture always causes peeling on concrete, whether epoxy is the best pick for garage floors, and how often to recoat to prevent problems.
Keep reading for concise answers to each of these common concerns.
How long should I wait before walking on a newly painted floor?
How long should you wait before walking on a freshly painted floor?
Wait at least 24 hours for light foot traffic with quick-dry floor paint, but follow the manufacturer’s cure time.
For full cure and durability, avoid heavy traffic, furniture, or rugs for 72 hours to 7 days.
Keep the area ventilated and maintain steady, moderate temperature and humidity while the paint cures.
Can I paint over peeling paint without removing it?
Can you paint over peeling floor paint without removing it? You shouldn’t.
Painting over loose flakes won’t bond and will make peeling worse. Instead, scrape or sand to sound substrate, clean thoroughly, and repair cracks.
Prime bare spots with a suitable primer, then apply the floor paint. Proper prep guarantees adhesion, durability, and a professional-looking finish rather than temporary coverage.
Will moisture always cause paint to peel on concrete?
While moisture is a common cause of paint failure on concrete, it doesn’t always lead to peeling—what matters is the source, amount, and movement of that moisture.
You’ll see peeling when water pushes from below, stays trapped, or fluctuates. Surface dampness alone mightn’t damage well-prepared coatings.
Diagnose vapor drive, leaks, or capillary rise, then fix the specific moisture path before repainting.
Is epoxy the best option to prevent peeling in garages?
If you’ve ruled out moisture or fixed the source, epoxy coatings are one of the most durable options to prevent peeling in garages because they bond tightly to properly prepared concrete, resist abrasion, and block dirt and oil that undermine paint adhesion.
You should prep thoroughly—etch, repair, and prime—and choose a quality epoxy; application and surface prep matter more than product hype.
How often should I recoat a painted floor to avoid peeling?
Generally, you should plan to recoat a painted floor every 3–7 years to avoid peeling, though traffic, exposure, and coating type will push that timeframe shorter or longer.
Inspect annually for wear, chips, or dull spots. High-traffic or moisture-prone areas may need touch-ups or a full recoat every 1–2 years.
Clean, repair, and sand before recoating to guarantee adhesion.