How to Keep Paint From Peeling off Furniture for Years to Come
You can keep paint from peeling off furniture for years by prepping surfaces thoroughly, sanding and removing dust, and repairing gaps before you prime. Pick a primer and paint suited to the material—bonding primers for laminate, rust-blocking for metal—and apply thin, even coats with proper drying time and controlled temperature and humidity. Finish with a durable topcoat and gentle maintenance to catch chips early, and continue for more tips on techniques and troubleshooting.
Quick Answer How to Keep Paint from Peeling Off Furniture for Years
Use proper surface prep, a quality primer, and a durable topcoat to keep paint from peeling for years.
You’ll want this method for high-use pieces and any wood, metal, or laminate that accepts paint well.
If you’re using fragile finishes or specialty paints, choose compatible primers and topcoats before starting.
One-sentence summary of the most effective approach
If you want paint to stay put for years, clean and repair the surface, sand it smooth, apply a quality primer, then use a durable paint and finish coat, allowing proper drying between steps.
For how to keep paint from peeling off furniture, you’ll maximize adhesion by removing grease, fixing damage, deglossing, using compatible products, and sealing with a tough topcoat so wear and moisture don’t lift paint.
When to use this method (types of furniture and paint)
When you’re working on pieces that get regular handling or see moisture—like dining chairs, dressers, bathroom cabinets, or outdoor furniture—you should follow the full prep-prime-paint-topcoat routine because those conditions demand maximum adhesion and durability.
Use this method for worn or bare wood, laminate with bonding primer, and metal.
For low-traffic decorative items, lighter prep and quality paint may suffice.
Basic Understanding Why Paint Peels from Furniture
To stop paint from peeling, you need to know what causes it: moisture, adhesion failure, and plain wear.
Different materials—wood, metal, laminate, MDF—bond with paint differently, so prep and primers matter.
Also pick the right paint and finish (latex, oil-based, chalk paint, lacquer) because each has different durability and adhesion.
What causes paint to peel: moisture, adhesion failure, and wear
Start by recognizing that three main problems usually make paint peel from furniture: moisture getting into the wood or joints, poor adhesion between the paint and the surface, and simple wear from use.
You’ll notice swelling, blistering, or flaking when humidity or spills loosen paint.
Bad prep or incompatible coatings weaken the bond, and repeated contact, abrasion, or movement causes gradual surface breakdown.
How different surfaces and materials affect paint bond (wood, metal, laminate, MDF)
Different materials grip paint in different ways, so you’ll need to match your prep and products to the surface: solid wood soaks up primers and holds paint well if sanded and sealed.
Metal needs rust removal and a metal-specific primer to prevent flaking.
Laminate and melamine require roughening or a bonding primer because smooth, nonporous finishes repel paint.
MDF swells easily at cut edges and needs sealing to stop moisture-driven peeling.
Sand, clean, prime, and seal appropriately for lasting adhesion.
How paint types and finishes influence durability (latex, oil-based, chalk paint, lacquer)
Because the type of paint and its finish determine how well it bonds and wears, choosing the right system is as important as surface prep.
Latex resists cracking and cleans easily but needs good primers.
Oil-based bonds strongly and sands smooth, but yellows.
Chalk paint adheres without much prep yet chips more.
Lacquer dries hard and durable but needs proper application and ventilation.
Materials, Tools, and Products You Need
Before you start, gather the right surface-prep tools like sanders, scrapers, and cleaners so you can remove old finish and contaminants.
Pick primers, paints, and topcoats matched to your material, and consider adhesion promoters, sealers, or specialty products to stop peeling before it starts.
Don’t forget safety gear and a well-ventilated workspace to protect yourself and guarantee proper curing.
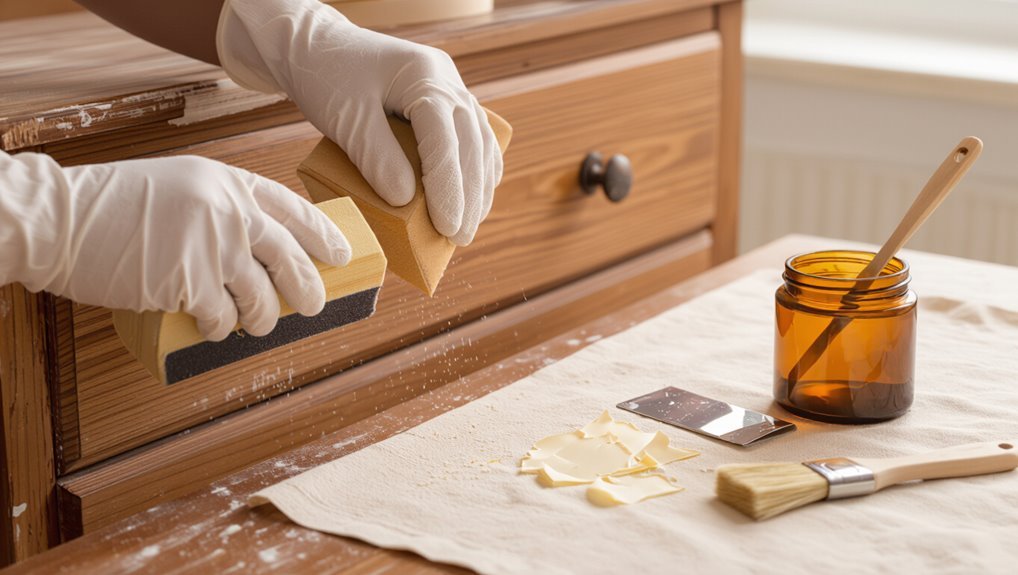
Surface-prep tools (sanders, scrapers, cleaners)
A few key tools will make surface prep fast and effective: sanders to smooth old finishes, scrapers to lift flaking paint, and cleaners to remove grease and dust so new paint can bond properly.
- Orbital sander — use 120–220 grit for smooth, even surfaces.
- Metal and plastic scrapers — pry off loose paint without gouging.
- Degreaser and tack cloth — dissolve oils, then remove residue and dust.
Primers, paints, and topcoats recommended by surface type
When you’re matching coatings to different furniture materials, choose primers, paints, and topcoats designed for each substrate so adhesion and durability aren’t left to chance.
Use these combos:
- Bare wood: oil- or shellac-based primer, latex or alkyd paint, polyurethane topcoat.
- Laminate/Veneer: bonding primer, acrylic enamel, waterbased polyurethane.
- Metal: rust-inhibiting primer, enamel, clear lacquer or marine-grade topcoat.
Adhesion promoters, sealers, and specialty products to prevent peeling
One clear way to stop paint from peeling is to use adhesion promoters, sealers, and specialty products that match the surface and finish you’re targeting; these materials bridge gaps, block contaminants, and give paint a better bite so coatings stay put.
Use:
- Bonding primer for slick or previously finished pieces.
- Shellac or sanding sealer for tannin bleed and grain fill.
- Flexible sealers for joints and moving parts.
Safety equipment and workspace setup
Because paint fumes, dust, and solvents can harm your health and ruin nearby surfaces, set up a well-ventilated, organized workspace and wear the right PPE before you start; you’ll need a respirator with appropriate cartridges, safety goggles, nitrile gloves, and disposable coveralls.
Plus drop cloths, tack cloths, and ventilation like a fan or open windows to control airborne particles and spills.
- Clear, flat workbench
- Nearby trash/recycling
- Dedicated drying rack
Step-by-Step Process to Prevent Paint Peeling
Start by inspecting the furniture to spot peeling, loose finish, or hidden damage so you know exactly what to fix.
Then clean and degrease thoroughly, remove old paint safely (sanding or chemical strippers as needed), and repair cracks or holes.
Finish with progressive sanding to the right grits for a smooth, adhesive-friendly surface before priming and repainting.
Step 1 Inspecting and diagnosing the furniture surface
Before you touch sandpaper or primer, inspect the furniture closely to diagnose why the paint’s failing.
Check for flaking, bubbling, or soft spots, and note areas with moisture damage, previous coatings, or poor adhesion.
Tap and listen for hollow sections, pry a corner to test adhesion, and record findings so your repair plan targets underlying causes rather than just cosmetic touch-ups.
Step 2 Proper cleaning and de-greasing techniques
1. You’ll start by wiping dust with a dry cloth, then clean thoroughly using a mild detergent and warm water to remove dirt.
Degrease stubborn spots with mineral spirits or a dedicated degreaser, applied sparingly and wiped off.
Rinse with clean water, dry completely, and let the surface cure for several hours before priming or painting to guarantee adhesion.
Step 3 Removing old paint and loose finish safely (sanding vs chemical strippers)
When old paint is flaking or the finish is chalky, you’ll need to remove loose material so new coatings can grip properly; choose sanding for small, controlled areas—use progressively finer grit and a sanding block to avoid gouges.
For heavy buildup or intricate moulding, use a low-odor chemical stripper, wear gloves and respirator, test a small spot, then neutralize and clean before priming.
Step 4 Repairing surface damage, filling cracks and holes
If you want a smooth, long-lasting finish, start by fixing dents, gouges, and loose joints so new paint can adhere evenly.
Remove loose fibers, glue or clamp joints, and fill holes with a suitable wood filler or epoxy for structural gaps.
Let repairs cure fully, then trim and feather edges so primer and paint cover repairs uniformly without raised seams or voids.
Step 5 Sanding for optimal adhesion: grit progression and techniques
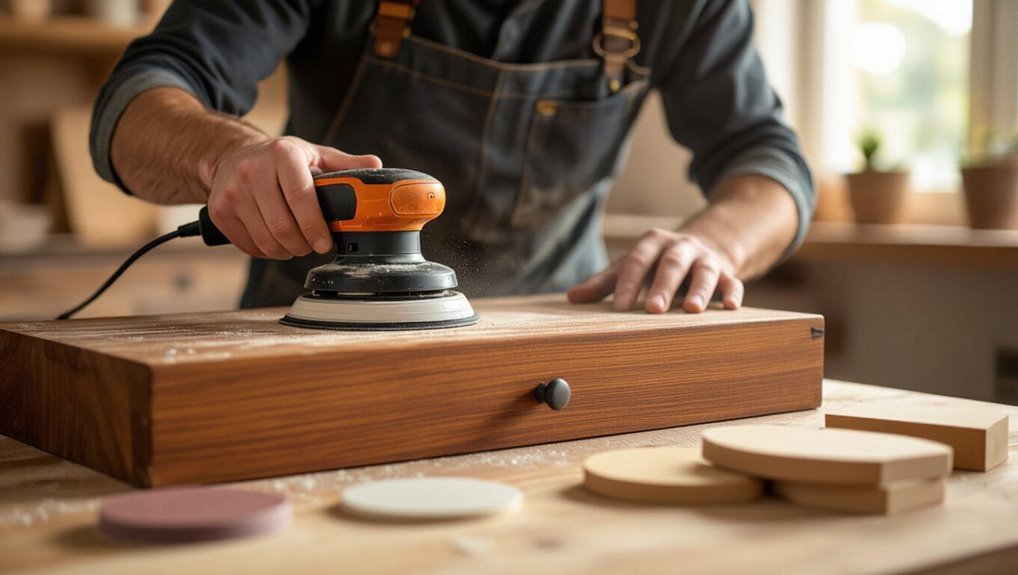
Begin by sanding the repaired areas and the surrounding surface to create a consistent profile that helps primer and paint grip. Start with a coarser grit to remove high spots and old finish, then work up through progressively finer grits to smooth scratches and feather edges for a seamless blend.
Sand with the grain, wipe dust between steps, and finish with a fine grit for ideal adhesion and even coverage.
Step 6 Choosing and applying the correct primer for your material
Now that your surface is smooth and dust-free, pick a primer that matches both the material and the paint you’ll use—wood, metal, laminate, and previously painted surfaces each need different formulations.
Apply thin, even coats, sanding lightly between coats if instructed. Use primers for stain blocking or adhesion as needed, follow drying times, and guarantee full cure before painting to prevent peeling.
Step 7 Selecting the right paint and application method (brush, roller, spray)
While your primer’s cured, pick a paint formulation and application method that match the surface and use—latex or acrylic for flexible, indoor wood; oil-based for high-traffic or metal; and specialty paints for laminate.
Then choose brush, roller, or spray based on the size, detail, and desired finish. Test compatibility on a scrap, use thin, even coats, and keep tools clean to guarantee adhesion.
Step 8 Proper drying, curing times, and environmental controls (temperature, humidity)
After you’ve applied compatible paint in thin, even coats, give each layer the proper time to dry and fully cure before handling or recoating—rushing this step is the most common cause of future peeling.
Work within manufacturer temperature and humidity ranges, ventilate for solvent escape, and avoid extreme cold or damp.
Wait recommended cure times before light use; patience prevents adhesion failure.
Step 9 Applying durable topcoats and sealers for long-term protection
Seal the work with a durable topcoat to lock in adhesion and shield paint from wear, moisture, and UV damage.
Choose a compatible sealer—polyurethane, water-based acrylic, or marine varnish—matching finish and exposure.
Apply thin, even coats with a high-quality brush or foam applicator, sanding lightly between coats.
Allow full cure before use to guarantee long-term protection and flexibility.
Step 10 Final inspection and touch-up routine
When you finish the final coats, do a careful inspection to catch any thin spots, drips, or areas where adhesion might fail later.
Run your hand lightly to feel for texture differences, use a bright light for missed spots, sand and recoat small flaws, and clean edges.
Note touch-up locations, let cures complete, then revisit after a week for any final repairs.
Common Situations and Best Approaches (Scenario-based)
You’ll encounter different challenges depending on the piece—dining sets need durable finishes, kitchen cabinets require grease- and moisture-resistant prep, and metal furniture demands rust treatment for good adhesion.
For laminate or veneer, use bonding primers and proper sanding, while outdoor pieces benefit from weatherproof paints and a regular maintenance schedule.
Follow the specific prep and finish recommendations for each scenario to stop peeling before it starts.
Painted wooden dining tables and chairs: durability strategies
Protect your painted dining table and chairs by focusing on the stress points where wear and moisture cause the finish to fail: edges, chair seats, table tops, and joints.
Sand lightly, clean thoroughly, and use a high-quality primer. Apply durable enamel or satin acrylic and thin protective topcoats.
Reinforce joints with glue or screws, add felt pads under legs, and wipe spills immediately to prevent peeling.
Kitchen cabinets exposed to grease and moisture: specialized prep and finishes
Because kitchen cabinets face constant heat, grease, and steam, they’ll need specialized prep and finishes to keep paint from peeling.
You should degrease thoroughly, sand lightly, and use a high-adhesion primer formulated for kitchens.
Finish with a durable, water-resistant topcoat like polyurethane or moisture-cured enamel.
Allow proper curing time, ventilate during application, and clean gently to preserve the coating.
Metal furniture prone to rust: rust treatment + adhesion tips
When metal furniture shows rust, deal with it promptly so paint can bond and last; chip loose scale, sand to bright metal, then use a rust converter on stubborn spots.
Clean thoroughly, degloss, and apply a metal primer designed for corrosion resistance.
Use high-build enamel or epoxy topcoats and follow manufacturer cure times to guarantee adhesion and long-term protection.
Laminate and veneer surfaces: bonding solutions and primers
If you’re refinishing laminate or veneer furniture, know that these slick, low-porosity surfaces need special prep and the right primers so paint will stick and stay put.
Sand lightly, wipe degreaser, and use a bonding primer or adhesion-promoting primer formulated for laminate.
For damaged veneer, glue loose edges and clamp before priming.
Apply thin, even coats and follow manufacturer cure times for lasting adhesion.
Outdoor furniture: weatherproof paints and maintenance schedule
Moving from indoor laminates to outdoor pieces means you’re dealing with UV, moisture, and temperature swings that can wreck paint if you don’t choose the right products and schedule maintenance.
Use exterior-grade primers and 100% acrylic or oil-based weatherproof paints. Seal with UV-resistant clear coats, inspect seasonally, touch up chips immediately, clean annually, and store or cover during extreme weather to prevent peeling.
Comparison Best Products and Methods by Use Case
Now you’ll compare the best primers, finishes, and topcoats for different furniture uses so you can pick the right products.
I’ll contrast latex, oil-based, and bonding primers; matte, satin, semi-gloss, and gloss finishes; and polycrylic, polyurethane, and lacquer topcoats with practical pros and cons.
That way you can match durability and appearance to each project’s needs.
Primer comparison table: latex vs oil-based vs bonding primers
Choosing the right primer can make or break a furniture repainting project, so we’ll compare latex, oil-based, and bonding primers side-by-side to help you pick the best product and method for each use case. You’ll learn which sticks, blocks stains, and handles tricky surfaces.
| Primer type | Best use |
|---|---|
| Latex | Quick, low-odor projects |
| Oil-based | Stain blocking, raw wood |
| Bonding | Smooth adhesion to slick finishes |
Paint finish durability: matte vs satin vs semi-gloss vs gloss
When you pick a paint finish for furniture, you’re balancing look, durability, and maintenance—matte hides imperfections but scuffs easily, satin offers a soft sheen with better wear resistance, semi-gloss stands up well to cleaning and moisture, and gloss gives maximum durability and a shiny, hard surface. Choose based on use: low, moderate, high traffic, or wet areas.
| Finish | Durability | Best Use |
|---|---|---|
| Matte | Low | Decorative pieces |
| Satin | Medium | Dining chairs |
| Semi-gloss | High | Cabinets |
| Gloss | Very High | Trim, high-touch surfaces |
Topcoat options: polycrylic vs polyurethane vs lacquer (pros/cons)
Although they all protect painted furniture, polycrylic, polyurethane, and lacquer perform differently enough that your choice should match the piece’s use and the paint beneath it. You’ll pick polycrylic for water-based paints and light wear, oil-based polyurethane for durability and heat, lacquer for fast drying and smooth refinishing—each has scent, yellowing, and application trade-offs.
| Finish | Strength | Best use |
|---|---|---|
| Polycrylic | Low-medium | Light interiors |
| Polyurethane | High | Floors, tabletops |
| Lacquer | Medium | Fine furniture refinishing |
Common Mistakes That Cause Paint to Peel (and How to Avoid Them)
Don’t skip proper surface prep or you’ll be fighting adhesion from the start.
Make sure your primer and paint are compatible, paint in suitable temperature and humidity, and apply thin, even coats with adequate cure time.
Also inspect for substrate movement, moisture, or structural issues before you paint so you’re not treating symptoms instead of causes.
Skipping proper surface preparation
If you skip proper surface preparation, the new paint won’t bond and will start to lift or flake soon after you finish.
You need to clean grime, remove loose old paint, sand glossy surfaces, and fill dents or holes.
Wipe away dust, let surfaces fully dry, and tack-cloth before priming.
These steps create a stable base so paint adheres and lasts.
Using incompatible primer/paint combinations
One common cause of peeling is mixing primers and paints that don’t chemically match, so check labels before you start.
If you use an oil-based primer under a water-based paint (or vice versa), adhesion fails.
Match primer type to your topcoat, follow manufacturer recommendations, and test a small area.
When in doubt, use a universal bonding primer designed for mixed substrates.
Painting in poor conditions (high humidity, low temp)
Because paint cures through chemical reactions that depend on temperature and moisture, working in high humidity or cold conditions can stop it from drying properly and lead to peeling later.
You should wait for mild, dry weather or control the environment with heaters and dehumidifiers.
Check paint can recommendations for temperature range, and don’t paint when condensation forms on surfaces.
Applying coats too thick or not allowing sufficient cure time
Even with ideal temperature and humidity, you can still cause peeling by slathering on paint or rushing recoats.
Apply thin, even layers and follow manufacturer dry and cure times. Thick coats trap solvents, sag, and cure unevenly, weakening adhesion.
Wait the full recommended interval before sanding or topcoating, and test tackiness—patience prevents failures and keeps finishes durable.
Ignoring substrate movement, moisture sources, or structural issues
If you skip accounting for how the furniture moves, breathes, or leaks, paint will eventually crack and peel.
Check for loose joints, warped panels, or damp spots before painting. Fix structural issues, seal leaks, and allow wood to dry fully.
Use flexible primers and paints for pieces that expand and contract, and control humidity to prevent future movement-related failure.
Preventive Maintenance and Long-Term Care
Keep your painted furniture looking fresh by cleaning it regularly with gentle, nonabrasive products and a soft cloth.
Check pieces each season for small chips or lifting edges and make quick touch-ups to stop damage from spreading.
Plan a recoating schedule based on wear—spot-sand and touch up as needed, and fully refinish when multiple areas show wear or adhesion fails.
Routine cleaning and gentle products to extend paint life
Clean your painted furniture regularly with a soft microfiber cloth and mild cleaners to prevent grime from breaking down the finish.
Wipe spills immediately, avoid abrasive pads and ammonia-based sprays, and use diluted dish soap or a pH-neutral wood cleaner.
Test any product on an inconspicuous spot first.
Finish with occasional dry dusting and keep cleaners minimal to preserve paint longevity.
Seasonal checks and quick fixes for small chips or lifts
Because paint can loosen gradually, do a quick inspection at least once a season to catch small chips, lifts, or crunchy edges before they get worse.
Gently sand rough spots, clean dust, apply matching touch-up paint or thin primer where needed, and press lifted edges back with a small brush of adhesive.
Wipe excess, let cure, then monitor those repairs monthly.
Recoating schedule and when to fully refinish
Plan on re-coating most painted furniture every 3–7 years depending on use and exposure, and refinish only when wear, structural damage, or multiple failed repairs make touch-ups ineffective.
Check finish annually, sand and spot-prime chips promptly, and apply a thin topcoat to protect high-contact areas.
If paint flakes, joints loosen, or stains penetrate, strip and refinish for lasting results.
Troubleshooting What to Do If Paint Starts to Peel
If you spot peeling, first assess how widespread the damage to decide between a quick spot repair or a full strip and refinish.
You can do temporary patch fixes—sanding loose edges, filling chips, and touching up paint—to hold things together until you have time for a proper refinish.
If the peeling is extensive, recurring, or involves structural damage, call a professional to guarantee a long-lasting repair.
Assessing extent of failure: spot repair vs full strip
When you find peeling paint, start by deciding whether the damage is localized or widespread—this choice determines whether you can do a quick spot repair or need a full strip and repaint.
Inspect for soft wood, bubbling, or adhesive failure. If several panels, edges, or layers lift, plan a full strip.
If one small area lifts cleanly, a targeted repair may suffice.
Quick patch fixes that hold until a full refinish
Although a full refinish is usually best, you can stabilize peeling paint quickly to keep damage from spreading and keep the piece usable until you have time for proper work.
Gently sand loose edges, clean debris, apply a thin layer of wood filler or epoxy for gaps, sand smooth, prime exposed areas, and touch up with matching paint.
Lightly seal with a clear coat.
When to call a professional
You can handle many small peel problems yourself, but some situations call for a pro.
Call a professional if peeling is widespread, underlying wood is rotten, structural joints are compromised, or previous coatings hide damage.
Also hire help when you lack tools, time, or confidence for full stripping and refinishing.
A pro guarantees proper prep, durable adhesion, and a finished look that lasts.
FAQs Fast Answers to Common Questions
You’ll get quick, practical answers to common worries like how long to wait before using painted furniture and whether you can paint over peeling paint without stripping.
You’ll learn if chalk paint tends to peel and how to prevent it, which primers work best on greasy kitchen cabinets, and whether spray paint will hold up long-term.
Read on for clear, no-nonsense guidance you can use right away.
How long should I wait before using painted furniture?
A painted piece usually needs at least 24–72 hours before light use and up to 30 days for full cure, depending on the paint and finish you used.
For daily use, wait a week for enamel or latex to harden; oil-based and polyurethane finishes can need longer.
Test discreet areas, avoid heavy weight or abrasion until the surface feels fully set and resistant.
Can I paint over peeling paint without stripping?
Wondering if you can paint over peeling paint without stripping? You can in some cases: scrape loose flakes, sand edges smooth, clean grease and dust, and apply a quality primer designed for adhesion.
For extensive peeling or blistering, stripping and repairing is safer. Test a small area first.
Proper prep prevents re-peeling and gives a durable finish without full stripping in minor cases.
Is chalk paint prone to peeling, and how can I prevent it?
If your surface’s prep is poor or you skip a sealer, chalk paint can peel — but when you clean, sand, and seal properly, it’s surprisingly durable.
You should remove grease, scuff glossy finishes, fill cracks, and let surfaces dry.
Apply chalk paint in thin coats, cure fully, then protect with a wax or clear topcoat to resist wear and moisture.
What primer works best for greasy kitchen cabinets?
Which primer works best for greasy kitchen cabinets depends on how stubborn the grease is and the cabinet material, but you’ll usually want a bonding, stain-blocking primer formulated for high-adhesion and kitchen use.
Clean thoroughly with degreaser, sand lightly, then apply an oil-based or shellac-based primer for severe staining; water-based bonding primers work for mild residue.
Prime evenly and let cure before painting.
Can I use spray paint for furniture that needs long-term durability?
After you’ve prepped and primed greasy kitchen cabinets properly, you might be tempted to reach for spray paint for speed and a smooth finish—so can you rely on it for long-term durability?
Yes, if you choose high-quality enamel or acrylic spray, apply thin even coats, sand between coats, cure fully, and finish with a clear protective topcoat.
Avoid cheap cans and high-traffic abuse.
Visual Guide and Reference Resources
You’ll find before-and-after workflow photos and key technique visuals that show each step and the results to mimic.
Keep a quick cheat-sheet handy listing sanding grits, recommended primer types, and typical dry times for common finishes.
Use these visuals and the cheat-sheet together to shorten mistakes and get longer-lasting paint.
Before-and-after workflow photos and key technique visuals
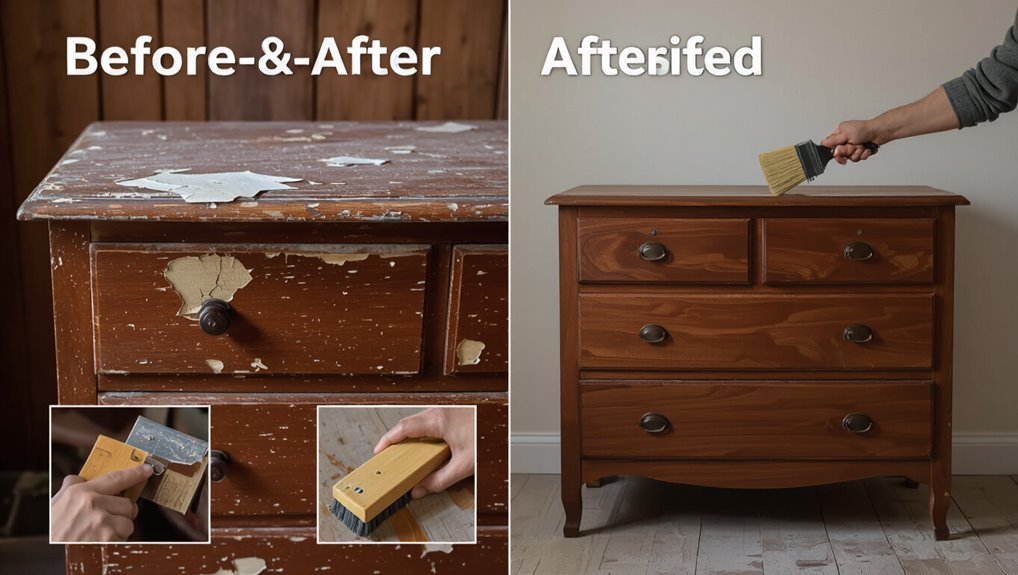
When you’re planning a paint project, before-and-after photos and clear technique visuals give you a reliable roadmap: they show the exact sequence of prep, application, and finish steps, highlight common problem spots (like edges and joints), and make it easy to compare results so you can replicate what works.
Use labeled step shots, close-ups of trouble areas, and short captions noting tools, pressure, and drying cues.
Quick cheat-sheet: sanding grits, primer types, and dry times
Because choosing the right grit, primer, and wait time makes the difference between a lasting finish and flaking paint, this quick cheat-sheet puts the essentials at your fingertips: recommended sandpaper grits for stripping and smoothing, primer types matched to material and paint, and realistic dry/recoat windows so you can plan each step without guessing.
- Stripping: 60–80; smoothing: 120–220.
- Primer: oil for bare wood/metal, bonding for glossy, shellac for stains.
- Dry/recoat: 1–2 hrs touch; 4–24 hrs full recoat; 48–72 hrs cure before heavy use.