How to Fix Chevy Peeling Paint the Right Way Without a Full Respray
You can fix Chevy peeling paint without a full respray by removing loose flakes, sanding to feather the edges, and treating any bare metal or rust with primer; then apply color‑matched touch‑up paint in thin layers, build it flush with the surrounding finish, and seal with clear coat for protection and shine. Use proper prep, a clean workspace, and safety gear. DIY spot repair saves time and money, and the steps below show how to get professional results.
Quick Answer Fixing Chevy Peeling Paint Without a Full Respray
You can often fix peeling Chevy paint without a full respray by spot-repairing with sanding, rust treatment, and touch-up primer and paint matched to your color.
Use a clear coat to blend and protect repaired areas, and consider a professional spot-blend for larger chips.
If rust has eaten through, panels are warped, or multiple large areas are failing, a full respray becomes unavoidable.
Short summary of the best non-respray options
When a Chevy’s clearcoat or paint starts to peel, you don’t always need a full respray; instead, you can stop further damage and restore appearance with targeted fixes like spot-sanding and blending, clearcoat-only refinishing, color-matched touch-up pens or sprays, and protective film or vinyl wraps.
To learn how to fix chevy peeling paint, pick the least invasive option, prep properly, and match colors precisely.
When a full respray is unavoidable
If spot repairs, clearcoat-only refinishes, or wraps can’t stop widespread peeling, a full respray becomes unavoidable.
You’ll need a thorough strip to bare metal or stable primer, corrosion repair, proper masking, and expert color matching.
Budget for labor, materials, and time; expect higher cost but lasting results.
Choose a reputable shop that guarantees adhesion and finish to prevent repeat failures.
Understanding Paint Peeling on Chevy Vehicles
You’ll recognize paint peeling by flaking, curling edges, or large patches where the clear shine is gone.
On Chevys, this often stems from clearcoat failure, factory prep or coating defects, prolonged UV exposure, or poor repairs.
Check whether the damage is only the outer clearcoat, the colored basecoat, or down to the primer/metal to decide how to fix it.
What paint peeling looks like
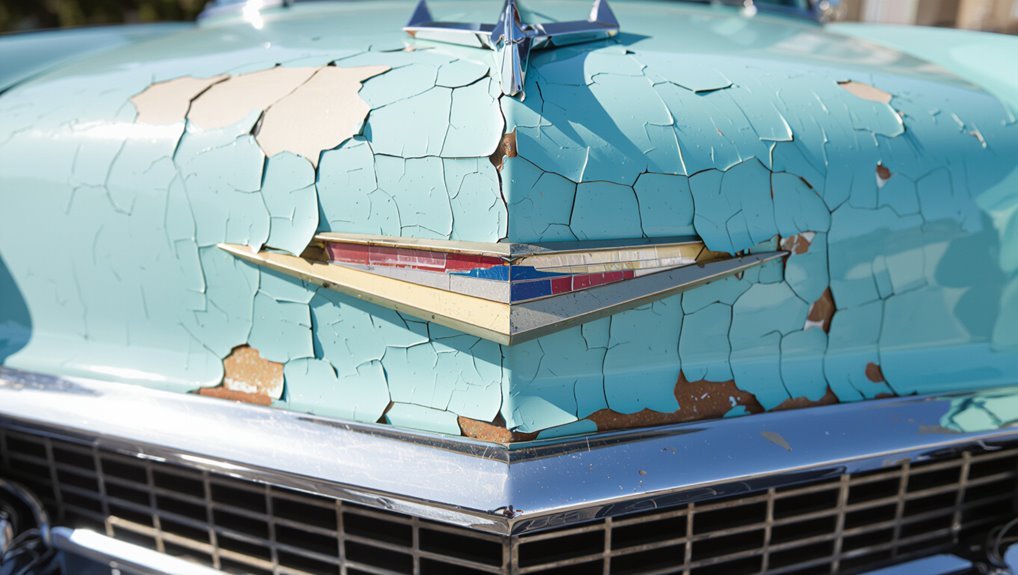
Paint peeling on a Chevy usually starts as small flakes or bubbles where the finish has lost adhesion.
You’ll notice edges lifting, clearcoat lifting away in patches, and exposed basecoat or primer.
Texture becomes rough; paint may crack into spiderweb patterns.
Colors dull where layers separate.
Touching affected areas can leave residue or powder.
You’ll spot irregular shapes spreading over time.
Common causes specific to Chevys (factory defects, clearcoat failure, UV, poor prep)
While several factors can make a Chevy’s finish fail, most peeling traces back to a few specific causes: factory defects in coating materials or application, clearcoat delamination, prolonged UV and environmental exposure, and inadequate surface preparation during repaints or repairs.
You’ll often see factory-applied thin or uneven clearcoats, sun-bleached panels, or repairs done without proper sanding, cleaning, or primer adhesion.
How to assess severity: surface peeling vs. clearcoat vs. basecoat
How do you tell whether peeling is just surface scuffs or something that needs serious work?
Inspect edges: if film lifts in thin flakes, it’s clearcoat failure.
Rub gently with fingernail — surface scuffs won’t catch.
If color flakes or bare metal shows, basecoat or primer is compromised.
Check rust, adhesion, and size: small clearcoat spots can be repaired; widespread basecoat damage needs professional attention.
Tools, Materials, and Safety You’ll Need
Before you start, gather the essential tools—sanding blocks, dual-action sander, masking tape, spray gun or touch-up brushes, and clean rags.
Pick recommended products like a degreasing cleaner, a range of sandpaper grits (320–2000), compatible primer, color-matched touch-up compounds, and a durable clearcoat.
Wear safety gear (respirator, gloves, eye protection) and set up a well-ventilated, dust-free workspace.
Essential tools list
Because prepping and repairing peeling paint demands care, you’ll want to gather the right tools, materials, and safety gear before you start.
You’ll need items for stripping, smoothing, masking, and protecting yourself. Keep everything organized and within reach.
- Sanding blocks, various grit sheets, and sanding sponges
- Masking tape, plastic sheeting, and clean microfiber cloths
- Respirator, nitrile gloves, and safety goggles
Recommended products (cleaners, sandpaper grits, primers, clearcoat, touch-up compounds)
1 clear, well-chosen product from each category will make a peeling-paint repair far easier and longer-lasting: a grease-cutting cleaner (like isopropyl alcohol or dedicated wax-and-grease remover), a progression of sandpapers from 320 to 2000 grit plus a 400–800 grit scuff pad, a high-build epoxy or self-etching primer, a compatible color-matched basecoat or touch-up compound, and a durable two-stage or single-stage clearcoat for protection.
| Category | Example |
|---|---|
| Cleaner | Isopropyl alcohol |
| Sandpaper | 320–2000 grit |
| Primer | High-build epoxy |
| Basecoat | Color-matched touch-up |
| Clearcoat | Two-stage durable |
Safety gear and workspace setup
Now that you’ve picked the right cleaners, sandpapers, primers, basecoat, and clearcoat, set up a safe, well-lit workspace and gear up properly—this will keep the repair tidy and protect you from fumes, dust, and stray particles.
Wear a respirator rated for solvents, chemical-resistant gloves, eye protection, and disposable coveralls. Ventilate the area, use drop cloths, keep a fire extinguisher nearby, and organize tools.
Step-by-Step Repair Methods
You’ll choose a method based on the damage size—spot repair for tiny chips, panel repair for localized peeling, and partial respray for larger areas.
Start by cleaning and inspecting the area, then sand away loose paint and feather the edges with progressively finer grits.
Treat any rust and apply primer before using color‑matched touch‑up paint for small chips or blending for larger repairs.
Method selection: when to use spot repair vs. panel repair vs. partial respray
How do you decide whether to do a spot repair, a full panel repair, or a partial respray?
You’ll choose spot repair for small chips or localized peeling with solid surrounding paint.
Use full panel repair when damage covers most of a panel or edges.
Opt for partial respray when blending’s needed across adjacent panels to match color and gloss seamlessly.
Step 1: Clean and inspect the damaged area
Start by removing loose paint, dirt, and wax so you can see the real extent of the damage; use a gentle car wash soap and a soft brush, then dry the area thoroughly.
Then inspect for rust, depth of peeling, and surrounding clearcoat damage so you know what to treat next.
- Check for rust spots
- Note paint lift size
- Photograph for reference
Step 2: Remove loose paint and feather edges (sanding technique, grits)
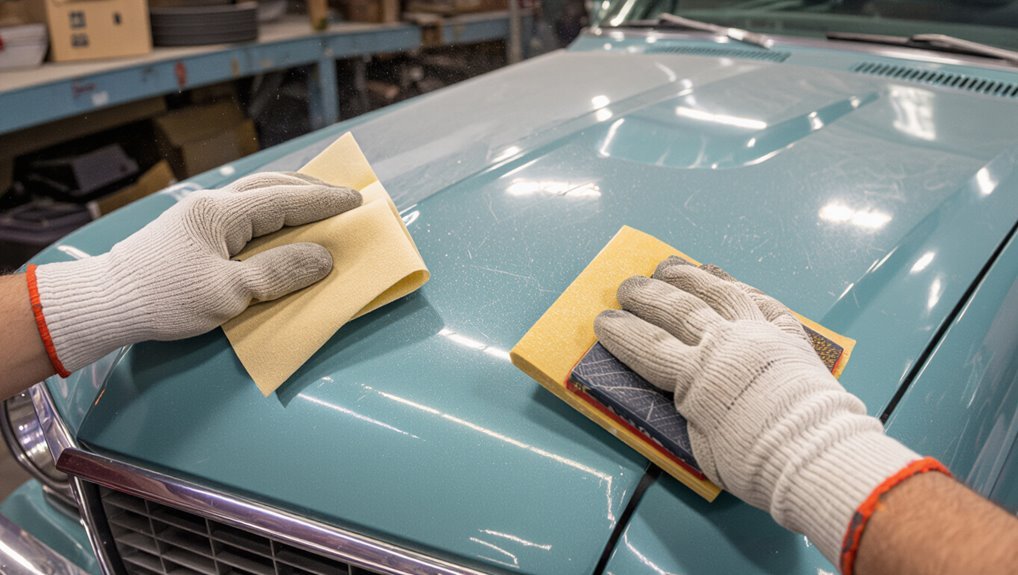
With the area cleaned and inspected, remove all loose paint and smooth the edges so new layers will bond properly.
Use a dual-action sander or sanding block, starting with 180–220 grit to knock off flaking paint, then feather changes with 320–400 grit for a smooth blend.
Keep strokes even, avoid gouging, and wipe dust away before proceeding to primer or filler.
Step 3: Treat underlying issues (rust conversion, primer application)
Once you’ve sanded back to solid metal and removed all loose material, treat any rust and apply primer so the repair won’t fail later.
Use a rust converter on pitted areas, clean thoroughly, and spot-prime with an adhesion-promoting primer. Follow with block-sanding between coats for smoothness.
- Neutralize rust
- Use epoxy/etch primer
- Sand primer smooth before paint
Step 4: Applying color-matched touch-up paint (technique for small chips)

Match the paint precisely and work carefully—use the vehicle’s paint code to get a color-correct touch-up bottle or pen. Shake it well, and test the color on a plastic card or hidden spot before you apply.
Clean the chip, apply thin layers, letting each dry. Build to level with surrounding paint, avoid overfilling, and finish with a tiny clear coat dot for protection and shine.
Step 5: Blending and feathering paint for larger areas (spray blending tips)
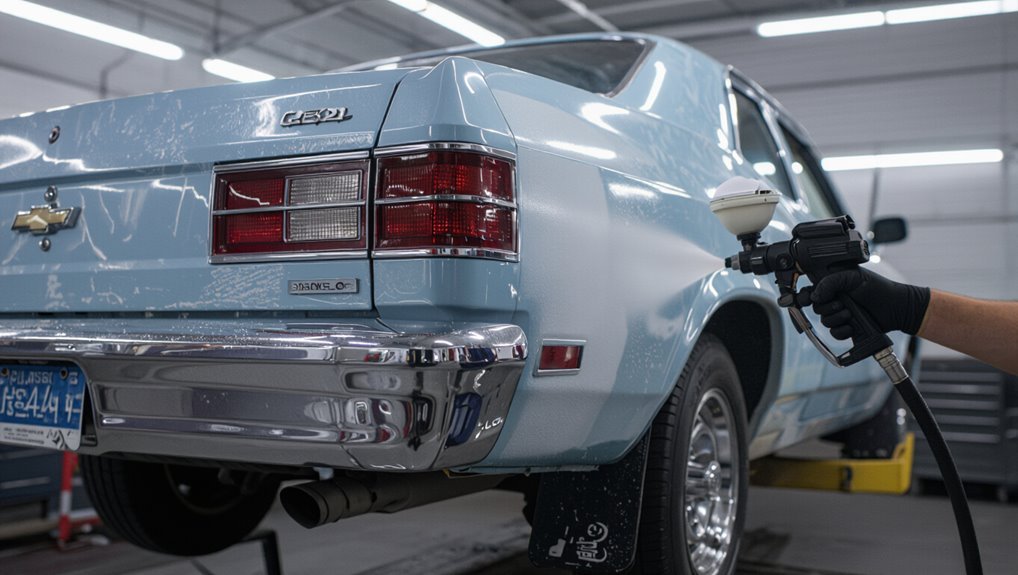
Because larger repaired areas need to flow into the factory finish, you’ll blend and feather the new spray paint outward so shifts disappear; keep your overlap narrow, use light even passes, and let thin coats build opacity.
Mask surrounding panels, sand blend edges with fine grit, maintain consistent distance, and feather into adjacent panels.
Check color under varied light and correct soft edges before clearcoat.
Step 6: Apply clearcoat and finish sanding/polish for seamless match
Begin by preparing the repaired area for clearcoat: clean the surface with a wax-and-grease remover, inspect for dust or orange peel, and tack-cloth any remaining particles so the finish lays down smooth.
Spray even, overlapping clearcoat passes, keep wet edges, and control flash times.
After curing, wet-sand high spots with fine grit, then polish the blend area to restore gloss and hide shifts.
Step 7: Final buffing, compound use, and protective waxing
Finish the repair by buffing, compounding, and sealing the area to blend it perfectly with the surrounding paint.
Use a dual-action polisher with a fine foam pad, working slowly to remove haze and minor orange peel.
Follow with a light polishing compound, then a quality synthetic wax or paint sealant.
Wipe residue, inspect in daylight, and reapply protection as needed for durability.
Quick Fixes and Temporary Solutions
You can use touch-up pens and DIY kits for small chips, but weigh their pros and cons—ease and cost versus color mismatch and durability.
Clear coat pens and spot sealants help protect repaired areas and slow peeling, though they’re not as durable as a full repaint.
Use these temporary fixes for minor blemishes or while you plan a proper repair, not as a long-term solution.
Touch-up pens and DIY kits pros and cons
One quick option is a touch-up pen or DIY kit, which can hide small chips and slow peeling without a trip to the body shop.
You’ll save money and fix minor blemishes fast, but color match may be imperfect, application needs steady hands, and durability’s limited.
Use them for small areas only; bigger damage needs professional repair for lasting results.
Clear coat pens and spot sealants
Clear coat pens and spot sealants give you a quick way to protect exposed paint and slow peeling before you get a proper repair.
You can apply them to small chips or lifted edges to seal moisture and reduce further lift. They’re easy to use, inexpensive, and temporary—just don’t expect color matching, durability, or a substitute for sanding, priming, and a professional finish.
When temporary fixes are acceptable
After sealing small chips with a clear coat pen, you might wonder when those quick fixes will do the job and when you’ll need a proper repair.
Use temporary fixes for isolated chips, short-term protection, or while saving for a respray.
Replace them if peeling spreads, primer is exposed, rust appears, or color mismatch becomes obvious—those mean a professional touch is necessary.
Comparison: DIY Repair vs. Professional Partial Repair vs. Full Respray
You’ll want to weigh cost, time, durability, color match, and warranty when choosing between DIY, a professional partial repair, or a full respray. Below is a quick comparison to help you decide at a glance.
| Option | What to expect |
|---|---|
| DIY | Low cost, quicker, less durable, color match may vary, no warranty |
| Professional / Full Respray | Higher cost, longer time, most durable, best color match, warranty included |
Cost, time, durability, color match, and warranty differences
When weighing DIY fixes, a professional partial repair, and a full respray, think regarding trade-offs:
DIY saves cash but takes your time and risks imperfect color and durability.
Partial shop repairs balance cost and quality for localized damage.
A full respray gives the best long-term finish and guaranteed color match at the highest price and downtime.
You’ll pay least DIY, moderate for shop, most for respray; warranties follow suit.
Common Mistakes to Avoid
Don’t skip removing loose paint and rust—you’ll just get lifting again.
Don’t over-sand or feather poorly, and don’t use the wrong color or sloppy blending.
Always use the right primer and clearcoat technique so the repair lasts.
Failing to remove all loose paint or rust
Start by scraping away every flake of loose paint and any rust you can see — leaving behind even small chips or scaled metal will let new paint lift and fail.
Use a wire brush and scraper, then treat bare metal with rust remover or converter.
Clean the area, dry it, and apply primer only to sound, clean surfaces so repairs bond and last.
Over-sanding or poor feathering
If you sand too aggressively or fail to feather the edges smoothly, you’ll create visible ridges and thin spots that show through the new coat and make adhesion uneven.
Work progressively with finer grits, blend changeover zones gently, and check contours frequently.
Stop when the surface is smooth and uniform; over-sanding weakens primer and paint, forcing repairs and visible imperfections later.
Mismatched paint and poor blending
Those sanding mistakes can leave you with uneven edges that make color differences worse, so you’ve got to pay attention to matching and blending next.
Use exact OEM color codes, test sprays, and a quality gun to replicate hue and metallic flake.
Blend gradually into surrounding panels, feather coats thinly, and compare under different light to avoid obvious shifts and patchy mismatches.
Skipping primer or improper clearcoat application
Because paint needs a foundation and a lock on top, skipping primer or botching the clearcoat ruins more jobs than bad color matching does.
You’ll get poor adhesion, visible feather lines, and early peeling without proper primer. Apply primer to bare metal or repaired areas, sand between coats, then spray even, full clearcoat layers.
Cure properly to protect finish and longevity.
Prevention and Best Practices to Stop Future Peeling
To keep peeling from coming back, you should stick to regular washing, waxing, and consider paint protection like ceramic coating or clear film.
Fix chips and stone damage as soon as you spot them so rust and lifting don’t start under the paint.
And for any repaired panels, follow a scheduled long-term maintenance plan so small issues don’t turn into big ones.
Regular washing, waxing, and paint protection options
Keep your Chevy’s finish healthy by making regular washing, timely waxing, and smart paint protection part of your routine.
Wash biweekly with pH-neutral soap, rinse thoroughly, and dry to avoid mineral spots.
Wax every three months or use a polymer sealant for longer protection.
Consider ceramic coating for durable defense or paint protection film on high-impact areas to reduce future peeling.
Addressing chips and stone damage early
Address chips and stone damage as soon as you spot them to prevent moisture and rust from undermining the surrounding paint.
Clean the area, remove loose debris, and apply touch-up paint or primer matched to your Chevy. Use clear coat or small resin repairs for protection.
Inspect high-impact zones frequently and apply rock-chip film on vulnerable edges to stop small dings becoming larger failures.
Long-term maintenance for repaired panels
While the immediate repair matters, long-term care prevents small fixes from failing again.
You should wash and wax regularly, inspect seams and edges every few months, and touch up chips promptly.
Keep drainage holes clear and avoid harsh chemicals or pressure washing near repaired areas.
Park in shade, use a cover when possible, and reapply protective coatings as they show wear to stop future peeling.
Cost Estimates and Timeframes
You’ll want to know what each repair will cost and how long it takes before you start.
DIY spot repairs typically run $20–$150 in materials and take a few hours to a day, while full DIY resprays can take a weekend or more.
Professional partial repairs usually cost $150–$800 with turnaround from a day to a week depending on severity and shop workload.
Typical DIY material costs and time per repair type
Expect to spend anywhere from $20 for a single small touch-up to $300+ for a full-panel DIY repaint, with most common repairs falling between $50–$150; below I’ll break down material lists, realistic time commitments, and cost-driving factors for each repair type so you can plan resources and schedule.
| Repair | Materials | Time |
|---|---|---|
| Small chip | Touch-up paint, primer | 30–60 min |
| Local peel | Sand, filler, spray | 2–4 hrs |
| Full panel | Primer, base, clear | 4–8 hrs |
Typical professional partial-repair costs and turnaround
For most partial repairs — small panels, door sections, or localized peel spots — professional shops usually charge between $150 and $800 depending on damage extent, color complexity, and whether blending is required.
Expect 1–3 days for simple spot repairs; 2–7 days if panel blending or multiple panels are involved.
Ask for written estimates, warranty details, and whether rental or drop-off timing affects turnaround.
When to Seek Professional Help
If the peeling covers multiple panels, exposes structural rust, or went deeper than the clear coat, you should consider professional help because those issues are hard to fix properly at home.
When you start calling shops, ask about experience with Chevys, whether they’ll address rust structurally or just cosmetically, turnaround time, and what warranty they offer.
Picking a shop that answers those questions clearly and puts a written warranty on repairs keeps you from wasting time and money.
Signs repair is beyond DIY (extent, structural rust, multiple panels)
When damage covers large areas, shows deep or bubbling rust, or affects structural panels like the rocker, floor, or strut towers, you’re best off hiring a pro—these problems usually need panel replacement, welding, or frame work that go beyond simple sanding and touch-up.
If paint failure spans multiple panels, exposes bare metal in seams, or returns after patching, don’t risk DIY—get expert assessment.
How to choose a reliable body shop (questions to ask, warranties)
Once you decide the damage is beyond DIY, choosing the right body shop becomes the next priority.
Ask about certifications, experience with Chevys, and whether they strip to bare metal.
Request before-and-after photos, written estimates, and color-matching methods.
Confirm warranty length and what’s covered, pickup/delivery options, and payment terms.
Trust shops with clear communication and written guarantees.
FAQ
You’ll have common questions about DIY fixes, color matching, and whether a touch-up will actually stop rust.
Expect differences in longevity between spot repairs and a full respray, and be careful when applying clearcoat over old, peeling layers.
Also check your Chevrolet warranty or contact a dealer to see if your paint issue is covered.
Can I fix Chevy peeling paint myself and get a perfect color match?
Curious if you can tackle peeling Chevy paint yourself and achieve a perfect color match? You can repair small areas yourself, but matching factory finish is tricky.
Use OEM color codes, quality primers, and proper blending techniques. Expect some trial, practice, and tools.
For larger panels or flawless results, a pro with spray booth and color-matching equipment gives the best chance of indistinguishable results.
How long will a spot repair last compared to a full respray?
If you decide to tackle a small spot yourself, know that a localized repair rarely matches the longevity of a proper full respray.
A quality spot repair can last several years if prepped and sealed well, but it’s more vulnerable to edge lifting, UV fade, and incomplete adhesion.
A full respray, professionally done, typically outlasts spot fixes by many years.
Will using a touch-up pen prevent rust?
Wondering whether that touch-up pen will stop rust in its tracks? A pen can seal small chips briefly and slow moisture exposure, but it’s not a long-term rust barrier on bare metal or under lifting paint.
For lasting protection you’ll need to remove rust, prime properly, and use matching paint. Pens are a temporary fix, not a substitute for proper repair.
Can I use automotive clearcoat over old peeling clearcoat?
Because clearcoat adhesion depends on a solid, clean substrate, you can’t just spray new clear over peeling clearcoat and expect a durable result.
You need to remove loose clear, sand glossy edges, feather into sound paint, clean thoroughly, and use appropriate primer or adhesion promoter.
Spot-spraying may work for small areas, but for reliable longevity you’ll often need proper prep or professional repair.
Does Chevrolet warranty peeling paint and how to check coverage?
How do you know whether Chevrolet will cover peeling paint under warranty?
Check your vehicle’s limited warranty and corrosion or paint sections—coverage varies by model year and region.
Contact your Chevy dealer with VIN, photos, and purchase date.
They’ll inspect and determine if defects or rock-chip exclusions apply.
If approved, dealer repairs or repainting may be authorized; otherwise you’ll pay.