Why Is My Primer Bubbling on the Wall? Causes and Fixes
If your primer is bubbling on the wall, it means the coating couldn’t bond or dry properly—usually due to moisture in the substrate, poor surface prep, trapped air from application, incompatible products, or bad temperature and humidity. Small isolated blisters are often cosmetic; widespread bubbling suggests moisture intrusion or substrate failure. You can test for dampness, remove loose primer, let surfaces dry, and re-prime with compatible products; keep going and you’ll find step‑by‑step fixes, causes, and prevention tips.
Quick Answer Why Your Primer Is Bubbling on the Wall
If your primer is bubbling, it’s usually caused by moisture in the wall, trapped solvent, poor adhesion, or painting over dirty or glossy surfaces.
You should treat small, isolated bubbles as mostly cosmetic—scrape, sand, spot-prime, and repaint—while widespread bubbling, soft spots, or continued blistering can signal moisture intrusion or substrate failure that needs repair.
Start by checking for leaks or dampness so you can decide whether a simple touch-up will do or if you need to fix the underlying problem.
Concise summary of most common causes
When primer bubbles on your wall, it’s usually from one of a few clear causes: moisture trapped in the substrate, poor surface prep (dust, grease, or peeling paint), incompatible or low-quality primer, or applying it over a damp or newly patched area.
You’re likely asking why is primer bubbling on wall — check moisture, cleanliness, primer compatibility, and cure time to pinpoint and fix it.
When bubbling is a cosmetic issue vs. structural concern
Now that you’ve checked moisture, surface prep, and primer choice, you can focus on whether the bubbling is merely cosmetic or signals a deeper problem.
Small, isolated bubbles that don’t span joints or plaster usually stay cosmetic—sand, re-prime, repaint.
If bubbles align with cracks, soft drywall, persistent moisture, or mold, treat it as structural: fix leaks, replace damaged substrate, then prime and paint.
How Primer Works: Basic Understanding
Primer creates a thin, bondable layer that helps paint stick to different surfaces and blocks stains.
You’ll pick from water- or oil-based, shellac, or specialty primers, each with strengths like fast drying, stain blocking, or better adhesion.
How well the primer grabs the wall depends on surface cleanliness, moisture, and temperature, so those conditions matter for a smooth, lasting finish.
What primer does and how it bonds to surfaces
Before you paint, understand that primer’s job is to create a stable, uniform surface that paint can stick to and to seal porous substrates so the finish goes on evenly.
You’ll apply a thin, even layer that fills tiny pits, evens porosity, and promotes adhesion by bonding chemically or mechanically.
Properly cured primer prevents peeling, blistering, and uneven topcoat absorption.
Types of primer and their properties
There are several common primer types you’ll choose from—latex (water-based), oil-based, shellac, and specialty formulations—each designed for different surfaces and problems. You’ll pick based on porosity, stain-blocking, drying time, and sandability. Below is a visual cue to help:
| Surface | Dry Time | Best For |
|---|---|---|
| Latex | Fast | Interior drywall |
| Oil | Slow | Trim, stains |
How environmental and substrate conditions affect adhesion
Choosing the right primer type matters, but how it performs also depends on the conditions you paint in and the surface beneath it.
You’ll get poor adhesion if you work in high humidity, extreme temperatures, or over damp, chalky, greasy, or powdery substrates.
Prep, dry conditions, and correct temperature range guarantee the primer bonds.
Always clean, sand, and remove contaminants before priming.
Primary Causes of Primer Bubbling (Problem-Solution)
When your primer starts bubbling, you’ll usually find one or more clear causes to fix.
Check for moisture in the wall or painting over damp or unprimed surfaces, incompatible primer and topcoat combos, poor prep like dust, grease, or loose paint, and trapped air from your roller, brush, or spray technique.
Address each specific problem—dry the substrate, clean and sand, choose compatible products, and adjust application—to prevent bubbles.
Moisture in the substrate or wall
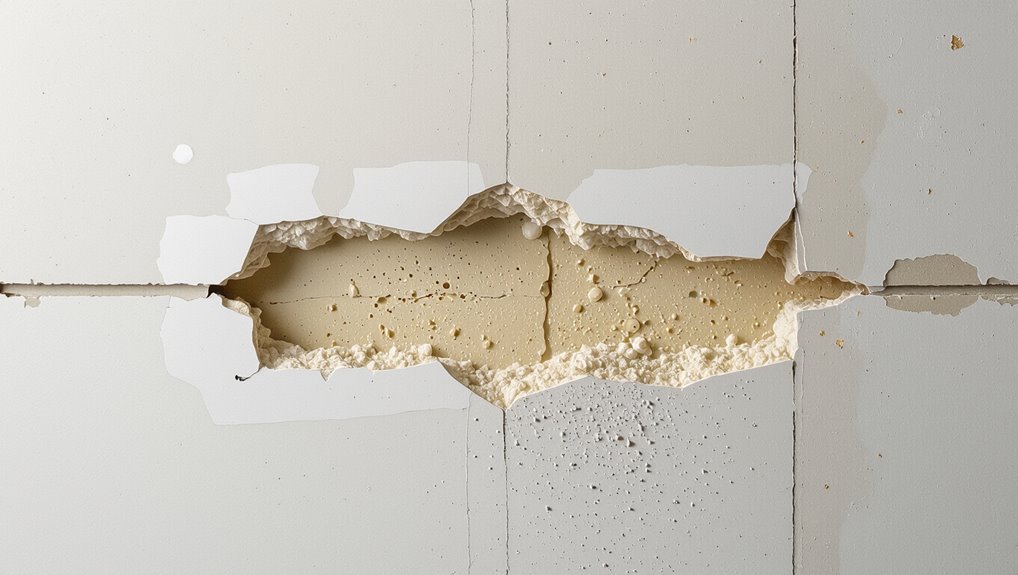
Moisture trapped in the wall’s substrate is a common culprit behind primer bubbling; if the surface is damp, water vapor pushes the primer away as it tries to dry.
You should identify leaks, rising damp, or condensation sources, dry the wall thoroughly, and use a moisture meter.
Only reapply primer when readings show acceptable moisture levels to prevent repeat bubbling.
Painting over damp or unprimed surfaces
Ever wondered why primer peels and bubbles shortly after you finish a wall?
If you paint over damp or unprimed surfaces, adhesion fails and trapped moisture expands, causing bubbling.
Always wait for full dryness, check with a moisture meter or tape test, and apply a proper sealer or primer designed for bare drywall or previously damp areas to guarantee a stable, bonded base.
Incompatible primer and topcoat combinations
One common cause of bubbling is using a primer and topcoat that just don’t play well together; if you slap a latex paint over an oil-based primer (or vice versa) without proper preparation, the coatings can repel or fail to bond, letting bubbles form as the layers separate.
Check product labels, sand or scuff glossy primers, use a compatible bonding primer, and test a small area before painting.
Poor surface preparation (dust, grease, loose paint)
If you skip proper cleaning and surface prep, primers won’t stick and bubbles will form as paint lifts from dust, grease, or flaky old coatings.
You should remove contaminants, degrease oily spots, and scrape or sand loose paint until the substrate is sound.
Wipe with a tack cloth, let surfaces fully dry, and repair any powdery or crumbling areas before priming to guarantee adhesion.
Trapped air from application technique (roller/brush/spray)
When you work too fast or use the wrong tool, you can trap air under the primer and cause blistering as it dries.
To prevent this, apply evenly with the right roller nap, brush, or spray tip, and avoid overworking the coat.
Back-roll sprayed primer, maintain a wet edge, and use slow, steady strokes so bubbles don’t form and lift the film.
High humidity, temperature extremes, and drying issues
Because primer needs the right conditions to cure, high humidity and extreme temperatures can keep solvents from evaporating properly and cause bubbling.
If it’s too cold, the film won’t set; if it’s too hot, it skins over and traps moisture.
Work within manufacturer temperature and humidity ranges, ventilate, and allow longer dry times between coats to prevent bubbles and adhesion problems.
Old or expired primer and improper mixing
After you’ve ruled out environmental causes, check the product itself—old or improperly mixed primer can cause bubbling just as easily as bad weather.
If the can’s past its shelf life, binders break down and solvents separate. Stir thoroughly; don’t shake aggressively.
Strain lumps and discard foul-smelling or curdled primer. Use fresh, well-mixed product and follow manufacturer pot-life and thinning instructions to prevent bubbles.
Chemical reactions with previous coatings or stains
If previous coatings or stains contain incompatible chemicals, they’ll react with your primer and cause bubbling or peeling.
Test suspect surfaces with a solvent or small primer patch first. Strip or sand glossy, oil-based, or stained areas until you reach a clean, porous substrate.
Use a compatible primer (bonding or stain-blocking) and follow manufacturer instructions to prevent future chemical conflicts.
How to Diagnose the Specific Cause
Start with a visual inspection checklist to note bubbling patterns, discoloration, and nearby stains.
Then run simple moisture tests—touch, a blotter test, or a moisture meter—and identify the substrate (drywall, plaster, masonry, or wood).
If moisture and substrate don’t explain the issue, do a small patch test for incompatibility and call a professional if you’re unsure or the problem is widespread.
Visual inspection checklist
When you inspect bubbled primer, work methodically across the wall so you can link each defect to a likely cause; note the size, location, pattern, texture, and any odors or dampness.
Check nearby sources and past repairs, document findings, and photograph each area for reference.
- clustered near trim or joints
- random pinholes or blisters
- peeling with flaky substrate
Simple moisture tests (touch, blotter, moisture meter)
After you’ve cataloged bubbling patterns and nearby conditions, check for moisture with a few quick tests that tell you whether water is the culprit.
Touch the surface—cold, damp walls feel different. Press a dry white paper towel or blotter against the bubble for 15–30 minutes; staining or darkening shows moisture.
Use a moisture meter for a precise reading; follow manufacturer guidelines and compare readings to normal ranges.
Identifying substrate types (drywall, plaster, masonry, wood)
Any bubbling problem can trace back to the substrate, so identify whether you’re dealing with drywall, plaster, masonry, or wood before choosing a fix.
Tap and listen: drywall sounds hollow, plaster is dense with a dull thud. Look for lath lines, mortar texture, or wood grain.
Check paint adhesion, previous coatings, and surface porosity to pinpoint appropriate prep and repair.
Testing for incompatibility (small patch test)
If you’re seeing bubbles in primer, run a quick incompatibility patch to pinpoint whether the primer, underlying paint, or surface is to blame.
Clean and dry a small area, apply primer, let it cure, then topcoat a tiny square with the designated paint.
If bubbling recurs, try a different primer or paint on another patch to isolate which product reacts.
When to call a professional
Wondering whether to call a pro? If bubbling persists after simple fixes—testing adhesion, drying, and minor scraping—or if you spot mold, widespread bubbling, soft plaster, paint failure, or suspect leaks, hire a pro.
They’ll diagnose moisture sources, test substrates, and recommend remediation like vapor barriers, structural repair, or reapplication.
Call sooner to prevent costlier damage.
Step-by-Step Fixes for Bubbling Primer (Remediation)
Now that you’ve diagnosed the cause, let’s walk through practical fixes you can use for small spots or whole walls.
You’ll learn how to reverse bubbles by scraping, sanding, and feathering edges, how to treat and dry moisture-damaged areas, and how to choose and apply the right primer for re-coating.
For large failures we’ll cover full-strip and re-coat procedures so you can restore the surface correctly.
Small-area fixes (spot repairs)
When bubbling shows up in a limited area, you don’t have to redo the whole wall—spot repairs let you fix the problem quickly and with minimal disruption.
Peel loose primer, clean the substrate, and guarantee it’s dry.
Apply a compatible primer patch, let it cure, then repaint that small area.
Match texture and feather paint edges so the repair blends invisibly.
Reversing bubbles: scraping, sanding, and feathering edges
Start by removing any loose or bubbled primer with a stiff putty knife or paint scraper so you’re working on a solid surface; don’t gouge the drywall—just lift away flakes until the edge around the defect is firmly adhered.
Sand the perimeter smooth with medium then fine grit, wipe dust, apply a thin skim coat of joint compound, feather edges, sand again, prime, and repaint.
Treating and drying out moisture-damaged walls
If moisture caused the primer to bubble, you’ll need to remove the water source and dry the wall before repairing; otherwise bubbles and stains will return no matter how well you patch and paint.
Locate leaks, fix plumbing or roof issues, and improve ventilation. Use dehumidifiers and fans, open windows, and let the wall reach normal moisture levels.
Test with a moisture meter before proceeding.
Re-priming: choosing the right primer and application method
Why did the primer bubble in the first place?
Now choose a high-quality stain-blocking, moisture-resistant primer compatible with your topcoat—latex for latex, oil-based for problematic stains.
Clean and sand the surface, let it fully dry, then apply thin, even coats with a roller or brush.
Maintain recommended temperature and humidity, and allow full cure between coats for lasting adhesion.
Repairing large areas: full strip and re-coat procedure
Before you recoat a large bubbled area, you’ll need to remove all loose primer and any underlying material that’s compromising adhesion so the new system can bond properly.
Strip to sound substrate, sand feathered edges, and clean dust.
Patch damaged plaster or drywall, prime with appropriate bonding primer, then recoat.
- Strip loose material
- Repair substrate
- Prime and recoat
Addressing mold or efflorescence before priming
Although mold and efflorescence often look similar, they require different treatments, so you should identify which one you’re dealing with before priming.
For mold, clean with a bleach or EPA-approved fungicide, dry thoroughly, and fix moisture sources.
For efflorescence, brush off salts, use a masonry cleaner, allow full drying, and seal with a breathable primer.
Only then prime.
Preventive Measures and Best Practices
Before you prime, follow a simple surface-prep checklist—clean, sand, and repair any damage—so the primer can bond properly.
Choose a primer that’s compatible with your substrate and topcoat, work in the recommended temperature and humidity range, and use application techniques (brush, roller, or spray) that minimize trapped air.
Respect manufacturer drying times and recoat windows, and allow full curing before exposing the surface to moisture or heavy use.
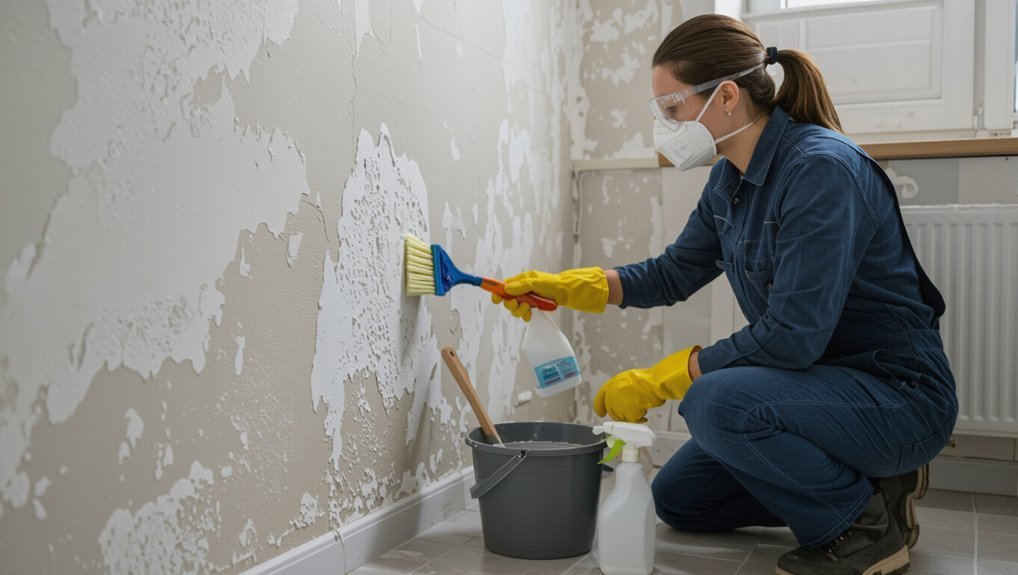
Proper surface preparation checklist before priming
When you prep a wall properly, you cut the risk of primer bubbling dramatically by removing loose paint, dirt, grease, and moisture so the primer can bond evenly.
Inspect for damage, sand glossy areas, and wash with a degreaser. Let surfaces dry fully.
Follow this quick checklist:
- Scrape and sand loose paint
- Clean with appropriate cleaner
- Repair and dry damaged areas
Correct primer selection for substrate and topcoat
Which primer will give you the best bond for your wall and topcoat? You should match primer type to substrate and finish: use high-adhesion or stain-blocking primers on difficult surfaces, oil-based for tannin bleed, and bonding primers for slick substrates. Check compatibility with your topcoat to avoid delamination.
| Substrate | Recommended primer |
|---|---|
| Bare drywall | PVA primer |
| Wood | Oil-based or shellac |
| Glossy surfaces | Bonding primer |
| Stained walls | Stain-blocking primer |
Ideal environmental conditions for application (temperature, humidity)
If you want your primer to cure correctly and avoid bubbling, apply it only within the manufacturer’s recommended temperature and humidity range—typically between 50–85°F (10–29°C) and under 70% relative humidity—because extremes slow drying or trap moisture that creates bubbles.
Monitor conditions with a thermometer and hygrometer, avoid painting during rapid temperature swings, and allow substrates to acclimate and dry fully before priming.
Application techniques to avoid trapped air (brush vs roller vs spray)
Because trapped air usually comes from how you apply primer, choosing the right tool and technique matters:
Use a high-quality brush for edges and tight areas, stroking smoothly to avoid whipping air.
For flat surfaces, use a dense-nap roller and roll evenly, pressing lightly to prevent bubbles.
Consider spray for uniform coverage, keeping passes steady and overlapping slightly to eliminate pockets of trapped air.
Drying times, recoating windows, and curing recommendations
Once you’ve used the right application method to avoid trapped air, give the primer proper time to dry before any recoat or sanding — rushing will trap solvents and cause bubbling later.
Check manufacturer recoat windows (often 1–4 hours for latex, longer for oil), wait full cure before heavy use (days to weeks), control temperature and humidity, and perform touch tests before overcoating.
Storing and mixing primer correctly
When you store and mix primer properly, you prevent separation, contamination, and the trapped gases that can cause bubbling later.
Keep cans sealed, upright, and at recommended temperatures. Shake or stir slowly to reincorporate solids without aerating.
Use clean tools and strain older primer before use.
Follow manufacturer shelf-life and disposal guidance so you’re always applying stable, reliable product.
Common Mistakes That Cause Bubbling
You’ll often find bubbling happens when you rush: not letting surfaces dry, painting over active leaks, or skipping cleaning and sanding.
Using the wrong exterior vs. interior primer, over‑thinning, or over‑brushing can make the problem worse.
Let’s look at each mistake so you can avoid them next time.
Rushing the job: insufficient drying time
If you hurry through priming without letting coats dry fully, trapped moisture and solvents can form bubbles as the next layer goes on.
You should follow manufacturer drying times, increase ventilation, and use fans or dehumidifiers in humid conditions.
Test touch-dryness, wait longer in cool or damp rooms, and avoid recoating until primer feels firm to prevent bubbling and adhesion failure.
Painting over active moisture or leaks
Why would you prime or paint over a wall that’s still damp?
If moisture or an active leak’s present, paint can’t adhere and trapped water forces bubbles, blisters, and peeling.
Stop work, locate and fix leaks, dry the substrate thoroughly, and use a moisture-resistant primer once conditions are stable.
Painting over wet areas only creates recurring damage and wastes time and materials.
Skipping cleaning or sanding steps
Once you’ve fixed leaks and confirmed the wall’s dry, don’t skip surface prep — failing to clean or sand is a common cause of primer bubbling.
You need to remove dust, grease, loose paint, and chalky residues; otherwise primer won’t adhere. Lightly sand glossy spots for tooth, wipe with a damp cloth, let dry, then prime.
Proper prep prevents bubbles and peeling.
Using the wrong product for exterior vs interior
Ever wonder why primer bubbles even on a dry, prepped wall? You may be using exterior primer indoors or vice versa.
Exterior formulas contain additives for weather resistance and can off-gas or dry differently inside, causing lift or bubbles.
Use the correct interior or exterior primer for the surface and conditions. Check labels and manufacturers’ recommendations before applying.
Over-thinning or over-brushing primer
If you’ve picked the right primer but still see bubbles, check how you’re applying and thinning it.
Over-thinning reduces adhesion and causes solvent entrapment; thin only per manufacturer directions.
Over-brushing reworks drying film, traps air, and raises nap.
Use proper roller or brush, apply even coats, and let each coat dry fully before touching up to prevent bubbling.
Cost and Time Estimates for Repairs
You can often fix small bubbled spots yourself in a few hours with about $10–$50 in materials like sandpaper, primer, and patching compound.
Larger areas or signs of moisture and mold can push costs higher and usually make hiring a pro more cost-effective.
We’ll compare DIY time/cost ranges to professional remediation so you can decide what’s best.
DIY repair time and material cost ranges
Most small primer-bubbling fixes take a few hours of hands-on work and under $50 in materials, while larger patches can span a weekend and cost $50–$200. You’ll sand, clean, spot-prime, and repaint; expect 2–8 hours and basic supplies.
| Task | Typical cost/time |
|---|---|
| Small patch | $10–$50 / 2–4 hrs |
| Medium patch | $50–$100 / 4–8 hrs |
| Large patch | $100–$200 / weekend |
| Supplies only | $10–$60 total |
When professional remediation is cost-effective
When bubbling covers large areas, involves recurring moisture, or hides underlying damage, calling a pro often costs less in the long run than repeated DIY fixes.
A contractor can diagnose leaks, remediate mold, and repair structural issues. Expect a walkthrough, moisture testing, repairs (patching, drywall replacement, sealing), and repainting.
Typical costs range widely—get multiple estimates and timelines before committing.
Preventive Products and Tools Recommendations
Before you start repairs, you’ll want a few key products: moisture meters to check wall dampness, dehumidifiers and fans to control humidity, and sanders, scrapers, or sprayers for prep and application.
Choose primers formulated for your substrate—masonry, drywall, or previously painted surfaces—to prevent future bubbling.
I’ll also recommend specific tools and brands that make the job faster and more reliable.
Moisture meters, dehumidifiers, and fans
If you want to stop primer bubbling at the source, start by measuring and controlling the moisture in the room: a reliable moisture meter tells you whether the substrate or ambient air is too damp, while dehumidifiers and high‑speed fans lower humidity and speed drying so primer can bond properly.
Use tools to verify and maintain conditions before you prime.
- Buy a handheld moisture meter
- Run a dehumidifier during prep
- Aim fans for consistent airflow
Recommended primers for common substrates
Choose a primer that matches the substrate and the job: drywall needs a high-adhesion, low-VOC drywall primer; bare wood benefits from a shellac- or oil‑based primer to seal tannins; concrete and masonry require a breathable, alkali-resistant masonry primer; and glossy surfaces demand a bonding primer formulated for slick substrates.
- Use stain-blocking primers for tannin or water stains.
- Pick mildew-resistant primers in humid areas.
- Match primer base (water vs. oil) to topcoat type.
Tools for proper application and repair (sanders, scrapers, sprayers)
Good tools make the job faster and cut down on common primer problems, so stock a few key items: an orbital sander with 120–150 grit for feathering edges, a razor scraper for lifting loose primer, a medium-stiff putty knife for patching, and a quality HVLP or airless sprayer plus angled brushes and a short-nap roller for smooth, even application.
Use tack cloths, respirator, and drop cloths; test settings and practice on scrap.
FAQ
Have questions about bubbling primer? You’ll find quick answers here on whether you can paint over bubbles, how long to wait after treating moisture, whether a different topcoat helps, if bubbling signals structural damage, and how to tell mold from efflorescence.
Read on for concise troubleshooting and next steps.
Can I paint over bubbles without fixing them?
Can you paint over bubbles without fixing them? You can, but don’t.
Painting over trapped bubbles hides defects temporarily; the finish will likely peel, crack, or show texture irregularities.
For lasting results, remove loose primer, identify and address the underlying cause (moisture, poor adhesion, contamination), then re-prime and paint.
Skipping repair risks wasted time and extra work later.
How long should I wait after treating moisture before priming?
How long you wait depends on how thoroughly you treated the moisture: after fixing leaks or improving ventilation you should let the area dry completely—typically 24–72 hours for small spots in warm, ventilated conditions, but up to several days or even weeks for large, damp areas or porous materials.
Check moisture with a meter or touch; only prime when surface reads dry and feels dry to touch.
Will a different topcoat stop bubbling caused by moisture?
Once the wall is fully dry, you might wonder whether switching to a different topcoat will stop bubbling caused by moisture.
Changing topcoat alone won’t fix trapped moisture or adhesion loss. You need a moisture-free substrate and proper primer.
If those are addressed, choose a breathable, moisture-tolerant finish; it’ll resist future bubbling better than non-breathable coatings but won’t cure existing moisture damage.
Is bubbling primer a sign of structural damage?
Is bubbling primer a sign of structural damage? Not usually. Bubbles most often mean moisture, poor adhesion, or trapped air, not a failing structure.
However, if you see cracks, sagging, or recurring wetness behind paint, those could indicate underlying issues like leaks or rot.
Inspect for building movement, persistent damp, or large-scale cracking and consult a pro if you suspect real structural problems.
How can I tell if bubbles are caused by mold or efflorescence?
Wondering whether those paint bubbles hide mold or efflorescence?
Check appearance: mold often has fuzzy, discolored patches (black, green, brown) and a musty smell; efflorescence looks like powdery white salt deposits and flakes when brushed.
Test: rub with a damp cloth—mold smears, salts dissolve.
If unsure, sample or call a pro for lab testing and safe removal.