How to Remove Sticky Tape Residue From Painted Walls Without Damage
You can remove sticky tape residue from painted walls without damage by starting gently: wipe with warm soapy water, try a rubber eraser or a soft plastic scraper, then use a hair dryer on low to soften adhesive. If residue stays, test vegetable oil or 70% rubbing alcohol in an inconspicuous spot and rub gently. Always rinse with soapy water and dry. Follow these cautious steps and you’ll avoid harm; keep going to learn safer alternatives and tips.
Quick Answer Safest Ways to Remove Sticky Tape Residue from Painted Walls
When you need the fastest, safest way to remove tape residue from painted walls, start with gentle options like a soft cloth, warm soapy water, or a rubber eraser to avoid damage.
For stubborn spots, try rubbing alcohol or a commercial adhesive remover applied sparingly and tested in a hidden area first.
For most paint types, your best single approach is warm soapy water plus a soft cloth, reserving solvents only if that doesn’t work.
Summary of fastest, damage-free methods
Try a few quick, gentle methods to lift tape residue without harming paint:
Rub the area with a soft cloth dampened in warm, soapy water.
Soften the adhesive with a hair dryer on low heat, or apply a small amount of rubbing alcohol or a dedicated adhesive remover and wipe gently.
For how to remove sticky tape residue from painted walls, test first, work slowly, and blot—don’t scrub.
One-sentence recommended approach for most paint types
For most painted walls, warm soapy water to loosen the residue, gentle blotting with a soft cloth, and finishing with a light dab of rubbing alcohol (tested first in an inconspicuous spot) will safely lift tape adhesive without harming the paint.
You should work gently, avoid scrubbing, rinse and dry the area, and repeat only as needed, stopping if paint softens or dulls.
Basic Understanding What Tape Residue Is and Why It Can Damage Paint
Tape residue is the sticky film left by pressure-sensitive adhesives like rubber-based, acrylic, or silicone formulas, and each type bonds differently to surfaces.
You’ll notice some residues sit on top of paint while others soak in or chemically interact with the finish, risking softening, staining, or lifting.
Older paint, delicate finishes (like eggshell or flat), extreme temperatures, and long contact time all increase the chance you’ll damage the paint when removing residue.
What sticky tape residue consists of (adhesive types)
Adhesives on tape are usually blends of natural rubber, synthetic rubber (acrylics), or silicone-based compounds, and each type behaves differently when left on painted surfaces.
You’ll find natural rubber is tacky and can harden or yellow; acrylics resist heat and age cleaner but can leave stubborn films; silicone leaves oily residues that repel water and require solvent treatment.
How residue interacts with painted surfaces
When left on painted surfaces, sticky residue can chemically bond with the paint’s binder and attract dirt, causing dull spots and uneven gloss that you’ll notice once the tape’s gone.
Over time the residue can soften or lift finish layers, trap moisture, and impede proper repainting. You’ll need gentle removal to avoid pulling softened paint or leaving staining that’s hard to correct.
Factors that increase risk of paint damage (paint finish, age, temperature)
Because different paints react differently to adhesives, you should consider finish, age, and temperature before attempting removal.
Matte and flat finishes are more porous and lift easier; gloss holds tape but can peel if brittle.
Older paint may be weakened by sun or moisture. Cold makes adhesive firmer; heat softens it.
Test a small hidden spot and use gentler methods first to avoid damage.
Assessing Your Wall Before You Start
Before you start, identify your paint type and finish—matte, eggshell, satin, semi-gloss, or gloss—since each reacts differently to removal methods.
Pick an inconspicuous spot and spot-test your chosen cleaner and technique to make sure it won’t damage the paint.
Gather the right tools and safety gear (gloves, goggles, soft cloths, scraper, and mild solvent) so you’re ready to work safely.
How to identify paint type and finish (matte, eggshell, satin, semi-gloss, gloss)
Start by looking closely at a small section of your wall to determine the paint type and finish—you’ll avoid damage and get better results if you know whether you’re working with matte, eggshell, satin, semi-gloss, or gloss.
Matte looks flat and hides flaws; eggshell has subtle sheen; satin is smoother with more light reflection; semi-gloss and gloss are shiny and tougher, so clean gently.
Spot test: where and how to test removal methods safely
Where should you test first? Pick an inconspicuous spot near the residue—behind furniture, inside a corner, or under trim.
Clean it gently, then apply your chosen remover for the recommended time. Blot and inspect for color change, peeling, or texture shifts.
Wait the full drying period before deciding. Repeat elsewhere if paint and finish vary across the wall.
Tools and safety equipment checklist
Gather the right tools and safety gear so you can assess the wall without causing damage or risking injury.
You’ll inspect paint, residue type, and wall condition using simple items that keep you safe and avoid scuffs.
- Soft cloths and cotton swabs
- Mild cleaner and rubbing alcohol
- Plastic scraper and credit card
- Gloves and eye protection
Step-by-Step Safe Removal Methods
Start by working through a clear, step-by-step approach so you won’t damage the paint.
You’ll try gentle mechanical removal first, then soften residue with a hair dryer before moving on to mild household cleaners and, if needed, cautious oil-based or solvent options.
Finish with a paint-safe stain removal and a final clean to restore the surface.
Step 1 Gentle mechanical removal
Start by gently lifting residue with your fingernail, a soft plastic scraper, or an old credit card, working at a low angle to avoid scratching the surface.
If the residue peels away cleanly, keep going; if it smears, becomes stubborn, or the surface shows stress, stop and switch to a solvent or heat method.
Always test a small hidden area first so you know when to change tactics.
Use fingernail, soft plastic scraper, or credit card
Carefully work the edge of the residue with a fingernail, a soft plastic scraper, or an old credit card to lift the sticky layer without scratching the surface.
Gently pry at a shallow angle, lifting small bits at a time. Don’t force or gouge paint; if the residue peels, stop and reposition.
Wipe loosened adhesive with a soft, dry cloth as you go.
When to stop and switch methods
If the adhesive resists lifting or you notice any surface damage, stop and reassess before continuing; switch to a gentler solvent or a different tool to avoid making the problem worse.
Test alternatives on an inconspicuous spot, pause if paint softens or flakes, and try warm soapy water, a rubber eraser, or low-strength adhesive remover.
Proceed slowly and re-evaluate frequently.
Step 2 Heat method (hair dryer)
Use a hair dryer on low to medium heat and hold it about 6–8 inches from the residue, warming in 20–30 second bursts to avoid overheating the surface.
You’ll know the adhesive’s soft enough when it becomes tacky and peels away easily with a fingernail or soft cloth.
This method works best on pressure-sensitive tapes and durable finishes like glass, metal, and many plastics—avoid high heat on thin plastics, painted surfaces, or heat-sensitive laminates.
How to apply heat safely (distance, duration)
When you’re using a hair dryer to soften tape residue, hold it 6–8 inches from the surface and keep it moving in small circles so heat’s distributed evenly; aim for about 20–30 seconds per spot, check by gently testing the adhesive, and repeat only as needed to avoid overheating the material.
Use a low–medium setting, pause between passes, and never let the dryer touch the paint.
Best for what adhesives and finishes
Which types of tape respond best to heat?
Thin adhesives like painter’s tape, masking tape, and some cellophane or paper tapes soften and lift easily.
Avoid heavy-duty duct, carpet, or rubber-based tape—heat can spread adhesive or damage gloss finishes.
You can use heat on semi-gloss and satin paints; test first on matte or delicate eggshell to prevent bubbling or discoloration.
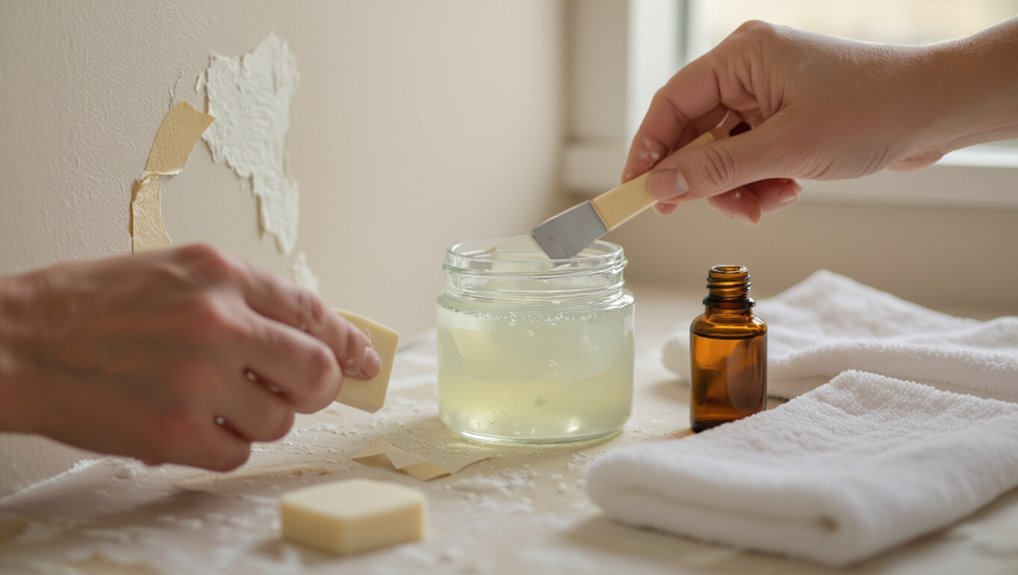
Step 3 Mild household solutions
You can try mild household solutions next, starting with warm soapy water—mix a few drops of dish soap in warm water, apply with a cloth, and let it sit for a few minutes before wiping.
For tougher spots, use a vinegar solution (equal parts white vinegar and water) applied sparingly and tested on an inconspicuous area first.
Both methods are gentle, but don’t soak porous surfaces or leave vinegar on sensitive finishes.
Warm soapy water method (solution, application, dwell time)
Step 1: mix a few drops of dish soap into a bowl of warm water to make a sudsy solution, then dip a soft cloth or sponge, wring it out, and press it onto the tape residue for several minutes so the warmth and soap loosen the adhesive.
After soaking, gently rub in circular motions; repeat and blot dry until residue lifts completely.
Vinegar solution method (dilution and precautions)
Because white vinegar gently breaks down many adhesives, you can use a diluted vinegar solution to remove sticky tape residue from most hard, nonporous surfaces.
Mix equal parts white vinegar and warm water, apply with a soft cloth, and let sit 30–60 seconds.
Test a hidden spot first, avoid prolonged soaking on painted areas, and rinse with clean water to neutralize acidity.
Step 4 Oil-based and solvent options (use cautiously)
You can move to stronger options when mild cleaners don’t cut it, but use oil-based tricks and solvents cautiously.
Try vegetable oil, peanut butter, or a quick spray of WD-40 to loosen residue, then wipe clean with soap.
For stubborn spots, use rubbing or isopropyl alcohol (check concentration and let it sit briefly).
If you opt for commercial adhesive removers, read the label for surface compatibility and safety warnings before applying.
Vegetable oil, peanut butter, or WD-40 (application and removal)
Try an oil-based option when gentle solvents are needed: vegetable oil, peanut butter, or WD-40 can loosen sticky tape residue by breaking down adhesive bonds so it wipes away more easily.
Apply a small amount, let it sit 5–10 minutes, then gently rub with a soft cloth.
Wipe away oily residue with mild soapy water, rinse, and dry.
Test first in an inconspicuous spot.
Rubbing alcohol and isopropyl alcohol (concentration, dwell time)
If oil-based options don’t fully remove the residue, reach for rubbing alcohol or isopropyl alcohol as a stronger, controlled solvent.
Use 70% isopropyl for balance between effectiveness and safety; 90% works faster but can dry paint.
Dampen a soft cloth, blot gently, and let it sit 10–30 seconds. Rinse with a damp cloth and test an inconspicuous spot first.
Commercial adhesive removers (types, label warnings)
When oil and household solvents don’t finish the job, commercial adhesive removers offer stronger, purpose-made formulas that speed up residue removal while minimizing surface damage when used correctly.
Read labels: choose citrus, solvent, or petroleum-based types for compatibility.
Test a hidden spot, ventilate, wear gloves, and avoid prolonged contact.
Note flammability, VOC warnings, and paint-compatibility instructions before use.
Step 5 Final cleaning and paint-safe stain removal
Once the residue’s gone, wipe the area with a mild detergent and warm water to remove any oily film, then rinse and dry thoroughly.
If you spot a faint stain or dull patch in the finish, test a small, hidden area with a gentle cleaner before treating the whole spot.
For minor paint damage, use matching touch-up paint or a fine brush to blend the repair, letting each coat dry completely.
Removing oily residues and rinsing
Wipe the area with a clean, lint-free cloth dampened with warm soapy water to lift any oily residue left by adhesives and solvents; gentle pressure and repeated passes will remove most grime without harming paint.
Rinse with a second cloth dampened in plain water to remove soap film, then dry with a microfiber cloth.
Inspect for tackiness and repeat rinsing if needed.
Touch-up paint tips for any minor finish damage
If you notice small chips or scratches after cleaning, you can quickly touch them up to restore the finish and prevent further damage.
Lightly sand rough edges, wipe dust, and use matching touch-up paint or a small artist’s brush.
Apply thin coats, let each dry fully, and feather edges to blend.
Finish with a clear coat if sheen differs.
Comparison of Methods Effectiveness vs. Risk
You’ll find a quick comparison table below that ranks common removal methods by effectiveness and risk so you can pick fast.
Use the guidance to choose the best option for your paint finish and the type of adhesive you’re dealing with.
If you’re unsure, start with the lowest-risk method and work up until the residue comes off.
Quick comparison table of methods
When deciding which method to use, weigh how effective it is at removing residue against the potential risk to the surface or your finish. Below is a quick comparison to help you choose quickly.
| Method | Effectiveness | Risk |
|---|---|---|
| Warm soapy water | Moderate | Low |
| Rubbing alcohol | High | Medium |
| Oil (olive/mineral) | Moderate | Low |
| Commercial remover | High | Medium |
Best choices by paint finish and adhesive type
Because different paints and adhesives respond differently, match your remover to both the finish and the sticky residue: gentler options like warm soapy water or oil work best on flat or eggshell paints and light adhesive, while stronger solvents such as rubbing alcohol or commercial removers are better for semi-gloss, gloss, or stubborn adhesive but carry higher risk to delicate finishes—test a hidden spot first.
- Flat/eggshell + light glue: soap/oil
- Satin: oil then rubbing alcohol
- Semi-gloss/gloss: rubbing alcohol/commercial remover
- Stubborn adhesive: heat plus commercial solvent, test first
Common Mistakes That Cause Paint Damage
Be careful—scrubbing too hard or using metal tools can gouge or scratch the paint.
Don’t start applying strong solvents without testing a small, hidden spot first, since some chemicals strip or discolor finishes.
Also avoid overheating or leaving solvents on too long, because prolonged exposure softens paint and causes bubbling or peeling.
Scrubbing too hard or using metal tools
If you scrub too hard or reach for metal tools, you’ll strip paint or gouge the surface beneath the residue.
Use soft cloths, microfiber, or a plastic scraper instead. Work gently, testing pressure on an inconspicuous spot.
Lift residue gradually—don’t force it. Stop at the first sign of paint dulling, peeling, or scratching, and switch to milder techniques to preserve the finish.
Applying strong solvents without testing
When you reach for strong solvents without testing first, you risk stripping or discoloring the paint beneath the residue.
Always test in an inconspicuous spot, wait for full drying, and inspect for softening or color change. If the paint reacts, stop and choose a milder remover.
Wear gloves, ventilate the area, and apply solvent sparingly with a soft cloth to minimize risk.
Overheating or prolonged solvent exposure
Although you want the residue gone fast, overheating or leaving solvents on too long can soften paint, lift coatings, or cause bubbling that’s often irreversible.
Don’t blast heat with a hairdryer or soak soaked rags; instead, work in short bursts, blot gently, and rinse the area promptly.
Test a hidden spot, use mild solvent alternatives, and stop at the first sign of paint change.
Prevention and Best Practices
To prevent sticky residue, choose the right tape for your paint and apply it with even pressure so it adheres cleanly.
Remove tape at the recommended time and work in moderate temperatures to reduce adhesive transfer.
Store leftover tape and keep painted walls clean and dry so future applications stick properly and peel off cleanly.
How to avoid residue in future (tape selection and application tips)
If you want to prevent sticky residue, pick the right tape and apply it carefully: choose low-residue or removable tapes for painted or delicate surfaces, avoid prolonged exposure to heat or sunlight, and press and remove tape slowly and at a low angle to minimize adhesive transfer.
- Test tape on an inconspicuous spot first.
- Use painter’s or delicate-surface tape.
- Avoid overstretching during application.
- Store tape cool, dry, upright.
Proper removal timing and environmental conditions
When you remove tape at the right time and under suitable conditions, you’re far less likely to leave sticky residue or damage the surface.
Aim to peel within an hour for most painter’s tapes; wait 24 hours for stronger adhesives. Work in moderate temperatures (60–80°F) and low humidity.
Peel slowly at a 45° angle, keeping the film taut to prevent tearing or paint lift.
Storage and maintenance tips for painted walls
Keeping tape removal timing and conditions in mind helps protect your paint, but long-term care hinges on proper storage and maintenance of your walls.
Store furniture away from walls to prevent scuffs, use felt pads, and avoid leaning damp items.
Clean gently with mild detergent, touch up nicks promptly, control humidity to prevent peeling, and rotate framed items to reduce sun fade.
Tools and Products Recommended (Starter Kit)
You’ll want a small starter kit of safe tools—like plastic scrapers, microfiber cloths, and rubbing alcohol—plus common household items such as vegetable oil or baking soda for gentler jobs.
For tougher residue, consider commercial adhesive removers and look for labels that mention citrus solvents, isopropyl alcohol, or low-VOC formulas and note any surface warnings.
Keep gloves and a test patch handy so you can confirm compatibility before treating the whole area.
List of safe tools and household items
Before you start scraping or soaking, gather a small, safe starter kit of tools and household products that handle most sticky-tape residue without damaging surfaces.
Use gentle, non-abrasive items and common cleaners.
- Soft microfiber cloths and cotton swabs
- Plastic putty knife or old credit card
- Mild dish soap mixed with warm water
- Rubbing alcohol (isopropyl, diluted as needed)
Recommended commercial products and what to look for on labels
Once you have your basic kit ready, reach for a few commercial products that speed removal and protect finishes.
- Goo Gone or citrus-based remover — look for “safe on painted surfaces.”
- Rubbing alcohol (isopropyl 70%–90%) — label should say “for adhesives.”
- WD-40 — check “safe on paint” and test first.
- Gentle adhesive remover pads — non-abrasive, solvent-safe label.
Troubleshooting Scenarios
If residue won’t budge after basic treatment, I’ll walk you through escalation steps so you know what to try next.
If paint has discolored or peeled, you’ll get clear remediation options to repair or conceal the damage.
For large-area adhesive film or stubborn glue, you’ll learn how to decide between DIY methods and when to call a pro.
Residue that won’t budge escalation steps
When stubborn residue refuses to come off, move through escalating steps so you don’t damage the surface:
start with gentle methods like warm soapy water and a plastic scraper, then try stronger solvents (rubbing alcohol, citrus-based removers), and finish with targeted mechanical approaches (rubber erasers, adhesive removers, or light sanding) only as needed.
Test each step in an inconspicuous spot and proceed slowly.
Discolored or peeled paint after removal remediation
Although tape removal often leaves a clean surface, you may find paint that’s stained, faded, or lifting; you’ll want to address the problem quickly to prevent further damage.
Lightly sand lifted edges, clean with mild soap and water, and let dry.
Prime exposed areas with stain-blocking primer, then touch up with matching paint.
For large peeling, consider patching before repainting.
Large-area adhesive film or glue professional help vs DIY
Facing a large area covered in adhesive film or stubborn glue calls for a quick assessment of your time, tools, and tolerance for risk. You’ll save money by doing it yourself but may need a pro if the surface is delicate, extensive, or under warranty.
If DIY, test solvents on a hidden spot, use low-heat tools, and work slowly.
Hire pros for textured, antique, or high-value finishes.
Frequently Asked Questions (FAQ)
You’ll find answers here to common concerns like using nail polish remover on painted walls, whether heat can safely lift residue, and how long to wait after painting before you peel tape.
You’ll also learn which solvents are safe for different paint types and what to do about old, hardened tape residue.
If your situation’s tricky, these FAQs will point you to the right, low-risk methods.
Can I use nail polish remover on painted walls?
Can you use nail polish remover on painted walls? You can, but proceed with caution.
Acetone-based removers can strip or dull many paints, especially latex and matte finishes. Test an inconspicuous spot first.
Use a cotton swab, dab lightly, then rinse with water and mild soap. If paint softens or discolors, stop and try a gentler adhesive remover formulated for painted surfaces.
Will heat always remove tape residue without damage?
If nail polish remover risks damaging paint, you might try heat instead—but it’s not foolproof.
Heat softens adhesive so you can peel or wipe residue, but it can also soften paint, blister finishes, or darken delicate surfaces.
Test a small hidden spot first, use low heat from a hairdryer, keep it moving, and stop if paint shows any change.
How long should I wait after painting before removing tape?
Although it depends on paint type and temperature, you should usually remove painter’s tape while the paint is still slightly tacky—about 30 to 60 minutes for latex in mild conditions—so edges stay sharp without peeling.
For oil-based or humid/cool environments, wait longer (several hours).
Pull tape back on itself at a 45° angle slowly; if paint lifts, stop and let cure further.
Is there a safe solvent for all paint types?
Wondering if one solvent handles every paint type? No — there isn’t a universal safe solvent.
Different paints react differently: water-based (latex) tolerate mild soap and rubbing alcohol, while oil or enamel need gentler solvents and spot tests.
Always test an inconspicuous area, start with the mildest cleaner, and avoid harsh chemicals that can soften, dull, or dissolve paint finishes.
What if residue is from old, hardened tape?
When residue has been sitting for months or years it often hardens and bonds more tightly to surfaces, so you’ll need a different approach than for fresh adhesive.
Start by gently lifting edges with a plastic scraper, then soften residue with a warm, damp cloth or hair dryer on low.
If needed, use mild solvent sparingly, test first, and rinse promptly to avoid paint damage.