How to Paint Paneling Walls Without Sanding and Still Get Great Results
You can paint paneling without sanding if you prep it right: clean thoroughly, remove grease and mildew, and dull any sheen with a liquid deglosser or chemical etcher. Use a high-quality bonding primer applied with a brush for grooves and a short-nap roller for flats, then topcoat with durable acrylic latex or water-based enamel. Fix gaps and loose seams first and maintain a wet edge for even coverage. Keep going to learn step-by-step techniques and common pitfalls.
Quick Answer Can You Paint Paneling Without Sanding?
Yes—you can often paint paneling without sanding if the surface is clean, glossy-free, and you use a bonding primer; expect decent short-term results but possibly less adhesion and a higher risk of peeling long-term.
Skip sanding when the paneling is in good condition, the finish isn’t overly glossy, and you need a quick refresh.
Don’t skip sanding if the surface is rough, flaking, or you want the most durable, long-lasting paint job.
Short verdict and expected results
If you’re short on time, you can paint most wood paneling without sanding, but expect the paint’s adhesion and longevity to depend on how glossy or dirty the surface is; dull, clean, or previously painted panels usually take well to a deglossing cleaner/primer, while glossy, varnished, or heavily soiled panels may need light sanding or a bonding primer for reliable results.
Expect smoother finish, moderate durability when you follow deglossing and priming steps; heavy wear areas might require touch-ups sooner.
How to paint paneling walls without sanding focuses on prep, proper primer, and topcoat choice for best outcomes.
When skipping sanding is acceptable vs. when it’s not
Although you can often skip sanding, whether you should depends on the paneling’s finish and condition: dull, clean, or previously painted panels usually accept deglossing and a bonding primer well, while glossy, varnished, rotten, or heavily soiled surfaces will need light sanding or a specialty primer to guarantee adhesion and durability.
Inspect for gloss, damage, and contamination; sand where adhesion or smoothness is doubtful.
Understanding Wood Paneling and Why Sanding Is Usually Recommended
Whether your walls are real wood, veneer, MDF, faux wood, or beadboard, each material has different porosity and finish that affects how paint sticks.
Sanding helps remove gloss, old finish, grime, and loose paint, and it creates a slightly rough surface that improves mechanical adhesion.
Understanding those surface issues and how paint bonds to them will help you choose the right prep for a lasting result.
Types of paneling (real wood, veneer, MDF, faux wood, beadboard)
Wood paneling comes in several distinct types—real solid wood, thin wood veneer, MDF (medium-density fiberboard), faux wood, and beadboard—each with different surfaces and treatments that affect how well paint adheres.
You’ll treat them differently: solid wood accepts primer well, veneer needs gentle prep, MDF soaks primers at edges, faux has plasticized finishes, and beadboard’s grooves demand careful brushwork for even coverage.
Typical surface problems sanding addresses (gloss, old finish, grime, loose paint)
Start by identifying the issues sanding will solve: glossy or varnished finishes that repel paint, patches of old or flaking finish, greasy grime and dirt, and any loose or peeling paint that could lift later.
You’ll also watch for uneven sheen, residual adhesive or sealers, and small raised edges where trim or boards meet—these all prevent smooth, durable paint coverage if left untreated.
How paint adhesion works on paneling
Because paint bonds mechanically and chemically to the paneling surface, you need to prepare it so the coating can grip — not just look good.
Paneling’s smooth veneer, glossy finish, or sealed wood resists adhesion. Sanding roughens and removes contaminants, exposing pores for mechanical tooth; primers add chemical bonding.
If you skip sanding, clean thoroughly and use a high-bond primer to guarantee lasting adhesion.
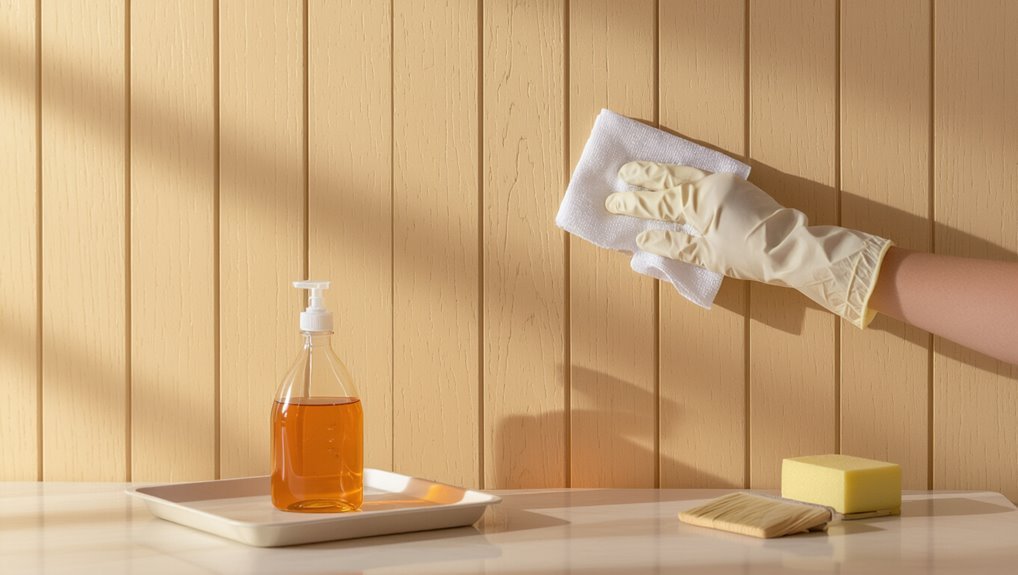
Materials, Tools, and Products You’ll Need (No-Sand Approach)
Before you start painting without sanding, gather the right cleaning supplies and a strong degreaser plus a liquid deglosser or chemical etcher to guarantee good adhesion.
Choose a compatible primer—bonding primer, shellac, oil-based, or acrylic—then pick paint and sheen suited for paneling, and decide whether you’ll use brushes, rollers, or a sprayer.
Also have caulk, filler, and basic tools on hand to repair gaps and seams for a smooth finish.
Cleaning supplies and degreasers
1 essential step is thoroughly cleaning the paneling so paint adheres properly; you’ll want a heavy‑duty cleaner or degreaser, a scrub brush, microfiber cloths, and a bucket of warm water.
Use a nonabrasive cleaner to remove dirt, oils, and grime. Rinse surfaces well, wring cloths to avoid drips, and let the paneling dry completely before priming or painting to guarantee proper adhesion.
Liquid deglosser / chemical etcher options
After you’ve cleaned and dried the paneling, using a liquid deglosser or chemical etcher can give paint the bite it needs without sanding.
Choose a product labeled for glossy or slick surfaces, follow safety instructions, and wipe thoroughly before priming.
Consider these options:
- TSP substitute wipes for light etching
- Glycol-based liquid deglossers
- Citrus-based cleaners for mild adhesion help
- Alcohol-based prep solutions
Primer types for non-sanded paneling (bonding primer, shellac, oil-based, acrylic)
Primers are what make paint stick to non-sanded paneling, so pick one that matches the surface and your topcoat.
Use a bonding primer for slick laminates or veneer, shellac for stain-blocking and odor-prone areas, oil-based for superior adhesion on tricky woods, and acrylic for easier cleanup and lower VOCs.
Apply per label, ensuring full coverage before painting.
Paint types and sheens recommended for paneling
When choosing paint for non-sanded paneling, pick a formula and sheen that balance durability, coverage, and the look you want.
Use a high-quality acrylic latex or water-based enamel for easy cleanup and good adhesion over primer.
Choose eggshell or satin for living areas—low sheen hides imperfections but cleans well; semi-gloss suits trim and high-traffic spots for extra durability and wipeability.
Brushes, rollers, sprayers, caulk, filler and other tools
Choosing the right paint finish is only part of the job—you’ll get professional-looking results faster if you have the proper tools on hand.
Gather quality angled brushes for grooves, a dense nap roller for smooth coverage, a sprayer for large areas, plus caulk and filler for gaps.
Keep these essentials ready:
- Angled sash brush
- ¾” to 1″ nap roller
- HVLP sprayer or airless option
- Paintable caulk and wood filler
Safety gear and surface protection
Before you start, gather basic safety gear and durable surface protection so you can work confidently and keep clean: safety goggles, a NIOSH-rated respirator or mask (especially for spraying or using caulk/fillers), nitrile or latex gloves, knee pads, and a long-sleeve shirt to protect skin from splatter.
Use drop cloths, tape, and plastic sheeting; protect floors and furniture.
- cover floors thoroughly
- tape edges precisely
- shield fixtures and outlets
- use disposable gloves
Step-by-Step: How to Paint Paneling Without Sanding
First, check the paneling for loose boards, damage, and any heavy texture so you know what repairs you’ll need.
Next, clean the surface thoroughly to remove dust, grease, nicotine, and mildew, then fill gaps and seams with caulk or wood filler and address raised edges.
Finally, use a liquid deglosser or chemical etcher per the instructions, let it dry, and finish with a bonding primer applied evenly and allowed to cure.
Step 1 Assess the paneling condition (loose panels, damage, texture)
Start by closely inspecting every wall panel for loose seams, cracks, dents, or warped boards—you’ll want to identify areas that need repair before you paint.
Check panel edges, joints, and trim for gaps or movement. Note gouges, missing veneer, or raised texture that could show through paint.
Mark spots for caulking, filling, or replacement so your prep is targeted and efficient.
Step 2 Clean thoroughly (dust, grease, nicotine, mildew)
Grab a sponge or a soft-bristle brush and a strong cleaner—paneling needs to be spotless so paint will stick. You’ll remove dust, grease, nicotine, and mildew with focused steps.
Rinse and dry fully before priming.
- Vacuum grooves first
- Degrease with TSP substitute
- Treat mildew with diluted bleach
- Rinse and towel-dry thoroughly
Step 3 Repair and fill gaps (caulking, wood filler, handle raised seams)
Fill gaps and smooth imperfections so your finish looks professional even without sanding.
Use paintable acrylic caulk for seams, pressing it into gaps with a caulk gun and smoothing with a wet finger or tool.
For gouges or missing trim, apply wood filler, let it cure, then level with a putty knife.
Remove raised seams or loose edges before priming and painting.
Step 4 Apply liquid deglosser or chemical etcher (how to use, dry time)
Prep the surface by wiping down the paneling.
Then apply a liquid deglosser or chemical etcher to remove sheen and promote primer adhesion. Pour a small amount onto a clean rag and rub firmly in sections, working from top to bottom and changing rags as they get dirty.
Let the surface air-dry for 10–30 minutes until it feels dull and residue-free before priming.
Step 5 Prime with a bonding primer (application tips, drying time)
Once the deglosser has dried, apply a high-quality bonding primer designed for slick or glossy surfaces so the paint will adhere without sanding.
Use a brush for grooves and a short-nap roller for flat areas, working in manageable sections.
Maintain a wet edge, follow manufacturer’s spread rate, and allow recommended dry time—typically 1–4 hours—before recoating or painting.
Step 6 Choose paint method and apply (brush/roller/spray techniques; number of coats)
After your bonding primer has cured, decide whether you’ll brush, roll, or spray based on the paneling’s texture and your comfort level—brush for grooves, a short-nap roller for flats, and a sprayer for the fastest, most even coverage.
Apply thin, even coats, maintain a wet edge, and allow recommended dry time between coats.
Two coats usually suffice; inspect for uniform coverage and add a third only if needed.
Step 7 Finish details (cutting in, maintaining grain appearance, reattaching trim)
With your final coat dry, focus on the finish details that make the job look professional: cutting in clean edges, preserving the paneling’s grain where you want it visible, and reattaching trim and hardware.
Use a high-quality angled brush for crisp lines, feather paint into grooves to keep natural texture, touch up seams, and reinstall trim carefully—caulk and small nails secure a seamless, finished appearance.
Step 8 Cure time and reinstallation of fixtures
Although the paint may look dry to the touch, let it cure fully before you reinstall fixtures or hang anything on the walls; doing so prevents smudges, marks, and uneven sheen.
Wait the manufacturer’s recommended cure time—often 24–72 hours for light use, up to two weeks for full hardness.
Reattach switch plates, mirrors, and hardware gently, using soft pads to avoid scuffs.
Alternative Methods and Product Comparisons
When you’re deciding how to prep and finish paneling, weigh liquid deglossers, light sanding, and non-sanding alternatives for adhesion and surface texture.
Compare bonding primers, shellac, and oil-based primers for stain-blocking, odor, and drying time so you pick the right trade-offs.
Also consider spraying versus rolling on textured paneling—spraying speeds coverage but can overspray, while rolling is neater but may miss deep grooves.
Liquid deglosser vs. light sanding vs. sanding alternatives
Before you pick a method, consider how glossy the paneling is, how much time you have, and how much dust you can tolerate—liquid deglossers dissolve sheen quickly with no sanding dust, light sanding scuffs the surface for stronger adhesion but creates mess, and alternatives like scuff pads or bonding primers give middle-ground options depending on the finish and your patience.
| Method | Use when |
|---|---|
| Liquid deglosser | Low dust, low prep time |
| Light sanding | Tough finish, max adhesion |
| Scuff pad | Moderate sheen, less mess |
| Bonding primer | Poorly adhesive surfaces |
Bonding primer vs. shellac vs. oil-based primer (pros and cons)
If you’re weighing prep options, the next decision is picking the right primer for adhesion and stain-blocking.
Bonding primers stick to slick veneer and latex paint, are low-odor, and work well for water-based topcoats.
Shellac blocks heavy stains and dries fast but smells and requires solvent cleanup.
Oil-based primers are durable and block tannins but take longer to dry and need mineral spirits.
Spraying vs. rolling for textured paneling (advantages and drawbacks)
Although textured paneling hides imperfections, choosing between spraying and rolling changes how much texture you keep and how fast the job goes.
You’ll spray for thin, even coats and crisp edges, covering faster but risking overspray and needing equipment.
Rollers trap paint in grooves, keeping texture and minimizing prep, but require multiple passes for uniform coverage and can leave stipple.
Common Problems When Skipping Sanding and How to Fix Them
If you skip sanding, you’ll likely run into problems like peeling paint, visible seams or raised grain, and stains or mildew bleeding through.
You’ll need targeted fixes—scraping and re-coating for flaking, seam filling and light sanding or deglossing for uneven texture, and spot treatments plus a stain-blocking primer for stains and mildew.
If adhesion still fails after priming, you’ll troubleshoot with stronger cleaners, a bonding primer, or by sanding back to a sound surface before repainting.
Peeling or flaking paint causes and remedies
When paint peels or flakes after you skip sanding, it’s usually because the new coat couldn’t properly bond to the old surface—dust, gloss, or lingering contaminants act like tiny barriers that break the paint’s grip.
Remove loose paint, clean with TSP or a trisodium-free cleaner, rinse, dry, and spot-prime with a bonding primer.
Repaint only when the primer cures fully.
Visible seams, raised grain, or uneven finish correction steps
Because paneling seams and raised wood grain stay obvious without proper prep, you’ll need targeted fixes to get a smooth, even finish.
Fill seams with paintable caulk, smooth with a damp cloth, and let dry.
Lightly scuff high-grain areas with a fine abrasive pad, clean dust, prime with a bonding primer, then apply thin, even topcoats to minimize texture and sheen variation.
Mildew, stains bleeding through spot treatment and stain-blocking primers
After you’ve smoothed seams and knocked down raised grain, you still might face mildew or old stains seeping through paint—especially on paneling that didn’t get a proper sanding.
Treat mildew with a bleach solution, rinse and dry fully.
For tannin or water stains, spot-prime with a solvent-based or shellac blocking primer before priming the whole wall to prevent bleed-through.
Poor adhesion after primer troubleshooting
If you skip sanding, primer can peel, flake, or fail to bond to slick or glossy paneling—so you’ll want to recognize the signs and act quickly.
Check for lifting, powdery residue, or obvious gaps. Remove loose primer, clean with TSP substitute, scuff with a liquid deglosser, then reapply a high-adhesion primer.
Allow full cure before topcoat to guarantee lasting adhesion.
Best Practices, Tips, and Time-Saving Strategies
To make paneling look smoother, you’ll want to pick a low- or satin-sheen that reduces glare and hides the paneled texture.
Use simple techniques—like feathering paint into grooves, masking around outlets and trim, and cutting in clean corners—to save time and keep lines sharp.
I’ll also cover upkeep tips for painted paneling and how to weigh the cost-time trade-offs between DIY and hiring a pro.
Choosing the right sheen to minimize paneling look
While a flat finish can hide grooves, choosing the right sheen is about balancing light reflection and durability so your paneling reads more like a smooth wall than wood grain.
Use low-sheen eggshell or matte for subtlety and easier touch-ups; pick satin where you need washability.
Test swatches under room lighting, and avoid high gloss, which accentuates texture and draws attention to seams.
Techniques to disguise grooves and seams
When you want your painted paneling to read like flat drywall, focus on filling and feathering grooves, smoothing seams, and controlling texture so light won’t highlight every ridge.
Use a flexible acrylic caulk for narrow gaps, lightweight spackling for wider cuts, and a broad knife to feather edges.
Finish with a thin roller nap and light cross-rolling to blend texture seamlessly.
Working around electrical outlets, trim, and corners efficiently
Plan your approach before you start cutting in so you’ll work faster and avoid mistakes around outlets, trim, and corners; gather the right tools—angled sash brush, slim roller, painter’s tape, outlet keys, and a putty knife—and sequence tasks to limit drying time and rework.
Remove plates, tape edges, paint trim first, cut in at corners with the sash brush, then roll panels, patch drips, reinstall fixtures.
Maintenance tips for painted paneling long-term
After you’ve finished painting and reinstalled fixtures, keep your paneling looking fresh with a simple maintenance routine that saves time and prevents costly touch-ups.
Wipe surfaces monthly with a soft, damp cloth and mild cleaner. Touch up chips with matching paint and a small brush promptly.
Control humidity, avoid harsh scrubbing, and protect high-traffic areas with washable fabric or removable panels.
Cost vs. time trade-offs: DIY vs. hiring a pro
Although tackling painted paneling yourself can save money, you’ll trade dollars for time and effort — and sometimes for finish quality.
Weigh material costs, primer and paint, and rental tools against a pro’s labor and speed. If you’ve got patience and steady hands, DIY cuts costs.
If you need flawless results fast, hire a pro to avoid mistakes and wasted supplies.
Mistakes to Avoid
Don’t skip cleaning or grab the wrong primer, because paint won’t bond properly to grime or glossy surfaces.
Also avoid applying coats that are too thick or too thin—both lead to poor coverage and durability.
Finally, check for moisture or structural problems first and steer clear of high-gloss finishes that’ll highlight every imperfection.
Skipping cleaning or using the wrong primer
If you skip cleaning or grab the wrong primer, paint won’t stick well and the finish will fail sooner than you expect.
You should degrease grooves, remove dust, and repair loose panels before priming. Use a bonding primer designed for slick or melamine surfaces; don’t use flat interior primer meant for drywall.
Proper prep prevents peeling and saves time.
Applying too thick or too few coats
Go easy on the roller and brush: applying coats that are too thick or skipping needed ones leads to drips, long dry times, and an uneven finish.
Apply thin, even coats, allow proper drying between layers, and light-roll for uniform texture.
Two to three thin coats usually cover paneling well; add another only if coverage isn’t consistent, not because you rushed the previous pass.
Ignoring moisture or structural issues
While it might be tempting to paint over damp or warped paneling to save time, you’ll just trap moisture and hide structural problems that get worse underneath the finish.
Inspect for leaks, rot, or loose boards before painting. Fix leaks, replace damaged sections, and guarantee proper ventilation and drying.
Painting over active issues wastes effort and risks mold, peeling, and costly future repairs.
Using high-gloss finishes that highlight imperfections
Because glossy paints reflect light, they’ll expose every seam, dent, and uneven texture on your paneling, making flaws far more noticeable than a satin or eggshell finish would.
Don’t choose high-gloss unless you’ve fully repaired and primed surfaces. Instead, pick a low-sheen finish to minimize texture, or spot-prime and skim imperfections first if you want a brighter, reflective look without emphasizing defects.
Before-and-After Case Examples (Scenarios)
You’ll see three practical before-and-after scenarios that show which approach fits different paneling problems.
First is a small room refreshed quickly with a deglosser and primer, then a high-moisture basement treated with a stain-blocking primer, and finally a case where sanding and refinishing was the smarter choice.
Use these examples to match your room’s condition to the right method.
Small room makeover using deglosser and primer
If your small room feels dated because of dark wood paneling, a quick makeover using a liquid deglosser and a good primer can transform the space without heavy sanding or a full remodel.
You’ll wipe panels with deglosser, let them dry, spot-prime knots, then roll on a bonding primer.
Finish with two coats of latex paint for brighter, cleaner walls that open the room.
High-moisture basement paneling solution with stain-blocking primer
When basement paneling shows water stains or mildew, treating it with a stain-blocking bonding primer designed for high-moisture areas keeps odors and bleed-through from ruining your new finish.
You clean mildew with a mildew-specific cleaner, let panels dry thoroughly, then apply the primer.
After curing, use a mildew-resistant paint. This approach hides stains and resists future moisture without sanding.
When full restoration (sanding/refinishing) was the better choice
The stain-blocking primer method works well for many damp basements, but some paneling problems call for full restoration through sanding and refinishing.
If panels are warped, deeply stained, or peeling veneer, you’ll get longer-lasting results by restoring them. Sanding removes damage, exposes sound wood, and lets you refinish or replace boards.
Choose full restoration when structural integrity or aesthetics demand more than paint.
FAQ
You’ll probably have a few quick questions—like whether sticky primers or all-in-one paints let you skip priming, how long paint holds up without sanding, or if dark-to-light color changes need extra coats.
You might also wonder whether painting will make the room feel smaller or flatter, or if you can later restore the wood look after painting.
Keep these FAQs in mind as you plan so you get the results you want.
Can I paint paneling without priming if I use sticky primers or all-in-one paints?
Curious if sticky primers or all-in-one paints let you skip priming paneling? Yes, they can work on sealed or lightly worn paneling—sticky primers boost adhesion and all-in-ones combine bonding and paint.
Still, clean surfaces, fill gaps, and test a small area first. For glossy, oily, or heavily stained paneling, a dedicated primer or deglosser is safer for lasting results.
How long does painted paneling last without sanding first?
If you skipped sanding because you used a sticky primer or all‑in‑one paint, expect variable longevity depending on surface condition and product quality.
Generally, good adhesion yields 5–10 years of service on smooth, clean paneling; older, oily, or damaged surfaces may show peeling or chipping within 1–3 years.
Touchups extend life; proper cleaning and avoiding excessive moisture help maintain the finish.
Will painting paneling make my room look smaller or flatter?
Wondering whether painting paneling will shrink or flatten your room? It can if you pick a very dark, matte color and paint every surface uniformly.
To avoid a boxed-in feel, choose lighter or medium tones, satin or eggshell finishes, and paint trim slightly lighter than panels.
Proper lighting and strategic accent walls keep depth and proportion intact without sanding.
Can I change the color from dark to light without multiple coats?
Can you switch a dark paneling color to a light one without endless coats? Yes—with proper prep and product choices you’ll cut coats.
Clean, degloss, and prime with a high-quality stain-blocking primer designed for glossy or tannin-rich wood.
Use a light-reflecting, high-opacity paint (eg. 100% acrylic or enamel).
Two coats are often enough; patchy areas may need touch-ups.
Is it possible to restore the wood look after painting later?
How easily can you bring back the natural wood look after painting?
You can’t truly reverse paint without stripping to bare wood. To restore wood appearance, strip paint chemically or with a heat gun, sand to reveal grain, then stain or apply wood-look gel stain and seal.
Expect effort, possible panel damage, and color variation; full authenticity may be limited.