How to Texture Coat Exterior Walls for a Durable Finish
You can give exterior walls a durable, weather-resistant texture coat by first evaluating and cleaning the substrate, fixing cracks and moisture issues, and priming once repairs cure. Mix a manufacturer-recommended texture blend with appropriate binders and graded sand, then apply with a sprayer, roller, or trowel to achieve your chosen finish. Monitor temperature and humidity for proper curing, perform regular inspections, and address blemishes promptly. Keep going to learn detailed steps, tool choices, and troubleshooting tips.
How to Texture Coat Exterior Walls for a Durable Finish
You’ll get a quick answer on what to expect from a texture coat and the typical results it delivers.
Expect improved weather resistance, hiding of minor surface imperfections, and a range of finish textures from smooth to heavily stippled.
With proper prep and the right materials, your exterior will gain both durability and curb appeal.
Quick Answer What to Expect and Typical Results
Expect a textured exterior to add both protection and visual depth to your walls: properly applied texture coating hides minor imperfections, improves weather resistance, and lasts years with basic maintenance.
When you learn how to texture coat exterior walls, expect uniform coverage, slight color variation, and durable abrasion resistance.
Typical results include reduced touch-ups, improved curb appeal, and a finish that holds up to sun, rain, and temperature changes.
Basic Understanding: What Is Texture Coating and Why Use It
Texture coating is a protective finish you apply to exterior walls that combines a base material with aggregate or acrylics to create different looks and textures.
You’ll choose it for added durability, improved weather resistance, easier maintenance, and a cleaner aesthetic.
Common options include sand, pebble, skip trowel, acrylic, and elastomeric textures.
Definition of Texture Coating for Exterior Walls
A texture coat is a thin, pigmented layer applied over exterior walls to add visual interest, hide small imperfections, and boost weather resistance.
You apply textured compounds or paints with trowels, rollers, or sprays to create patterns and surface grip.
It bonds to masonry, stucco, or properly primed siding, letting you unify appearance and prepare walls for final protective finishes.
Benefits Durability, Weather Resistance, Aesthetics, and Maintenance
Durability is one of the main reasons you’ll choose a texture coat: it strengthens exterior walls against chipping, cracking, and everyday wear so they last longer with less repair.
It also boosts weather resistance, shedding rain and resisting UV, improves curb appeal with depth and uniformity, and simplifies maintenance by hiding imperfections and reducing cleaning and repainting frequency, saving time and money.
Common Texture Types (Sand, Pebble, Skip Trowel, Acrylic, Elastomeric)
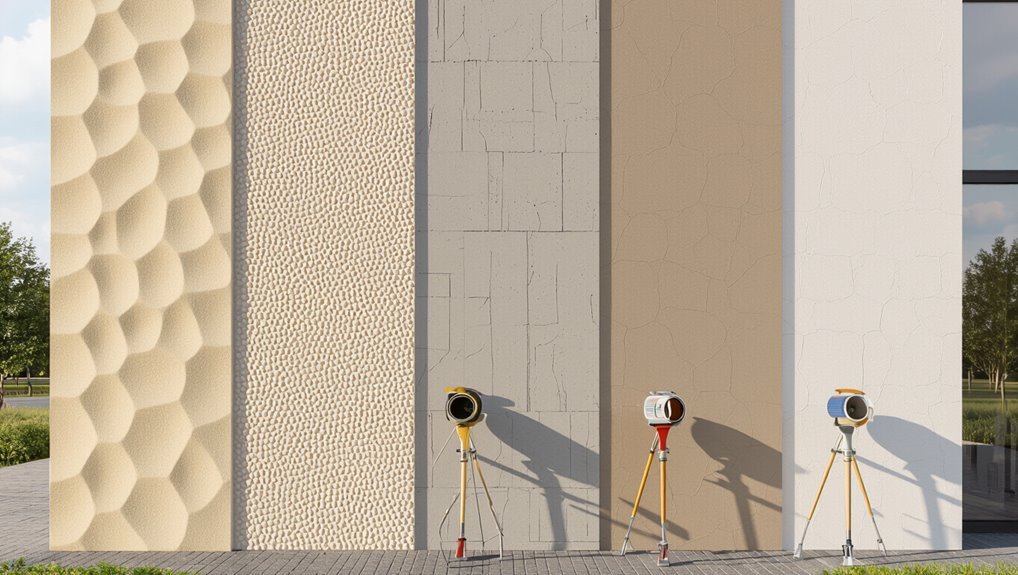
Beyond durability and weather resistance, the finish you choose affects both look and performance, so it’s useful to know the common texture options available.
You pick textures for appearance, slip resistance, and crack hiding. Consider:
- Sand: subtle grip, low sheen.
- Pebble: coarse, hides flaws.
- Skip trowel: decorative, uneven pattern.
- Acrylic/elastomeric: flexible, weatherproof.
Assessing Your Walls Before Starting
Before you start texture coating, you’ll want to identify the surface type—masonry, stucco, brick, concrete, or rendered plaster—because each needs different prep.
Check for damage like cracks, moisture, efflorescence, or mold and note anything that affects adhesion.
Use a simple suitability checklist and call a professional if you find structural issues, extensive damp, or persistent mold.
Surface Types: Masonry, Stucco, Brick, Concrete, Rendered Plaster
Surface type matters—masonry, stucco, brick, concrete, and rendered plaster each accept texture coats differently, so you should identify what you’re working with before mixing materials or picking application methods.
Smooth concrete needs profilic adhesion primers; porous brick and masonry absorb more primer and thicker mixes; stucco and rendered plaster take lighter, flexible textures.
Match primer, mix consistency, and tooling to surface.
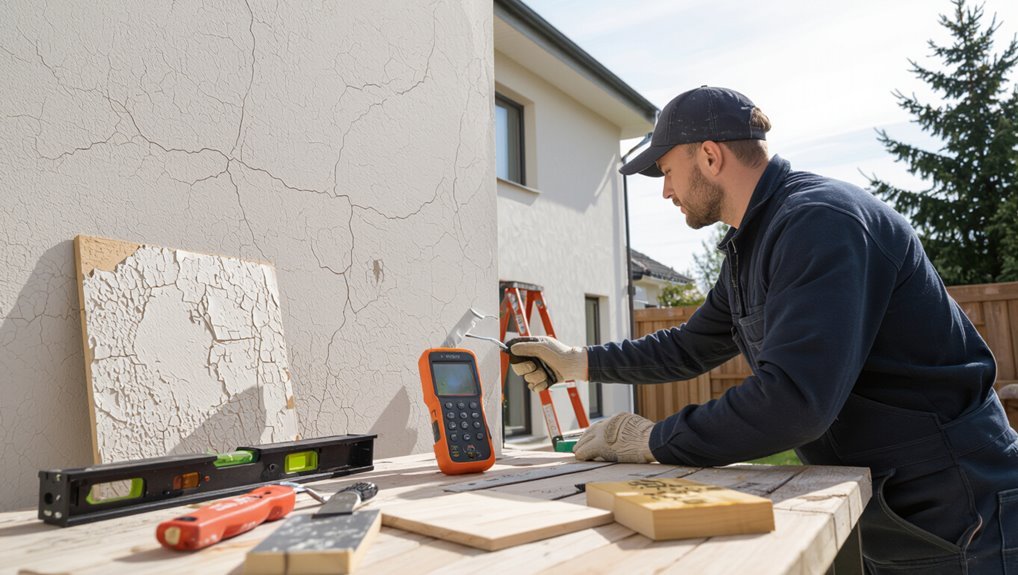
Inspecting for Damage: Cracks, Moisture, Efflorescence, Mold
When you’re evaluating exterior walls, start by looking for cracks, moisture stains, efflorescence, and mold, because each problem dictates different repairs and prep steps.
Check crack width and depth for structural vs. surface issues. Trace moisture to leaks, gutters, or rising damp.
Scrape efflorescence to reveal salt sources. Treat mold with biocide, then dry and repair before texture coating.
Suitability Checklist and When to Consult a Professional
After fixing visible damage, you should run a quick suitability checklist to confirm the wall’s ready for texture coating:
- Surface is dry and free of efflorescence or mold
- Cracks and loose plaster are repaired and stable
- Substrate accepts a primer and texture sample adheres
- No ongoing water or structural issues; if unsure, consult a licensed contractor for assessment and quotes
Quick Materials and Tools Checklist
Before you start, gather the essentials: basecoats, primers, texture mixes, sealers, and elastomeric options suited to your climate and substrate.
You’ll also need tools like trowels, sprayers, rollers, brushes, scaffolding, and proper protective gear.
Having the right products and equipment on hand will save time and prevent costly mistakes.
Materials: Basecoats, Primers, Texture Mixes, Sealers, Elastomeric Options
Tools and materials matter—so gather quality basecoats, primers, texture mixes, sealers, and any elastomeric products you’ll need before you start.
Choose compatible products for substrate, climate, and desired texture. Prep surfaces, follow manufacturer mixes, and test a small patch for adhesion and color.
Use weather-rated sealers and elastomeric for crack-bridging where needed.
- Basecoat
- Primer
- Texture mix
- Sealer/elastomeric
Tools: Trowels, Sprayers, Rollers, Brushes, Scaffolding, Protective Gear
A well-chosen kit makes the job smoother and faster, so gather the right trowels, sprayers, rollers, brushes, scaffolding, and protective gear before you start.
Choose durable stainless trowels, an adjustable sprayer, nap rollers for texture, and sturdy brushes.
Secure safe scaffolding and PPE. Work methodically, keep tools clean, and replace worn items promptly.
- Stainless steel trowels
- Adjustable sprayer
- Nap rollers
- Safety gear
Choosing Products by Climate and Substrate
With your tools ready, pick products that suit both the climate where you’ll be working and the wall substrate you’re coating. Choose breathable acrylics for humid areas, elastomeric for cracking regions, and cement-based finishes for masonry. Match primers to substrate and use corrosion-resistant fasteners. Check cure times for temperature limits.
| Product | Climate | Substrate |
|---|---|---|
| Acrylic | Humid | Stucco |
| Elastomeric | Variable | Painted |
| Cement | Cold | Masonry |
| Primer | Any | All |
Step-by-Step Process to Texture Coat Exterior Walls
Before you start, set up a safe, clean work area and gather protective gear so you can move quickly and work confidently.
Next you’ll strip old finishes, repair and prime any damage, then choose and mix the right texture material with the proper ratios and additives.
Finally, pick the best application method—spraying, trowelling, or rolling—based on the texture and surface.
Step 1 Prepare the Work Area and Safety Setup
Start by clearing a 6–10 foot perimeter around the walls so you can move freely and set up scaffolding, ladders, drop cloths, and tools without tripping hazards.
Check for loose debris, trim plants, and mark utilities.
Wear PPE—gloves, eye protection, dust mask or respirator, and non-slip boots.
Secure ladders/scaffolding, guarantee stable footing, and keep a first-aid kit nearby.
Step 2 Clean and Strip Old Finishes (Power Washing, Chemical Strippers)
Now that the area and safety measures are set, move on to removing dirt, loose paint, and old coatings so the new texture will bond properly.
Use a pressure washer at 1500–2500 psi, keeping the tip 12–18 inches away and working downward.
For stubborn finishes, apply a suitable chemical stripper, following manufacturer instructions, then rinse thoroughly and let surfaces dry before proceeding.
Step 3 Repair and Prime: Patching, Crack Stitching, Waterproofing Membranes
Repairing and priming guarantee your texture coat sticks and lasts, so address cracks, holes, and failed areas methodically: remove loose material, stitch or fill cracks with appropriate epoxy or mortar, apply patching compound to depressions and feather edges smooth, and install waterproof membranes where water intrusion is likely before priming with a product matched to your substrate.
After repairs cure, sand, clean, and apply primer evenly; allow full dry time.
Step 4 Choose and Mix the Texture Material (Ratios, Additives)
When you’re ready to create the texture coat, pick a mix that matches the substrate, desired finish, and local climate, then measure ingredients precisely.
Choose cement-, lime- or acrylic-based binders based on flexibility and breathability. Add graded sand for texture, polymer modifiers for adhesion, and corrosion inhibitors where metal lath exists.
Follow manufacturer ratios, slowly add water, and mix to a lump-free, workable consistency.
Step 5 Application Methods: Spraying vs. Trowelling vs. Rolling (When to Use Each)
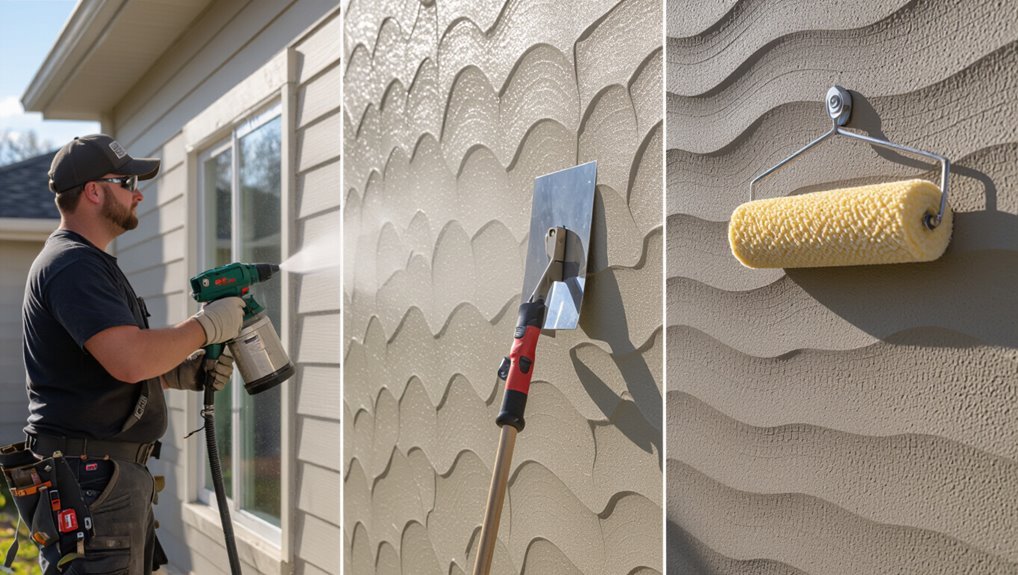
Step 5 is about choosing the right application method—spraying, trowelling, or rolling—because the choice affects finish, speed, and durability; pick the method that suits your substrate, texture mix, site conditions, and skill level.
Use spraying for large areas and fast coverage, trowelling for thicker, defined textures and repairs, and rolling for thin coats or touch-ups where control and simplicity matter most.
Step 6 Creating Desired Texture Patterns and Consistency Controls
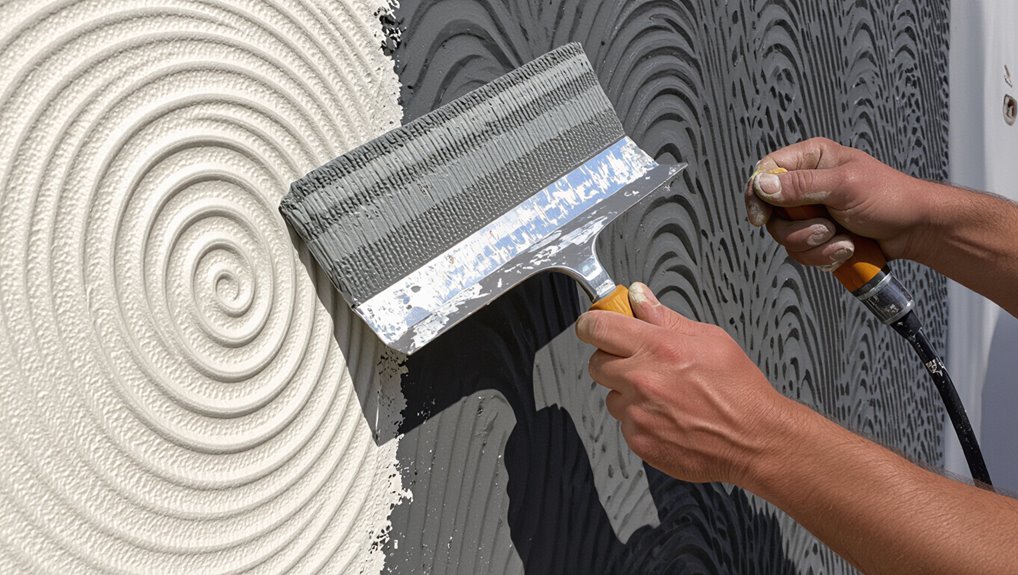
6 focuses on shaping the look and performance of your finish by controlling texture patterns and mix consistency so you get uniform results across the whole wall.
Decide pattern (skip trowel, stipple, swirl), adjust mix viscosity for tool and surface, test on scrap, mark reference lines, maintain batch uniformity, and work in controlled sections.
Check and correct mismatches immediately for seamless shifts.
Step 7 Curing Time, Drying Conditions, and Secondary Coats
Although temperature and humidity will dictate much of the timeline, you’ll want to plan curing and drying as deliberately as you planned your mix and texture so coatings bond properly and subsequent coats finish evenly.
Monitor surface moisture, keep conditions within manufacturer guidelines, and allow full cure before sanding or recoat.
Apply thin, even secondary coats; avoid rushes that trap moisture or cause delamination.
Step 8 Finishing: Topcoats, Sealers, Paint Options for Longevity
Once your texture has fully cured, choose a compatible topcoat and sealer to protect the surface and lock in the look; the right combination will repel moisture, resist UV damage, and simplify maintenance over years of exposure.
Select breathable acrylic or elastomeric paints for flexibility, apply a UV-stable sealer, use quality primers where needed, and follow manufacturer dry times to guarantee adhesion and long-term durability.
Step 9 Clean-Up, Tool Care, and Waste Disposal
Gather your tools, clear the worksite, and handle waste responsibly to finish the job right: remove masks, tarps, and debris; sweep and hose surfaces.
Clean rollers, brushes, and trowels with appropriate solvents, then dry and store them. Dispose of leftover coatings, rags, and containers per local hazardous-waste rules.
Document materials used, and schedule regular tool maintenance to extend their life.
Comparative Guidance: Choosing the Right Texture System
When picking a texture system, you’ll want to compare acrylic, cementitious, and elastomeric options for performance and maintenance.
Consider your climate—cold, wet, hot, or coastal—to match flexibility, breathability, and freeze/thaw or salt resistance.
I’ll walk you through which systems work best in each environment so you can choose confidently.
Acrylic vs. Cementitious vs. Elastomeric Systems
Choosing the right exterior texture system matters because it affects durability, appearance, and long-term maintenance; acrylic, cementitious, and elastomeric coatings each bring different strengths and trade-offs, so you’ll want to match the system to your climate, substrate, and budget.
| System | Strength |
|---|---|
| Acrylic | UV resistance, color retention |
| Cementitious | Impact resistance, breathability |
| Elastomeric | Crack bridging, waterproofing |
Best Options by Climate: Cold, Wet, Hot, Coastal Environments
Because climate drives how a texture system performs, you’ll want to pick coatings suited to your specific conditions—cold climates need systems that resist freeze-thaw and allow vapor to escape, wet climates require breathable yet water-shedding finishes, hot sunny regions benefit from UV-stable, reflective acrylics, and coastal properties demand corrosion- and salt-tolerant, flexible membranes.
- Cold: vapor-permeable cementitious or acrylic blends
- Wet: breathable water-repellent textures
- Hot: UV-resistant reflective acrylics
- Coastal: elastomeric, salt-tolerant systems
Common Problems, Causes, and How to Fix Them
You’ll run into a handful of recurring issues—peeling, blistering, cracking, efflorescence, staining, and poor adhesion—and you’ll need to diagnose each one correctly before you fix it.
For each problem I’ll show you the likely causes, the step-by-step repair or patch methods, and the preventive measures to keep it from coming back.
Follow those targeted checks and remedial actions so your texture coat stays durable and looks right.
Peeling, Blistering, and Flaking Diagnosis and Repair Steps
When paint starts peeling, blistering, or flaking on exterior walls, it’s usually a sign that something went wrong with surface prep, moisture management, or product choice—so you’ll want to diagnose the root cause before patching cosmetics.
Inspect substrate, test for moisture, and check adhesion.
Remove failed coating, dry and repair substrate, prime with compatible primer, and reapply texture coat using proper materials and techniques.
Cracking and Hairline Fractures Patch Methods and Reinforcement
Cracks—ranging from hairline fissures to wider splits—signal movement, substrate weakness, or improper curing and should be assessed before you repaint or texture-coat an exterior wall.
Clean and widen hairlines, apply flexible acrylic filler or elastomeric sealant, embed fiberglass mesh for larger cracks, feather edges, then prime.
Monitor settlement; reinforce with control joints or substrate repairs if cracks recur.
Efflorescence and Staining Removal and Prevention
After you’ve repaired cracks and stabilized the substrate, look for efflorescence and staining—white powdery deposits, rust streaks, or biological growth indicate moisture and soluble salts working through the wall.
Remove deposits with a stiff brush and mild acid wash or proprietary cleaner, rinse thoroughly, treat rust, kill algae with biocide, fix leaks, improve drainage and ventilation, and apply breathable, salt-resistant primers before texture coating.
Poor Adhesion After Application Causes and Remedial Actions
1 common reason texture coats peel is poor adhesion to the prepared substrate, and you’ll usually spot it as flaking, edge lifting, or large sections pulling away shortly after application.
Check for dust, oils, loose paint, or dampness. Remove contaminants, repair substrate, prime with a compatible bonding primer, and apply within manufacturer’s temperature and humidity ranges.
Allow proper cure before exposure.
Best Practices and Pro Tips for a Durable Finish
Before you start coating, make sure the substrate meets surface preparation standards and that temperature and humidity are within the manufacturer’s recommended range.
Apply texture in controlled layers, respecting maximum thickness per coat and ideal curing times between passes.
Finally, set a simple long-term maintenance and touch-up schedule so small repairs don’t become major problems.
Surface Preparation Standards and Environmental Controls
When you aim for a durable texture coat, meticulous surface prep and strict environmental control are nonnegotiable: clean, sound substrates and stable temperature and humidity keep adhesion strong and prevent cracking, blistering, or uneven curing.
You should remove loose paint, efflorescence, mold, and contaminants; repair voids and guarantee proper bonding primers.
Monitor wind, dust, and curing shelter to protect fresh work.
Optimal Application Temperatures and Humidity Guidelines
Although temperature and humidity might seem like background concerns, they dictate how your texture coat cures and how well it bonds to the substrate.
Apply coatings when temperatures are between 50–85°F (10–29°C) and relative humidity is under 85%.
Avoid application during rapid temperature swings, rain, or heavy dew.
Use heaters or fans to stabilize conditions and follow manufacturer cure-time recommendations for best adhesion.
Layering Strategy and Maximum Recommended Thicknesses
A good layering strategy starts with planning each coat’s purpose—bond, build, and finish—and sticking to manufacturer thickness limits so your system cures properly and resists cracking.
Apply thin bond coats for adhesion, moderate build coats for texture, and a light finish coat for protection.
Allow full cure between layers, never exceed cumulative thickness recommendations, and use reinforcement where specified.
Long-Term Maintenance Schedule and Touch-Up Techniques
Set a simple inspection cadence—quarterly visual checks and a thorough annual review—to catch hairline cracks, delamination, or staining before they grow.
You’ll clean, document, and address issues promptly; patch small defects, reapply texture where needed, and reseal joints to prevent moisture intrusion.
- Clean mildew and dirt with mild detergent
- Spot-prime and blend repairs
- Recoat high-wear areas every 5–7 years
- Keep records of dates and materials used
Cost, Timeframe, and Scope Planning
You’ll want a clear budget that breaks costs into materials, labor, and any equipment rental so you know where your money’s going.
Plan the timeline by project size—expect a single wall to take a day or two, a whole exterior several days, and multi-storey jobs to stretch longer with safety setups.
Decide early whether to hire a pro or DIY based on risk tolerance, warranty needs, and your skill level.
Typical Cost Breakdown: Materials, Labor, Equipment Rental
1 key part of planning a texture coat job is breaking down costs into materials, labor, and equipment rental so you can estimate total spend, timeline, and scope before work begins. You’ll list supplies, hourly labor, and rental days, then total. Compare bids and factor contingency.
| Item | Typical Cost | Notes |
|---|---|---|
| Materials | $500–$2,000 | Coverage varies |
| Labor | $30–$70/hr | Skilled crews |
| Equipment | $50–$300/day | Scaffolds, sprayers |
Project Timeline: Small Wall vs. Whole Exterior vs. Multi-Storey
With materials, labor, and equipment costs mapped out, it’s time to plan the timeline by scale: a small patch or single wall, a full exterior, or a multi-storey job each brings different time, cost, and safety implications.
For a small wall expect a day or two; a whole exterior takes several days to a week; multi-storey projects add staging, inspections, and extra days for safety setups and curing.
When to Hire a Pro vs. DIY: Risk, Warranty, and Skill Considerations
Because texture-coating ranges from a quick patch to multi-storey work, decide early whether to hire a pro or do it yourself based on risk, warranty, and your skill level.
Balance cost, timeframe, and scope: if safety, complex substrates, or warranty matter, hire; if small, confident, and time-flexible, DIY.
- Safety risks (heights, scaffolding)
- Warranty requirements
- Skill and tool access
- Project timeline constraints
FAQ
You probably have specific questions about lifespan, application, cost-benefit, patch matching, and upkeep—let’s answer them simply and practically.
You’ll learn how long texture coats typically last, whether you can apply over paint or render, and when elastomeric is worth it.
We’ll also cover matching patches to existing finishes and basic maintenance to extend the coating’s life.
How long does a texture coat last on exterior walls?
How long a texture coat lasts depends mainly on the materials, installation quality, and local climate—expect anywhere from 10 to 25 years for common acrylic or cement-based finishes, while high-quality elastomeric systems can last 20 years or more if they’re properly applied and maintained.
You can extend life by keeping surfaces clean, repairing cracks quickly, inspecting seals, and repainting or resealing before severe deterioration.
Can I apply texture coating over existing paint or render?
Can you apply a texture coat over existing paint or render? Yes, provided the substrate is sound, clean, and well-adhered.
Remove loose paint, repair cracks, and wash away dirt or mildew. Prime glossy surfaces and bare patches as recommended.
Test a small area for adhesion. If render is severely damaged or friable, re-render or repair before texturing to guarantee durability and proper bonding.
Is an elastomeric coating worth the extra cost?
Really worth it?
You’ll pay more upfront for elastomeric coatings, but they offer superior crack-bridging, waterproofing, and long-term durability.
If your walls face heavy weather, hairline cracks, or moisture issues, they reduce maintenance and repainting frequency.
For sheltered, sound substrates, standard textured coatings may suffice.
Weigh lifespan and risk: higher initial cost often saves money and hassle over time.
How do I match texture on patch repairs to the existing finish?
Want your patch to disappear into the surrounding finish? Match texture by cleaning and feathering edges, using the same basecoat and aggregate, and testing blends on scrap.
Adjust trowel angle, pressure, and additive thickness to replicate pattern. Work wet edges into existing texture, let cure, then sand lightly only if needed.
Prime and topcoat both areas for uniform color and sheen.
What maintenance will prolong the life of a texture-coated exterior?
To keep your texture-coated exterior looking and performing its best, follow a simple routine of inspections, gentle cleaning, and timely repairs.
Check for cracks, delamination, mildew, and damaged joints twice yearly.
Wash with a mild detergent and soft brush, rinse thoroughly, and touch up or reseal small areas promptly.
Trim vegetation, maintain gutters, and repaint or recoat as manufacturer recommends.