Why Does Ceiling Paint Crack? Common Causes and How to Fix Them
Ceiling paint cracks because moisture, temperature swings, poor prep, or incompatible paints make the coating lose adhesion and flex, so you’ll see hairline splits, alligatoring, or peeling. Leaks, high humidity, and attic condensation are common culprits, while dirt, old glossy coatings, or too many thick layers also fail. Fixing it means finding leaks, scraping loose paint, patching or replacing damaged drywall, priming, and repainting with a flexible, quality paint—and more tips follow.
Quick Answer Why Ceiling Paint Cracks
Ceiling paint usually cracks because of moisture, poor surface prep, or old, incompatible paint.
If the cracks are small and dry, you can patch and repaint for a quick fix; if they’re widespread, bubbling, or linked to leaks, you’ll need a full repair to address underlying damage.
Start by inspecting the area so you can choose the right approach.
One-sentence summary of common causes
Although it might seem sudden, paint on your ceiling usually cracks because of moisture, temperature swings, poor surface prep, or using incompatible or low-quality paint.
When you ask why does ceiling paint crack, think aging drywall, leaks, humidity changes, thermal expansion, and paint adhesion failures; these factors alone or combined cause hairline fissures, peeling, and flaking.
When you need a quick fix vs. a full repair
Sometimes a quick patch will do, but you’ll need a full repair when the cracking signals ongoing damage—think active leaks, widespread peeling, soft or sagging drywall, or mold.
Do a quick fix for small hairline cracks or cosmetic flaking: clean, sand, fill, prime, repaint.
Opt for full repair if damage returns, water stains persist, insulation is wet, or structure feels compromised—call a pro.
Basic Understanding What Is Ceiling Paint Cracking?
You’ll often spot cracking as hairline splits, spiderweb patterns, alligator-like scales, or sections that peel away.
Pay attention to whether the surface coating itself is failing versus underlying plaster or drywall that’s crumbling or separating.
That distinction matters because paint failure is fixed differently than structural or substrate damage.
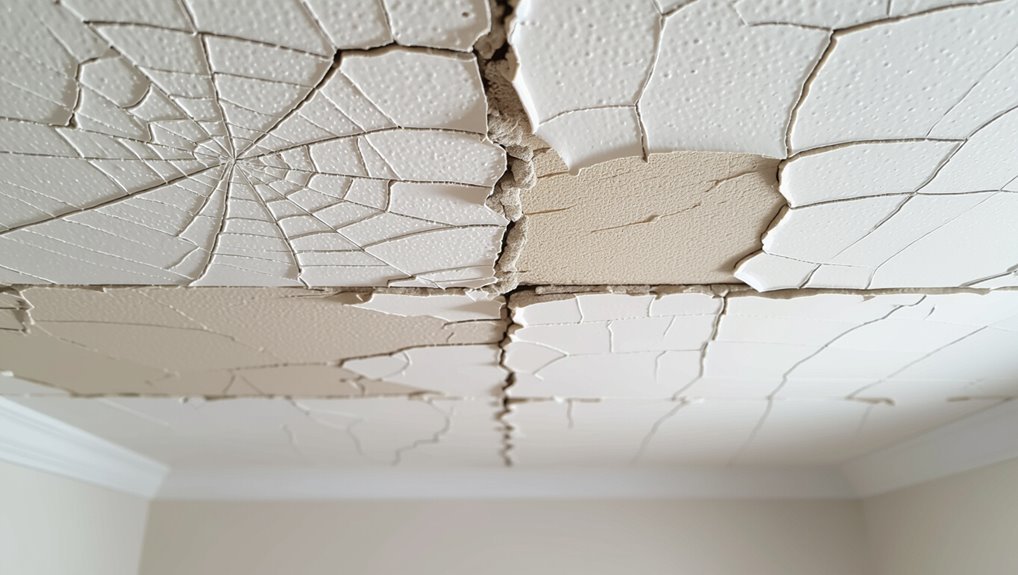
What ‘œcracking’ looks like (hairline, spider, alligator, peeling)
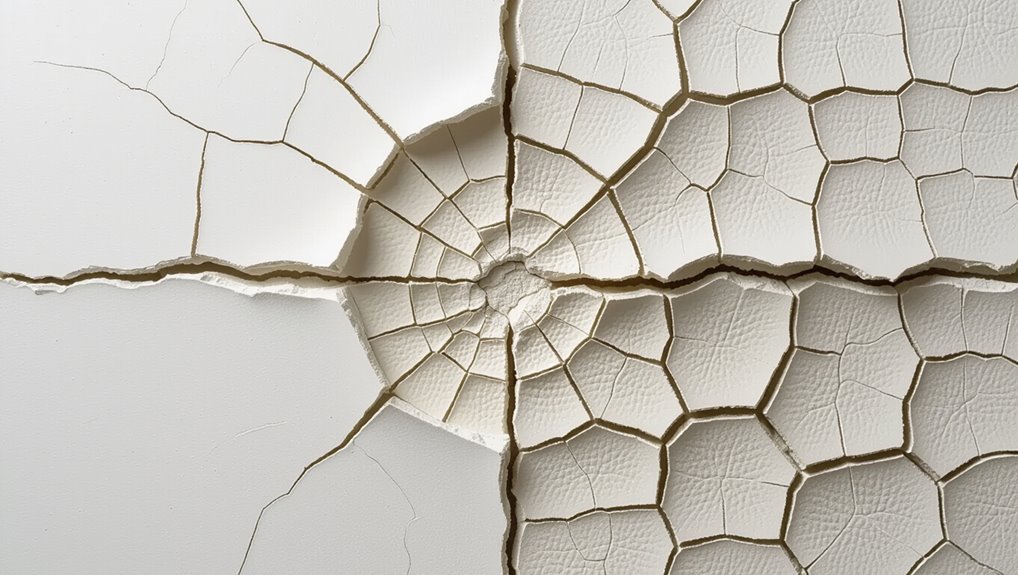
When paint on a ceiling starts to fail, it shows distinct patterns you can learn to recognize: hairline cracks are fine, straight lines; spider cracks radiate from a point like a web; alligatoring creates a network of angular, plate-like segments; peeling lifts in sheets or flakes, exposing substrate.
You’ll use these visual clues to identify severity and choose the right repair approach.
How paint failure differs from plaster or drywall damage
Although paint cracking can look dramatic, it’s usually a surface issue you can fix without replacing materials; plaster or drywall damage, by contrast, means the substrate itself is compromised and needs repair.
You can often scrape, sand, prime, and repaint cracked paint.
If the plaster or drywall is soft, crumbling, or shows joint failure, you’ll need patching, re-taping, or board replacement before repainting.
Main Causes of Ceiling Paint Cracking
You’ll usually see ceiling paint crack because of problems with the structure or substrate, moisture from leaks or condensation, and temperature swings that cause expansion and contraction.
Poor surface prep—like dirt, loose old paint, or skipping primer—plus low-quality or incompatible paints make cracking more likely.
We’ll look at how each of these factors shows up and what you can do about them.
Structural and substrate issues
Because the materials beneath your ceiling determine how paint behaves, structural and substrate issues are a common root of cracking, not just surface problems.
If drywall joints, loose plaster, sagging panels, or improper priming let the substrate move or flex, paint will split.
You should inspect fasteners, seams, and framing movement, repair or reinforce the substrate, then re-prime before repainting.
Moisture and water damage (leaks, condensation, roof issues)
Structural problems often let surfaces move, but moisture is a different kind of offender that actively breaks down paint and the materials beneath it.
If you ignore leaks, roof failures, or chronic condensation, paint will blister, peel, and crack as drywall and plaster weaken.
Stop the water source, dry the area, replace damaged substrate, and reclad and repaint with moisture-resistant products to prevent recurrence.
Temperature fluctuations and thermal expansion
When temperatures swing widely between day and night or across seasons, your ceiling’s paint and substrate expand and contract at different rates.
That repeated movement stresses the paint film until it cracks. You’ll notice fine hairline cracks or larger fissures where joints, beams, or drywall meet.
Reduce risk by controlling indoor temperature swings and using flexible, high-quality paints that accommodate movement.
Poor surface preparation (dirt, loose older paint, improper priming)
If you skip proper prep—leaving dirt, peeling paint, or failing to prime—you’ll almost guarantee cracking later.
You need to clean, sand, and remove loose paint first so new coatings bond. Prime stained or porous areas and feather edges where old paint lifts.
Otherwise adhesion fails, moisture gets trapped, and movement causes flakes and cracks. Proper prep prevents most primer/paint failures.
Low-quality or incompatible paint and coatings
Although it’s tempting to save money, using low-quality or incompatible paints often causes cracking because they lack flexibility, adhesion, or proper formulation for ceilings.
You’ll notice fast failure, especially where humidity or temperature change. Choose ceiling-specific, breathable formulations and match paint type to existing coatings.
Test adhesion first, follow manufacturer instructions, and replace cheap products to guarantee a durable, crack-resistant finish.
Excessive layers of paint and trapped oils
Because paint builds up over time and household oils can become sealed under new coats, excessive layers and trapped oils often cause ceiling paint to crack and flake.
You’ll see hairline fractures where older glossy or oily surfaces prevent proper adhesion.
Strip or sand back to sound substrate, degrease thoroughly, then prime with a bonding or stain-blocking primer before recoating to restore a durable finish.
Movement from framing, joists, or settling
Beyond surface issues like trapped oils and thick paint build-up, movement in the structure itself often causes ceiling paint to crack.
When joists shift, framing settles, or temperature and humidity change, drywall and plaster flex. You’ll see long, spiderweb, or stair-step cracks tracking along seams or joist lines.
Address structural movement first—repair framing, secure joints, and use flexible joint compound before repainting.
Application mistakes (too thick coats, drying too fast)
If you apply paint in coats that are too thick or let layers dry unevenly, the surface won’t cure properly and will crack as it contracts and flexes.
You can prevent this by controlling coat thickness, drying rate, and technique:
- Use thin, even coats
- Follow manufacturer recoat times
- Avoid high heat or direct fans
- Sand between coats for adhesion
How to Diagnose the Root Cause
Start with a visual inspection checklist: look for pattern, location, stains, and nearby fixtures to spot likely causes.
Use moisture testing—probe or a moisture meter—and tap the ceiling to listen for hollow sounds that signal delamination.
Call a pro if you find structural issues, recurring moisture, or suspected mold.
Visual inspection checklist
When you inspect cracked ceiling paint, move methodically from broad observations to close-up checks so you can pinpoint likely causes quickly.
Note pattern, extent, and nearby fixtures. Check for substrate movement or paint delamination. Look for staining or texture changes.
Then use this quick checklist:
- Crack pattern (hairline, map, diagonal)
- Joint and seam gaps
- Paint adhesion (scrape test)
- Nearby structural or finish damage
Moisture testing methods (probe, moisture meter)
Because moisture is often the hidden cause of ceiling paint cracks, you’ll want to test suspect areas with both a probe and a moisture meter to confirm whether water is present and how deep it goes.
Use a sharp probe to check dampness beneath paint and plaster; follow with a pin or pinless moisture meter to map moisture levels across the ceiling and pinpoint hotspots for repair.
Tap and sound test for delamination
Tap the ceiling lightly with a knuckle or the handle of a screwdriver and listen for hollow or dull sounds that indicate delamination between the paint, plaster, or drywall layers; a clear, resonant “ping” usually means the material is intact, while a dead thud or uneven tones point to areas that need closer inspection.
Mark suspect spots, probe carefully with a small screwdriver, and remove loose material for repair.
When to call a pro (structural, recurrent moisture, mold)
If your probing and sound-testing reveal widespread soft spots, persistent wet patches, or recurring paint failure despite repairs, bring in a professional to diagnose the root cause.
Call a structural engineer for sagging, cracking framing, or joist issues.
Hire a moisture/mold specialist if leaks, high humidity, or visible mold persist.
They’ll use moisture meters, infrared scans, and lab tests, then recommend repairs and remediation.
Step-by-Step Fix: Repairing Cracked Ceiling Paint
Before you start, clear the room and protect floors and furniture so repairs won’t create a bigger mess.
Next, stop any leaks or humidity problems, then scrape and sand away loose paint and damaged substrate.
Patch or reinforce the plaster or drywall, and finish by priming with a stain-blocking, high-adhesion primer before repainting.
Step 1 Prepare the room (protect floors, clear furniture)
While you’ll be doing the messy work overhead, clear the room and protect everything below: move furniture out or to the center and cover floors and remaining items with heavy-duty drop cloths or plastic sheeting secured with painter’s tape.
Remove fragile objects, unplug electronics, and label small pieces. Keep a clear path for ladders, set up adequate lighting, and wear safety goggles and a dust mask.
Step 2 Identify and fix underlying issues (stop leaks, control humidity)
Now that the room’s prepped and protected, turn your attention to what caused the cracking in the first place.
Inspect for roof or plumbing leaks and patch them promptly.
Reduce humidity with exhaust fans or a dehumidifier, improve attic ventilation, and fix condensation sources.
Address structural movement or water stains before repainting so the repair holds and cracks don’t return.
Step 3 Remove damaged paint and loose substrate (scraping, sanding)
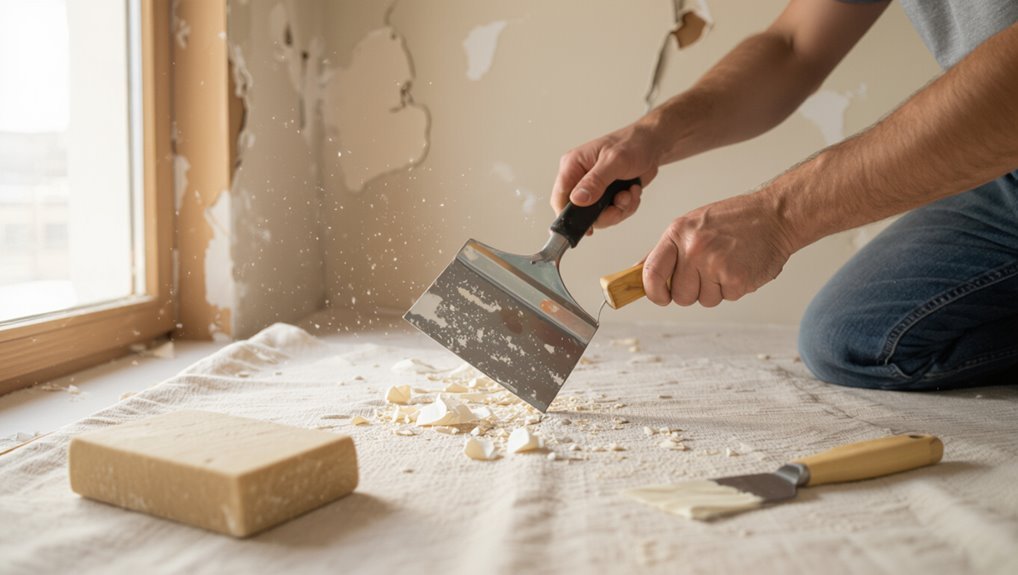
Scrape away loose paint and damaged drywall to create a stable surface for repairs.
Use a putty knife or scraper at a shallow angle, removing all flaking paint and crumbly paper.
Sand feathered edges with medium-grit then fine-grit sandpaper for a smooth changeover.
Vacuum dust, wipe with a damp cloth, and let dry.
Don’t skip thorough prep—paint won’t adhere otherwise.
Step 4 Repair substrate (patch plaster/drywall, reinforce joints)
Patch the damaged area thoroughly before you prime or repaint so the ceiling will stay smooth and stable.
Cut out compromised drywall or loose plaster, fasten a backing if needed, and apply patching compound in thin layers.
Embed tape over seams, sand between coats, and feather edges for a seamless finish.
Ascertain joints and fasteners are reinforced to prevent future movement and cracking.
Step 5 Prime with appropriate primer (stain-blocking, adhesion)
Step 5 is priming: apply a primer designed for ceilings and the specific problem—use a stain-blocking sealer over water or smoke stains and a high-adhesion primer on bare plaster or patched drywall.
Let the primer dry fully, follow manufacturer recoat times, and sand lightly if needed.
Primer seals repaired areas, prevents bleed-through, and promotes uniform paint adhesion for a lasting finish.
Step 6 Repaint with suitable ceiling paint and proper technique
Now repaint the ceiling using a product and technique that suit the surface and previous repairs: choose a high-quality ceiling or flat latex paint, matching sheen and color.
Use a roller with appropriate nap for texture, load evenly, and cut in with a brush.
Apply thin, even coats, let each dry fully, and sand light between coats if needed for a smooth, uniform finish.
Step 7 Finish inspection and cleanup
With the last coat dry, take a careful walkaround to inspect the repair and surrounding ceiling for any missed thin spots, lap marks, or texture differences so you can correct them before cleanup.
Touch up small flaws, blend texture, and feather edges.
Remove drop cloths, clean tools with appropriate solvent, vacuum dust, and wipe surfaces.
Dispose of waste properly and store leftover paint sealed.
Alternative Repair Methods and When to Use Them
If the cracking is isolated, you’ll usually get away with spot repairs.
But widespread or recurring cracks often mean a full ceiling repaint is wiser.
In areas that move or flex—like over joists or in older homes—you might choose an elastomeric or flexible coating to accommodate movement.
For severe surface damage or compromised drywall, skim coating or reinstalling the drywall is the right call.
Spot repairs vs. full ceiling repaint
You can often save time and money by choosing a spot repair when cracks are isolated and the surrounding texture and paint match well; reserve a full ceiling repaint for widespread cracking, large patches, or color/finish mismatches that make touch-ups obvious.
For spot fixes, clean, fill, sand, prime, and blend paint.
Repaint the whole ceiling when repairs remain noticeable or multiple areas need consistent finish.
Using elastomeric or flexible coatings for movement-prone areas
When ceilings keep cracking because joists shift, humidity fluctuates, or hairline movement runs through drywall seams, elastomeric or flexible coatings can bridge gaps and move with the substrate so repairs last longer.
You’ll prep by cleaning, priming with a compatible primer, then apply thin flexible coats.
They’re ideal for localized movement-prone spots; they’re not a fix for extensive structural damage.
Skim coating or reinstalling drywall for severe damage
Flexible coatings handle localized movement, but severe cracking, widespread texture loss, or sagging drywall calls for more substantial work like skim coating or reinstalling drywall. You’ll assess damage, choose skim coat for surface uniformity, or replace panels if structure’s compromised. Expect dust, drying time, and repainting. Plan for professional help if seams, insulation, or framing need repair.
| Step | Visual |
|---|---|
| Inspect | cracked map |
| Skim | smooth plane |
| Replace | fresh panel |
| Dry | soft light |
| Paint | clean finish |
Prevention and Long-term Best Practices
To prevent future cracking, you’ll start with proper surface prep and priming, choose compatible paints, and control moisture and ventilation in trouble spots like bathrooms and attics.
Pay attention to temperature and humidity while you’re applying paint, and pick products rated for those conditions.
Finally, set a simple maintenance schedule to spot issues early and address them before they worsen.
Proper surface preparation and priming routines
Because a ceiling’s finish only lasts as long as the surface beneath it, you should clean, repair, and prime carefully before painting; proper prep removes loose material, seals stains, and gives primer something sound to bond to, which prevents cracking and peeling down the road.
Follow these steps:
- Clean dust, grease, and mildew thoroughly.
- Patch cracks and sand smooth.
- Use stain-blocking primer where needed.
- Allow full drying before topcoats.
Choosing the right paint and product compatibility
Once your surface is prepped and primed correctly, pick paints that match the substrate, environment, and primer to avoid bond failure and cracking.
Use paint formulated for ceilings or high-adhesion latex for drywall, oil-based or alkyd over compatible primers for older substrates, and guarantee sheen levels suit traffic and cleaning.
Test adhesion and follow manufacturer’s cure times for lasting results.
Controlling moisture and ventilation (bathrooms, attics)
If you want paint to stay crack-free in high-humidity spaces like bathrooms and attics, control moisture and ventilation before painting and maintain it afterward: install or upgrade exhaust fans, guarantee attic vents and baffles provide continuous airflow, repair roof or plumbing leaks promptly, and keep indoor humidity below 50% with dehumidifiers or HVAC settings.
Also inspect seals around fixtures, run fans during showers, and monitor humidity regularly.
Managing temperature and humidity during application
When you’re painting a ceiling, control of temperature and humidity during application makes the difference between a smooth, durable finish and future cracking; aim to paint when the room temperature is steady (usually 50–85°F/10–29°C) and relative humidity is below about 50%.
Use portable heat or dehumidifiers to stabilize conditions, avoid painting near drafts or open windows, and allow proper dry times between coats.
Maintenance schedule and early detection tips
After you’ve controlled temperature and humidity during application, set up a simple maintenance schedule so small issues don’t become full-blown cracks.
Inspect ceilings monthly for hairline splits, stains, or paint flaking. Wipe dust, fix leaks immediately, and touch up tiny cracks with flexible filler and matching paint.
Log repairs and humidity readings quarterly to catch trends before damage worsens.
Common Mistakes to Avoid
Don’t paint over wet or unprimed surfaces, because trapped moisture or poor adhesion will make cracks reappear.
Check and fix any roof or plumbing leaks first, since ongoing water damage ruins even the best prep.
Use the correct primer and paint, and avoid applying paint too thickly or in cold, humid, or windy conditions.
Painting over wet or unprimed surfaces
If you paint over damp or unprimed ceilings, the finish won’t stick properly and you’ll see peeling, blistering, or uneven coverage soon after.
Always let moisture dry fully, test with a moisture meter, and sand glossy surfaces.
Apply a suitable primer for porous or stained areas to guarantee adhesion.
Skipping these steps guarantees failure—take the time to prep correctly for lasting results.
Ignoring roof or plumbing leaks
Prep mistakes aren’t the only thing that wrecks a ceiling finish; hidden leaks will undo your work fast.
If you ignore roof or plumbing leaks, moisture weakens drywall, causes paint to blister and crack, and promotes mold.
Find and fix leaks before repainting. Dry the area thoroughly, replace damaged drywall if needed, and confirm repairs hold to prevent recurring damage.
Using the wrong primer or paint type
Because ceilings present unique surface and lighting challenges, choosing the wrong primer or paint can doom your job before the roller ever leaves the tray.
If you use interior wall paint, unsealed stains will bleed through and adhesion will suffer.
Pick a stain-blocking primer and a ceiling-grade, flat finish formulated for low splatter and opacity so your coat bonds and hides imperfections.
Applying paint too thick or in unsuitable conditions
When you lay paint on too thick or work in humid, cold, or dusty conditions, the coat won’t level properly and is far more likely to sag, crack, or trap moisture that leads to peeling.
You should apply thinner, even coats, follow manufacturer drying times, and control temperature and humidity.
Use proper ventilation, avoid painting before rain or heating cycles, and test a small area first.
Cost and Time Estimates for Repairs
You’ll want a clear cost and time breakdown for DIY repairs—materials and a few hours for small cracks, more for patching and sanding.
Compare that to professional quotes, which factor labor, access, and whether full replacement is needed.
Note that moisture damage, high ceilings, or textured finishes will raise both complexity and price.
DIY repair cost and time breakdown
Estimating DIY repair costs and time for ceiling paint cracking helps you decide whether to tackle the job yourself or hire a pro.
For small hairline cracks, expect $10–$30 for filler, sandpaper, primer, and paint, and 1–3 hours including drying.
For larger cracks or textured ceilings, budget $30–$80 and 4–8 hours.
Factor in ladder rental and multiple coats.
Professional repair vs. replacement cost factors
If you’re weighing professional repair against full ceiling replacement, focus on the extent of damage, access difficulties, and finish matching—these factors drive most cost and time differences. You’ll pay less for patching and spot repainting; replacement costs rise with demolition, disposal, and new finish. Choose repair for localized cracking; replace for widespread structural damage.
| Option | Typical outcome |
|---|---|
| Repair | Lower cost, quicker |
| Replace | Higher cost, longer |
Factors that increase complexity and price
When cracks extend across multiple joists, involve moisture damage, or sit behind difficult access points, expect both the price and timeline to climb—these factors add labor, materials, and often specialist trades (like plumbers or structural contractors) that you’ll have to coordinate.
You’ll pay more for scaffolding, drywall replacement, mold remediation, structural repairs, permits, and inspections, and unexpected issues during work will further extend cost and schedule.
FAQ
Have questions? You’ll learn whether you can just paint over cracks, how to spot superficial versus structural damage, and whether controlling humidity or choosing specific ceiling paints will stop cracking.
You’ll also find guidance on how soon to repair and repaint after a leak.
Can I just paint over cracked ceiling paint?
Wondering whether you can just paint over cracked ceiling paint? You can if cracks are tiny and surface-only: clean, sand, prime, then repaint.
For larger, flaking, or peeling areas, don’t just paint — remove loose material, repair substrate with joint compound, sand smooth, prime, then paint.
Proper prep guarantees adhesion and prevents recurring cracks.
How do I tell if cracks are superficial or structural?
If the cracks look minor and you’ve cleaned, sanded, and primed as described, you still should verify they’re only surface-level before repainting.
Tap along cracks: a hollow sound or movement suggests underlying damage. Measure width and length—hairline vs. wider than 1/8 inch matters.
Check for sagging, moisture stains, or plaster dust. When unsure, consult a structural pro.
Will humidity control stop cracking permanently?
Because moisture swings are a major driver of paint and plaster movement, controlling humidity will greatly reduce new cracking and slow worsening of existing fissures, but it won’t always stop cracking permanently.
You should maintain steady indoor humidity, fix leaks, and ventilate baths and kitchens.
Still, existing structural shifts, poor prep, or incompatible materials can keep causing cracks despite good humidity control.
What paint types are best for ceilings to prevent cracking?
Keeping humidity under control helps, but picking the right paint also makes a big difference in preventing ceiling cracks.
Use high-quality acrylic latex paints with flexible binders—they expand and contract with temperature and moisture.
For older or patched ceilings, choose an elastomeric or flexible primer undercoat.
Flat or matte ceiling finishes hide imperfections, but guarantee proper adhesion and breathable formulations to minimize future cracking.
How soon after a leak should I repair and repaint?
How soon should you repair and repaint after a leak?
Wait until the ceiling is completely dry—often 48–72 hours with good ventilation, longer for soaked insulation or drywall.
Fix the source, replace damaged drywall or insulation, then prime with a stain-blocking primer.
Repaint once primer cures (usually 24 hours).
Rushing causes stain bleed or peeling; patience prevents repeat repairs.