Can You Revive Dried Acrylic Paint? Simple Fix Guide
Yes — you can often rescue partly dried acrylics, but fully cured paint can’t be restored to its original, workable state. Gently mist or add distilled water or an acrylic medium to soften tacky paint, scrape away thick skins, then knead or strain the usable paint. Use flow improver or retarder to keep pigment and extend working time. Always test a small amount first and practice proper storage to prevent future loss — continue for step-by-step methods and troubleshooting.
Who This Guide Helps and How to Use It

Who’s this guide for and how should you use it?
You’ll find practical help for artist frustrations, learn quick emergency solutions and longer-term revitalization methods, and adopt acrylic care and paint preservation habits.
Use concise creative techniques, improve studio organization, and streamline art supply management.
Follow steps when needed, adapt tips to your process, and prevent future losses.
Quick Answer: When Dried Acrylic Paint Can Be Revived
If the paint’s only partly dry you can usually revive it with water or a medium.
Thick, skinned areas may soften but often need scraping and reworking rather than full restoration.
Once acrylics are fully cured into a hard film they’re irreversible and require repainting.
When Paint Is Partly Dry
When acrylic paint has only partly dried, you can usually revive it by rehydrating the surface—gently mist water or a few drops of acrylic medium and work it with a brush or palette knife until it softens.
You’ll use basic acrylic paint chemistry to guide amounts, and do a quick paint texture analysis to decide whether brushing, scraping, or adding medium restores workable consistency without overworking the layer.
Reviving Thick Paint Skins
Partly dry paint can often be coaxed back with moisture and gentle agitation, but thick, skin‑like layers behave differently and need stronger measures.
You’ll soak the jar’s interior with water or retarder, loosen the skin with a palette knife, then strain or decant usable paint.
Adopt paint preservation techniques and better acrylic storage solutions to prevent skins forming and extend usable life.
Irreversible Fully Dried Paint
Although you can often rescue tacky or softened acrylics, paint that’s fully cured into a hard, brittle film can’t be returned to usable fluid form; the polymers have cross‑linked irreversibly.
You’ll face limits with dried paint and should focus on replacement or mechanical removal.
Consider these salvage techniques options:
- Sanding off layers
- Scraping with a solvent-safe tool
- Overpainting after priming
- Replacing affected areas
Can You Really Revive Cured Acrylic Paint?
Curious if that hardened smear on your palette can be brought back to life? You can sometimes soften partially cured paint with retarder or acrylic medium, but truly cured paint — chemically bonded and fully crosslinked — resists restoration.
For paint revival, focus on small flakes or skin; scrape or rehydrate cautiously. Don’t expect full recovery of structurally cured layers.
How to Test Acrylic Paint: Quick Checks
If you want to know whether a spot of acrylic is still usable or permanently set, there are a few quick checks you can run at your worktable.
Use these testing methods to assess drying time, paint consistency, color intensity, binder properties, paint viscosity, and potential rehydration techniques:
- Touch test for tackiness.
- Thin with water to gauge viscosity.
- Scrape a tiny sample.
- Apply to test paper for color intensity.
What “Dried” Means for Acrylic Paint
When acrylic paint dries, you’ll first notice a surface film forming as the water and solvents evaporate.
Under that film the pigment particles are held together by a hardening binder, which changes how flexible or brittle the paint is.
Knowing these solvent-evaporation effects helps you judge whether the paint can be reactivated or is permanently compromised.
Surface Film Formation
Although acrylic paint feels dry to the touch within minutes, what’s actually happened is the polymer binder has coalesced into a continuous surface film as water and solvents evaporated.
You’ll notice surface texture and altered paint consistency; this film blocks absorption and limits flow.
Consider:
- Smoothness changes
- Skin formation
- Reduced tack
- Rewetting resistance
Pigment Binder Hardening
Because the polymer binder locks the pigment particles into a cohesive matrix as solvents leave, you’ll notice pigment integrity depends on tight binder interactions.
The paint becomes a mechanically stable film; pigments stay fixed and won’t disperse without breaking those interactions.
To revive, you must soften or reintroduce mobility to the binder carefully, or you’ll damage color strength and surface cohesion.
Solvent Evaporation Effects
If you’ve ever left acrylics open and come back to a stiff, matte surface, that change is mainly the solvents—water and co-solvents—leaving the film and allowing the polymer particles to fuse.
You’ll notice solvent types and evaporation rates affect skinning, tack, and film strength. Consider:
- Water-dominant mixes
- Fast co-solvents
- Humidity impact
- Temperature effects
Surface-Dry vs. Thickened vs. Fully Cured Acrylic
When you touch a painted surface, what you feel can be one of three states: surface-dry, thickened, or fully cured.
You’ll notice surface drying that leaves a skin but thin layers still soften; thickened paint has altered paint consistency, tacky and gummy yet workable with additives; fully cured acrylic is hard, non-tacky, and can’t be revived—only sanded or overpainted.
Safety First: Ventilation, Gloves, and Workspace
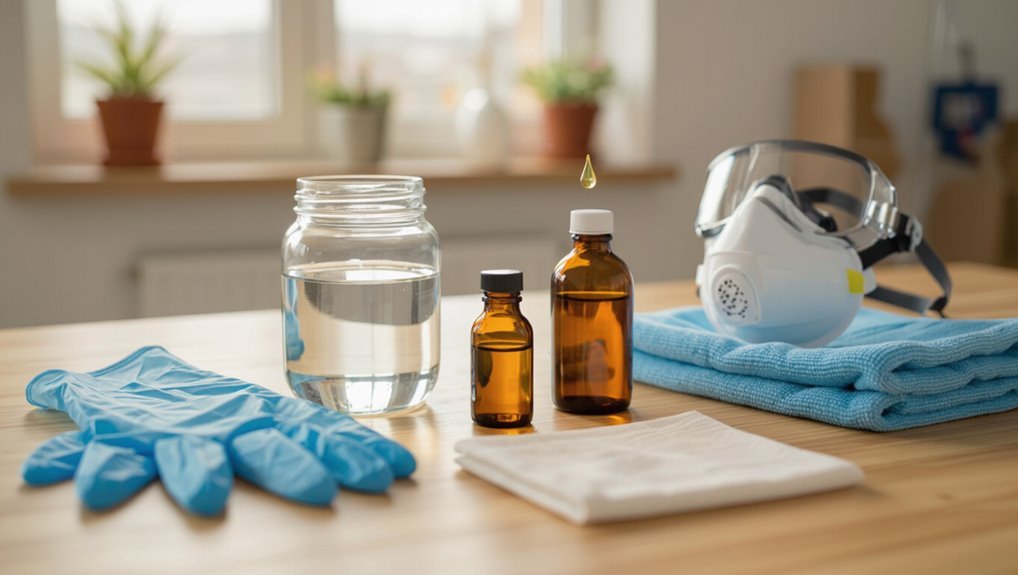
1 simple rule: prioritize safety before you try to revive dried acrylic paint. You’ll follow clear safety precautions: guarantee airflow, pick appropriate glove types, and keep tools tidy.
Use ventilation tips like open windows and a fan, choose nitrile or latex gloves, and maintain workspace organization to prevent spills and contamination.
- Ventilation tips
- Glove types
- Workspace organization
- Safety precautions
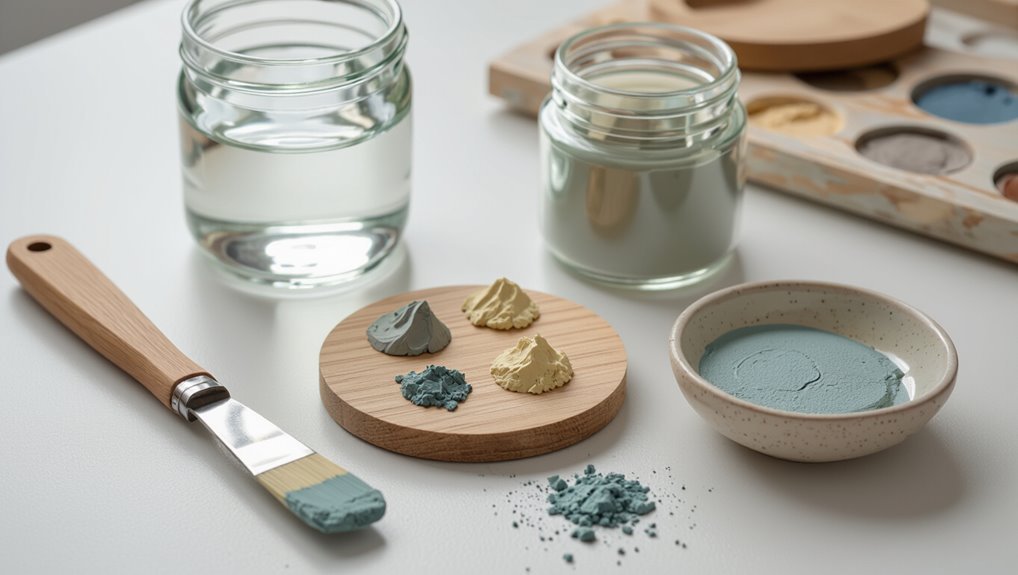
Tools and Materials to Revive Acrylic at Home
Gather a few well-chosen items and you’ll have what’s needed to revive dried acrylic at home: distilled water, acrylic medium (flow improver or gloss medium), a spray bottle, palette knife or plastic scraper, clean jars, and soft brushes or sponges for blending. This tools overview guides your material selection; use the table to match purpose and item.
| Purpose | Item |
|---|---|
| Rehydrate | Distilled water |
| Blend | Soft brushes |
| Scrape | Palette knife |
| Store | Clean jars |
| Spray | Spray bottle |
Best Liquids for Rehydrating Acrylic: Water vs. Mediums
You can use plain water for a quick rehydrate when a piece is only slightly dried and you need fast workability.
For better long-term flexibility and to avoid weakening the film, reach for an acrylic medium designed for rewetting or flow.
We’ll compare when each option makes sense so you can choose the right fix for the paint’s condition.
Water: Quick Rehydration Option
While water’s the fastest way to rehydrate dried acrylic, it works best for thin skins or slightly tacky paint rather than thick, crusted lumps.
You’ll control water usage and mixing ratios to restore paint consistency and moisture balance, using gentle application methods and blending strategies to preserve paint texture and shorten drying times.
- Quick fixes
- Rehydration techniques
- Paint consistency
- Application methods
Acrylic Mediums: Better Longevity
Acrylic mediums give dried or tacky paint better long-term results than plain water, because they reintroduce flexibility, binding agents, and controlled viscosity without overly diluting pigment or weakening the film.
Use gel or flow improver to lift and rework scumbled or stiff paint.
Follow acrylic longevity tips: test small areas, mix sparingly, and prioritize medium benefits for durable, stable restoration rather than quick watery fixes.
When to Use Plain Water to Loosen Acrylic
If the paint has only just started to skin over or sits slightly tacky, reach for plain water first to soften it gently.
You’ll judge by water temperature and paint viscosity: lukewarm water loosens thin films without breaking binders. Use sparingly, blot excess, and stir gently.
- Test a small area
- Use lukewarm water
- Blot, don’t rub
- Reassess viscosity
When to Use Acrylic Flow Improver or Retarder
When water won’t restore the flow without breaking the binder, reach for a flow improver or retarder to adjust drying and leveling.
Use flow improver when you need thinner, smoother strokes without changing paint strength, and use retarder when you want to keep paint workable longer for blending or glazing.
Choose based on acrylic paint applications, flow improver benefits, retarder usage, paint consistency tips, mixing mediums, drying time management, paint texture enhancement, and layering techniques.
Thin Tube Acrylic Without Losing Pigment
When you thin tube acrylic to revive it, focus on preserving pigment intensity so colors don’t wash out.
Use a little water or a dedicated acrylic medium and mix gradually, stopping before the pigment looks diluted.
That way you’ll thin without overwatering and keep strong, vibrant tones.
Preserve Pigment Intensity
Although it’s tempting to thin dried acrylic to restore flow, you’ll want to do it in ways that keep the pigment concentration strong; dilute too much or use the wrong medium and your colors will fade or go translucent.
- Use acrylic mediums designed for pigment preservation.
- Add small increments; test color vibrancy.
- Prefer flow improvers over water.
- Layer sparingly to retain opacity and richness.
Thin Without Overwatering
If you want to thin tube acrylic without washing out the pigment, work gradually and choose the right additives so you keep color intensity while improving flow.
You’ll thin paint by managing acrylic viscosity and adjusting consistency with proper medium selection.
Balance painting techniques, paint application, and texture control to preserve color matching.
Consider drying times and layering methods to avoid overworking and maintain vibrancy.
Step-by-Step: Revive Dried Paint on a Palette
Grab a palette knife and a small jar of solvent—you’re about to bring dry acrylic back to life without wasting paint.
Scrape softened edges, add a few drops of medium, and knead to restore workable paint.
Mind palette care and preserve paint thickness; don’t over-thin.
Mind your palette—restore paint without losing body; avoid over‑thinning to keep rich texture and depth.
- Scrape
- Add medium
- Knead
- Test consistency
Revive Paint in a Partially Used Tube
Start by checking the tube for cracks, clogs, or a hardened nozzle so you know how bad the paint is.
Gently warm and knead the tube or add a few drops of acrylic medium to soften the paint inside, then squeeze out a small amount to test consistency and color.
If it responds well, reseal the tube tightly and store it upright in a cool, dark place to extend its life.
Assess Tube Condition
When you pick up a partially used tube, check its exterior and nozzle for signs of hardened paint, splits, or a swollen body—these clues tell you whether the paint inside is still usable or compromised.
Perform a quick dried paint assessment and verify tube integrity before proceeding.
- Inspect cap seal.
- Look for leaks.
- Squeeze gently for flex.
- Smell for odd odor.
Soften Paint Inside
If the tube passed your quick inspection, you can try to loosen the paint inside so it squeezes smoothly again.
Warm the tube gently (wrap in a warm cloth or sit near low heat) to loosen dried film, then knead from cap toward end to redistribute pigment and medium.
Use softening techniques like adding a drop of water or acrylic medium to restore workable paint consistency.
Test And Store Properly
Before you reseal the tube, check the paint’s consistency and color by squeezing a small amount onto a palette and spreading it with a palette knife; this lets you see whether it still mixes, levels, and covers as expected and whether any additives are needed.
Use testing methods and follow storage tips to prolong usability.
- Note texture
- Test opacity
- Add medium if needed
- Seal with minimal air
Salvage Paint With a Skin in a Jar
A dried skin forming on top of acrylic in a jar isn’t hopeless—you can usually rescue the paint beneath with a little care.
Wear gloves, lift or peel the skin gently, then scoop out unaffected paint.
Wear gloves, gently peel back the skin, then scoop out and save the fresh paint underneath.
Strain through a fine mesh to remove debris, transfer to clean container, and add a few drops of acrylic medium or water to restore consistency.
Label and resume jar storage.
Rehydrate Crusty Paint on Brushes Safely
Start by checking the brush’s shape and bristle integrity so you know whether it’s worth salvaging.
Choose safe solvents like mild brush cleaners, isopropyl alcohol, or a water-based acrylic reactivator, avoiding harsh thinners.
Gently work the solvent from the ferrule to the tip with your fingers or a soft comb until the paint softens and rinses away.
Assess Brush Condition
1 quick inspection will tell you whether a brush is salvageable: spread the bristles gently and look for hardened clumps, splayed or bent tips, and a loose ferrule.
You’ll decide if it’s worth salvaging based on brush maintenance and acrylic care.
- Remove paint crumbs gently
- Check ferrule tightness
- Test spring and shape
- Note natural vs synthetic type
Safe Solvent Options
When you spot crusty acrylic on bristles, choose solvents that soften without shredding the hair or dissolving the ferrule glue; gentle options like warm water with dish soap, isopropyl alcohol (70–90%), and specially formulated brush cleaners will rehydrate paint safely while minimizing damage.
Pick safe solvent options, consider eco friendly choices, test cleaning agents via compatibility tests, follow solvent ratios, safety precautions, and proper application techniques.
Gentle Rehydration Techniques
Although dried acrylic can look hopeless, you can often soften and lift crusty paint from brushes without harsh chemicals by using gentle rehydration methods like warm, soapy water, diluted isopropyl alcohol, or commercial brush restorers applied with patience and light agitation.
Use these hydration tips and steps to restore bristles:
- Soak in warm, soapy water.
- Gently comb with a brush cleaner.
- Rinse with diluted isopropyl.
- Finish with conditioner.
Soften Dried Layers With a Spray Bottle
If your dried acrylic has formed thin, brittle layers, a fine mist from a spray bottle can gently rehydrate the surface without washing the paint away.
Lightly mist, wait a minute, then blot excess with a clean cloth.
Repeat sparingly to soften paint and test small areas first.
These revive techniques restore pliability for careful blending or collection without over-saturating the layer.
Use a Palette Knife to Remix and Test Paint
Grab a palette knife and scrape a small bit of the softened paint onto a mixing surface so you can remix and test its texture and color.
You’ll use palette mixing to judge consistency, adjust thickness, and evaluate paint texture before applying.
Try these steps:
- Scrape a small sample.
- Fold and press to remix.
- Check spread and tack.
- Smooth for final color match.
When to Add Binder or Glazing Medium
Once you’ve tested the remixed paint with your palette knife and judged its spread and tack, decide whether to add a binder or glazing medium based on the paint’s cohesion and planned use.
If paint flakes or lacks cohesion, use stronger binder types; if you want transparent layers or depth, choose glazing techniques with a clear medium.
Add slowly, retest, and paint when satisfactory.
How Heat Affects Dried Acrylic : What to Avoid
Because dried acrylic softens and reactivates under sustained heat, you should avoid applying direct heat sources like hair dryers, heat guns, or ovens to speed up drying or rework layers.
Heat exposure alters acrylic chemistry and can reduce paint stability and paint integrity. Manage drying time and drying conditions gently.
- Avoid concentrated heat sources
- Monitor temperature impact
- Allow natural drying
- Prevent repeated heating
Why Microwaves and Ovens Are a Bad Idea
Don’t try heating acrylic in a microwave or oven — high heat changes the paint’s chemistry and can ruin pigments and binders.
You could also release toxic fumes as additives break down, and trapped moisture or solvents can cause sudden flare-ups.
For safety and better results, stick to safer rehydration methods instead.
Heat Alters Paint Chemistry
Although it might seem quicker to zap dried acrylic in a microwave or bake it in an oven, heat changes the paint’s chemistry in ways that can ruin pigments, binders, and finish.
You shouldn’t use intense heat sources to alter paint viscosity or rescue texture. Consider these consequences:
- Pigment fading
- Binder breakdown
- Uneven reflow
- Loss of gloss
Risk Of Fire And Fumes
Beyond chemical changes, using a microwave or oven to rework dried acrylic creates a real safety hazard: the paint, its plastic binders, and any additives can emit toxic fumes or ignite under high heat.
You shouldn’t risk fire hazards or fume exposure; instead, follow safety precautions, work outdoors or near exhaust, and address ventilation needs before heating anything.
Use safer, low-heat methods.
Thin Paint for Glazing vs. Brushwork
When you thin acrylics for glazing, you’re aiming for transparent, even layers that modify color without hiding what’s underneath; thinning for brushwork, by contrast, keeps enough body to show texture and maintain brushstrokes.
You’ll choose mediums and water ratios based on purpose, preserving pigment and adhesion.
- glazing techniques: low pigment, fluid medium
- brush techniques: heavier body, less water
- test values
- slow drying additives
Reviving Heavy-Body vs. Fluid Acrylics
Whether you’re dealing with a crusted tube of heavy-body or a tacky bottle of fluid acrylic, reviving them calls for different approaches:
Heavy-body paints benefit from slow rehydration to restore texture and impasto ability, while fluid acrylics need careful thinning to recover flow without breaking their binder.
You’ll treat heavy body differences by adding medium gradually; for fluid acrylics, use diluted medium or water sparingly.
Fixing Separated or Clumpy Acrylic Paint
If your acrylic paint has separated into watery serum and thicker pigment or formed gritty clumps, you can usually bring it back by gently recombining the parts and restoring the binder balance.
Use these steps to address separation causes and guarantee clump prevention:
- Stir slowly with a palette knife.
- Add a few drops of acrylic medium.
- Strain through fine mesh.
- Test consistency on scrap.
Avoid Common Mistakes That Ruin Pigment or Finish
Because acrylics are forgiving in many ways, it’s easy to make small mistakes that permanently dull pigments or ruin a smooth finish, so you need to know what to avoid and why.
Don’t over-thin with water, mix incompatible mediums, or use dirty tools.
For mistake prevention, label containers, test additives, and store properly. These steps guarantee pigment preservation and a consistent, workable finish.
Signs Your Acrylic Is Beyond Salvage
If the paint feels hard and brittle when you press the tube or skin it, it’s probably past saving.
Watch for obvious color separation or any sign of mold growth, which means you should discard it.
Don’t try to thin or mix contaminated paint — it’ll only compromise your work.
Paint Is Hard And Brittle
When dried acrylic feels hard and snaps or flakes instead of bending, it’s usually past the point of safe revival.
You’ll notice ruined paint texture, compromised paint adhesion, and lost color integrity despite trying restoration techniques.
Consider better storage solutions next time to extend paint lifespan; note how drying conditions affected acrylic consistency.
- Inspect surface brittleness
- Test snap/flaking
- Skip reconstitution
- Replace container
Color Separation Or Mold
Hard, brittle paint is one clear dead end; another is obvious color separation or visible mold growth. If you see slimy spots or layers separating, don’t try to rescue it—mold prevention failed and contamination risks color mixing unpredictably. Discard contaminated jars and sanitize storage. Use fresh paint and proper lids to avoid repeats.
| Sign | Action |
|---|---|
| Separation | Toss |
| Mold | Sanitize |
Cost vs. Benefit: Fix It or Buy New Paint
While reviving dried acrylic can save you money, you should weigh the effort and likely results against simply buying fresh paint.
Do a quick cost analysis and include budget considerations before deciding.
Consider these factors:
- Time needed to revive versus time painting.
- Amount of paint salvageable.
- Cost of additives or tools.
- Quality risk and possible repainting.
How Pigment Type Affects Revive Success
Because different pigments absorb and bind differently, you’ll find some colors respond much better to rehydration than others. You should check pigment properties, paint texture, and color stability before trying revival techniques; heavier inorganic pigments often resist, while organic dyes rehydrate easier. Compare results:
| Pigment Type | Ease of Revival | Typical Outcome |
|---|---|---|
| Inorganic | Low | Grittier |
| Organic | High | Smoother |
Use Acrylic Mediums to Restore Flexibility and Adhesion
Acrylic mediums can bring dried paint back to life by restoring flexibility and improving adhesion, so you should choose the type that matches your paint’s needs.
Use acrylic mediums to restore flexibility and employ adhesion techniques while adjusting paint consistency with proper mixing methods to aid drying prevention, texture enhancement, and color vibrancy.
- Gel medium
- Retarder
- Flow improver
- Matte medium
Test Revived Paint on Scrap Surfaces First
Before you use revived paint on your project, test it on scrap surfaces to confirm the color match.
Check how well the paint adheres and cures on the same substrate you’ll be using.
If the color or adhesion isn’t right, adjust your mix or try a different medium before proceeding.
Test Color Match
When you revive dried acrylic, don’t assume the color will match straight away—test it on scrap material first.
You’ll check color consistency and paint texture before committing.
Try these steps:
- Apply a thin swatch.
- Let it dry fully.
- Compare under natural light.
- Note adjustments needed (medium, tint, or more water).
Check Adhesion Strength
Test the revived paint on scrap surfaces to make sure it actually sticks—don’t trust color and flow alone. You’ll perform simple adhesion testing: apply, dry, scratch, and tape-peel to gauge paint durability. If it lifts or flakes, remix or discard. Use varied scraps (plastic, wood, canvas) to confirm bonding before committing to a final piece.
| Surface | Result |
|---|---|
| Wood | |
| Plastic | |
| Canvas |
Troubleshooting Tacky or Gummy Revived Paint
If your revived acrylic still feels tacky or gummy, don’t assume it’s ruined—there are a few common causes and quick checks you can run to pinpoint the problem.
- Check humidity and drying time; high humidity causes tacky texture.
- Verify you didn’t over-dilute; water can cause gummy consistency.
- Test cure by leaving a small smear to dry fully.
- Add a tiny acrylic medium if needed and retest.
Airtight Storage Techniques to Prevent Drying
After you’ve ruled out humidity or over-dilution as causes of tackiness, focus on preventing future drying by storing paints in truly airtight conditions.
You’ll use airtight containers, wrap lids with plastic, and keep small batches in sealed ampoules or jars.
Store away from heat and light, label dates, and rotate stock.
These steps improve paint preservation and reduce waste.
Properly Reseal Tubes and Jars to Extend Life
When you finish using paint, twist the cap until it’s snug but not over-tightened to avoid stripping the threads.
Wipe any paint from the rim before sealing so the lid sits flush and won’t let air creep in.
For jars and squeeze tubes, consider storing them upside down to keep the seal primed and reduce air exposure.
Cap Tightening Technique
One simple habit that saves paint is tightening caps and lids properly each time you finish a session.
You’ll prevent air intrusion and drying by using firm, even pressure and matching threads. Follow cap maintenance strategies and paint storage tips to prolong life.
- Twist until snug
- Avoid over-tightening
- Use original caps
- Store upright
Clean Rim Before Sealing
Tightening the cap is only half the job; a clean rim guarantees that seal actually holds.
Wipe tube or jar threads and lip after each use with a lint-free cloth or cotton swab and a dab of water or rubbing alcohol. These simple cleaning techniques prevent dried buildup.
Combine them with proper sealing methods—smooth cap threading and gentle pressure—to keep acrylics usable longer.
Store Upside Down
Flip your tubes and jars so the paint rests against the cap—this simple habit keeps the seal wet and makes restarting a session faster.
You’ll avoid crusted edges and extend usable life. For tidy paint storage, reseal firmly and store containers upside down.
- Wipe rims before closing
- Tighten caps fully
- Use airtight jars
- Label open dates
Storing Mixed Palettes Without Skinning Over
If you want to keep mixed acrylics usable between sessions, the key is controlling air exposure and humidity so the surface doesn’t form a skin.
For reliable mixed palette storage, cover palettes tightly with cling film or airtight lids, work in a slightly humid room, and group similar colors to limit opening.
These simple steps improve acrylic paint preservation and save time later.
Use Retarders and Preservatives on the Palette
Controlling air and humidity helps, but sometimes you need chemical aid to keep paints workable longer—this is where retarders and mild preservatives come in.
Controlling air and humidity helps, but small amounts of retarders and preservatives can keep paints workable longer.
You’ll add small amounts to slow drying and inhibit microbes while practicing palette management for paint preservation.
- Use a few drops of retarder.
- Test compatibility first.
- Avoid overuse.
- Clean palette edges regularly.
Long-Term Storage: Freezing and Airtight Options
If you want to keep acrylics usable for months, consider freezing small portions and sealing them airtight to prevent freezer burn.
You’ll need to thaw paints slowly at room temperature and test a bit before using.
Quality storage containers and proper labeling will save you time and wasted paint.
Freezing Acrylic Paints
When you need to store large quantities of acrylic paint for months, freezing can be a practical option that preserves pigments and slows chemical breakdown. However, it requires proper preparation to avoid container rupture, moisture contamination, or texture changes.
- Use clean, freezer-safe containers.
- Leave headspace for expansion.
- Seal tightly to aid freezing techniques.
- Thaw slowly for paint preservation before stirring.
Airtight Storage Solutions
One reliable approach to long-term acrylic paint storage is to combine airtight containers with proper freezing or cool, dry shelving so your paints keep consistency and color.
Use airtight containers and airtight solutions to prevent moisture retention; focus on container sealing and humidity control.
These storage techniques improve paint preservation, extend paint shelf life, and boost paint longevity for reliable paint storage.
Labeling and Rotating Supplies to Avoid Forgotten Paint
Start by labeling every jar, tube, and palette with the color name, date opened, and any medium or thinner you mixed in so you’ll know at a glance what’s usable.
Use paint organization and supply rotation to keep fresh stock frontward. Rotate oldest to front, discard spoiled items, track mixed batches, and note rehydration attempts.
- Rotate oldest forward
- Track mixes
- Discard spoiled
- Note rehydration
Environment Factors That Speed Acrylic Drying
Be aware that heat and direct sunlight will speed up acrylic drying and can turn thin layers into crusty films.
Low humidity also pulls moisture out of paint faster, and strong airflow or ventilation accelerates evaporation even more.
Keep these factors in mind when storing or trying to revive dried paint so you can control how quickly it sets.
Heat And Sunlight
Heat and direct sunlight speed acrylic drying by evaporating water and accelerating polymer film formation.
So, you’ll notice paints skin over and harden much faster in warm, sunlit spots.
You should monitor heat effects and sunlight exposure to control temperature impact and drying acceleration.
Consider how paint behavior changes with environmental conditions and nearby heat sources affecting drying rate.
- Move jars from windows
- Shade works
- Cool storage helps
- Avoid heaters
Low Humidity Levels
If sunlight and warmth speed drying by removing moisture, low humidity does the same by reducing the air’s moisture-holding capacity and pulling water out of acrylic films more quickly.
You’ll notice faster skinning and shorter working time; humidity effects accelerate curing and can make revived paint brittle.
To protect acrylic longevity, store leftover paint in sealed containers and consider humidifying your workspace when you need longer open time.
Airflow And Ventilation
When you increase airflow around a drying acrylic surface, moving air carries away solvent-laden moisture and shortens the film’s open time.
You should balance ventilation importance with humidity control and air quality to avoid over-fast curing and preserve paint.
Improve workspace organization and airflow management; adopt gentle drying techniques for paint preservation and drying prevention.
- Use adjustable fans.
- Seal wet edges.
- Monitor humidity.
- Isolate works.
Clean and Maintain Brushes When Reviving Paint
Start by rinsing your brushes thoroughly to remove any loose, dried paint before you try reviving residual pigment—this prevents hard flakes from contaminating the paint and scratching bristles.
Use gentle brush cleaning methods, mild soap, and warm water, reshape bristles, and let them dry flat.
Regular paint preservation techniques extend brush life and stop old paint from ruining revived colors.
Safely Dispose of Unsalvageable Acrylic Paint
If a paint batch can’t be revived, you should dispose of it in a way that protects the environment.
Check your local hazardous-waste rules, since municipal guidelines and drop-off options vary.
Follow those regulations to avoid contaminating drains or landfill sites.
Environmentally Safe Disposal
Because dried or unsalvageable acrylic paint can still harm drains, soil, and wildlife, you should dispose of it thoughtfully and follow local regulations to minimize environmental impact.
Use eco friendly practices and seek paint recycling when possible.
Follow these steps:
- Solidify small amounts and trash sealed.
- Donate unopened cans.
- Use household hazardous waste collection.
- Avoid pouring down drains or into soil.
Local Hazard Regulations
After you’ve tried solidifying, donating, or taking unusable acrylics to a household hazardous waste site, check your local hazard regulations to confirm you’re disposing of paint legally and safely.
You’ll follow local safety rules, hazard communication protocols, and regulatory compliance steps.
Perform a risk assessment, consider environmental impact and chemical exposure, and guarantee safety training and workplace safety measures are in place.
Donate or Recycle Partially Usable Paint
Wondering what to do with partially dried acrylics you won’t revive?
Consider community help: many places accept partially usable paint. Look into donate options and local recycle programs to avoid landfill.
You can:
- Contact schools or community centers.
- Offer art groups or shelters.
- Use municipal paint take-back.
- List them on local swap apps.
When to Switch Brands: Quality Warning Signs
If you’ve exhausted options for donating or recycling partially usable paint, it’s worth evaluating whether your current acrylic brand still meets your needs. Watch for inconsistent pigment, poor adhesion, odd odors, or repeated drying failures despite proper storage—those signal declining brand quality and failed product testing. Consider switching if issues persist.
| Issue | What to watch for |
|---|---|
| Pigment | Fading, separation |
| Adhesion | Peeling, cracking |
| Odor | Chemical, off |
| Drying | Too fast/slow |
| Consistency | Lumpy, watery |
Budget-Friendly Products That Help Revive Acrylic
When paint starts to thicken or show surface skin, you don’t need pricey restorers—several budget-friendly products can bring dried or gummy acrylic back to life quickly and safely.
You can revive paints with common, affordable items and consider acrylic paint alternatives for specific uses.
- Distilled water
- Acrylic medium
- Flow improver
- Isopropyl alcohol (diluted)
Studio Pro Techniques Artists Use to Restore Paint
Those budget-friendly fixes work well for mild skinning, but professional studios use a few more controlled techniques to restore paint without compromising color or consistency.
You’ll employ targeted restoration techniques: carefully rehydrating skins, testing pigment preservation, and using measured mixing strategies with appropriate acrylic mediums.
You document batches, adjust viscosity incrementally, and avoid over-thinning to retain opacity and durable adhesion.
Case Studies: Tube, Palette, and Jar Revives
Because each storage method alters how acrylics dry and respond to rehydration, you’ll need slightly different approaches for tubes, palettes, and jars.
Follow concise case tips:
- For tube storage: assess paint viscosity, add medium, preserve paint longevity.
- Palette management: scrape, rehydrate for color matching, mind drying conditions.
- Jar sealing: replace lids, check jar sealing to prevent skin.
- Brush care: clean, reshape, prevent cross-contamination.
Quick Emergency Fixes During a Painting Session
If paint starts to tack or your brush drags across the canvas, act fast: use quick emergency solutions like misting water sparingly or adding a drop of acrylic medium. Follow these painting tips to revive tacky spots and clean brushes.
| Problem | Quick Fix |
|---|---|
| Tacky paint | Light mist |
| Dragging brush | Medium drop |
| Thick spot | Scrape/light remix |
Adapting Revived Paint for Different Techniques
After you’ve revived tacky or thick spots, think about how the restored paint will behave for the technique you want to use; a misted layer will spread more thinly than paint reworked with medium.
After reviving tacky areas, consider how the paint will respond — misted layers spread thinner than medium-reworked strokes.
- Test revived techniques on scrap paper.
- Adjust viscosity for glazing versus impasto.
- Use flow improvers for smooth blends.
- Note paint adaptability for edges and texture, then proceed.
How Revival Affects Archival Quality
When you revive dried acrylic, you change more than its feel—you’re also altering its long-term behavior and stability.
You should know that additives and repeated rehydration can affect archival integrity by changing binder cohesion and flexibility. That may reduce paint longevity, increase yellowing or cracking risk, and alter adhesion.
Test revived paint on samples and document methods to safeguard future conservation.
Quick Checklist: Revive Steps for Any Condition
1 clear checklist helps you revive dried acrylic reliably across conditions. You’ll assess surface tack, loosen films, and match paint consistency before reworking; remember gentle drying techniques to avoid skin formation.
- Scrape or soften crusts carefully.
- Add medium to adjust consistency.
- Stir and test adhesion.
- Use controlled drying techniques to set layers.
FAQs Artists Ask About Reviving Acrylic Paint
Curious how to tell if acrylic is truly gone or just salvageable? You’ll learn quick answers, artist tips, and when to accept loss. Try rehydration methods, test texture, and note smell.
| Question | Quick Answer |
|---|---|
| Is it irreversible? | Often yes if brittle |
| Rehydrate? | Use retarders or water |
| Smell? | Sour means ruined |
| Test first? | Small sample only |
Frequently Asked Questions
Can Revived Paint Be Varnished Safely for Long-Term Protection?
Yes — you can varnish revived paint safely for long-term protection. You’ll improve revived paint durability by testing adhesion, using appropriate varnishing techniques, applying thin, even coats, and allowing full curing between layers for lasting results.
Will Revived Acrylics Darken or Yellow Over Time?
Bright beginnings: you’ll usually see minimal darkening, but revived acrylics can slightly shift over time. Color stability depends on longevity factors like pigment type, binder integrity, exposure to light, and proper varnish and storage.
How Does Revived Paint Behave Under Heavy Impasto Techniques?
Revived acrylics tolerate impasto texture but may be slightly weaker; you’ll need longer drying time and careful layering, because tackiness or reduced binder can cause sagging or cracking under heavy buildup, so test before committing.
Can Revived Acrylics Be Mixed With Oil Paints Later?
No — you shouldn’t mix revived acrylics with oils later; mixing techniques differ and paint compatibility fails. You’ll risk adhesion and cracking, so keep acrylics and oil layers separate or use proper isolation and oil-over-acrylic methods.
Are Revived Paints Safe for Artworks Intended for Sale?
Yes — you can sell revived paints if they’re stable, but investigate paint composition and drying integrity first: test adhesion, flexibility, and color fidelity, since compromised binders or altered pigments can undermine longevity and collector trust.
Conclusion
You’ve found the seeds in the cracked soil: some paints will drink again, others are gone to stone. Treat each tube like a small rescued bird—gentle water, careful stirring, patience—and let texture and sheen tell you if it will sing. Remember that revived color may carry scars, but those marks become part of the story. Keep notes, trust tests, and save what you can; where paint returns, new pictures follow.