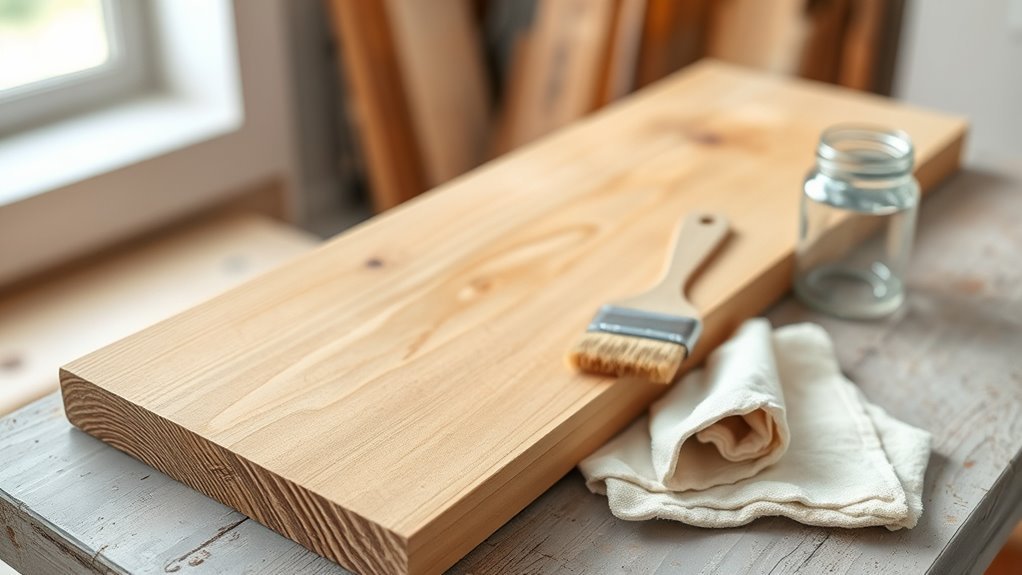
Does Wood Need to Be Dry Before Painting
Yes — you must paint dry wood. If you paint while wood is damp, the finish won’t adhere, and you’ll get peeling, blistering, mildew, and uneven sheen. Aim for under about 12–15% moisture and check several spots with a meter or simple touch tests. Let boards acclimate, stack with stickers for airflow, or use dehumidifiers for faster drying. Follow these steps and you’ll avoid costly rework and poor results; keep going to learn how to check and prepare wood properly.
Can You Paint Damp Wood? Short Answer and Rules
Although you can sometimes paint slightly damp wood, you shouldn’t paint wet wood because the finish won’t adhere and will peel or blister.
Though slightly damp wood can sometimes be painted, never paint wet wood — it won’t adhere and will peel.
You’ll want to test moisture with a meter; below about 12-15% is ideal for most paints.
Drying prevents raised wood grain and guarantees even absorption, so your paint sheen stays consistent.
If wood’s only slightly damp, sand lightly, remove dust, and use a primer formulated for marginal conditions.
Avoid painting after rain or in high humidity.
Follow manufacturer drying times, work in shaded, ventilated areas, and don’t rush the process to prevent failures.
Does Wood Need to Be Dry Before Painting?
You should check wood moisture content before painting because excess dampness affects adhesion and finish.
I’ll explain simple drying methods you can use and how long they typically take.
Painting damp wood risks peeling, mold, and wasted effort, so it’s worth getting it dry first.
Moisture Content Matters
Because wood absorbs and releases moisture, its moisture content directly affects paint adhesion and durability. If the wood isn’t dry enough, paint can blister, peel, or trap mold underneath.
You should measure moisture content before painting because high levels expand wood grain and stress coatings. Paint bonds poorly to wet fibers, and seasonal moisture changes will later crack finishes.
Use moisture barriers where appropriate to limit vapor movement, but don’t rely on them to fix already damp timber.
Aim for stable, acceptable moisture readings for your region and species, and treat the surface so primers and topcoats can adhere predictably.
Drying Methods Explained
When you’re preparing to paint, drying the wood first isn’t optional—it’s vital. You want stable moisture so the wood grain stays true and the paint sheen develops evenly. Choose a method based on time, budget, and location.
- Air-dry: stack with stickers, allow ventilation, monitor moisture with a meter.
- Kiln-dry: faster, controlled, achieves low moisture for fine finish and consistent paint sheen.
- Accelerated room drying: use dehumidifiers and fans in a sealed space for moderate speed and lower cost.
Check moisture content before priming to guarantee adhesion and a smooth final appearance.
Painting Damp Wood Risks
Having the wood properly dried is more than a preference—painting damp wood causes a host of problems you’ll want to avoid. Moisture lifts paint, causes blistering, and prevents proper adhesion so finishes peel quickly.
Dampness swells wood grain, distorts joints, and creates uneven texture that shows through paint. You’ll also risk mold growth under the finish and longer curing times that attract dirt.
Stain absorption becomes unpredictable when fibers are swollen, producing blotches and uneven color if you’re staining before sealing.
Always measure moisture content, wait for stable readings, and use appropriate primers to guarantee durable, attractive results.
Quick Checklist: Is This Wood Ready to Paint?
Before you start painting, check the wood’s moisture content with a meter to make sure it’s within the paint manufacturer’s recommended range.
Do a surface dryness test by pressing a clean cloth to the wood—if it picks up moisture or darkens the surface, wait longer.
These quick checks help prevent adhesion problems and finish failure.
Moisture Content Check
Even if the board looks dry, you should check its moisture content before you start painting. Paint won’t adhere properly to damp wood and can peel, blister, or trap mold.
You’ll measure percent moisture with a meter or by weight comparisons, because wood grain affects moisture absorption and holds water differently.
Aim for 12% or lower for interior work, 10–14% for exteriors depending on climate.
- Use a pin or pinless moisture meter for quick readings.
- Compare readings across boards and along the wood grain.
- Hold off painting until readings are consistently within target range.
Surface Dryness Test
Want to know quickly if the wood’s surface is truly dry and ready for paint? Use a simple surface dryness test: press a clean finger, look for darkening along the wood grain, and feel for tackiness. If it darkens or feels sticky, wait. Do a small tape pull—no finish should lift. Check a scrap with a fingernail; dry wood resists dents. Finally, test a tiny primer spot for paint sheen after it dries.
| Action | What to watch for | Result |
|---|---|---|
| Finger press | Darkening | Wait |
| Tape pull | Lifted fibers | Don’t paint |
| Scratch test | Denting | Not ready |
| Primer spot | Even sheen | Go ahead |
How Moisture Affects Paint Adhesion
How does moisture in wood undermine paint adhesion? You’ll find that water lifts coatings, prevents primer bonding, and hides true wood grain, so paint can’t form a lasting bond.
Wet fibers swell, then shrink as they dry, stressing the film and altering paint texture. To prevent problems, control moisture before you paint.
- Use a moisture meter to confirm stable moisture content.
- Sand and clean to expose consistent wood grain for better bonding.
- Choose primers and paints rated for higher humidity when full dryness isn’t possible.
Address moisture first, and your finish will adhere and last.
What Paint Failures Look Like on Damp Wood
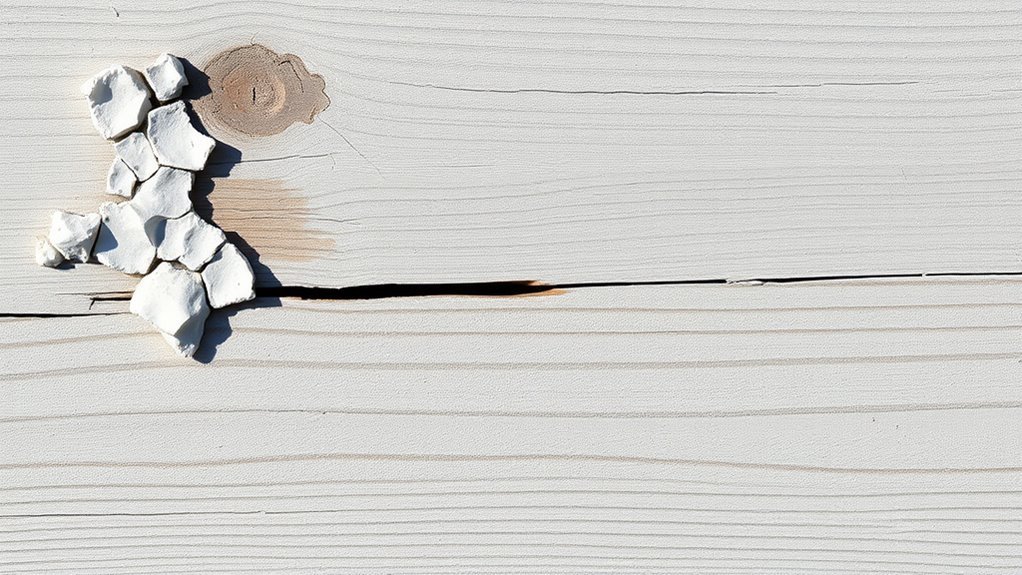
Once you’ve addressed moisture and prepped the surface, you’ll still want to recognize the signs that paint was applied to damp wood so you can fix problems early.
After prepping and drying, watch for telltale signs that paint went on damp so you can fix issues early.
You’ll notice blistering or bubbling where trapped moisture lifts paint, often along wood grain lines. Peeling edges and large flakes reveal adhesion failure, while a soft, spongy feel undercoat indicates persistent dampness.
Dark streaks or discoloration show moisture stains bleeding through, and mildew spots create fuzzy, powdery patches.
Paint texture may look uneven—sagging in low spots and rough where fibers raised.
Spotting these issues quickly lets you strip, dry, and recoat properly.
How Much Moisture Is Too Much for Painting Wood?
If you’re painting wood, aim for a moisture content below about 12–15% for most exterior and interior applications; higher levels increase the risk of adhesion failure, blistering, and staining. You should test and wait—moist wood swells, obscures wood grain patterns, and prevents proper bonding, which alters paint sheen and durability.
Target lower levels for high-sheen finishes and trim. Consider these signs and actions:
- Visible dampness, darkened grain, or raised grain; delay painting.
- High humidity or recent rain; allow drying time before priming.
- Use breathable primers and avoid sealing trapped moisture to reduce failure risks.
What a Moisture Meter Tells You About Wood Readiness
You’ve learned the moisture thresholds to aim for; now a moisture meter tells you whether the wood actually meets them. It gives an objective percentage that reflects moisture retention in the board, not just surface feel.
Readings vary across wood grain and sections, so you’ll check several spots—end grain often shows higher moisture retention than face grain. That percentage helps you decide if drying is sufficient before painting, reducing blistering or adhesion failures.
A meter also reveals uneven drying, prompting targeted conditioning or waiting. Use its data to judge readiness rather than guessing from appearance or touch.
How to Use a Moisture Meter on Lumber and Trim
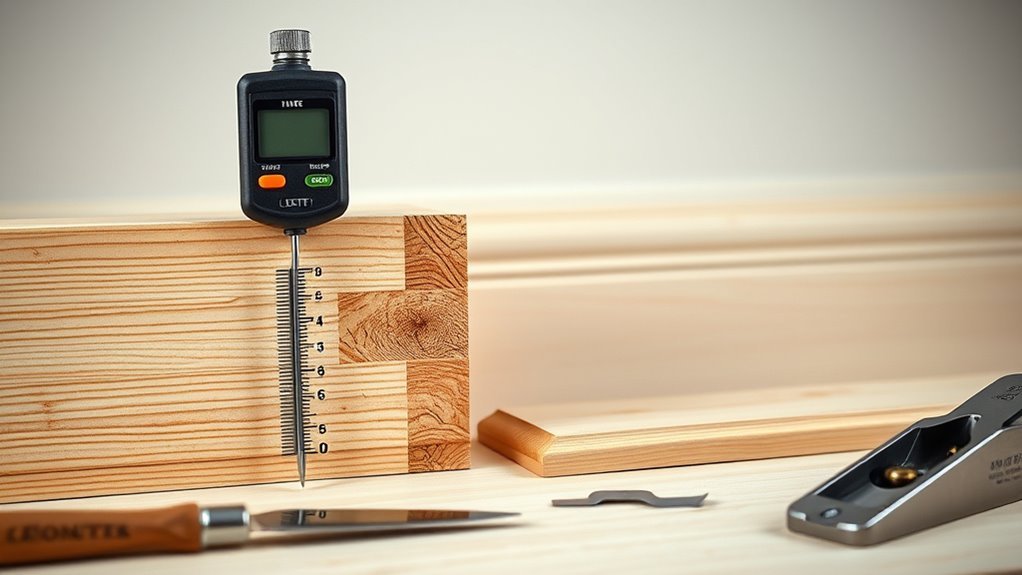
Before testing, pick the right mode and spots on each board so your readings tell the truth about moisture where it matters. You’ll set the meter to lumber or trim mode, press flat or use pins depending on surface, and take multiple readings across knots and along the wood grain to catch variability.
Aim for consistent values below your paint formulation’s recommended percent moisture. If readings vary, average several spots and prioritize the highest readings. Calibrate the meter periodically and record values. Trust the meter over touch when prepping for painting.
- Test near ends and center
- Check knots and sapwood
- Log and compare readings
Check Wood Dryness Without a Meter: Simple Tests
Meters give the most reliable numbers, but you can still judge wood moisture with simple hands-on checks when a meter’s not available.
Feel the wood grain: damp wood feels cool and slightly tacky, while dry wood is warm and smooth.
Press a fingernail into an inconspicuous spot; green or moist wood denting easily suggests high moisture.
Weigh similar-cut pieces—wet boards weigh noticeably more.
Clamp a small glass over a wood sample for an hour; condensation means it’s still releasing moisture.
Finally, test with primer on a scrap to see if paint color soaks unevenly, indicating residual dampness.
Why Kiln-Dried Lumber Paints Differently Than Green Wood
Because kiln drying strips most of the bound and free moisture from lumber, it paints and behaves quite differently than green wood you’d buy straight from a sawmill. You’ll notice kiln-dried boards accept primer and paint more consistently because cells aren’t saturated, so wood grain shows predictably and paint sheen levels stay uniform.
Green wood often raises grain, shrinks, and releases moisture that undermines adhesion and finish. You should expect:
- Faster absorption and quicker recoat times on kiln-dried lumber.
- Less cupping, warping, and surface movement after finishing.
- More consistent paint sheen and smoother final appearance.
How Wood Species Change Drying and Paint Behavior
Different species dry at different rates and respond to paint in distinct ways, so you’ll want to choose and prepare lumber with those characteristics in mind. You’ll notice wood grain affects absorption and how finishes sit; tight grains often repel paint, open grains soak it. Drying patterns vary by species, creating stresses that can cause hairline cracks or raised grain if painted too soon. Match primer and paint to the species and wait until moisture content is stable. Use the quick reference below to compare common behaviors.
| Species | Typical behavior |
|---|---|
| Pine | Open grain, fast drying |
| Oak | Tight grain, uneven drying |
How Wood Thickness and Grain Change Drying Time
While thicker boards and tighter grain structures slow moisture movement, you’ll see thinner, open-grained boards dry much faster and more uniformly. You should check thickness and wood grain because both control internal moisture paths and surface exposure.
Thinner stock equilibrates quicker; dense, tight-grained hardwoods retain moisture longer and can show uneven drying shrinkage that leads to stress and warping. Plan drying time based on cross-section and grain orientation to avoid paint failures.
- Thinner boards: faster equilibrium, less internal gradient.
- Open wood grain: better airflow, reduced drying shrinkage risk.
- Thick, tight grain: monitor for trapped moisture and distortion.
How Temperature and Humidity Control Drying Speed
Grain and thickness set how moisture moves inside the board, but ambient conditions dictate how fast that moisture leaves the wood. You’ll find higher temperatures speed evaporation, so warm, steady heat shortens drying time.
Low humidity pulls moisture out faster; high humidity slows it and risks trapped dampness that spoils adhesion. Monitor both: a moisture meter plus consistent readings let you know when surface and core match paint specs.
Consider wood grain—end grain dries faster than face grain—and wait for moisture equilibrium before coating. Proper dryness guarantees paint sheen develops evenly and prevents peeling or blushing later.
How Wind and Sun Speed Outdoor Wood Drying
When you let wood dry outdoors, wind helps by moving moist air away from the surface so evaporation keeps going.
Direct sunlight raises the wood’s surface temperature and speeds moisture loss through both evaporation and increased vapor pressure.
Together, wind and sun can shorten drying time but may also dry the surface faster than the core, so you’ll want to monitor moisture content.
Wind’s Role In Drying
If you set freshly cut lumber out in a sunny, breezy spot, both sun and wind will pull moisture from the wood much faster than still air alone. You’ll notice wind’s influence in how evenly the surface dries and how the drying speed increases with airflow.
Position boards so wind reaches all faces; rotate stacks to avoid trapped damp pockets. Watch for rapid surface drying that can trap inner moisture.
- Use elevated, spaced stickers to let air flow beneath.
- Face wood toward prevailing breezes for consistent evaporation.
- Avoid overcrowding stacks that block airflow and slow drying.
Sunlight Speeding Moisture Loss
Although sunlight and wind often work together, direct sun can dramatically accelerate surface moisture loss by heating the wood and increasing evaporation rates. You’ll notice Sunlight effects immediately: warm boards shed surface dampness faster than shaded ones.
That speed helps when you need to paint, but it can also dry only the outer fibers, creating moisture gradients that cause checking or cupping if the core stays wet.
Combine steady breeze and sun for consistent Moisture evaporation across boards.
Monitor moisture with a meter, avoid painting until readings are stable, and let shaded drying finish the job so coatings adhere evenly.
How Indoor Ventilation Helps Prep Drying
Because moisture has to leave the wood, you’ll speed drying and get a more even surface by improving indoor ventilation. You’ll lower indoor humidity and boost ventilation efficiency so finishes adhere better. Point fans toward open windows and run exhaust fans to pull moist air out. Monitor with a hygrometer and pause work if levels stay high.
- Place a box fan to create crossflow and reduce damp pockets.
- Use an exhaust fan in bathrooms or kitchens to expel humid air quickly.
- Run a dehumidifier in closed spaces to maintain stable, paint-ready moisture content.
How Long New Construction Lumber Needs to Dry
You’ll want new construction lumber to reach a stable moisture content—typically 6–12% for interior painting—before you apply primer or paint.
Depending on species, thickness, and site conditions, that can take anywhere from a few weeks to several months.
I’ll explain how to measure moisture content and estimate drying times so you can plan your schedule.
Moisture Content Targets
When planning paint or finish work, know that new construction lumber usually needs to reach specific moisture content (MC) targets before you proceed. Most interior wood should be between 6% and 9% MC, while exterior trim and siding can be acceptable up to about 12%.
You’ll measure MC with a moisture meter and aim for stable readings across boards so wood grain movement won’t lift finishes or alter paint sheen. Check several spots, especially end grain and thicker sections.
- Measure across boards and compare readings.
- Prioritize interior carpentry for lower MC.
- Record readings before priming.
Drying Time Estimates
How long will new construction lumber take to reach paint-ready moisture levels? You’ll typically wait weeks to months depending on species, thickness, and climate. Allow wood to drop to recommended moisture to avoid paint peeling or uneven wood staining. Use a moisture meter and schedule checks.
| Condition | Estimated Drying Time |
|---|---|
| Thin boards, dry climate | 1–4 weeks |
| Thick beams, dry climate | 1–3 months |
| Thin boards, humid climate | 1–2 months |
| Thick beams, humid climate | 3–6+ months |
Plan accordingly; quicker sealing risks finish failures.
How Long Pressure-Treated Wood Should Dry Before Painting
Because pressure-treated lumber often contains high moisture and preservative chemicals, you should wait until it reaches an appropriate dryness before painting to guarantee good adhesion and finish longevity. You’ll typically wait 6–12 months outdoors, less if kiln-dried afterward; check moisture content with a meter (below 15%).
Letting wood dry preserves wood grain clarity and improves paint durability. Prepare by sanding and using an appropriate primer for treated wood before topcoating.
- Check moisture with a reliable meter.
- Use a solvent-based or specialty primer for treated lumber.
- Allow extra drying time in humid or shaded locations.
How Long Reclaimed or Salvaged Wood Should Dry
If you’re working with reclaimed or salvaged wood, plan on letting it dry until its moisture content matches the environment where you’ll install or paint it—typically 8–12 weeks for boards air-drying under good conditions, but longer for dense or previously sheltered pieces. You should monitor moisture content with a meter and inspect wood grain for checks or warping as it equilibrates. Drying time varies by species, thickness, and prior exposure. Be patient: painting too soon traps moisture, causing peeling. Use this quick checklist:
| Check | Action |
|---|---|
| Moisture meter | Target 6–12% |
| Grain inspection | Look for cracks |
| Timeframe | 8–16+ weeks |
How Long Exterior Siding and Fences Need to Dry
For exterior siding and fences, how long you should let wood dry depends on the material—softwoods, hardwoods, and engineered boards all shed moisture at different rates.
You’ll also need to factor in local weather and the season, since sun, humidity, and temperature swings speed or slow drying.
Plan drying time based on the specific material and current conditions rather than a fixed number of days.
Drying Time By Material
When you’re planning to paint exterior siding or fences, know that drying times vary widely by material, season, and moisture source. You’ll check moisture content: kiln-dried lumber can be ready in days, green lumber and thick posts take weeks to months.
Wood grain and porosity affect absorption and surface readiness, and proper dryness boosts finish durability.
- Softwoods (pine, cedar): 1–6 weeks for surface dryness, longer for deep moisture.
- Hardwoods (oak, mahogany): several weeks to months; dense grain slows drying.
- Pressure-treated or reclaimed wood: expect months; monitor moisture meter until stable.
Weather And Seasonal Effects
Material type and initial moisture give you a baseline for drying, but weather and season usually dictate how long exterior siding and fences actually need to dry before painting. You’ll want warmer, drier air and steady sun; humidity, rain, and cold slow evaporation and extend wait times.
After heavy rain or high humidity, give softwoods extra days so moisture retreats from the wood grain; dense hardwoods hold moisture longer. Morning dew can rewet surfaces, so paint mid to late day when surfaces feel dry.
Proper dryness prevents poor adhesion and uneven paint texture, so confirm moisture content before you roll or brush.
How Long to Wait Before Painting Newly Installed Deck Boards
Because newly installed deck boards hold a lot of moisture from milling and weather exposure, you’ll want to wait until they reach an appropriate dryness before painting. Check moisture content with a meter; aim for 12-15% for exterior paint or stain. Wet boards trap moisture in the wood grain, causing paint peeling and adhesion failure.
Wait until deck boards dry to 12–15% moisture before painting—wet wood causes peeling and adhesion failure.
- Wait 2–6 weeks for kiln-dried lumber, longer for green or pressure-treated boards.
- Verify several dry days and good airflow; avoid painting right after rain.
- Test with a water droplet: if it beads, delay; if it soaks in, you’re closer to ready.
How Long Interior Trim and Molding Should Dry Before Painting
If you’ve just installed interior trim or molding, let the wood and any adhesives or fillers cure fully before painting — typically 24 to 72 hours for kiln-dried lumber and up to a week for freshly milled or primed pieces. You should check moisture with a meter, examine wood grain for raised fibers, and sand lightly after drying. Match primer and paint for proper paint compatibility; avoid sealing too early. Use the table for quick guidance.
| Type | Dry Time | Notes |
|---|---|---|
| Kiln-dried | 1–3 days | Best for stability |
| Freshly milled | ~1 week | May warp |
| Primed | 24–72 hrs | Check compatibility |
How Long Hardwood Floors Need to Acclimate Before Finishing
Just as trim needs time to settle before you paint it, hardwood flooring also has to acclimate to your home’s humidity and temperature before you finish it. You should let planks sit unopened in the installation room so the wood grain adjusts, minimizing gaps or cupping after finish is applied.
Typical acclimation runs 3–7 days for engineered, 7–14 days for solid hardwood; longer in extreme climates. Keep HVAC stable, avoid high humidity. Once acclimated, finish promptly to limit exposure to dust and paint fumes from nearby projects.
- Check moisture content with a meter
- Maintain consistent temperature
- Inspect boards for movement
Prep Slightly Damp Wood: Sanding, Deglossing, Quick-Dry Steps
When wood feels slightly damp to the touch, don’t skip prep—sand lightly, remove gloss, and use quick-dry methods so the finish will bond and cure correctly. You’ll sand with the grain to preserve wood grain texture, degloss with a solvent or liquid sandpaper, and wipe dry. Choose a fast-evaporating primer and low-VOC reducer so paint sheen settles evenly. Work in thin coats, allow tack-free time, and avoid heavy buildup. Use a moisture meter to confirm acceptable levels before final coats. Follow manufacturer cure times; patience beats trapping moisture under finish.
| Step | Action |
|---|---|
| 1 | Sand light |
| 2 | Degloss |
| 3 | Wipe dry |
| 4 | Prime quick-dry |
How to Dry Wood Faster Without Causing Cracks
Because uneven drying causes stress, you’ll want to speed moisture loss without letting the surface dry too fast or the core stay wet. Work in shade, turn boards regularly, and keep ends sealed briefly to prevent end-grain checking. Monitor moisture with a meter and feel for changes in paint texture after test coats.
- Rotate and stack with stickers for airflow to protect wood grain.
- Keep drying gradual: thin coats of drying oil can regulate surface loss.
- Use small test pieces to confirm no cracking before finishing main parts.
Follow steady conditions; adjust after tests to avoid splits.
Use Dehumidifiers and Heaters to Dry Wood for Painting
You’ll want to aim for a stable moisture content around 6–12% before painting to guarantee good adhesion and prevent future warping.
Place dehumidifiers and heaters so air flows evenly across the wood—avoid concentrating heat on one spot—and keep vents unobstructed for proper ventilation.
Monitor moisture with a meter and adjust device placement or ventilation if readings aren’t dropping steadily.
Ideal Moisture Levels
If you want paint to adhere properly and avoid issues like blistering or mildew, aim for a moisture content of 12% or lower in most interior projects (and 15% max for exterior work). Use dehumidifiers or controlled heat to get there steadily. You’ll check with a moisture meter, reading several spots along the wood grain to confirm uniform dryness.
Consistent moisture improves finish durability and prevents later movement. Don’t rush the process; gradual drying avoids cracks.
Tips to follow:
- Measure multiple boards and locations for accurate averages
- Dry slowly with controlled heat and dehumidification
- Recheck before priming and painting
Placement And Ventilation
When arranging boards for drying, place them off the ground with stickers between each layer to promote even air circulation and prevent trapped moisture.
You’ll position boards so air moves along the wood grain, reducing cupping and uneven drying.
Use a dehumidifier to lower ambient humidity and a small heater to raise temperature slightly, but avoid rapid drying that causes cracks or color variation.
Monitor moisture content regularly and adjust equipment to keep steady conditions.
Vent fans help exchange damp air; open vents briefly if needed.
How Wind, Sun, and Shade Affect Outdoor Paint Timing
Because sunlight, wind, and shade each change how quickly moisture leaves wood, you’ll want to plan painting times around local conditions rather than just a calendar date.
You should check surface dryness after sunny, breezy days; shaded areas can stay damp longer.
Consider indoor humidity effects when storing wood or tools, and use compatible wood preservatives beforehand to prevent rot without trapping moisture.
Time coats for when mornings dry quickly and evenings stay dry for several hours.
Watch forecasts for wind and sun: they speed drying, while overcast, calm days slow it.
- Sun: accelerates surface drying
- Wind: increases evaporation
- Shade: retains moisture
When to Use Oil-Based Primer on Moisture-Prone Wood
Although oil-based primers aren’t always necessary, you should reach for one on moisture-prone wood because it offers superior sealing, stain blocking, and adhesion that help prevent tannin bleed and trapped moisture from ruining topcoats.
On moisture-prone wood, use an oil-based primer for superior sealing, stain blocking, and long-term adhesion protection.
Use it when wood grain shows open pores, old water stains, or when the substrate will stay humid. You’ll get better paint adhesion and a uniform base that resists rising moisture and blotchy finish.
Apply after sanding to expose fresh wood grain, allow recommended dry time, and inspect for recurring dampness.
Choose oil-based primer for long-term protection when moisture risk is clear and persistent.
When to Choose Water-Based Primers for Damp Wood
If your project will see only occasional dampness or you need fast turnaround, reach for a water-based primer—it dries quickly, has lower odor, and resists yellowing so your topcoat stays true. You’ll want water-based primers when wood grain is stable and moisture is mild; they penetrate well, won’t obscure texture, and let you monitor the grain before finishing.
They also help maintain paint sheen without heavy film buildup. Consider these quick checks:
- Surface absorbs slightly and doesn’t feel cold or soggy.
- Job needs rapid recoats or low-VOC materials.
- You plan a light-grit sanding to restore paint sheen.
How Stain-Blocking Primers React to Residual Moisture
When residual moisture lingers in wood, stain‑blocking primers can still help—but they won’t perform miracles. You’ll find primers limit stain penetration from tannins, knots, or minor water marks, sealing surface fibers along the wood grain to reduce bleed‑through.
They don’t, however, dry out saturated lumber or stop mold growth fed by trapped moisture. Apply thin, even coats and allow extended cure times in humid conditions so the primer can form a proper barrier.
If moisture levels are high, test a small area first; primer may blush, lift, or fail to adhere where moisture drives ongoing staining underneath.
How Paint Type Influences Moisture Tolerance
Because different paint chemistries handle dampness in different ways, choosing the right type matters if you’re working with wood that isn’t bone‑dry. You’ll want a paint that tolerates slight moisture without compromising paint adhesion or raising the wood grain.
Oil‑based formulas resist moisture better initially, while modern water‑based acrylics flex and breathe as humidity changes.
- Oil-based: strong initial sealing, slower cure, better on slightly damp wood.
- Acrylic latex: flexible, resists cracking, lets moisture escape through grain.
- Specialty moisture‑tolerant coatings: formulated for high humidity, enhance adhesion.
Pick based on exposure, drying time, and long‑term adhesion.
How to Test Paint Adhesion on Marginally Dry Wood
Although the wood may look dry, you should always run a simple adhesion test before painting marginally dry surfaces to avoid wasted time and materials.
Pick a small, inconspicuous area and clean dust from the wood grain. Apply your chosen primer and topcoat as you’d normally do, let them cure per label instructions.
Then press and peel a strip of high‑quality tape at 90°. If paint lifts, the substrate still holds moisture or contaminants and you’ll need more drying or preparation. If it stays, the paint durability looks promising.
Repeat in a few spots to account for grain variation before full application.
How to Identify Hidden Moisture Sources in Painted Wood
If paint is bubbling, peeling, or showing hairline cracks, don’t assume surface problems alone—you should look for hidden moisture sources that can keep wood damp under finish. Check behind trim, at siding seams, and under failed primer; moisture can wick along wood grain or hide beneath poor knot removal.
Use a moisture meter and probe multiple spots, lift caulked joints, and inspect vents and gutters for leaks. Look for irregular staining or soft spots that spread beyond visible damage.
- Inspect attic and crawlspace for leaks and damp insulation
- Probe edges and end grain for elevated moisture
- Follow water marks to exterior penetrations
How Condensation Causes Paint Problems on Windows and Doors
When you spot condensation between panes or on window and door frames, it usually means extra moisture is present where paint needs to stick.
That trapped moisture can break down adhesion, causing paint to bubble, peel, or flake.
Repeated wetting and drying also makes the wood swell and shrink, opening joints and worsening finish failures.
Moisture Trapped Between Panes
Ever wondered why paint peels or bubbles around window and door frames even after you let the wood dry? When trapped moisture collects between panes, pane condensation raises local humidity and feeds the frame from the inside. You’ll see staining, swelling, and finish failure where moisture cycles occur.
Addressing the issue before painting prevents repeat damage.
- Check seals and replace failed glazing to stop trapped moisture.
- Dry and ventilate cavities; use desiccants or a dehumidifier to reduce pane condensation.
- Repair or replace rotted trim, then prime with a moisture-tolerant product before repainting.
Paint Adhesion Breakdown
How does condensation undermine paint on windows and doors? You’ll see moisture collect along frames, seeping into the wood grain and lifting the finish. Condensed water breaks the bond between primer and substrate, so paint texture loses cohesion and starts to blister or flake.
Repeated wetting and drying forces tiny failures at edges and between coats, letting larger sections peel away. You’ll notice chalking where fibers swell slightly and coatings lose adhesion.
To prevent this, control humidity, guarantee good ventilation, and use breathable primers designed for damp-prone locations so the paint can adhere despite occasional condensation.
Wood Swelling And Shrinkage
Condensation doesn’t just break the paint bond; it repeatedly wets the wood so it swells and then dries so it shrinks. Those dimensional changes put mechanical stress on coatings and joints.
You’ll notice paint checks where wood grain expands across the face, and gaps at joints when seasonal humidity drops. On windows and doors, this cycle peels finishes, distorts seals, and opens paths for rot.
Control indoor moisture, coat only dry, acclimated wood, and detail joints to tolerate movement.
- Inspect for swelling at sills and muntins
- Refinish with flexible primer and paint
- Use weatherstripping that compresses and rebounds
How to Repair Peeling Paint Caused by Damp Wood
When damp wood causes paint to peel, you’ll need to address moisture and adhesion before repainting to prevent the problem from coming back. You dry the area, find and fix leaks, and lightly sand to remove loose paint. Treat remaining damp spots with a fungicide if needed. Prime with a moisture-tolerant primer, then repaint using products that support wood staining and grain enhancement if you want a natural look. Monitor humidity to prevent recurrence.
| Step | Action | Tip |
|---|---|---|
| 1 | Dry area | Use fans/dehumidifier |
| 2 | Repair source | Fix leaks |
| 3 | Sand | Remove loose paint |
| 4 | Treat | Fungicide if mold |
| 5 | Prime/paint | Moisture-tolerant primer |
Remove and Replace Water-Damaged Trim Before Painting
Before you repaint, remove any trim that’s warped, soft, or shows visible rot so the new finish will adhere properly and the repair will last. You should inspect nail holes, seams, and underlying sheathing, then cut out damaged sections and fit primed replacement trim. Match profile and wood grain to maintain appearance and prevent moisture traps.
Sand joints, apply epoxy where minor damage exists, and guarantee surfaces are dry before priming. Choose a primer and paint sheen suited to exterior trim for durability. Follow with proper fastening and sealant to keep water out and prolong the new finish.
- Inspect and remove damaged trim
- Fit and secure replacements
- Prime, seal, and paint
How to Seal and Paint Siding After Rain or Heavy Dew
After heavy rain or dew, check the siding’s surface moisture with a meter or by touching it—paint won’t stick to damp wood.
If the surface’s dry enough, prep quickly by wiping away residue, repairing any gaps, and applying a quality exterior sealer to lock out moisture.
Then you can paint on a proper primer and topcoat while conditions are still favorable.
Check Surface Moisture
If your siding’s been exposed to rain or heavy dew, don’t assume it’s ready for sealant or paint—check the surface moisture first. Use a moisture meter or press a dry cloth against the wood; lingering dampness can cause surface staining and ruin paint compatibility. Verify readings below manufacturer-recommended percentages before proceeding.
Also inspect for mold or efflorescence and let those areas dry and clean fully.
- Measure moisture in multiple boards and depths.
- Note shaded or lower sections that retain dampness.
- Recheck after a sunny, breezy period to confirm dryness.
Only start sealing or painting once readings and appearance are acceptable.
Prep And Seal Quickly
When the siding’s surface reads dry and looks clean, move quickly to prep and seal so moisture won’t re-enter the wood. You should sand any raised wood grain lightly, wipe away dust, and inspect for trapped damp in joints.
Use a high-quality primer designed for slightly humid conditions, sealing end grains and gaps to block moisture migration. Caulk seams before priming if needed.
After primer dries to the manufacturer’s recommended time, apply your topcoat, checking Paint sheen compatibility with the primer.
Work efficiently in sections so finish layers cure without new dew or rain contact, preventing future problems.
How to Handle Painting Over Damp Stains and Tannins
Although damp stains and tannins can seem persistent, you can still get a durable, attractive finish by addressing moisture and pigment sources before painting. Start by drying affected wood and confirming the stain isn’t active; use a moisture meter.
Sand to expose clean wood grain and remove surface tannins, then clean with a TSP substitute.
Apply a stain-blocking primer formulated for tannin-rich woods; choose a mid-sheen that complements the paint sheen you want.
Finally, topcoat with exterior-grade paint once the primer cures.
- Dry and test moisture levels
- Sand and clean thoroughly
- Use stain-blocking primer, then topcoat
How to Paint Pressure-Treated Wood Safely After Drying
After you’ve confirmed the wood is dry and free of active stains, prepare pressure-treated lumber for painting by checking its surface and pH, sanding any rough areas, and removing mill glaze or residue that can repel coatings. You’ll clean, rinse, and let it fully dry again, then apply a compatible primer designed for treated wood. Sand lightly to follow the wood grain so the paint texture sits evenly. Choose breathable, exterior-grade topcoat and apply thin coats. Monitor adhesion and cure before full use. Trust careful prep to protect the wood and keep finishes lasting.
| Feel | Trust |
|---|---|
| Relief | Confidence |
| Care | Pride |
| Security | Joy |
How to Prime and Paint in High-Humidity Climates
Because moisture fights paint adhesion, you’ll need to time and prepare every step differently in high-humidity climates.
You should check wood grain for raised fibers, sand lightly, and dry the surface with a fan or dehumidifier before priming.
Choose a moisture-tolerant primer and apply thin coats, letting each dry fully so paint adhesion isn’t compromised.
When painting, keep strokes aligned with the wood grain and use high-quality paint formulated for humid conditions.
- Use a quick-drying, mildew-resistant primer.
- Sand between coats to maintain smooth wood grain.
- Work during the driest part of the day.
How to Schedule Outdoor Painting Around Weather Forecasts
Now that you’ve prepped and primed for humid conditions, plan your outdoor painting around the weather forecast to protect drying times and adhesion. Check hour-by-hour predictions, avoid rain windows, and pick days with stable temperatures and low overnight dew. Monitor humidity and plan coats so the previous layer dries to final paint sheen before recoating. Work morning to midday to use rising temperatures and falling humidity. Protect exposed wood grain and edges with temporary covers if forecasts shift.
| Condition | Action |
|---|---|
| High humidity | Delay or use slow-dry paint |
| Light rain risk | Cover or postpone |
| Cool nights | Finish earlier |
| Heat spike | Shade work |
How to Store and Stack Lumber to Keep It Paint-Ready
If you want lumber to stay paint-ready, store and stack it so air circulates, moisture stays out, and boards stay flat. Keep lumber off the ground on stickers, cover with a breathable tarp, and face similar wood grain and paint color together so you’ll pick matching boards later. Rotate stock occasionally and inspect for damp spots.
- Use evenly spaced stickers to promote airflow and prevent cupping.
- Stack heavier boards at the bottom and clamp gently to maintain flatness.
- Store indoors or under a ventilated shelter to avoid rain and ground moisture.
Handle wood gently to preserve surface for finishing.
How to Acclimate Purchased Wood Before Finishing
When you bring new lumber home, let it sit in the room where you’ll finish it so it can reach ambient temperature and humidity.
Check the moisture content with a meter and wait until it’s within the recommended range for your paint or stain.
If it’s too wet, give it more time or use controlled drying until readings are stable.
Let Wood Reach Room
Because purchased lumber has been stored and shipped in different climates, you should let it sit in the room where you’ll finish it until its moisture content stabilizes to the local conditions.
Letting wood reach room temperature prevents warping and helps the wood grain settle so finishes lay evenly and paint sheen stays consistent.
Keep pieces flat, supported, and spaced for air circulation. Avoid direct heat or sunlight that drives uneven drying.
- Stack with stickers between boards for airflow
- Keep doors and windows closed to steady humidity
- Leave for several days to a week, depending on thickness
Check Moisture Content
How do you know your lumber’s ready for paint? Use a moisture meter to check moisture content across boards, testing near ends and center. Aim for 6–8% indoors; for exterior projects, match local equilibrium.
Let wood acclimate in the room where it’ll be finished until readings stabilize.
Watch the wood grain for cupping or gaps indicating imbalance; retest after any visible change. Sand or seal only when readings are consistent.
Proper moisture control prevents adhesion failure and preserves finish durability.
Keep lumber off concrete, elevate for airflow, and avoid rapid humidity swings while acclimating.
How to Record and Share Moisture Readings With Contractors or Clients
If you’re sharing moisture readings with contractors or clients, record the date, time, location on the structure, device model, probe type, and exact readings so everyone can verify conditions and track progress.
Note wood grain orientation and any color matching concerns near stained or finished areas; those details affect drying and appearance.
Save photos showing the probe placement and surrounding context.
- Attach a CSV or simple spreadsheet with timestamps and reading locations.
- Include labeled photos and a short note about ambient conditions (temperature, humidity).
- Send readings via email and cloud link so recipients can comment and archive.
Common DIY Mistakes: When to Delay Painting Due to Moisture
Don’t skip checking the wood’s moisture content before you paint—high readings mean paint won’t adhere or will blister.
Also avoid painting right after rain, since surface dampness can hide moisture deeper in the wood.
If moisture levels aren’t within the recommended range, wait and recheck before you start.
Check Wood Moisture Content
Wondering whether the wood’s ready for paint? You’ll want to check wood moisture content first. Use a moisture meter across the wood grain to spot damp pockets; readings under 12-15% are usually safe.
Look for color consistency—wet areas often darken or echo uneven grain. If you don’t have a meter, press your palm to the surface: a cold, clammy feel hints at moisture.
- Test multiple boards and locations, especially end grain.
- Calibrate your meter for different species and thicknesses.
- Delay painting if readings vary or color consistency shows damp patches.
Avoid Painting After Rain
Why wait after a rainstorm before you paint? You shouldn’t paint wet wood—the moisture soaks into the wood grain, lifts fibers, and prevents proper adhesion. If you paint too soon, the finish may blister, peel, or show uneven paint sheen.
Wait until the surface feels dry and a moisture meter reads appropriate levels for your paint type. Drying times vary with temperature, humidity, and species.
If you must work quickly, use a fast-drying primer formulated for damp conditions, but plan to repaint once fully dry. Patience avoids callbacks and preserves a smooth, lasting finish.
Frequently Asked Questions
Can Painted Wood Later Absorb Moisture and Blister Internally?
Yes — you’ll see moisture absorption cause internal blistering if painted wood traps wetness; the coating can seal surface pores while water migrates, expands, and creates hidden blisters, so you’ll prevent this by drying and sealing properly.
Can Water-Based Vs Oil-Based Paints Affect Drying Times on Wood?
Measure twice, cut once — you’ll find water-based paints dry faster but oil-based cure slower. You’ll boost paint adhesion and longevity with proper surface preparation, and you’ll choose based on drying needs and finish preferences.
Does Wood Sealer Prevent Moisture Migration After Painting?
Yes — wood sealing creates effective moisture barriers, so you’ll slow or prevent moisture migration after painting. Choose the right wood sealing product, apply properly, and maintain coatings to keep those moisture barriers functioning long-term.
Can Mold or Mildew Be Killed Without Removing Paint First?
Yes — you can kill mold without removing paint first, but you’ll need proper surface preparation and cleaning to preserve paint adhesion; treat with a fungicide or diluted bleach, scrub, rinse, dry, and spot-prime any damaged areas.
Are Nail Holes and Joints More Prone to Moisture-Related Failures?
Yes — nail holes and joints are more prone to moisture-related failures. You’ll watch wood grain swell and shift, undermining paint adhesion at seams and fastener points, so you’ll seal, fill, and flash properly to prevent decay.
Conclusion
Think of your wood like bread dough — if it’s too wet, it won’t hold its shape; if too dry, it cracks. You wouldn’t frost soggy cake or a rock-hard loaf and expect it to look good. Let the wood rest, reach the right moisture, then finish it. Follow the checklist and moisture readings, and your paint will cling like icing on a perfectly baked loaf, not slide off into a sticky mess.