How Do I Paint Over Oil Based Paint: Proper Preparation Steps
You can paint over oil-based paint, but you’ll need to prep it properly so new paint will stick and last. Start by cleaning grease and dirt with a degreaser, sand the surface to dull the gloss, wipe away dust, and prime with a high-quality bonding primer labeled for oil-to-latex or shellac. Caulk gaps and repair any damage first. Use compatible topcoat paint and allow full dry times. Keep going for step-by-step tips, troubleshooting, and product picks.
Quick Answer: Can You Paint Over Oil-Based Paint?
Short answer: yes—you can paint over oil-based paint, but you’ll need to prepare the surface first.
Short answer: yes—you can paint over oil-based paint; just clean, sand, degloss, and prime for proper adhesion.
You’ll sand, clean, and degloss the old oil paint so new coatings adhere.
Prime with a bonding primer made for oil-to-latex changes and consider compatibility considerations between old and new systems.
Follow drying times and test a small area before tackling the whole surface.
How to Tell Oil-Based Vs. Latex Paint?
You can often tell oil-based from latex paint with a couple quick checks.
Smell the surface—oil-based paint usually still has a faint solvent scent, while latex smells milder or like nothing.
Also note drying time: latex dries to the touch within an hour or two, while oil-based takes much longer to harden.
Surface Smell Test
Wondering whether a finish is oil-based or latex? Use a simple surface smell test to gauge odor intensity and check surface condition.
Follow these steps:
- Rub a cotton ball with denatured alcohol on paint.
- Sniff for strong solvent smell — high odor intensity suggests oil-based.
- No solvent odor usually means latex; note chips, gloss, and tackiness.
Drying Time Check
Because oil-based paint takes noticeably longer to lose tack and fully cure than latex, checking how quickly a painted surface dries gives you a clear clue: touch a hidden edge or corner after an hour and then again after several hours—if it’s still tacky or smells strongly of solvents, it’s likely oil-based; if it’s dry to the touch within an hour or two and has only a faint odor, it’s probably latex.
Consider drying time factors and oil paint variables like temperature, humidity, film thickness, and ventilation; they’ll influence your test and help confirm whether you’re dealing with oil or latex before you prep and paint over it.
Why Oil-Based Finishes Need Special Prep
Although oil-based finishes look smooth and durable, they resist adhesion and trap contaminants that’ll ruin a new topcoat if you don’t prep properly.
You need to address oil paint properties and restore surface adhesion. Do this by:
- Cleaning to remove grease and contaminants.
- Scuff-sanding to break the glossy surface.
- Using a compatible primer to guarantee the new paint bonds reliably.
When to Keep Oil Paint and When to Switch to Water-Based
If you need long-lasting, hard-wearing protection on trim or a high-traffic surface, stick with oil for its durability.
If you want easier cleanup, lower odor, and quicker recoat times, switch to a water-based product.
Also weigh the substrate—some surfaces and existing finishes take one type better than the other, so check compatibility before you start.
Keep Oil For Durability
When durability matters most—high-traffic trim, floors, or exterior surfaces you want to resist moisture and wear—stick with oil-based paint; it forms a tougher, more abrasion-resistant film than most water-based options.
You’ll preserve oil paint longevity and surface durability for these uses. Consider:
- Entryway floors
- Exterior trim
- Stair treads and railings
Switch For Easy Cleanup
1 clear reason to switch from oil to water-based paint is cleanup: you’ll save time, avoid harsh solvents, and make future touch-ups easier.
If you want easy cleanup and faster recoat times, choose water-based.
You’ll adapt painting techniques slightly—use quality brushes, thin coats, and mild soap for cleanup—while still evaluating durability needs before deciding to switch.
Consider Surface Compatibility
Because different surfaces accept finishes differently, you should match the paint type to the substrate before you start.
Assess surface texture and existing oil finish: will paint adhesion hold or will sanding be needed?
Decide to keep oil or switch to water-based based on substrate, use, and moisture exposure.
- Smooth, glossy: sand/prime.
- Porous: water-based may soak.
- High-moisture: keep oil.
Tools and Materials for Prepping and Painting Over Oil
Gather the right tools before you touch a brush: you’ll need abrasives (sandpaper or a sanding block in 120–220 grit), a deglosser or chemical stripper for stubborn finishes, a high-quality oil- or solvent-based primer, compatible latex or oil-topcoat, tack cloths, clean rags, solvent for cleanup (mineral spirits), good brushes or foam rollers, painter’s tape, and protective gear like gloves and a respirator.
| Item | Purpose |
|---|---|
| Sandpaper | Scuffing glossy oil |
| Deglosser | Remove sheen |
| Primer | Promote adhesion |
| Topcoat | Finish durability |
| Respirator | Safety protection |
Use this tools checklist and material recommendations to prep efficiently.
How to Test Surface Adhesion Effectively?
Now that you’ve got the right tools and materials, you’ll want to confirm the paint will actually stick before you start priming.
Perform adhesion tests as part of surface preparation to avoid peeling later. Try these steps:
- Clean and sand a small area.
- Apply primer and paint sample.
- After curing, use tape or a cross-hatch test to check adhesion.
Detecting Lead in Old Oil Paint: What to Do
Worried your old oil paint might contain lead? You should do lead testing before proceeding. Use certified kits or hire a pro for accurate results. If positive, plan for safe removal by a licensed contractor; don’t DIY risky methods. Below is a quick checklist table to guide your next steps.
| Step | Action | Who |
|---|---|---|
| 1 | Test | You/Pro |
| 2 | Confirm | Lab |
| 3 | Plan | Contractor |
| 4 | Notify | Household |
| 5 | Remove | Licensed pro |
Safety Precautions Before Sanding or Stripping Oil Paint
Before you sand or strip old oil paint, make sure the area is well ventilated and wear a properly rated respirator to avoid inhaling dust and fumes.
Protect your skin with long sleeves, gloves, and consider a disposable coverall to keep particles off clothing.
Wear safety goggles to shield your eyes from chips and chemical splashes.
Ventilation And Respiratory Protection
Because sanding or stripping oil-based paint releases dust and solvent fumes, you should confirm strong ventilation and use proper respiratory protection before you start.
Follow safety guidelines and set your workspace setup to control hazardous materials and paint fumes, improve air quality, and confirm breathing protection:
- Open windows and use exhaust fans (ventilation methods).
- Use NIOSH-rated respiratory masks.
- Monitor air quality while working.
Skin And Eye Safety
While you’re preparing to sand or strip oil-based paint, protect your skin and eyes with proper barriers and eyewear to prevent chemical burns, irritation, and flying debris. You should wear gloves, long sleeves, and splash goggles as part of personal protective gear to limit exposure to chemical hazards. Clean any contact immediately and dispose of contaminated clothing.
| Item | Purpose |
|---|---|
| Gloves | Barrier |
| Goggles | Eye protection |
| Sleeves | Skin coverage |
| Cleanup | Decontamination |
Cleaning Grease, Dirt, and Nicotine From Oil-Painted Walls
If your oil-painted walls look grimy from grease, dirt, or nicotine, you’ll need to remove those residues before repainting so new paint can adhere and look even.
Use proper cleaning solutions and degreasing methods to tackle grease removal, nicotine stains, and dirt cleaning as part of wall preparation and surface treatment.
Use appropriate cleaners and degreasers to remove grease, nicotine, and dirt for proper wall prep.
Steps:
- Pretest cleaner.
- Effective scrubbing.
- Rinse and dry.
How to Degloss Oil Paint Without Harsh Stripping
1 simple method to degloss oil paint without harsh stripping is to scuff-sand the surface lightly, which dulls the sheen and gives new finish something to bite into.
Use fine-grit sandpaper, clean dust, then apply a good deglosser solution if needed.
These deglossing techniques let you use modern oil paint alternatives or latex primers for reliable adhesion and a smooth topcoat.
When to Sand Oil-Painted Surfaces (And When Not To)
You’ll want to sand when the oil finish is glossy, has drips, or you need to dull the surface for primer adhesion.
Use light sanding with 220–320 grit or a scuff pad for smooth, even abrasion and clean thoroughly afterward.
Skip sanding if the old paint is dull, well-adhered, and you’re using a bonding primer designed for oil surfaces.
When To Sand
Although oil paint can be durable, you should sand it in specific situations to guarantee proper adhesion and a smooth finish.
You’ll sand when surfaces are glossy, rough, or flaking.
Consider sanding frequency for maintenance and after repairs.
Balance effort with need; don’t sand intact, well-adhered oil.
Choose appropriate sanding techniques in the next section.
- Glossy finishes
- Flaking paint
- Repairs
Sanding Techniques To Use
Start by matching your sanding method to the job: use light hand-sanding with fine-grit paper for dulling glossy oil finishes and a coarser grit or power sander for removing flaking or thick layers, while always finishing with a finer grit to smooth the surface.
Choose sanding techniques and grit selection based on condition, pick proper sanding tools, use dust control, and follow safety measures.
When To Skip Sanding
Not every oil-painted surface needs sanding before you repaint; sometimes you can skip it if the old finish is clean, firmly bonded, and only mildly glossy.
You can use sanding alternatives or deglossers when paint thickness is adequate. Decide based on adhesion and condition:
- Intact, bonded finish — skip sanding.
- Mild gloss — use deglosser.
- Thick buildup — sand or strip.
Best Sandpaper Grits and Sanding Techniques
Choose the right sandpaper grit and technique to create a smooth, toothy surface that helps new paint adhere without over-sanding the oil finish.
For surface preparation, practice grit selection: start 120–150 grit for profiling, follow 220–320 for finish smoothing.
Use proper sanding tools, vary sanding angles to reach contours, and follow sanding techniques and sanding safety—dust mask, eye protection, and moderate pressure.
Removing Loose, Flaking Oil Paint Safely
After sanding to create a keyed surface, you’ll need to remove any loose or flaking oil paint before applying new coatings.
Use tools and methods that prioritize safe removal and avoid damage:
- Scrape gently with a putty knife or paint scraper.
- Use a wire brush for stubborn flakes.
- Vacuum and wipe surfaces with a damp cloth to remove dust and debris.
Repairing Cracks, Blisters, and Gouges in Oil Paint
Address cracks, blisters, and gouges promptly to prevent moisture and rust from getting under the paint and to guarantee your new finish lays down smoothly. Conduct surface assessment and damage evaluation, choose filler selection wisely for crack repair, blister treatment, and gouge filling. Use proper sanding techniques for smoothing surfaces before priming and repainting.
| Issue | Action |
|---|---|
| Crack | Clean, fill |
| Blister | Scrape, treat |
| Gouge | Pack, sand |
| Finish | Prime, paint |
| Inspect | Reassess |
Filling Nail Holes, Seams, and Trim Gaps on Oil Surfaces
Start by locating and evaluating nail holes, gaps along trim, and any seam openings so you know the extent of repair needed.
Choose fillers made for oil surfaces—like oil-based wood filler or paintable caulk—for each type of gap.
Once cured, sand and smooth seams flush with the surrounding surface before priming and painting.
Locate And Assess Damage
Walk the room slowly and inspect every painted surface for nail holes, cracked seams, and gaps where trim meets walls or ceilings; you’ll catch issues the first sweep misses.
Use damage assessment to prioritize repairs and choose repair strategies. Then:
- Note size, location, and frequency.
- Identify underlying causes (movement, moisture).
- Rank urgency for sanding, sealing, or professional help.
Use Appropriate Fillers
When you’re ready to fill nail holes, seams, and trim gaps on oil-painted surfaces, choose a filler that adheres to oil finishes and flexes with the substrate so repairs don’t crack or pop out later; acrylic-latex caulk works well for gaps and seams, while a solvent-compatible water-based spackling or a paintable epoxy putty is better for deeper nail holes and gouges.
| Filler types | Drying times | Surface compatibility |
|---|---|---|
| Acrylic-latex | Fast | Trim, seams |
| Epoxy putty | Medium | Deep holes |
| Spackling | Variable | Small repairs |
Use proper application techniques, color matching, product recommendations, repair methods, and avoid common mistakes.
Sand And Smooth Seams
After the filler has cured, you’ll need to sand and smooth the seams so the repair blends with the surrounding oil finish; use a sanding block with fine-grit paper (120–220) and light, even strokes to avoid gouging the substrate.
Apply precise sanding techniques for seam filling and surface preparation to guarantee paint adhesion.
- Blend edges
- Clean dust
- Inspect final feel
Choosing a Primer for Adhesion to Oil-Based Paint
Because oil-based finishes repel many modern coatings, you’ll need a primer specifically formulated for adhesion to make your new paint stick and last. Choose based on primer types, adhesion methods, surface preparation, paint compatibility, drying properties, finish options, product recommendations, and application techniques.
| Primer Type | Best Use |
|---|---|
| Latex-bonding | Quick drying, light odor |
| Shellac | Strong adhesion, stain blocking |
Oil Primers Vs. Bonding Primers: How to Choose
You’ve picked the right primer category, but now you’ll need to decide between traditional oil-based primers and modern bonding primers.
Consider primer selection criteria:
- oil primer benefits: superior adhesion on slick surfaces, finish durability comparison, paint compatibility issues.
- bonding primer advantages: faster drying time considerations, better for difficult substrates.
- Weigh surface preparation methods, application techniques, environmental impact, cost differences.
Spot-Priming Vs. Priming the Whole Surface
When you’re covering small repairs or touch-ups, spot-priming saves time and product.
However, if the old finish varies in sheen or porosity, you’ll get a more uniform result by priming the whole surface.
Do a surface assessment and adhesion testing, then choose primer types based on paint compatibility.
Use repair techniques and full priming when finish selection or paint durability require thorough surface preparation.
Applying Primer Over Oil: Brush, Roller, and Sprayer Tips
If you’re working over oil-based paint, pick application tools and techniques that promote even coverage and strong adhesion.
Prepare the surface, confirm paint compatibility, and choose an appropriate primer application method. Follow these tips:
- Brush techniques: cut in smoothly, maintain wet edge for adhesion methods.
- Roller efficiency: use nap suited to texture, roll uniformly for finish quality.
- Sprayer settings: adjust pressure and tip for thin, even coats.
Primer Drying Times and Recoat Windows Over Oil
When you prime over oil, check the primer’s specified drying time so you know when it reaches a tack-free window.
That tack-free period tells you when the primer won’t gum up but may still need more cure before sanding.
Aim to recoat within the manufacturer’s recommended timeframe to guarantee proper adhesion and avoid finish problems.
Primer Drying Time
Although oil-based surfaces can seem stubborn, primers dry predictably once you know the variables to watch for. You’ll monitor temperature, humidity, and film thickness.
Use proper primer application techniques and primer color selection to speed acceptance.
Typical recoat windows:
- Cool/damp: 24–48 hours
- Normal: 8–16 hours
- Warm/dry: 4–8 hours
Tack-Free Window
A clear tack-free window tells you when a primer over oil is dry enough to handle recoats without trapping solvents or causing adhesion problems.
You’ll test by lightly touching a hidden area; if it’s not sticky, tack free solutions like proper ventilation and temperature control helped.
Use consistent drying techniques—airflow, humidity control, and manufacturer-recommended times—to avoid premature recoating and guarantee strong primer bonding.
Recoat Timeframe
If you’ve applied a primer over oil, expect longer dry times than with latex—manufacturers’ tack-free windows typically run from 2 to 24 hours, but full recoat windows can stretch from 24 hours up to 7 days depending on product, temperature, and humidity.
- Check label for specific recoat timing.
- Confirm paint compatibility before topcoat.
- Sand light and remove dust before recoating.
Selecting a Topcoat When Painting Over Oil-Based Paint
When you choose a topcoat for oil-based paint, focus on compatibility, durability, and the finish you want; the right product guarantees adhesion and long-term wear.
Evaluate topcoat options—alkyd varnish for toughness, polyurethane for scratch resistance, or oil-modified sealers for sheen control.
Consider finish durability, application method, and maintenance needs so your surface stays protected and looks consistent.
How to Transition From Oil-Based to Water-Based Paint
When you’re switching from oil-based to water-based paint, first confirm the surface is compatible and free of glossy residue.
You’ll need to properly clean, sand, and degloss the area to guarantee adhesion.
Finish by choosing a high-quality bonding primer formulated to bridge oil and water paints.
Identify Surface Compatibility
Because oil and water-based paints bond differently, you’ll need to check the surface before switching to avoid adhesion problems.
Identify surface types and assess paint compatibility quickly:
- Glossy wood or metal — may need deglossing or primer.
- Previously sealed drywall — usually compatible with water-based after scuffing.
- Alkyd finishes — consider a bonding primer to guarantee topcoat adhesion.
Proper Surface Preparation
Start by cleaning and degreasing the surface so the new water‑based paint can bond properly; remove dirt, wax, and oils with a trisodium phosphate (TSP) solution or a dedicated cleaner, then rinse and let it dry. Score glossy oil paint, sand for surface texture, avoid common prep mistakes, and use correct painting tools to protect paint adhesion and reveal paint layers.
| Tool | Purpose |
|---|---|
| Sandpaper | Smooth surface |
| Cleaner | Remove oils |
Choose Appropriate Primer
If you’re switching from oil‑based to water‑based paint, pick a bonding primer formulated to adhere to glossy or enamel surfaces so the new paint won’t peel or blister.
Use primer types suited for oils, then perform adhesion testing. Follow these steps:
- Clean and sand the surface.
- Apply a solvent‑based or universal bonding primer.
- Test a small area for adhesion before full coating.
Best Sheens Over Formerly Oiled Surfaces
Choosing the right sheen matters more than you might think when painting over an oil-based surface: it affects adhesion, hides imperfections, and determines how well your new finish resists stains and wear.
For sheen selection, choose satin or semi-gloss for best finish durability and cleanability. Flat hides flaws but isn’t as durable; high gloss offers maximum durability but highlights imperfections, so prep accordingly.
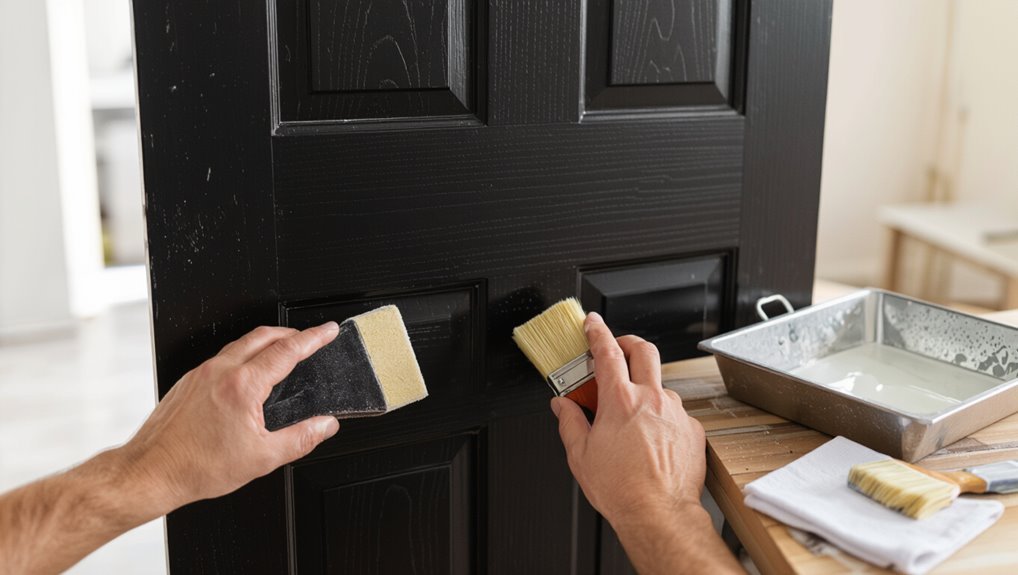
Painting Cabinets, Trim, and Doors Over Oil-Based Finishes
When you’re tackling cabinets, trim, or doors that have an oil-based finish, start with proper surface prep: clean, degloss, sand, and remove dust so paint will adhere.
Choose a high-bonding primer formulated for glossy or oil surfaces—either a bonding latex primer or a shellac/alkyd-based primer depending on your topcoat.
Apply primer evenly and inspect for adhesion before finishing to guarantee a durable result.
Surface Prep Steps
Start by removing hardware, cleaning thoroughly, and scuff-sanding the oil-based surface so paint will adhere properly; you’ll also want to repair dents or gouges and fill gaps with appropriate wood filler or caulk before priming.
Follow these steps:
- Surface cleaning, sanding techniques, and damage assessment.
- Filler selection, moisture control, and odor removal.
- Adhesion testing, paint compatibility, and safety measures.
Primer Selection
Picking the right primer is essential for getting durable, even coverage over oil-based cabinets, trim, and doors — you want a product that bonds to glossy finishes and blocks stains without adding extra sanding.
Consider primer types (shellac, oil, latex) for primer compatibility and primer advantages like stain blocking and adhesion.
Follow recommended primer application and choose primer finishes that suit your topcoat.
How to Prevent Peeling and Adhesion Failures
Because oil finishes can repel newer coatings, you’ll need to remove contaminants and create a reliable bonding surface before you paint.
Because oil finishes repel modern coatings, remove contaminants and prep the surface to ensure reliable paint adhesion.
Use these adhesion techniques for peeling prevention:
- Degrease, sand to dull gloss, and wipe clean.
- Apply a high-quality bonding primer per instructions.
- Verify surfaces are fully dry and cured before topcoating to prevent failure.
Troubleshooting Bubbling, Wrinkling, and Brush Marks
When you see bubbling, wrinkling, or pronounced brush marks after painting over oil-based finishes, it’s a sign the coating wasn’t applied under ideal conditions or the substrate wasn’t prepared correctly.
Diagnose bubbling issues and adhesion problems: sand, remove loose paint, and guarantee paint compatibility.
Address drying inconsistencies, temperature impacts, and humidity effects.
Use wrinkling solutions and brush mark remedies to correct surface imperfections and texture differences.
Cleaning and Maintaining Newly Recoated Surfaces
After the new coat cures, keep the surface clean and protected to preserve adhesion and finish quality.
You’ll use surface care and cleaning methods, plus protective coatings for surface protection and long term upkeep.
Routine inspections catch issues early. Product recommendations guide stain removal and touch up techniques.
Follow these maintenance tips:
- Gentle cleaning weekly.
- Inspect quarterly.
- Touch up as needed.
Estimated Time and Cost for a Typical Room Repaint
If you’re repainting a typical 12×12 room, expect the job to take roughly one to two days for a DIYer and a single workday for a professional crew, depending on prep and drying times.
For planning, use time estimates and a simple cost breakdown: DIY might run $60–$150 for materials; pros commonly charge $300–$800 including labor, supplies, and minor repairs.
When to Call a Pro Instead of DIY
Because oil-based paint can hide problems and demand precise prep, call a pro when you’re facing extensive peeling, stubborn adhesion issues, large-scale surface repairs, or when the finish must be flawless (trim, cabinets, or historic woodwork).
Get a professional assessment if project complexity, safety concerns, or surface condition exceed your experience level, time constraints, or budget considerations; pros guarantee paint quality.
If the job’s too complex, unsafe, or time‑tight, get a pro—professionals ensure a flawless, lasting finish.
- Hire for complexity.
- Hire for safety.
- Hire for quality.
Disposing of Oil-Based Paint and Materials Responsibly
Once your painting is done or you decide a pro should take over, you’ll need to handle leftover oil-based paint and contaminated materials responsibly to protect people and the environment.
Don’t pour paint down drains or toss soaked rags. Use local recycling centers or household hazardous waste events for disposal.
Store sealed cans safely until drop-off, and follow facility instructions to avoid fines and contamination.
Quick Pre-Paint Checklist Before You Open a Can
Before you crack open a can, make sure you’ve got the right supplies, a well-ventilated workspace, and a clear plan for surface prep and safety.
Do a quick surface assessment, gather pre paint essentials, and confirm protection for floors.
Check:
- Cleaners, sandpaper, primer
- Tape, drop cloths, respirator
- Lighting, ventilation, disposal plan
Pro Tips and Before-and-After Lessons From Painters
3 pro tricks painters swear by will save you time and prevent costly rework:
- Scuff-sand glossy oil surfaces to give primer something to bite.
- Wipe down with a TSP substitute to remove oils and residue.
- Use a high-quality bonding primer before your topcoat.
Use these pro tips, document before and after photos, note curing times, and touch up imperfections promptly for lasting results.
Where to Find Product Specs, Primers, and Tech Data
When you need product specs, primers, or technical data, start at the manufacturer’s website and download the product data sheet and SDS—those two documents give you cure times, surface prep, VOCs, and compatibility notes you’ll need for oil-to-latex jobs.
Use these for product specifications, primer types, technical data, product comparisons, manufacturer guidelines, and surface compatibility.
- Compare datasheets
- Check primer types
- Note compatibility
Frequently Asked Questions
Can Oil-Based Paint Be Tinted With Universal Colorants Safely?
Yes — you can safely tint oil-based paint with universal colorants if you check colorant compatibility and use proper tinting techniques; you’ll test small batches, add colorant gradually, and stir thoroughly to guarantee uniform, stable results.
Will Oil-Based Paint Yellow Faster in Rooms With Little Sunlight?
Coincidentally, yes—you’ll notice oil-based paint can yellow faster in rooms with little sunlight. You’ll blame yellowing factors like oxidation and low UV exposure, but limited sunlight exposure often accelerates that warm, amber shift.
How Do Humidity and Temperature Affect Oil Primer Curing Times?
Humidity and temperature directly affect cure times: you’ll see slower cure in high humidity or low temperature and faster cure in warm, dry conditions. These environmental factors change drying rate, tack, and full hardness development.
Can I Apply Wallpaper Over Properly Primed Oil-Painted Walls?
Yes — you can, if you guarantee thorough wall preparation and use a compatible primer to promote wallpaper adhesion. You’ll sand, clean, remove gloss, and apply an appropriate primer; then your wallpaper will stick reliably.
Are Water-Based Faux Finishes Compatible Over Oil-Based Primers?
Yes — you can apply water-based faux finishes over oil-based primers if you verify primer compatibility and proper sanding/cleaning. You’ll achieve varied faux finish techniques, but always test adhesion and finish appearance on a small area first.
Conclusion
You can paint over oil-based paint, but you’ve got to prep it right: clean, sand, degloss, and prime with a bonding primer. If you skip steps you’ll get peeling or poor adhesion. For example, a homeowner I worked with cleaned and sanded yellowed oil trim, used an oil-to-latex bonding primer, then applied latex paint—no peeling after two years. Follow the checklist, pick proper primer, and you’ll get durable, modern results.