How to Fix Chipped Paint: Easy Repair Methods for Any Surface
You can fix most paint chips yourself: clean the area, sand edges smooth, and remove dust. For shallow chips, apply a filler or thin paint layers; for deeper gouges, use epoxy or a patch and prime before painting. Match the sheen and apply thin coats, feathering edges for a seamless blend, then finish with a clear topcoat if needed. Follow cure times and preventative prep for lasting results, and more step‑by‑step tips follow below.
Quick Fix: Repair a Paint Chip in Under 30 Minutes
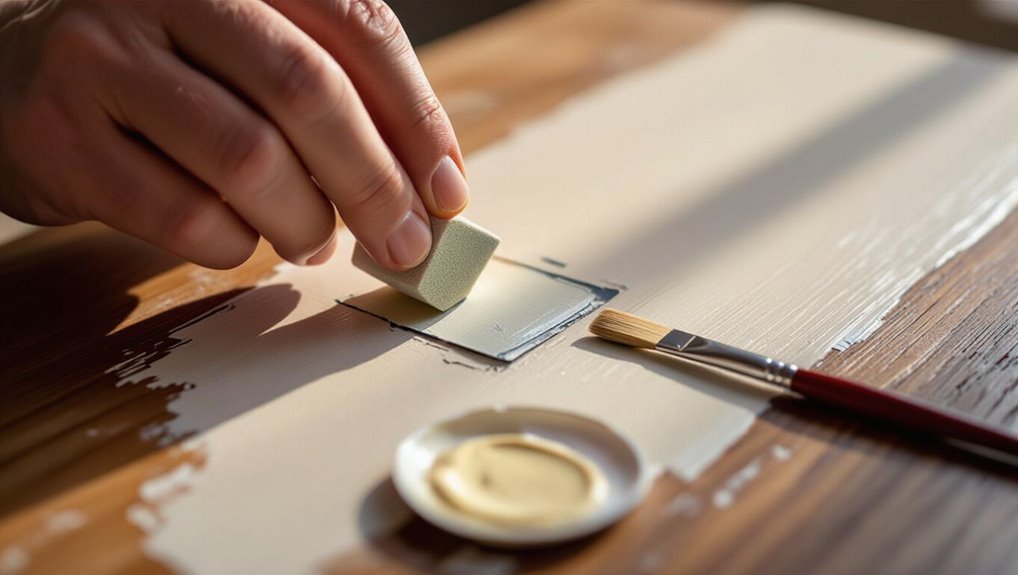
Grab a small brush and a matching touch-up paint — you can repair most minor chips in under 30 minutes.
Grab a small brush and matching touch-up paint — most minor chips can be fixed in under 30 minutes.
Clean the area, sand lightly, apply thin layers, and let each dry.
Blend edges, then finish with clear coat if needed.
These quick solutions save time and keep surfaces neat.
Regular paint maintenance prevents bigger problems and preserves appearance.
Who This Guide Is For and How to Use It
Now that you can handle a quick chip repair in under 30 minutes, this guide helps you decide when to use those fast fixes and when to take a more thorough approach.
You’re the target audience if you tackle home touch-ups or prep for repainting.
Use concise guide usage: scan damage, pick the recommended method, gather tools, and follow steps in order to get durable, neat results.
How to Identify Drywall, Wood, Metal, or Laminate
Wondering whether that chip sits in drywall, wood, metal, or laminate?
Check drywall characteristics like gypsum core and paper edges; it’s soft and powdery.
Inspect wood finishes for grain, varnish, or solid timber beneath the paint.
Tap metal to hear a tinny sound and note metal types (steel, aluminum).
Look for laminate features: thin decorative layer over composite board, often with seam lines.
How to Check Chip Depth and Paint Condition
Start by running your fingernail gently along the chip edges to see if they’re flaky, sharp, or well-bonded.
Check the exposed layers to tell whether you’re dealing with a single topcoat, multiple paint layers, or bare substrate.
That tells you how much sanding or priming you’ll need before repairing.
Inspect Chip Edges
Before you repair, closely inspect the chip edges to determine how deep the damage goes and whether surrounding paint is loose or just scuffed.
During chip edge inspection, run a fingertip and a tool lightly around the area to find flakes, raised edges, or substrate exposure.
You’re evaluating damage to decide cleaning, sanding, or filler needs before moving on to paint layer evaluation.
Assess Paint Layers
Paint layers tell you how deep the chip goes and what repair steps you’ll need, so peel back the mystery by checking how many coats and what kinds of paint are present.
Gently widen the chip to expose layers, note primer, base, and topcoat differences, and test paint adhesion.
Assess layer durability by fingernail scratch or light sanding to choose proper repair and compatible materials.
Essential Tools for Paint‑Chip Repair
When you’re fixing a chip, having the right tools makes the job faster and gives a neater result: you’ll need a few basics—fine-grit sandpaper, a small sanding block or file, a quality primer and matching touch-up paint, a fine brush or toothpick for application, and a clear topcoat—plus masking tape, a lint-free cloth, and rubbing alcohol for prep.
This tools overview lists repair essentials and simple tips.
Paint‑Chip Fillers: Which to Use for Each Surface
When you’re choosing a filler, pick one that matches the substrate—wood fillers for grainy surfaces and flexible formulations for trim.
For metal, use rust-inhibiting putty or epoxy, and for masonry choose cement-based or polymer repair compounds.
I’ll explain application tips and drying times for each so you get a durable, smooth repair.
Wood-Compatible Fillers
Because wood absorbs and moves differently than metal or drywall, you’ll want fillers that flex, bond to grain, and sand smoothly.
Choose wood filler types like water-based wood putty for small nicks, epoxy for structural gaps, or latex spackle for painted trim.
Follow proper application techniques: clean, dry surface; overfill slightly; let cure fully; sand flush; prime before repainting for long-lasting repairs.
Metal & Masonry Options
If you’re repairing chipped paint on metal or masonry, pick a filler that matches each material’s hardness, porosity, and movement so the repair won’t crack or peel.
Choose rust-inhibiting epoxy for metal to prevent metal corrosion; use breathable cementitious or polymer-modified fillers for masonry to preserve masonry durability.
- Epoxy for rust
- Metal putty
- Cementitious filler
- Lime-based patch
How to Choose Matching Paint and Sheen
Although matching paint and sheen can feel tricky, you can get a seamless repair by comparing small samples, noting surface texture, and choosing the same finish the surrounding wall uses.
Use color theory to pick the right undertone and test swatches under room light.
For sheen selection, match gloss level—flat, eggshell, satin, semi-gloss—to blend repairs invisibly with existing surfaces.
Prep Essentials: Clean, Degrease, and Dry the Area
Before you paint, you’ll want to remove dirt and loose flakes by wiping or gently sanding the chipped area.
Use a degreaser or a mix of warm water and dish soap to cut through oils, then rinse and blot dry with a clean cloth.
Make sure the surface is completely dry before priming or painting to guarantee proper adhesion.
Surface Cleaning Steps
Since proper adhesion starts with a clean surface, you’ll want to remove all dirt, grease, and loose particles before you touch a chip.
Use these surface preparation cleaning techniques to prep quickly and effectively:
- Brush away loose flakes.
- Sand edges smooth.
- Vacuum or blow dust off.
- Wipe with a damp cloth and let it air dry.
Degreasing And Drying
When you’ve removed loose paint and dust, degreasing is the next critical step to confirm new paint bonds properly.
Use a solvent-based cleaner or a mixture of dish soap and warm water to cut through oils, fingerprints, and grime. Rinse with clean water, then blot and air-dry.
For proper surface preparation, choose appropriate cleaning solutions, verify full dryness, and avoid recontamination before priming and painting.
Prep Drywall for a Seamless Paint‑Chip Patch
Start by clearing loose paint and dust from the chipped area so the patch will adhere properly.
Start by removing loose paint and dust so the patch can properly adhere and last.
You’ll sand edges, apply primer, and match texture using drywall texture techniques while following paint adhesion tips.
Then fill, sand smooth, and repaint for a seamless result.
- Sand edges
- Apply primer
- Match texture
- Fill and repaint
Prep Wood Trim and Furniture for Repair
Start by wiping the trim or furniture with a mild cleaner to remove dirt, grease, and loose paint so new materials will adhere.
Then sand the chipped area and feather the edges with fine-grit sandpaper until the surface is smooth and even.
Wipe away dust before you apply filler or primer to guarantee a clean, lasting repair.
Clean Surface Thoroughly
Before you repair chipped paint on wood trim or furniture, clean the surface thoroughly so filler and paint will adhere properly.
Use appropriate cleaning products for different surface types to remove dirt, grease, and wax.
Follow these steps:
- Wipe with a damp cloth and mild cleaner.
- Use degreaser on oily spots.
- Rinse and dry completely.
- Remove loose debris with a soft brush.
Sand And Smooth Edges
Use fine-grit sandpaper to gently smooth the edges of the chipped area so the filler and paint will blend evenly with the surrounding wood; sand just enough to feather the paint edge and remove any loose fibers, then wipe away dust with a tack cloth so the surface’s ready for filling. You’ll apply proper sanding techniques and focus on edge preparation before filling.
| Tool | Grit | Purpose |
|---|---|---|
| Sandpaper | 220 | Feather edges |
| Block | — | Even pressure |
| Tack cloth | — | Remove dust |
Prep Metal and Appliances Before Filling
If metal or appliances show bare spots or rust, you’ll need to clean and degloss them thoroughly so filler and primer will stick.
Follow metal surface preparation and appliance cleaning tips to promote adhesion and prevent corrosion.
- Remove grease with degreaser.
- Scrape loose rust.
- Apply rust converter if needed.
- Wipe with solvent and dry.
How to Sand Chipped Paint Areas Correctly
Now that metal and appliances are clean and dry, prepare to sand the chipped paint areas so new filler and primer will bond properly. Use gentle sanding techniques: start with 120–180 grit, finish with 220. Remove dust, tack-cloth, and check edges for feathering to improve paint adhesion. Apply primer only when surface is clean and smooth.
| Tool | Grit |
|---|---|
| Sandpaper | 120 |
| Sandpaper | 180 |
| Sandpaper | 220 |
| Cloth | Tack |
How to Fill Shallow Chips and Pinholes
Start by cleaning the chipped area thoroughly so dirt and loose paint won’t prevent adhesion.
Pick a filler made for shallow chips or pinholes and apply it in thin layers, letting each set before adding more.
Once it’s smooth and dry, sand lightly and prime the spot so paint bonds evenly.
Clean The Damaged Area
Brush away loose debris and dust, then wash the chipped area with a mild detergent and water to remove grease and residue.
Let it dry fully before proceeding. Consider paint types and surface textures when prepping.
Follow these steps:
- Vacuum or brush residue.
- Clean with detergent solution.
- Rinse and blot dry.
- Sand lightly to match surrounding texture.
Choose Appropriate Filler
Before you fill shallow chips and pinholes, pick a filler that matches the surface and paint type so repairs blend seamlessly.
Choose between spackling paste for drywall, wood filler for trim, or flexible exterior filler for outdoor surfaces. Read labels for cure time and sanding hardness.
Use appropriate application techniques—small putty knife or syringe—and apply thin layers, letting each layer dry before adding more.
Smooth And Prime Surface
1. Smooth and prime surface: you’ll fill shallow chips and pinholes, then prep for paint.
- Clean area and remove loose debris.
- Apply lightweight filler, press into pinholes.
- Use fine sanding techniques to feather edges smooth.
- Choose appropriate primer types for adhesion and sealing.
You’ll sand, wipe dust, and let primer cure before painting.
How to Repair Deeper Gouges and Missing Substrate
Assess the damage carefully so you can decide whether to fill, patch, or replace the missing material—deeper gouges and areas where the substrate is gone need a sturdier repair than simple spackling.
For gouge repair, clean and widen edges, install backing or use epoxy filler, then build layers.
Consider substrate replacement if structural support is compromised.
Sand, prime, and paint to finish.
How to Feather and Blend Repaired Drywall
Now that the patch is set, you’ll feather the compound outward so the repair tapers smoothly into the surrounding drywall.
Sand the area progressively with fine grit until it’s uniformly smooth and free of ridges.
Finally, blend the paint by feathering the edges of your topcoat and matching sheen so the repair disappears into the wall.
Feathering The Edges
Feathering the edges is what makes a patched area disappear into the surrounding drywall, so take your time to blend compound smoothly from the center outward using wider, lighter strokes with a clean taping knife.
Use these feathering techniques and focus on edge blending:
- Load thin compound
- Angle knife shallowly
- Extend strokes beyond repair
- Remove ridges gently
Sanding For Smoothness
Grab a sanding block and work gently in sweeping, circular motions to level the dried compound until it feels flush with the surrounding drywall. Use proper sanding techniques and smart grit selection: start coarser, finish finer. Avoid gouging; check frequently.
| Tool | Grit | Purpose |
|---|---|---|
| Block | 120 | Initial leveling |
| Sponge | 220 | Final smoothing |
Blending Paint Seamlessly
Once the surface is smooth, you’ll want to blend the new paint so the repair disappears into the wall.
Use color theory to match tones; test swatches in natural light.
Apply thin feathering strokes outward, overlap edges, and let layers dry between coats.
- Match tone
- Thin coats
- Feather edges
- Evaluate in light
How to Fill Wood Chips and Match Grain
When you’re repairing wood chips, start by cleaning the area and removing loose splinters so filler will bond properly. You’ll use filler application techniques, sand smooth, then stain or paint to achieve wood grain matching. Use a small scraper, then feather edges.
| Tool | Purpose |
|---|---|
| Scraper | Remove debris |
| Sandpaper | Smooth filler |
How to Treat Rusted or Corroded Metal Chips
Shifting from wood to metal, you’ll need a different approach for chips that show rust or corrosion. Treat promptly to stop spread: remove loose rust, apply corrosion treatment, neutralize surface, then seal.
Switching from wood to metal? Tackle rust quickly: remove loose corrosion, treat, neutralize, then seal.
- Wire-brush or sand to bare metal
- Apply corrosion treatment product
- Clean and dry thoroughly
- Finish with rust prevention coating or suitable paint
When and How to Prime Repaired Spots
Before you paint, prime any repaired spots so the patch bonds, hides stains, and confirms even coverage; you should prime after the filler or corrosion treatment is fully dry and sanded smooth.
Choose a primer compatible with the substrate, apply thin even coats, and sand between coats if needed.
Proper priming techniques are part of surface preparation that secures adhesion and uniform finish before topcoating.
Touch‑Up Techniques: Brush, Roller, or Spray
Choose the right application method—brush, roller, or spray—based on the size of the repair, the surface texture, and the type of paint you’re using.
- Use precise brush techniques for small chips and edges.
- Apply roller methods on flat, larger areas for even coverage.
- Try spray options for smooth, seamless finishes on trim.
- Prioritize color matching before applying any touch‑up.
How to Blend Color When You Lack an Exact Match
If you can’t find an exact color match, don’t panic—you can blend nearby shades to make the repaired area disappear.
Can’t find an exact match? Blend nearby shades gradually—test, tint subtly, and feather edges until the repair vanishes.
You’ll use color mixing basics: start with small test mixes, add tiny amounts of tint, and compare wet samples.
Apply gradual layering and feather edges with light strokes.
Effective blending techniques include glazing and stippling to soften shifts until the patch visually matches surrounding paint.
Best Topcoats to Finish and Protect Spot Repairs
Once your blended patch looks right and the paint has fully dried, protect that work with the proper topcoat so the repair lasts and matches the surrounding sheen.
Choose by surface and wear, and follow correct application techniques.
Consider these topcoat types:
- Water-based satin for interior walls.
- Oil-based gloss for trim.
- Clear polyurethane for high-traffic floors.
- Varnish for wood furniture.
How to Prevent Future Chipping and Paint Failure
Because future chipping usually comes from weak adhesion, you’ll prevent most failures by preparing surfaces properly, picking compatible products, and addressing underlying causes like moisture or movement.
Use preventive measures: clean, sand, prime, and guarantee proper cure times. Control humidity, fix leaks, and allow for substrate movement.
Establish regular paint maintenance, inspect periodically, and touch up small defects before they spread.
Troubleshooting Common Touch‑Up Problems
When touch‑ups don’t blend or fail quickly, you can usually trace the issue to surface prep, product mismatch, or application technique — and knowing which will save time and money.
You should check chipping causes and touch up timing. Common fixes:
- Reclean and sand.
- Match paint sheen and formula.
- Apply thin, even coats.
- Allow proper cure between coats.
When to Call a Pro: Cost and Time Estimates
If you’ve tried re-sanding, matching sheen and formula, and applying thin coats but the chip keeps coming back or the area’s large or structural, it’s time to contemplate hiring a pro.
Get a clear cost analysis and timeline estimates, ask for warranties, and request expert recommendations.
Pros handle hidden damage, color matching, and prep faster, saving you time and costly rework.
Frequently Asked Questions
Can I Repair Paint Chips on Exterior Brick or Masonry Surfaces?
Yes — you can repair paint chips on exterior brick and masonry; you’ll clean, patch with compatible mortar or filler, prime, then repaint using proper brick painting techniques as part of regular masonry maintenance to guarantee adhesion and weather protection.
How Do I Fix Paint Chips on Textured or Popcorn Ceilings?
You clean loose flakes, sand gently, apply joint compound to match texture, use texture matching techniques (spray or stomp), sand when dry, prime, then paint for seamless ceiling repair—you’ll blend and finish like a pro.
Are There Safe, Non-Toxic Fillers for Toys and Children’s Furniture?
Yes — you can use eco friendly options like natural beeswax, plant-based fillers, and non-toxic wood putty; you’ll choose safe materials certified low-VOC, phthalate-free, and ASTM F963-compliant for toys and children’s furniture.
Can Small Paint Chips Be Repaired on Antique Finishes Without Devaluing Them?
Yes — you can repair small paint chips on antiques without devaluing them if you prioritize antique preservation, test reversible, conservation-grade materials, and use careful paint matching so restorations remain discreet and historically respectful.
How Do I Touch up Chips on Painted Vinyl Siding?
Start smartly: scrub, sand, seal. You’ll clean the vinyl siding, sand edges, apply primer where needed, then use matching paint touch up with a small brush or pen, feathering coats and finishing with blended, blemish-free results.
Conclusion
You’ve got this—fixing a paint chip is a small victory that keeps your space looking cared for. With a few simple tools and the right touch‑up paint, you’ll seal, sand, and blend like a pro in under 30 minutes. Treat each repair as mending a tiny scar: it restores both surface and confidence. Follow the steps, prevent future chipping, and call a pro only when the damage or finish demands more time and skill.